Mint Mini Cheesecakes
Andes Mint Mini Cheesecakes: The Ultimate Bite-Sized Indulgence
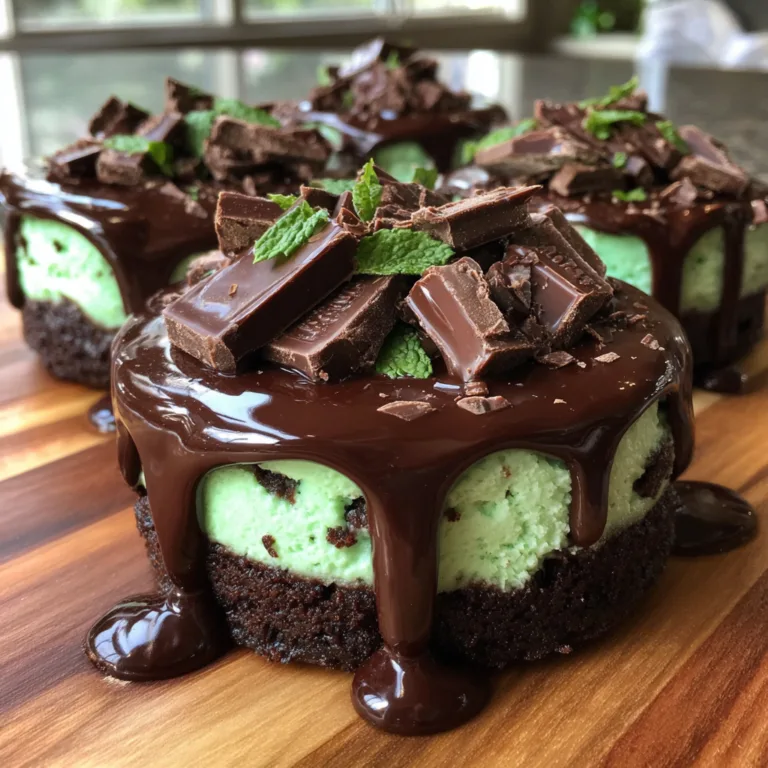
There are few flavor combinations as iconic and universally loved as mint and chocolate. It is a pairing that evokes a sense of nostalgia, comfort, and celebration. Enter the Andes Mint Mini Cheesecake. These petit desserts are a triumph of texture and taste, featuring a dense, buttery dark chocolate crust, a velvety smooth mint-green cheesecake filling, and a crowning glory of silky chocolate ganache topped with the unmistakable crunch of Andes mints.
Whether you are planning a festive spread for St. Patrick’s Day, looking for a refreshing addition to a heavy Christmas dinner, or simply craving a sophisticated treat that doesn’t require a fork, these mini cheesecakes are the answer. Unlike a full-sized cheesecake, which can be intimidating to bake (and slice without making a mess), these individual portions are baked in a standard muffin tin, ensuring perfect sizing and a significantly shorter baking time. They are the perfect grab-and-go dessert for parties, offering a complete flavor experience in just two or three bites.
Why This Recipe Is a Must-Try
If you have ever felt intimidated by the prospect of a water bath or a cracked cheesecake top, this recipe is your safety net. Mini cheesecakes are notoriously forgiving. Because they are small, they cook evenly and cool down quickly, drastically reducing the risk of sinking or cracking. Furthermore, the luscious layer of chocolate ganache on top hides any minor imperfections, meaning your presentation will look professional every single time.
The flavor profile here is perfectly balanced. The crust, usually made from crushed chocolate sandwich cookies, provides a bitter, crunchy counterpoint to the sweet and tangy cream cheese filling. The mint extract cuts through the richness of the dairy, acting as a palate cleanser, while the semi-sweet ganache ties everything together with a luxurious, glossy finish. It is a dessert that looks impressive but comes together with standard pantry staples.

Ingredients
Success starts with the right ingredients. Ensure your refrigerated items are at room temperature before you begin to ensure a lump-free batter.
- Chocolate Sandwich Cookies (e.g., Oreos): These form the base. You will crush them, cream filling and all, to create a sturdy, sweet, and dark crust.
- Unsalted Butter: Melted butter acts as the binder for the crust. Using unsalted allows you to control the sodium level.
- Cream Cheese: Use full-fat brick-style cream cheese. Tub varieties often contain air and different stabilizers that can ruin the texture of a baked cheesecake.
- Sugar: Standard granulated white sugar provides the necessary sweetness without altering the color of the mint filling.
- Sour Cream: This is the secret weapon for a tangy, tender cheesecake. It breaks up the heaviness of the cream cheese.
- Eggs: They provide structure. Room temperature eggs mix in easier, preventing you from overbeating the batter.
- Mint Extract: Be careful to buy “mint” or “peppermint” extract. Avoid “spearmint” which can taste like toothpaste.
- Green Food Coloring: Optional, but a drop or two gives the cheesecake that signature Andes Mint look. Gel coloring works best as it doesn’t add liquid.
- Heavy Cream & Semi-Sweet Chocolate: These two ingredients create the simple ganache topping.
- Andes Mints: The star of the show. Chopped up for garnish, they add texture and reinforce the flavor profile.
Instructions
Phase 1: The Crust
- Preheat and Prep: Preheat your oven to 325°F (165°C). Line a standard 12-count muffin tin with paper liners. This is crucial for easy removal later.
- Crush the Cookies: Place your chocolate sandwich cookies in a food processor and pulse until they are fine crumbs. If you don’t have a processor, a zip-top bag and a rolling pin work just as well.
- Mix and Press: Combine the crumbs with the melted butter in a small bowl. The texture should resemble wet sand. Place about 1 tablespoon of the mixture into the bottom of each muffin liner. Use the bottom of a shot glass or a small spoon to press the crust down firmly to create a solid base.
- Par-bake: Bake the crusts for 5 minutes while you prepare the filling. This ensures the crust stays crunchy under the moist filling.
Phase 2: The Filling
- Cream the Cheese: In a large mixing bowl, beat the softened cream cheese and sugar together on medium speed until completely smooth and creamy. Scrape down the bowl to ensure no lumps remain.
- Add Liquids: Mix in the sour cream, mint extract, and vanilla extract until combined. If using food coloring, add it now until you reach your desired shade of mint green.
- Add Eggs: Add the eggs one at a time, mixing on low speed just until combined. Do not overmix at this stage; incorporating too much air can cause the cheesecakes to puff up and then collapse/crack.
- Fill: Divide the batter evenly among the muffin cups, filling them almost to the top.
- Bake: Bake for 15-18 minutes. The centers should still have a slight jiggle to them—they will set as they cool. Do not overbake, or the texture will become grainy.
- Cool: Allow the cheesecakes to cool in the pan on a wire rack for 30 minutes, then transfer them to the refrigerator to chill for at least 3 hours (or overnight).
Phase 3: The Ganache & Assembly
- Make Ganache: Place your chocolate chips in a heat-proof bowl. Heat the heavy cream in a microwave or small saucepan until it just begins to simmer (do not let it boil over). Pour the hot cream over the chocolate chips and let it sit undisturbed for 5 minutes.
- Stir: Gently whisk the chocolate and cream together starting from the center and working outward until you have a glossy, smooth sauce.
- Top: Remove the chilled cheesecakes from their wrappers. Spoon a generous amount of ganache over each one, allowing it to drip down the sides slightly.
- Garnish: While the chocolate is still wet, sprinkle chopped Andes mints on top. Return to the fridge for 10 minutes to set the ganache before serving.
Tips for Perfection
Room Temperature is Key: It cannot be stressed enough—your cream cheese and eggs must be at room temperature. Cold cream cheese results in lumpy batter. If you are in a rush, you can cube the cream cheese and microwave it for 10-15 seconds, and place the eggs in a bowl of warm water for 5 minutes.
Cooling Strategy: Drastic temperature changes are the enemy of cheesecake. Let them cool gradually. Once baked, you can even crack the oven door and leave them in for 10 minutes (oven off) before moving them to the counter. This helps prevent the “crater” effect in the center.
Cutting the Mints: For the best visual appeal, chop your Andes mints diagonally. It creates sharper angles that look more professional than random crumbling.
Variations to Try
While the classic mint-chocolate combo is a winner, you can tweak this recipe to suit different tastes:
- The “Grasshopper”: Substitute the crushed cookie crust for a graham cracker crust and double the green food coloring for a brighter pop, reminiscent of the classic pie.
- White Chocolate Drizzle: Instead of a dark chocolate ganache, melt white chocolate and drizzle it over the top for a “snowy” winter look.
- Inside Surprise: Fold ½ cup of mini chocolate chips directly into the green cheesecake batter before baking for added texture inside the cake.
- Gluten-Free: Simply swap the standard chocolate sandwich cookies for a gluten-free alternative. The filling and ganache are naturally gluten-free (always check labels on baking extracts to be sure).
Serving and Storage
These mini cheesecakes are excellent for making ahead of time. In fact, they taste better on the second day as the flavors have time to meld.
Storage: Keep them in an airtight container in the refrigerator for up to 5 days. Because of the dairy content, they should not be left out at room temperature for more than 2 hours.
Freezing: These freeze beautifully! You can freeze them with or without the garnish. Place them on a baking sheet to freeze solid, then transfer to a freezer bag. They will keep for up to 3 months. Thaw overnight in the refrigerator before serving.

Fun Fact: The Origin of the Andes Mint
Did you know that Andes Mints were originally called “Andy’s Candies”? They were created by Andrew Kanelos in 1921. However, “Andy’s Candies” didn’t have the sophisticated ring he was looking for, so he changed it to “Andes” as a pun on his name and also to evoke the grandeur of the Andes mountains—suggesting the peak of chocolate perfection. Today, that signature three-layer design (chocolate-mint-chocolate) is instantly recognizable and signifies the end of a delicious meal for many.
Enjoy making these delightful treats; they are sure to become a requested favorite at every family gathering!
Andes Mint Mini Cheesecakes
Ingredients
Equipment
Method
- Preheat oven to 325°F (165°C). Line a 12-cup muffin pan with paper liners.
- Mix crushed cookies and melted butter. Press 1 tablespoon of mixture into the bottom of each liner. Bake for 5 minutes, then remove and cool slightly.
- Beat cream cheese and sugar until smooth. Add sour cream, vanilla, peppermint extract, and food coloring. Mix well.
- Add eggs one at a time, mixing on low speed just until incorporated. Do not overmix.
- Divide batter evenly among the muffin cups.
- Bake for 15-18 minutes until centers are set but slightly jiggly. Cool in pan for 30 minutes, then refrigerate for at least 3 hours.
- For ganache: Heat heavy cream until simmering. Pour over chocolate chips, let sit for 5 minutes, then whisk until smooth.
- Spoon ganache over chilled cheesecakes and top with chopped Andes mints.