Oreo Stuffed Cinnamon Rolls
Irresistible Oreo Stuffed Cinnamon Rolls: The Ultimate Cookies and Cream Breakfast Treat
There are few things in the culinary world more comforting than the scent of freshly baked cinnamon rolls wafting through your home on a crisp weekend morning. The warm spices, the tender, pillowy dough, and the melting glaze create an experience that is hard to top. But what if we took that classic breakfast staple and elevated it with one of the most beloved cookies of all time? Enter the Irresistible Oreo Stuffed Cinnamon Rolls. This decadent creation marries the buttery, fluffy goodness of a homemade sweet roll with the rich, chocolatey crunch and sweet cream flavor of Oreo cookies. It is not just a breakfast item; it is an absolute event.
Whether you are preparing a special holiday brunch, celebrating a birthday morning, or simply treating yourself and your loved ones to an indulgent weekend pastry, these cookies and cream rolls are guaranteed to stop the show. In this comprehensive guide, we will walk you through every single step to achieve bakery-level perfection right in your own kitchen. From mastering a foolproof enriched yeast dough to creating the ultimate dark cocoa filling and finishing it off with a heavy drizzle of rich cream cheese icing, you are about to discover your new favorite baking project.
The Magic of Combining Two Iconic Treats
The concept of “stuffed” or gourmet cinnamon rolls has exploded in popularity over the last decade, moving far beyond the traditional cinnamon-sugar filling. Bakeries around the world now stuff their dough with everything from fruit preserves to cookie butter. However, the Oreo stuffed variation holds a special place in the hearts of dessert lovers.
The magic lies in the contrast of textures and flavors. Traditional cinnamon rolls are soft and uniformly sweet. By introducing Oreo cookies into the mix, you add an element of deep, slightly bitter dark cocoa that beautifully balances the intense sweetness of the dough and the icing. Furthermore, the cookies themselves undergo a transformation in the oven. The whole Oreos rolled inside the dough soften slightly, integrating into the pastry to create pockets of fudgy, creamy goodness, while the crushed cookies sprinkled on top maintain their signature crunch. It is a multi-sensory experience that takes the humble sweet roll to extraordinary new heights.
The Anatomy of the Perfect Oreo Sweet Roll
To truly understand how to make the best possible Oreo Stuffed Cinnamon Rolls, we need to break down the anatomy of the pastry into its three essential components: the dough, the filling, and the icing.
1. The Enriched Dough
The foundation of any great roll is the dough. For this recipe, we use an enriched yeast dough. “Enriched” simply means that the dough contains fats—specifically, butter, milk, and eggs—in addition to the basic flour, water, and yeast. These fats tenderize the gluten strands, resulting in a crumb that is incredibly soft, fluffy, and rich. A lean dough (like French bread) would be too chewy and crusty for a sweet roll. The goal here is a dough that pulls apart in feathery, melt-in-your-mouth layers.
2. The Dark Cocoa and Cookie Filling
While a standard cinnamon roll uses a paste of butter, brown sugar, and cinnamon, this recipe pivots to highlight the “cookies and cream” profile. We swap out the cinnamon for cocoa powder—ideally, black cocoa powder if you can find it, as it provides that authentic, dark Oreo flavor. This cocoa-sugar paste acts as the glue for the main event: whole and crushed Oreo cookies layered directly onto the dough before rolling. As the rolls bake, the cream filling of the Oreos melts slightly into the dough, creating an incredibly gooey center.
3. The Cream Cheese Icing
No cinnamon roll is complete without a generous slathering of icing. While a simple powdered sugar glaze is nice, a cream cheese frosting is absolutely mandatory for Oreo rolls. The slight tanginess of the cream cheese cuts through the heavy sweetness of the chocolate filling and the sugary dough, providing a necessary flavor balance. It also mimics the sweet cream center of an Oreo cookie, completing the flavor profile perfectly.
Deep Dive into the Ingredients
Quality ingredients make a massive difference in baking. Here is exactly what you need to create these masterpiece rolls:
- – Whole Milk: The fat in whole milk creates a more tender dough than water or skim milk. It needs to be warmed to about 110°F (43°C) to activate the yeast.
- – Active Dry Yeast: This is what gives the rolls their incredible rise and fluffy texture. Ensure your yeast is not expired.
- – Granulated Sugar: Feeds the yeast and sweetens the dough.
- – Unsalted Butter: You will need butter for the dough, the filling, and the icing. Using unsalted allows you to control the sodium level. It should be melted for the dough, but room temperature (softened) for the filling and icing.
- – Large Egg: Adds richness, color, and structure to the dough. It should be at room temperature.
- – All-Purpose Flour: Provides the perfect amount of protein for a soft but structured roll. Bread flour can also be used for a slightly chewier texture.
- – Salt: Essential for flavor enhancement. Baked goods without salt taste flat.
- – Brown Sugar: Used in the filling for its moisture and deep molasses flavor.
- – Black Cocoa Powder: This is the secret ingredient! Black cocoa is what gives Oreos their distinct color and flavor. If you cannot find it, regular Dutch-processed cocoa powder works well.
- – Oreo Cookies: You will need a standard-sized package. Some will be left whole to line the dough, and others will be crushed for the filling and topping.
- – Cream Cheese: Full-fat cream cheese, softened to room temperature, is crucial for a smooth, lump-free icing.
- – Powdered Sugar: Thickens and sweetens the icing.
- – Vanilla Extract: Enhances the “sweet cream” flavor of the icing.
Step-by-Step Instructions for Bakery-Quality Rolls
Follow these meticulously detailed steps to ensure your dough rises beautifully and your rolls turn out perfectly gooey.
- Activate the Yeast: In the bowl of a stand mixer (or a large mixing bowl), combine the warm milk, active dry yeast, and 1 tablespoon of the granulated sugar. Stir gently and let it sit for 5-10 minutes. It should become frothy and bubbly. If it does not, your yeast is dead and you need to start over.
- Mix the Wet Ingredients: Once the yeast is bubbly, add the remaining granulated sugar, melted (but slightly cooled) butter, and the room temperature egg. Whisk until well combined.
- Form the Dough: Attach the dough hook to your mixer. Gradually add the all-purpose flour and salt. Mix on low speed until a shaggy dough begins to form.
- Knead the Dough: Increase the speed to medium and knead for 5-7 minutes. The dough should pull away from the sides of the bowl and feel smooth, elastic, and only slightly tacky to the touch. If it is too sticky, add flour 1 tablespoon at a time.
- First Rise: Form the dough into a smooth ball. Place it in a lightly greased bowl, turning once to coat the dough in oil. Cover the bowl tightly with plastic wrap or a warm, damp kitchen towel. Place it in a warm, draft-free spot for 1 to 1.5 hours, or until the dough has completely doubled in size.
- Prepare the Filling: While the dough is rising, mix the softened butter, brown sugar, and cocoa powder in a medium bowl until it forms a thick, dark, spreadable paste. Crush about 10 Oreo cookies into coarse crumbs.
- Roll Out the Dough: Punch down the risen dough to release the air. Turn it out onto a lightly floured surface. Use a rolling pin to roll the dough out into a large rectangle, approximately 12×18 inches.
- Add the Oreo Filling: Spread the chocolate butter paste evenly over the entire surface of the dough, leaving a small 1/2-inch border clean around the edges. Lay whole Oreo cookies in horizontal rows across the dough (you will use about 12-15 cookies depending on spacing). Sprinkle the crushed Oreo crumbs evenly in the spaces between the whole cookies.
- Roll and Cut: Starting from the long edge, roll the dough up tightly into a log, encasing the cookies. To cut the rolls cleanly without squishing them, use a piece of unflavored dental floss or heavy thread. Slide the floss under the log, cross the ends over the top, and pull to slice cleanly. Cut into 12 even slices.
- Second Rise: Place the cut rolls into a greased 9×13 inch baking dish. Cover again with plastic wrap or a towel and let them rise for another 45-60 minutes, until they are puffy and touching each other.
- Bake to Perfection: Preheat your oven to 350°F (175°C). Uncover the rolls and bake for 22-28 minutes. They should be golden brown on top, and the centers should be cooked through. If the tops are browning too quickly, tent the dish loosely with aluminum foil for the last 10 minutes of baking.
- Make the Icing: While the rolls are baking, make the cream cheese icing. In a medium bowl, beat the softened cream cheese and softened butter together until completely smooth and fluffy. Add the powdered sugar, vanilla extract, and a splash of milk. Beat until light, airy, and spreadable.
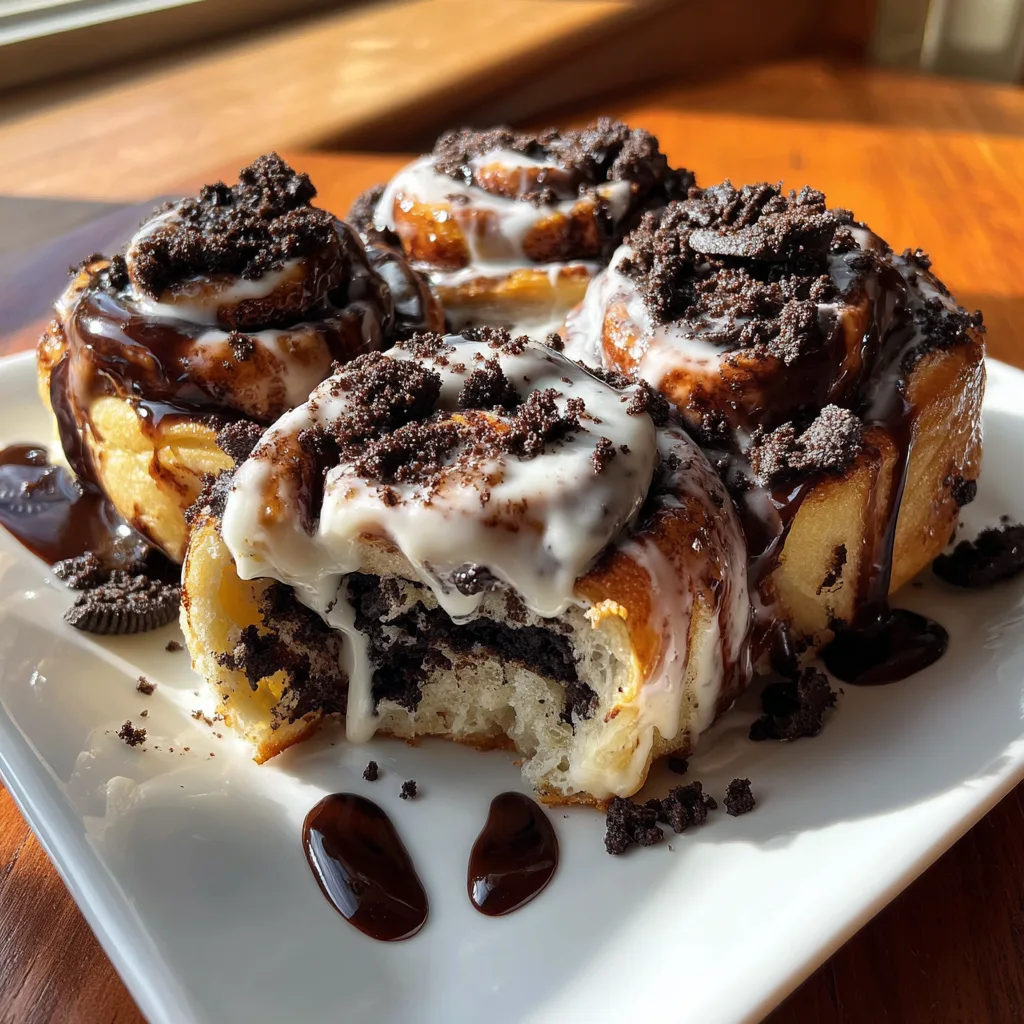
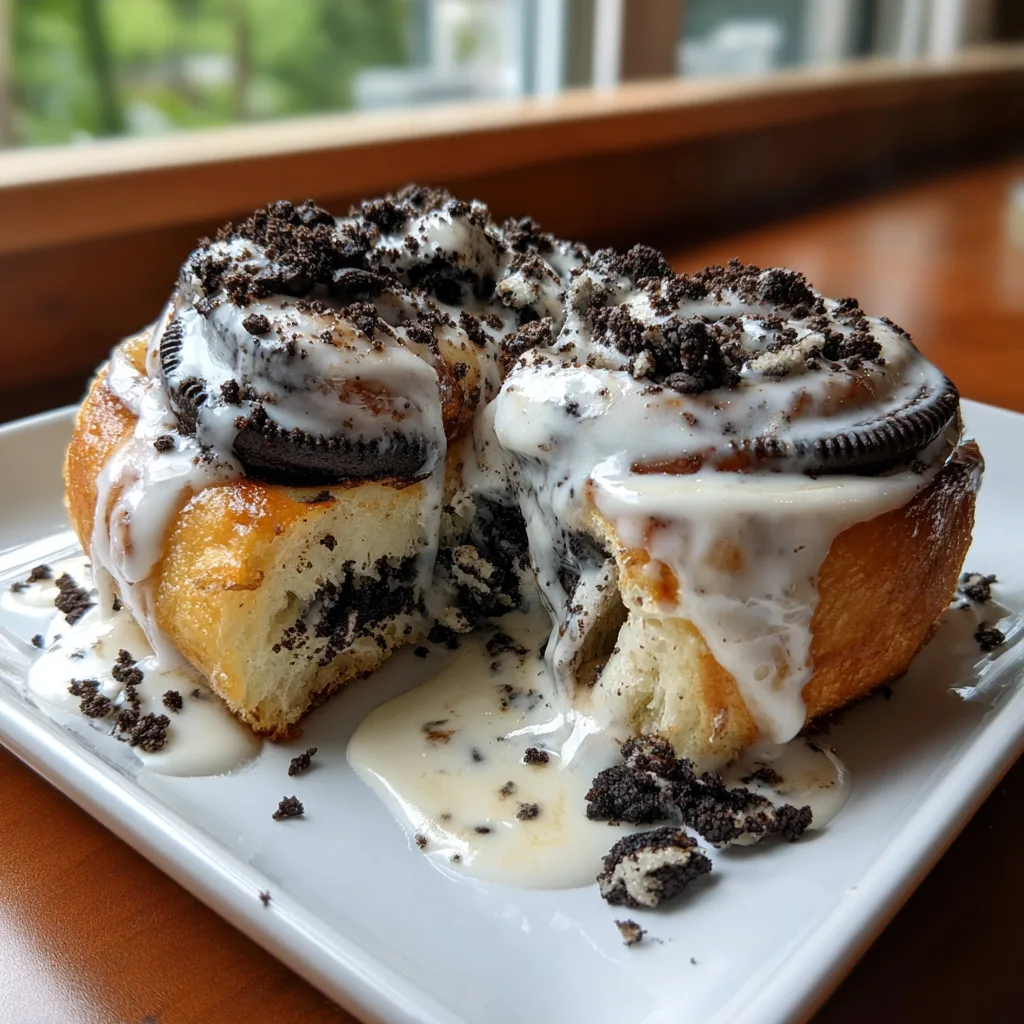
- Frost and Serve: Let the rolls cool in the pan for about 5-10 minutes. While they are still warm, slather the cream cheese icing heavily over the top so it melts down into the crevices. Sprinkle generously with remaining crushed Oreo cookies. Serve immediately for the ultimate gooey experience!
Expert Tips for the Best Rolls
The Temperature of Ingredients is Crucial: Yeast is highly sensitive to temperature. If your milk is too hot (above 120°F), it will kill the yeast, and your dough will never rise. If it is too cold, the yeast won’t activate. Aim for the temperature of warm bathwater. Similarly, room temperature eggs and butter ensure they incorporate smoothly into the dough without causing the butter to solidify.
Do Not Over-Flour Your Dough: The most common mistake in making sweet rolls is adding too much flour, which results in dry, tough, heavy bread. The dough should be slightly tacky and soft. It is better to have a slightly sticky dough than a dry one.
The Floss Trick for Cutting: Using a knife, even a serrated one, often squishes the roll, squeezing the filling out and ruining the beautiful spiral shape. Unflavored dental floss acts like a garrote, cutting cleanly through the soft dough and the whole Oreos inside without applying downward pressure.
Make-Ahead and Overnight Instructions
Freshly baked rolls for breakfast are amazing, but waking up at 5:00 AM to make dough is not. Fortunately, this recipe is incredibly adaptable for overnight preparation.
To make these overnight: Follow the recipe entirely through the step of cutting the rolls and placing them in the 9×13 baking dish. Instead of letting them rise for the second time on the counter, immediately cover the dish tightly with plastic wrap and place it in the refrigerator overnight (up to 14 hours). The cold environment will slow down the yeast, allowing a slow, flavorful rise. The next morning, remove the dish from the fridge and let it sit at room temperature for 1.5 to 2 hours before baking, allowing the rolls to take the chill off and finish their second puff. Bake as directed.
Frequently Asked Questions (FAQs)
Can I use store-bought pizza dough or crescent dough to save time?
While you can technically use tubes of refrigerated crescent dough or pizza dough to make a “lazy” version of this recipe, the results will not be the same. Store-bought doughs lack the rich, buttery, tender crumb of an enriched homemade yeast dough. If you are short on time, utilizing the overnight method mentioned above is a much better way to achieve bakery-quality results without the morning rush.
What if I cannot find black cocoa powder?
Black cocoa powder (the same type used by the manufacturers of Oreo cookies) provides an intense color and a specific deep flavor. However, it is often a specialty item found online. If you cannot find it, simply substitute high-quality Dutch-processed cocoa powder or even standard unsweetened cocoa powder. The filling will be slightly lighter in color and flavor, but it will still be absolutely delicious.
How should I store leftovers?
Because the icing contains cream cheese, leftover frosted rolls should be stored in an airtight container in the refrigerator for up to 4 days. They will firm up significantly in the cold. To enjoy them again, simply place a roll on a microwave-safe plate, drape a slightly damp paper towel over it, and microwave for 15-20 seconds. The damp towel helps steam the dough, returning it to its original soft, gooey glory.
In conclusion, these Irresistible Oreo Stuffed Cinnamon Rolls are a masterclass in indulgence. The tender dough, the dark chocolate cookie center, and the tangy, sweet cream cheese frosting come together to create a breakfast treat that you will want to make again and again. Grab your rolling pin, a package of your favorite chocolate sandwich cookies, and get ready to bake something truly extraordinary!
Irresistible Oreo Stuffed Cinnamon Rolls
Ingredients
Equipment
Method
- In a bowl, combine warm milk, yeast, and 1 tbsp of sugar. Let sit for 5-10 minutes until frothy.
- Whisk in the remaining sugar, melted butter, and egg. Gradually add flour and salt, mixing until a dough forms.
- Knead the dough for 5-7 minutes until smooth and elastic. Place in a greased bowl, cover, and let rise for 1 to 1.5 hours until doubled in size.
- For the filling, mix softened butter, brown sugar, and cocoa powder until a paste forms. Crush about 10 Oreos into coarse crumbs.
- Punch down dough and roll into a 12×18 inch rectangle on a floured surface.
- Spread the cocoa butter paste evenly over the dough. Arrange 12-15 whole Oreos across the dough and sprinkle the crushed Oreos in between.
- Roll the dough tightly into a log starting from the long edge. Cut into 12 slices using unflavored dental floss.
- Place rolls in a greased 9×13 inch baking dish. Cover and let rise for 45-60 minutes until puffy.
- Bake at 350°F (175°C) for 22-28 minutes until golden brown.
- While baking, beat cream cheese and butter until smooth. Add powdered sugar, vanilla, and milk, beating until fluffy.
- Spread icing over warm rolls and top with additional crushed Oreos. Serve immediately.