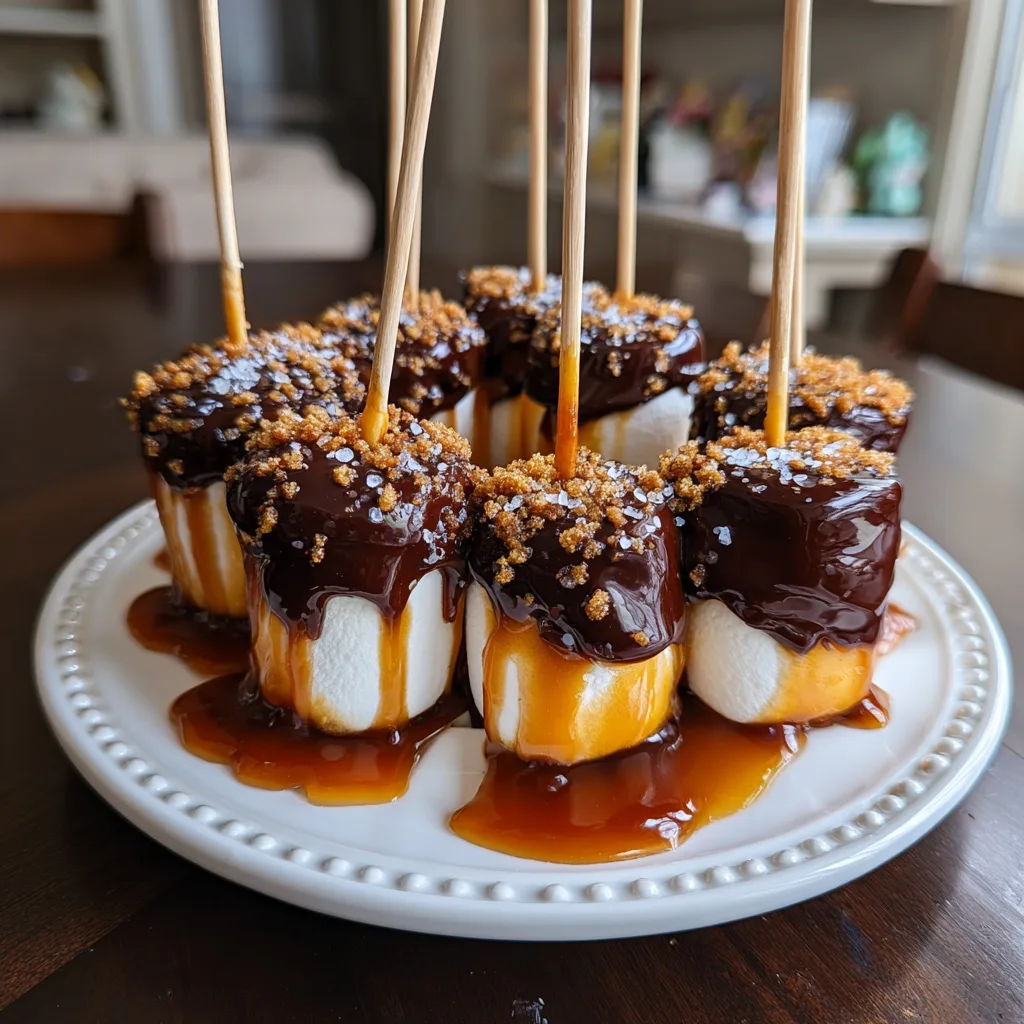
Chocolate Caramel Marshmallow Pops
The Ultimate Guide to Making Decadent Chocolate Caramel Marshmallows
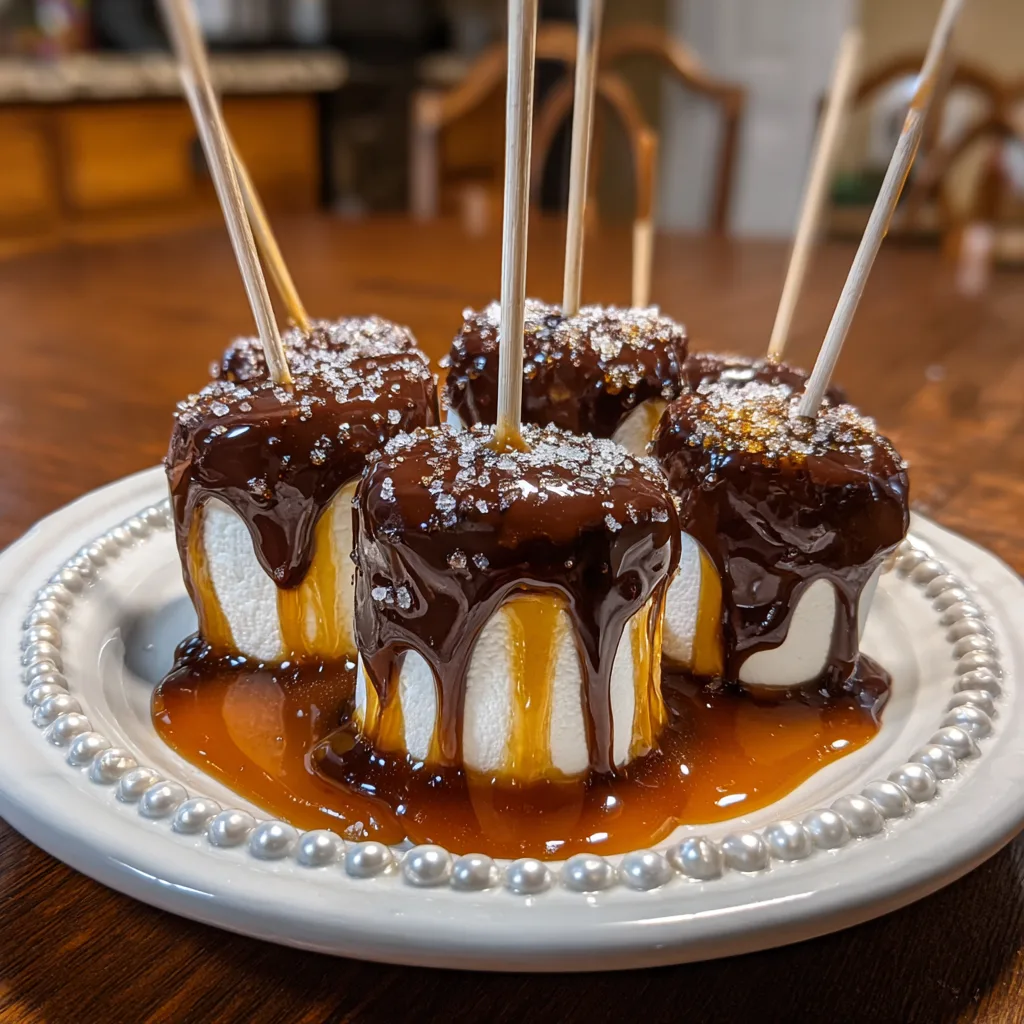
When it comes to homemade treats that look incredibly gourmet but are deceptively easy to make, nothing quite compares to chocolate caramel marshmallows. These delightful bite-sized indulgences offer the perfect symphony of textures and flavors. Imagine biting through a crisp, dark chocolate shell sprinkled with crunchy, savory sea salt, only to sink your teeth into a gooey, sweet caramel center that perfectly complements a soft, pillowy marshmallow. Whether you are preparing for a holiday party, looking for the perfect handmade edible gift, or simply wanting to elevate your weekend baking project, this chocolate caramel marshmallow recipe is guaranteed to become a household favorite.
In this comprehensive guide, we will explore every single aspect of creating the perfect chocolate caramel marshmallow pops. From selecting the absolute best ingredients and understanding the science of melting chocolate, to mastering the art of the caramel well and discovering creative flavor variations, this article leaves no stone unturned. Get ready to transform ordinary pantry staples into extraordinary confectionary masterpieces that will have your friends and family begging for the recipe.
Why You Will Fall in Love With This Recipe
There are countless reasons why these chocolate caramel marshmallows deserve a permanent spot in your recipe repertoire. First and foremost is the incredible flavor profile. The human palate is naturally drawn to the combination of sweet and salty. By pairing the intense sweetness of marshmallows and caramel with the slight bitterness of dark chocolate and the sharp, briny crunch of sea salt, you create an addictive flavor profile that satisfies multiple cravings at once.
Furthermore, the textural contrast is absolutely phenomenal. Confectionery perfection often relies on texture just as much as flavor. The initial snap of the chocolate coating gives way to the sticky, chewy caramel, which finally melts into the cloud-like softness of the marshmallow. It is a multi-sensory experience that simply cannot be replicated by store-bought candies.
Another major advantage of this recipe is its approachability. You do not need a culinary degree or expensive pastry equipment to achieve professional-looking results. With a few simple tools and careful attention to temperatures, even a novice home cook can produce stunning, bakery-worthy marshmallow pops. The process is also incredibly fun and family-friendly, making it a wonderful weekend activity to do with children or friends.
The Magic Trio: Understanding Your Core Ingredients
To achieve the best possible results, it is crucial to understand the three main components of this recipe: the marshmallows, the caramel, and the chocolate. Quality matters when making candy with so few ingredients.
The Marshmallows: While you can certainly make marshmallows from scratch using gelatin, sugar, and corn syrup, high-quality store-bought marshmallows work perfectly for this recipe and save you hours of prep time. Look for large or “jumbo” sized marshmallows, as they provide a better surface area for dipping and a more satisfying marshmallow-to-chocolate ratio. Ensure your marshmallows are fresh; stale marshmallows will be tough and chewy rather than soft and fluffy.
The Caramel: The signature of this specific treat is the beautiful, amber pool of caramel that sits at the top of the marshmallow, right where the stick is inserted. You want a caramel that is soft enough to bite into easily but firm enough that it does not slide right off the marshmallow at room temperature. High-quality soft caramel candies (the kind you unwrap individually) melted down with a splash of heavy cream provide the perfect consistency. Alternatively, caramel bits sold in the baking aisle are incredibly convenient.
The Chocolate: The chocolate coating is the protective shell that holds everything together. Because the caramel and marshmallow are intensely sweet, a high-quality dark chocolate (around 60% to 70% cacao) is strongly recommended to balance the flavor profile. You can use chocolate chips, but for the most professional, glossy finish with a satisfying “snap,” couverture chocolate or high-quality chocolate melting wafers (candy melts) are ideal. If using regular chocolate chips, a tiny bit of coconut oil can be added to help thin the chocolate for easier dipping and a shinier finish.
Essential Ingredients
Before you begin your candymaking adventure, gather the following ingredients. Make sure your workspace is clean, dry, and organized.
- – 1 bag (about 10 oz) of large or jumbo marshmallows
- – 11 oz bag of soft unwrapped caramels (or caramel baking bits)
- – 2 tablespoons heavy whipping cream
- – 16 oz high-quality dark chocolate chips, chunks, or melting wafers
- – 1 tablespoon refined coconut oil or shortening (optional, for thinning chocolate)
- – 2 tablespoons coarse flaky sea salt (like Maldon)
- – 2 tablespoons chocolate sprinkles or sparkling sugar (optional, for decoration)
- – Lollipop sticks or sturdy cake pop sticks
Essential Equipment for Candymaking
Having the right tools on hand will make the dipping process smooth and enjoyable. Here is what you will need:
- Parchment Paper or Silicone Baking Mats: Absolutely essential for placing your wet, dipped marshmallows on so they do not stick as they dry.
- Baking Sheets: To hold the parchment paper and allow for easy transfer to the refrigerator.
- Microwave-Safe Bowls or a Double Boiler: For gently melting the caramel and the chocolate without burning them.
- Tall, Narrow Glass or Jar: This is a secret weapon for dipping. Transferring your melted chocolate into a tall, narrow container makes it much easier to completely submerge the marshmallow in one smooth motion.
- A Teaspoon or Piping Bag: For carefully adding the caramel to the top of the marshmallow.
Step-by-Step Instructions
Follow these numbered steps carefully to create your flawless chocolate caramel marshmallows.
- Prepare Your Station: Line a large baking sheet with parchment paper or a silicone baking mat. Clear a space in your refrigerator to accommodate the baking sheet.
- Insert the Sticks: Take your lollipop sticks and insert them straight into the center of the top of each marshmallow. Push the stick about three-quarters of the way through the marshmallow to ensure it is secure, being careful not to push it all the way out the bottom. Place the skewered marshmallows on your prepared baking sheet.
- Create the Caramel Well (Optional but Recommended): For the caramel to pool beautifully around the stick without dripping down the sides too much, use your fingers to gently press down the marshmallow around the base of the stick, creating a tiny shallow “bowl” or well at the top of the marshmallow.
- Melt the Caramel: In a microwave-safe bowl, combine the unwrapped caramels (or caramel bits) and the heavy cream. Microwave in 30-second intervals, stirring vigorously after each interval, until the caramel is completely melted, smooth, and fluid. Do not overheat, or the caramel will become hard once it sets.
- Apply the Caramel: Using a small spoon, carefully dollop a small amount of the melted caramel around the base of the lollipop stick on top of each marshmallow. Allow the caramel to pool slightly. If the caramel thickens too much while you are working, pop it back in the microwave for 10 seconds.
- Chill to Set: Place the baking sheet of caramel-topped marshmallows in the refrigerator for 10 to 15 minutes. This chilling step is crucial; it firms up the caramel so it does not melt and slide off when it hits the warm chocolate.
- Melt the Chocolate: While the caramel is chilling, melt your dark chocolate. If using a microwave, place the chocolate (and coconut oil, if using) in a microwave-safe bowl. Heat at 50% power in 30-second bursts, stirring thoroughly between each burst. The residual heat will melt the remaining lumps. Be incredibly careful not to scorch the chocolate. Transfer the melted chocolate to a tall, narrow glass or cup for easier dipping.
- Dip the Marshmallows: Remove the chilled marshmallows from the fridge. Working one at a time, hold the marshmallow by the stick and dip it straight down into the melted chocolate. You want to submerge the marshmallow entirely, covering the caramel and letting the chocolate come just up to the base of the stick. Pull it straight up, and gently tap the stick against the edge of the glass to allow excess chocolate to drip off.
- Garnish and Set: Place the dipped marshmallow back onto the parchment paper. While the chocolate is still wet and glossy, immediately sprinkle the sides and top with coarse sea salt, chocolate sprinkles, or sparkling sugar. Repeat the dipping and garnishing process with the remaining marshmallows.
- Final Chill: Once all marshmallows are dipped and decorated, place the baking sheet back in the refrigerator for about 15 to 20 minutes, or until the chocolate is completely set and hardened. Serve and enjoy!
Pro Tips for the Perfect Glossy Coating
Making chocolate-dipped treats can sometimes be frustrating if the chocolate seizes or turns out dull. To ensure an ultra-shiny, liquid-glass finish, keep water completely away from your chocolate. Even a single drop of water can cause melted chocolate to “seize,” turning it into a thick, grainy paste that cannot be salvaged for dipping. Ensure all your bowls, spatulas, and tools are bone dry.
Temperature control is also vital. If your chocolate is too hot, it will melt the caramel and the marshmallow, creating a messy blob. If it is too cold, it will be too thick to create a smooth, even coating. Aim for a warm, fluid consistency. If your chocolate starts to cool and thicken while you are dipping, pop it back in the microwave for 5 to 10 seconds to loosen it up again.
The Importance of Sea Salt
You might be tempted to skip the sea salt or use regular table salt, but please resist the urge! The coarse flaky sea salt is the secret ingredient that elevates this recipe from a child’s candy to a gourmet confection. Regular table salt is too fine and will make the treat overwhelmingly salty. Coarse sea salt, particularly brands like Maldon, provides delicate, crunchy flakes that offer tiny, bright bursts of salinity. This beautifully cuts through the heavy, rich sweetness of the caramel and marshmallow, cleansing the palate and making you want to take another bite.
Creative Variations and Customizations
Once you master the basic chocolate caramel marshmallow, the possibilities for customization are truly endless. Here are a few fantastic variations to try for different occasions:
- The S’mores Pop: After dipping the marshmallow in chocolate, roll the bottom half in crushed graham crackers instead of sea salt. This brings the classic campfire flavor indoors without the need for a flame.
- Nutty Caramel Apple Style: Swap the dark chocolate for milk chocolate, and press finely chopped toasted pecans, walnuts, or peanuts into the wet chocolate. The nutty crunch pairs perfectly with the caramel.
- White Chocolate Raspberry: Use white chocolate for dipping, and garnish with crushed freeze-dried raspberries. The tartness of the berry beautifully balances the sweet white chocolate.
- Holiday Festivity: Swap the sea salt for crushed peppermint candies during the winter holidays, or use seasonally colored sprinkles for Halloween, Valentine’s Day, or the Fourth of July.
Serving Suggestions and Occasions
These chocolate caramel marshmallow pops are incredibly versatile. They make an absolutely stunning addition to a dessert table at weddings, baby showers, or birthday parties. Because they are on sticks, they are practically mess-free, making them an ideal treat for children’s parties or outdoor gatherings.
During the colder months, these pops serve a spectacular dual purpose. Not only are they delicious eaten on their own, but they also make the ultimate stir-stick for a mug of hot cocoa or coffee. Simply dunk the pop into a steaming cup of milk or coffee, and watch as the dark chocolate and caramel slowly melt into the beverage, leaving you with a rich, decadent drink and a gooey, warm marshmallow to enjoy.
Gifting and Packaging Ideas
If you are looking for an inexpensive but highly impressive DIY gift, look no further. To package these beautiful treats, wait until the chocolate is completely set and firm. Place each individual pop head-first into a small, clear cellophane treat bag. Gather the bag tightly around the base of the marshmallow and tie it off with a festive ribbon, baker’s twine, or a metallic twist tie.
You can arrange a bouquet of these pops in a decorative mug or a small tin lined with tissue paper. They are perfect for teacher appreciation gifts, neighborhood holiday exchanges, or as party favors for your guests to take home.
Storage and Make-Ahead Instructions
One of the best things about these treats is how well they store. Once the chocolate is completely hardened, you can store the marshmallow pops in an airtight container at room temperature for up to two weeks. Keep them in a cool, dry place away from direct sunlight or heat sources, which could cause the chocolate to melt or bloom (develop white streaks).
It is generally not recommended to freeze these treats. Freezing and thawing can cause condensation to form on the chocolate, which ruins the glossy finish and can make the marshmallows sticky and weeping. They are best enjoyed fresh or kept at standard room temperature.
Fun Facts About Marshmallows and Chocolate
Did you know that marshmallows have been around for thousands of years? The original marshmallows were made by ancient Egyptians, who extracted sap from the mallow plant (Althaea officinalis) that grew in marshes (hence the name “marsh mallow”). They mixed this sap with nuts and honey to create a sweet treat reserved exclusively for royalty and the gods. It wasn’t until the 19th century in France that confectioners started whipping the mallow sap with egg whites and sugar to create the fluffy texture we recognize today. Eventually, gelatin replaced the mallow root entirely, giving us the modern marshmallow.
When you combine that rich history with the complex journey of cacao beans turning into chocolate, you are holding centuries of culinary evolution on a single lollipop stick. The addition of caramel—sugar cooked to deep, complex perfection—completes this trinity of dessert history.
Conclusion
Making your own chocolate caramel marshmallows is a rewarding, creative, and mouth-watering endeavor. By following these detailed steps, respecting the temperatures of your ingredients, and adding that crucial pinch of sea salt, you will create a confection that rivals any high-end chocolate shop. Whether you make them for a special event, a thoughtful gift, or a late-night craving, these glossy, gooey, crunchy treats are sure to bring joy to anyone lucky enough to take a bite. Gather your ingredients, prepare your dipping station, and enjoy the delicious art of home candymaking!
Chocolate Caramel Marshmallow Pops
Ingredients
Equipment
Method
- Line a large baking sheet with parchment paper. Insert a lollipop stick into the top center of each marshmallow, going about 3/4 of the way down.
- In a microwave-safe bowl, melt the soft caramels and heavy cream in 30-second intervals, stirring until smooth and fluid.
- Using a small spoon, place a dollop of melted caramel around the base of the stick on top of each marshmallow.
- Place the caramel-topped marshmallows in the refrigerator for 10-15 minutes to allow the caramel to firm up.
- Melt the dark chocolate (and coconut oil, if using) in the microwave in 30-second bursts at 50% power until smooth. Pour into a tall, narrow glass.
- Dip each chilled marshmallow straight down into the warm chocolate, covering the caramel completely. Lift and gently tap to remove excess chocolate.
- Place the dipped marshmallow back on the parchment paper and immediately sprinkle with coarse sea salt and chocolate sprinkles before the chocolate sets.
- Return the baking sheet to the refrigerator for 15-20 minutes until the chocolate is completely hardened. Serve or package for gifts.