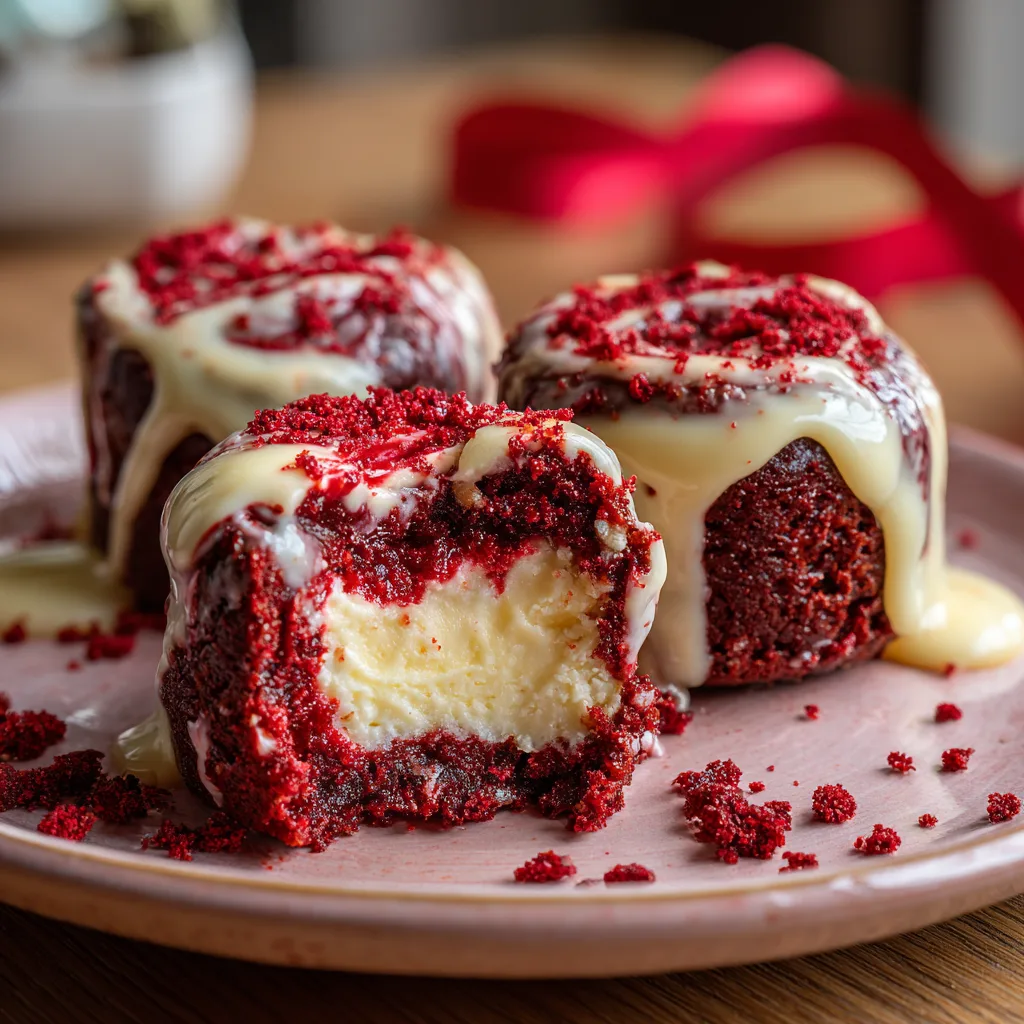
Red Velvet Brownie Bites
The Ultimate Sweet Red Velvet Brownie Bites Recipe: Ready in 30 Minutes
When you are craving something exceptionally decadent, beautifully festive, and unbelievably easy to make, nothing quite hits the mark like Sweet Red Velvet Brownie Bites. These miniature treats are the ultimate dessert mashup, combining the dense, fudgy texture of a rich brownie with the iconic, subtle cocoa flavor of classic red velvet cake. But the true star of the show is the thick, creamy cheesecake swirl nestled directly in the center of every single bite. In this comprehensive guide, we will explore exactly how to create these mouth-watering, vibrant desserts from scratch in just thirty minutes, ensuring that every batch you bake turns out utterly flawless, deeply moist, and visually stunning.
What Are Red Velvet Brownie Bites?
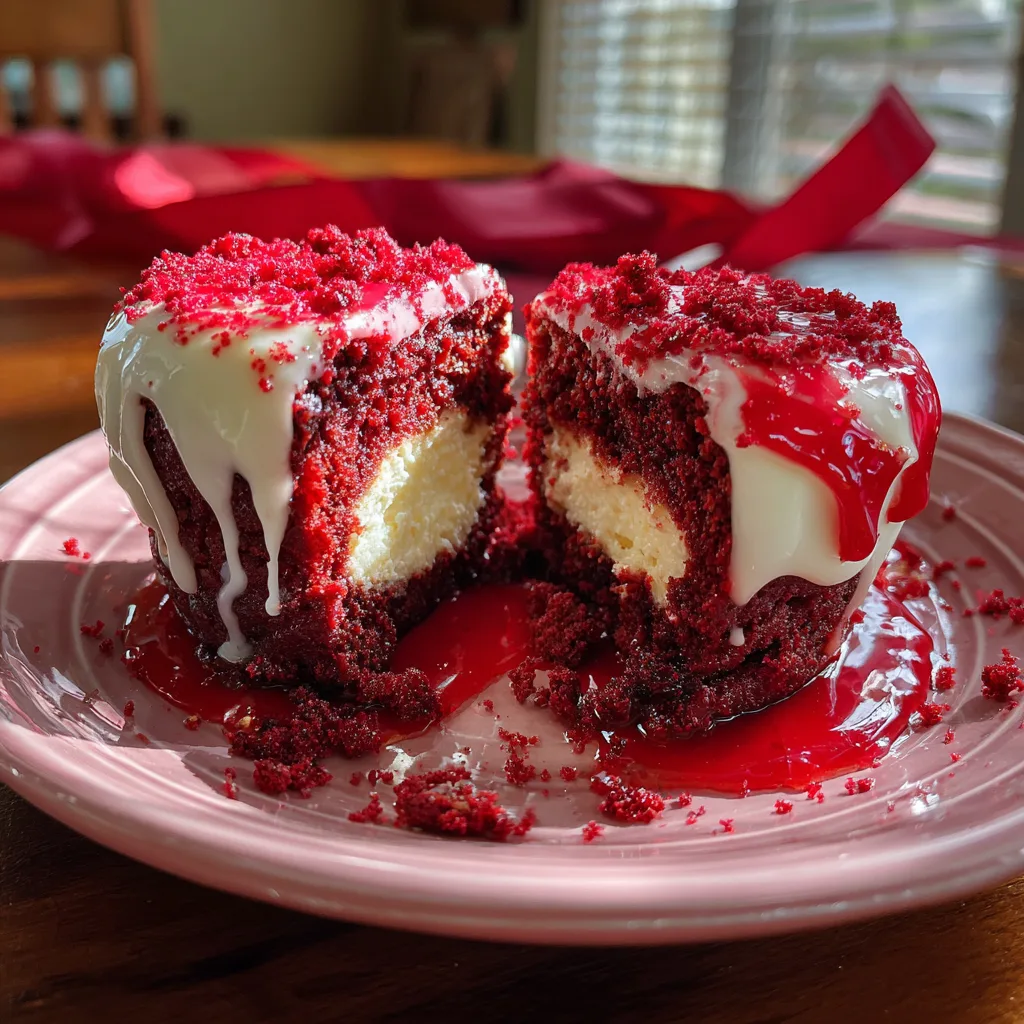
Red velvet brownie bites are a spectacular hybrid dessert that takes the best elements of three beloved classics: red velvet cake, chocolate brownies, and New York-style cheesecake. Unlike a traditional red velvet cake, which leans towards a light, airy crumb with a buttermilk tang, these brownie bites are intentionally engineered to be dense, chewy, and rich. They are baked in a mini muffin tin or specialized silicone molds to create perfectly portioned, cylindrical individual desserts that require no slicing or messy serving.
The batter itself is infused with a touch of cocoa powder, providing that signature subtle chocolate note that defines authentic red velvet, while a generous dose of vibrant red food coloring gives them their dramatic and romantic appearance. Baked right into the center of this ruby-red batter is a dollop of sweet, vanilla-scented cream cheese filling. As they bake, the brownie batter puffs up around the cheesecake core, creating a stunning visual contrast and a flavor profile that balances the earthy cocoa with tangy, creamy richness.
Why You Will Fall in Love with This Recipe
There are countless dessert recipes available, but these Sweet Red Velvet Brownie Bites stand out as a top-tier option for a multitude of reasons. First and foremost is their incredible speed and efficiency. The promise of having a gourmet-quality dessert from bowl to table in exactly 30 minutes is not an exaggeration. The batter comes together quickly by hand, requiring no complex stand mixers or lengthy chilling times, and because they are baked in miniature form, their oven time is drastically reduced compared to a full-sized pan of brownies or a whole cake.
Furthermore, these bites offer built-in portion control. They are the ideal grab-and-go sweet treat for parties, potlucks, or simply satisfying a late-night sweet tooth without committing to a massive slice of cake. Their vibrant red color and elegant cheesecake swirl make them look inherently fancy and celebratory, making them the ultimate go-to recipe for Valentine’s Day, Christmas, anniversaries, or romantic date nights at home. They look like they came from a high-end bakery, but they are entirely achievable for a novice home baker.
The Secret to Perfect Red Velvet Flavor
Achieving authentic red velvet flavor is an art form. It is a common misconception that red velvet is simply chocolate cake dyed red or a basic vanilla cake with food coloring. True red velvet has a highly specific, uniquely subtle flavor profile that balances cocoa, acid, and sweet vanilla.
The cocoa powder is the foundation. You do not want to use a heavy hand here; a small amount of high-quality unsweetened cocoa powder provides the necessary earthy, chocolatey undertones without overpowering the delicate vanilla and buttery notes of the batter. The next crucial element is the acidity. Traditionally, red velvet utilizes buttermilk and a splash of white vinegar. In this denser brownie version, we rely on the tanginess of the cream cheese swirl and the unique interaction between the cocoa powder and the other ingredients to mimic that signature slight tang. Lastly, do not skimp on the vanilla extract. A generous splash of pure vanilla elevates the overall aroma and bridges the gap between the cocoa and the sweet cream cheese filling.
The Magic of the Cheesecake Swirl
While the red velvet brownie base provides the structural and visual foundation, the cheesecake swirl is what elevates this dessert from good to unforgettable. The filling is delightfully simple, usually consisting of just softened cream cheese, granulated sugar, an egg yolk (to bind it and provide richness without making it too liquid), and a touch of vanilla.
The contrast in textures is where the magic truly happens. As you bite into the dessert, your teeth first break through the slightly crisp, chewy edge of the brownie, followed by the incredibly dense, moist crumb of the red velvet center, and finally, they meet the smooth, velvety, and luxurious cheesecake core. The slight tang of the cream cheese cuts through the sweetness of the brownie perfectly, ensuring that the dessert is indulgent but never cloying or overwhelmingly sweet.
Ingredients for Sweet Red Velvet Brownie Bites
To create these stunning miniature desserts, you will need to gather the following simple, accessible ingredients. Be sure to use room temperature ingredients for the best blending results.
- – 1/2 cup (1 stick) unsalted butter, melted and slightly cooled
- – 1 cup granulated sugar
- – 2 large eggs, room temperature
- – 1 teaspoon pure vanilla extract
- – 1 tablespoon liquid red food coloring (or 1 teaspoon gel food coloring)
- – 3/4 cup all-purpose flour
- – 1/4 cup unsweetened cocoa powder (natural or Dutch-processed)
- – 1/4 teaspoon salt
- – 4 ounces full-fat cream cheese, softened to room temperature
- – 3 tablespoons granulated sugar (for the filling)
- – 1 large egg yolk, room temperature
- – 1/2 teaspoon pure vanilla extract (for the filling)
Step-by-Step Instructions for Flawless Brownie Bites
Follow these detailed steps to ensure your red velvet brownie bites come out perfectly moist, beautifully swirled, and incredibly delicious every single time.
- Preheat and Prepare: Preheat your oven to 350°F (175°C). Generously spray a standard 12-cup mini muffin tin with non-stick baking spray, ensuring you coat the bottoms and the sides to prevent sticking. Alternatively, use a silicone mold for effortless removal.
- Whisk the Wet Ingredients: In a large mixing bowl, vigorously whisk together the melted unsalted butter and 1 cup of granulated sugar until well combined and slightly lighter in color.
- Add Eggs and Flavoring: Beat in the whole eggs one at a time, whisking well after each addition until the mixture is smooth and glossy. Stir in the 1 teaspoon of pure vanilla extract and the red food coloring. Be careful with the food coloring, as it can easily stain countertops and clothing. Whisk until the batter is a uniform, vibrant red color.
- Fold in the Dry Ingredients: Sift the all-purpose flour, unsweetened cocoa powder, and salt directly into the bowl with the wet ingredients. Using a rubber spatula, gently fold the dry ingredients into the wet batter just until no streaks of dry flour remain. Do not overmix, or the brownies will become tough. Set the red velvet batter aside.
- Create the Cheesecake Filling: In a separate, smaller bowl, beat the softened cream cheese and 3 tablespoons of sugar together until completely smooth and creamy. You can use a hand mixer or just a whisk. Add the egg yolk and 1/2 teaspoon of vanilla extract, mixing until perfectly incorporated and smooth.
- Assemble the Bites: Spoon about 1 tablespoon of the red velvet brownie batter into each cavity of the prepared mini muffin tin. The cups should be filled slightly more than halfway. Use the back of a small spoon to press a slight indentation into the center of the batter in each cup.
- Add the Swirl: Spoon a generous dollop (about 1 teaspoon) of the cream cheese filling directly into the indentation in the center of the red velvet batter. For a marbled look, you can use a toothpick to gently swirl the cream cheese into the red batter, or you can leave it as a solid cheesecake core.
- Bake to Perfection: Place the tin in the preheated oven and bake for 12 to 15 minutes. You will know they are done when the edges look set and the cheesecake center appears firm but not browned. A toothpick inserted into the red velvet portion should come out with a few moist crumbs attached.
- Cool Completely: Remove the pan from the oven and allow the brownie bites to cool in the pan for at least 10 minutes. This resting time allows them to set up and pull away slightly from the edges. Gently twist and lift them out of the pan, transferring them to a wire rack to cool completely before serving.
Essential Tips for Baking Mini Brownies
Baking miniature desserts requires a slightly different approach than baking full-sized cakes. Because they are so small, the window between perfectly baked and over-baked is very narrow. Always lean towards under-baking slightly, as the residual heat in the metal pan will continue to cook the brownie bites even after they are removed from the oven.
The temperature of your cream cheese is absolutely critical. If your cream cheese is too cold, your filling will be lumpy, and you will inevitably overmix it trying to smooth it out, which can incorporate too much air and cause the filling to crack during baking. Let it sit on the counter for at least an hour before beginning the recipe.
Finally, regarding food coloring: gel food coloring is highly recommended over liquid drops if you have it available. Gel colors are significantly more concentrated, meaning you need to use much less product to achieve a deep, vibrant crimson hue without altering the liquid ratio or texture of your delicate brownie batter.
Creative Variations and Mix-Ins
While the classic cream cheese swirl is incredible, you can easily customize this recipe to suit your exact cravings. For an extra dose of chocolate indulgence, fold a half cup of mini semi-sweet or white chocolate chips directly into the red velvet batter before scooping it into the pans. The white chocolate chips provide a beautiful color contrast and a creamy sweetness that pairs perfectly with the cocoa.
If you enjoy a bit of crunch, finely chopped pecans or walnuts make a fantastic addition, either mixed into the batter or sprinkled on top of the cream cheese swirl right before baking. You can also experiment with flavor extracts. Swapping the vanilla extract in the cream cheese filling for a tiny drop of almond extract or peppermint extract can completely transform the flavor profile for different holidays and seasons.
How to Serve and Present Your Brownie Bites
Presentation is key when it comes to miniature desserts. Because they are already so visually striking with their red and white contrast, they require very little embellishment. A simple dusting of powdered sugar over the top right before serving adds a beautiful, snowy finish that looks highly professional.
For a romantic Valentine’s Day presentation, serve these bites on a stark white or soft pink platter to make the red color pop. You can garnish the plate with fresh raspberries or a drizzle of melted dark chocolate. These rich bites pair phenomenally well with a hot cup of dark roast coffee, a glass of cold milk, or even a robust red wine like a Cabernet Sauvignon or a sweet port.
Storing, Freezing, and Thawing Instructions
Because these brownie bites contain a cream cheese filling, they require slightly different storage methods than standard brownies. If you plan to consume them within two days, they can be kept in an airtight container at room temperature in a cool, dry place. However, for maximum freshness and food safety, it is highly recommended to store them in the refrigerator.
In the fridge, stored in an airtight container, they will stay moist and delicious for up to 5 days. Interestingly, many people prefer the texture of these bites when they are chilled, as the cheesecake center becomes beautifully dense and fudgy.
If you want to make a large batch ahead of time, these freeze exceptionally well. Allow them to cool completely, then place them in a single layer in a freezer-safe container or a heavy-duty zip-top bag. They can be frozen for up to 3 months. To thaw, simply leave them at room temperature for an hour, or transfer them to the refrigerator overnight.
Frequently Asked Questions (FAQs)
Can I make this recipe in a standard muffin tin instead of a mini muffin tin?
Yes, you can absolutely use a standard 12-cup muffin tin. You will yield about 6 to 8 larger brownie cups instead of 12 minis. Because they are larger, you will need to increase the baking time to approximately 18 to 22 minutes. Keep a close eye on them and test the red velvet edges with a toothpick to ensure they do not overbake.
Can I omit the food coloring for a natural version?
Yes. If you prefer to avoid artificial food dyes, you can simply leave it out. The dessert will taste exactly the same, but it will have a light reddish-brown hue from the cocoa powder rather than the vibrant, iconic red color.
Why did my cheesecake filling sink into the brownie?
A slight sinking is normal and creates that beautiful stuffed core look. However, if it sank entirely to the bottom and disappeared, your cream cheese mixture may have been too warm or too liquid (often caused by using a giant egg yolk or over-beating). Ensure your cream cheese is just softened to room temperature, not melting.
Can I make these gluten-free?
Yes, you can substitute the all-purpose flour with a high-quality, 1-to-1 gluten-free baking blend that contains xanthan gum. The texture might be slightly more crumbly, but the flavor will remain rich and decadent.
The Fascinating History of Red Velvet
The origins of red velvet cake are steeped in culinary mythology, with roots tracing back to the Victorian era. Originally, “velvet” cakes were created by bakers who used almond flour, cocoa, or cornstarch to break down the protein in regular flour, resulting in a much finer, smoother, and softer “velvety” crumb compared to the coarser cakes of the time.
The signature red hue originally came from a natural chemical reaction. Early, unprocessed, non-alkalized cocoa powder contained high levels of anthocyanins. When this natural cocoa was mixed with acidic ingredients like buttermilk and raw vinegar, it triggered a reaction that turned the batter a distinct reddish-mahogany color. During the Great Depression, when extracts and natural ingredients were scarce, the Adams Extract company popularized the use of artificial red food dye, cementing the bright, striking crimson color we associate with modern red velvet today.
Conclusion: Your New Favorite Quick Dessert
Sweet Red Velvet Brownie Bites are the ultimate testament to the fact that gourmet, show-stopping desserts do not have to require hours of labor or professional pastry skills. With a handful of pantry staples, a block of cream cheese, and 30 minutes of your time, you can create a batch of deeply indulgent, perfectly portioned treats that will dazzle your family and friends.
Whether you are baking for a special occasion, looking for a romantic dessert to share, or simply treating yourself to something sweet, this recipe delivers on every single front. The rich cocoa brownie crumb harmonizes flawlessly with the tangy, smooth cheesecake swirl, creating a bite-sized masterpiece that is guaranteed to become a permanent fixture in your baking repertoire. Happy baking!
Sweet Red Velvet Brownie Bites
Ingredients
Equipment
Method
- Preheat oven to 350°F (175°C). Generously grease a 12-cup mini muffin tin with non-stick spray.
- In a large bowl, whisk the melted butter and 1 cup of sugar together until combined.
- Whisk in the whole eggs one at a time, then stir in 1 teaspoon of vanilla extract and the red food coloring until the batter is vibrant red.
- Add the flour, cocoa powder, and salt. Gently fold the dry ingredients into the wet mixture using a spatula just until combined. Do not overmix.
- In a separate small bowl, beat the softened cream cheese and 3 tablespoons of sugar until perfectly smooth. Add the egg yolk and 1/2 teaspoon vanilla, mixing until creamy.
- Spoon about 1 tablespoon of the red velvet batter into each cup of the prepared mini muffin tin. Make a slight indentation in the center of each.
- Spoon a dollop of the cream cheese filling into the center of the red velvet batter. Swirl gently with a toothpick if desired.
- Bake for 12 to 15 minutes, or until the edges are set and the cheesecake center is firm to the touch.
- Allow the brownie bites to cool in the pan for 10 minutes before carefully transferring them to a wire rack to cool completely.