Mini Bloomin’ Onions
The Ultimate Mini Bloomin’ Onions Recipe: Bite-Sized Crispy Perfection
Welcome to the ultimate guide for creating one of the most irresistible, crowd-pleasing appetizers you will ever make in your own kitchen: Mini Bloomin’ Onions. If you have ever been to a popular Australian-themed steakhouse, you are undoubtedly familiar with the towering, glorious, deep-fried monstrosity that is the classic bloomin’ onion. It is a masterpiece of savory indulgence—a massive onion, intricately carved, heavily battered, and fried until golden. However, making a full-sized version at home can be an intimidating, messy endeavor. Enter the ingenious, bite-sized alternative. By utilizing pearl onions or small boiling onions, we can capture all that iconic flavor and crunch in a much more manageable, shareable, and intensely satisfying format.
These miniature versions offer several distinct advantages over their giant counterpart. First and foremost is the crucial batter-to-onion ratio. In a large bloomin’ onion, the center pieces often become soggy or lack enough of that heavily seasoned crust. With mini onions, every single bite is guaranteed to deliver a satisfying, audible crunch followed by the sweet, tender, melt-in-your-mouth interior of the cooked onion. They are the perfect finger food for game days, holiday parties, or simply a decadent weekend snack. This comprehensive guide will walk you through every step of the process, from selecting the right alliums to mastering the double-dredge battering technique, ensuring your homemade appetizers rival any restaurant offering.
Why Mini Bloomin’ Onions are Better than the Original
While the visual spectacle of a massive, plate-sized fried onion is undeniable, the practicality and eating experience of the mini versions are vastly superior. Let us delve into why you should make the switch. When serving a large bloomin’ onion to a group, the process of tearing it apart can become incredibly messy. Petals break, greasy fingers are unavoidable, and the structural integrity of the appetizer collapses within minutes. Mini bloomin’ onions solve this problem entirely. They are individual, bite-sized portions. Guests can simply pick up a single, perfectly formed miniature bloom, dip it into their sauce of choice, and pop it in their mouth. It is elegant, clean, and highly addictive.
Furthermore, the cooking process is significantly less daunting. Deep-frying a whole, one-pound onion requires a massive amount of oil and a very large Dutch oven or commercial fryer. It also requires precise temperature control, as the outside can burn before the thick inner layers of the large onion cook completely through. Mini onions, on the other hand, cook incredibly fast. You can fry them in smaller batches using a standard saucepan or a counter-top deep fryer, using far less oil. Because they are small, the heat penetrates quickly, ensuring the onion is sweet and tender by the time the outer crust reaches a perfect golden-brown crisp.
Choosing and Preparing the Perfect Onions
The foundation of this recipe lies in selecting the correct type of onion. You cannot simply chop a large white onion into chunks; you need small, whole onions that will hold their shape when carved. The absolute best choice for this recipe is the pearl onion. Pearl onions are naturally sweet, mild, and the perfect bite-size diameter (usually about 1 inch across). If pearl onions are unavailable, small boiling onions or very small shallots can be substituted, though shallots will offer a slightly more pungent, garlicky flavor profile.
Preparing pearl onions requires a bit of patience, but there is a professional chef’s trick to make peeling them completely painless. Do not try to peel them raw with a paring knife; you will spend hours and likely mangle the delicate layers. Instead, bring a small pot of water to a rolling boil. Drop the unpeeled pearl onions into the boiling water for exactly 60 seconds. Immediately remove them with a slotted spoon and plunge them into an ice-water bath. Once they are cool enough to handle, simply trim off the root end (leaving just enough of the root base intact to hold the onion together) and squeeze the opposite end. The perfectly peeled onion will slip right out of its papery skin.
Once peeled, it is time to create the “bloom.” Place the onion root-side down on your cutting board. Using a sharp paring knife, make a downward slice through the center of the onion, stopping about 1/4 inch above the root base. Do not cut all the way through! Rotate the onion 90 degrees and make another slice, creating a cross. Make two more slices diagonally, so you have 8 distinct wedges or “petals” still attached at the bottom base. Gently tease the petals apart with your fingers to open the bloom.
The Science of the Perfect Crispy Batter
The hallmark of a great bloomin’ onion is the thick, aggressively seasoned, wildly crunchy exterior. Achieving this at home requires a specific blend of dry ingredients and a double-dredging technique. A standard flour coating will not provide enough crunch; we need a secret weapon: cornstarch. Mixing all-purpose flour with a generous amount of cornstarch is the key to creating a shatteringly crisp crust. Cornstarch limits gluten development and absorbs less moisture than flour, resulting in a lighter, crispier coating that stays crunchy long after it comes out of the fryer.
The seasoning blend is equally critical. A true steakhouse-style onion uses a robust mixture of spices. You will need paprika (for color and mild sweetness), cayenne pepper (for heat), garlic powder, onion powder, dried oregano, salt, and freshly ground black pepper. Do not be shy with the salt; fried foods require adequate seasoning to make the flavors pop.
For the batter to adhere properly to the slippery, curved surfaces of the onion petals, we utilize a wet-to-dry dredging method. The wet mixture usually consists of milk and eggs, creating a sticky binder. The onions are first tossed in the seasoned dry flour mixture, then dipped into the wet egg wash, and finally tossed back into the dry flour mixture. This double-dip creates a thick, craggy exterior that will fry up into magnificent, crunchy ridges.
Ingredients
Gather the following ingredients to create your masterpiece. Quality spices will make a massive difference in the final flavor profile.
- – 1 lb fresh pearl onions (or small boiling onions)
- – 2 cups all-purpose flour
- – 1/2 cup cornstarch
- – 2 tablespoons paprika (sweet or smoked, depending on preference)
- – 1 tablespoon garlic powder
- – 1 tablespoon onion powder
- – 1 teaspoon cayenne pepper (adjust for desired heat level)
- – 1 teaspoon dried oregano
- – 1 tablespoon kosher salt
- – 1 teaspoon freshly ground black pepper
- – 2 large eggs
- – 1 cup whole milk
- – 4-6 cups vegetable oil, canola oil, or peanut oil (for frying)
Instructions
Follow these steps meticulously for the best results. Organization and prep work (mise en place) are essential when deep frying.
- Blanch and Peel the Onions: Bring a pot of water to a boil. Drop the unpeeled pearl onions in for 60 seconds. Remove and immediately plunge into a bowl of ice water. Once cool, trim the root end slightly (keeping the base intact) and squeeze the onion out of its skin.
- Cut the Blooms: Place each peeled onion root-side down. Using a small, sharp knife, make 4 intersecting cuts downward, stopping about 1/4 inch from the root base, resulting in 8 sections. Gently fan the petals outward with your fingers.
- Prepare the Dry Dredge: In a large mixing bowl, whisk together the all-purpose flour, cornstarch, paprika, garlic powder, onion powder, cayenne pepper, oregano, kosher salt, and black pepper. Ensure the spices are evenly distributed throughout the flour.
- Prepare the Wet Wash: In a separate, medium-sized bowl, whisk together the eggs and the whole milk until fully combined and slightly frothy.
- Heat the Oil: Pour your frying oil into a heavy-bottomed Dutch oven or a deep fryer. Attach a deep-fry thermometer and heat the oil to a steady 375°F (190°C).
- The First Dredge: Working in batches of 5-6 onions at a time, toss the carved onions into the dry flour mixture. Toss them thoroughly, using your fingers to gently work the seasoned flour between the cut petals. Shake off the excess flour.
- The Wet Dip: Transfer the flour-dusted onions into the egg and milk mixture. Submerge them completely, ensuring the liquid gets down into the center of the bloom. Let the excess liquid drip off.
- The Final Dredge: Place the wet onions back into the dry flour mixture. Toss them vigorously. This second coating is crucial for building the thick crust. Again, use your fingers to gently push flour between the petals so they don’t stick together during frying. Shake off any loose, excess flour.
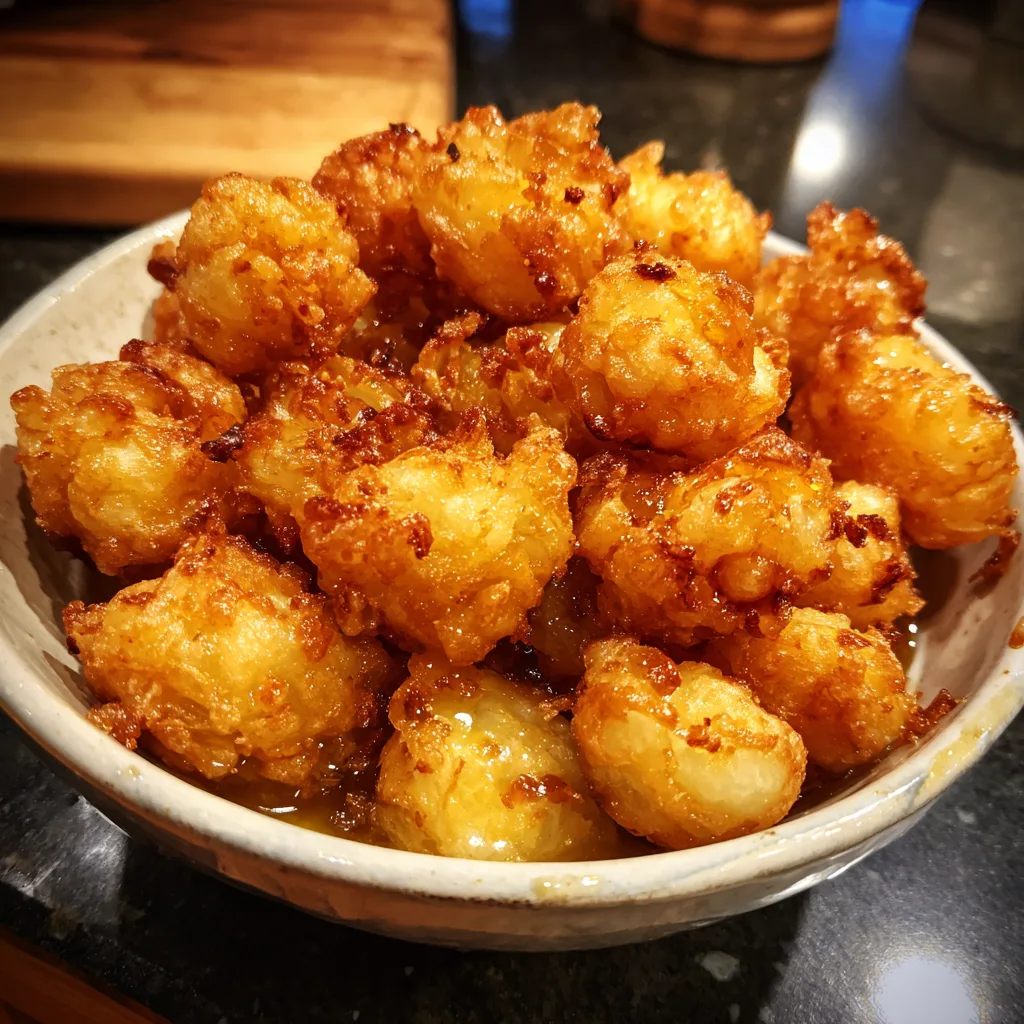
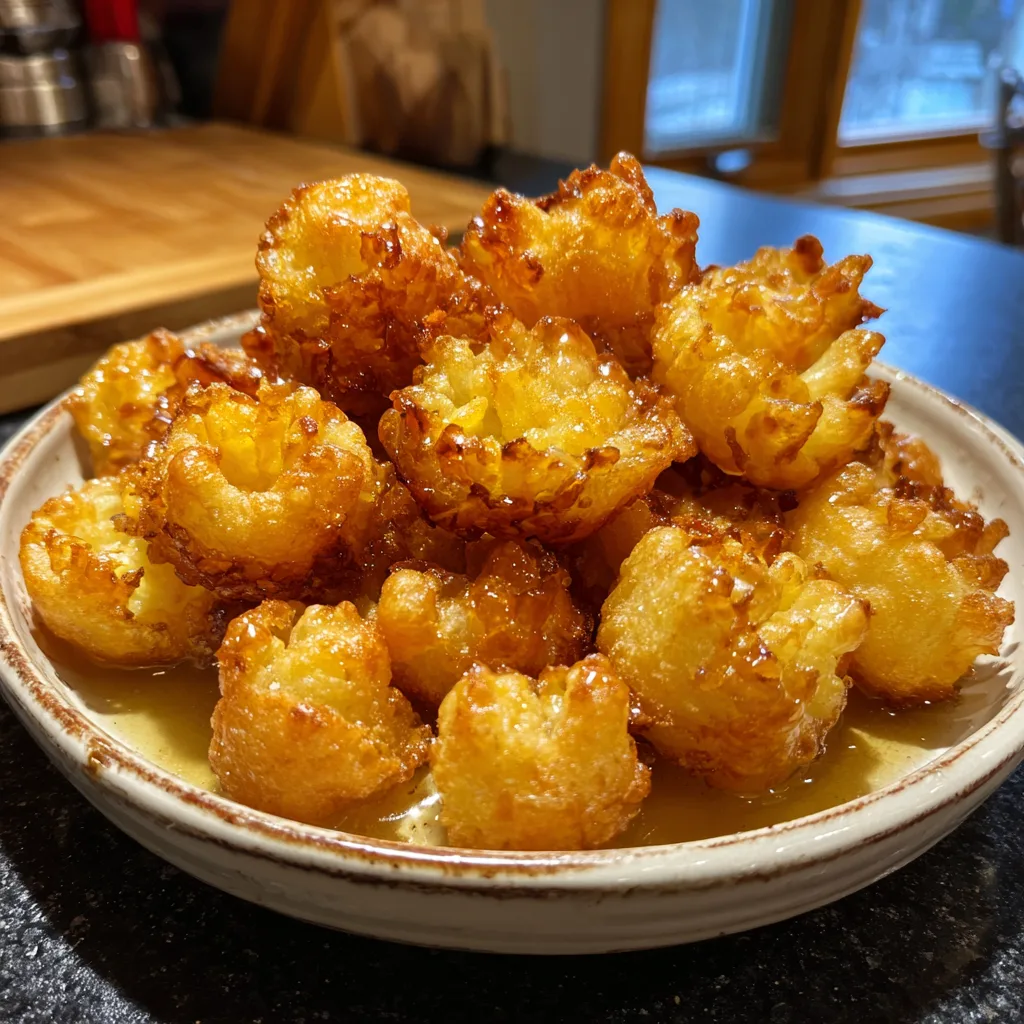
- Fry to Golden Perfection: Carefully lower the battered onions into the hot oil using a spider strainer or a slotted spoon. Fry them for 3 to 4 minutes. They will cook very quickly. Use the strainer to gently turn them so they brown evenly. They are done when they are a deep, rich golden brown and the exterior is incredibly crispy.
- Drain and Serve: Remove the fried onions from the oil and transfer them to a wire cooling rack set over a baking sheet (this prevents the bottoms from getting soggy, which happens if you use paper towels). Serve immediately while piping hot.
Pro Tips for Deep Frying at Home
Deep frying can be intimidating, but with a few simple rules, it is perfectly safe and yields incredible results. The most important tool you can own for frying is a clip-on deep-fry thermometer. Guessing the temperature of your oil is a recipe for disaster. If the oil is too cold (below 350°F), the thick batter will act like a sponge, absorbing the grease and resulting in heavy, oil-logged onions. If the oil is too hot (above 400°F), the outside crust will burn to a bitter crisp before the raw onion inside has a chance to cook and sweeten.
Always fry in small batches. Adding too many cold, battered onions to the pot at once will drastically drop the temperature of the oil. This leads to the aforementioned soggy, greasy result. Maintain the heat, let the oil recover to 375°F between batches, and be patient. Additionally, use an oil with a high smoke point. Vegetable oil, canola oil, and peanut oil are excellent choices because they can handle high temperatures without breaking down or imparting a burnt flavor to your food. Never use extra virgin olive oil or butter for deep frying.
Amazing Dipping Sauces to Serve Alongside
A bloomin’ onion is only half the experience; the other half is the signature dipping sauce. While these mini onions are flavorful enough to eat on their own, pairing them with a cool, creamy, and slightly spicy sauce elevates them to legendary status. The classic “Bloom Sauce” is essentially a spicy mayonnaise base.
To make a homemade copycat sauce, combine 1/2 cup of high-quality mayonnaise, 2 tablespoons of ketchup, 2 tablespoons of prepared creamy horseradish (adjust based on your heat tolerance), 1/4 teaspoon of paprika, 1/4 teaspoon of salt, 1/8 teaspoon of dried oregano, a dash of black pepper, and a pinch of cayenne. Whisk it all together and let it chill in the refrigerator for at least 30 minutes before serving. The resting time allows the flavors to meld beautifully.
If horseradish isn’t your favorite, these mini onions also pair spectacularly well with a high-quality buttermilk ranch dressing, a roasted garlic aioli, or even a tangy, mustard-based barbecue sauce. The contrast between the hot, crunchy, heavily spiced onion and the cool, creamy dip is culinary perfection.
Variations to Spice Things Up
Once you have mastered the basic recipe, you can easily tweak the flavor profile to suit your mood. For a Louisiana-inspired twist, omit the oregano and replace the paprika with a heavy tablespoon of your favorite Cajun or Creole seasoning blend. The resulting onions will be fiery, earthy, and incredibly savory.
For a gluten-free variation, you can successfully substitute the all-purpose flour with a high-quality, 1-to-1 gluten-free baking blend. Because we are already using a large amount of cornstarch (which is naturally gluten-free), the texture will remain remarkably similar to the original. Just ensure all your individual spices are certified gluten-free, as cross-contamination can occur in manufacturing facilities.
Fun Facts and Cultural Context of the Bloomin’ Onion
Despite its heavy association with Australian-themed dining in the United States, the bloomin’ onion has absolutely zero roots in actual Australian cuisine. It is a completely American invention. The concept of cutting an onion to resemble a flower and deep-frying it was popularized in the late 1980s by the founders of Outback Steakhouse. They were looking for a signature, visually striking appetizer that was highly profitable (onions are incredibly cheap) and paired perfectly with beer and cocktails.
Since its inception, the bloomin’ onion has become a cultural phenomenon, inspiring countless spin-offs at state fairs, casual dining chains, and food trucks across North America. Making this miniature version at home allows you to partake in this piece of modern American culinary history, offering a fun, interactive, and undeniably delicious eating experience right in your own dining room. Gather your friends, heat up the oil, and prepare to be amazed by these tiny, crispy marvels.
Mini Bloomin’ Onions
Ingredients
Equipment
Method
- Blanch pearl onions in boiling water for 60 seconds, then plunge into ice water. Peel and trim roots, keeping base intact.
- Place each onion root-side down and cut 4 intersecting downward slices, stopping 1/4 inch from the base to create petals.
- Whisk together flour, cornstarch, paprika, garlic powder, onion powder, cayenne, oregano, salt, and pepper in a bowl.
- In a separate bowl, whisk together the eggs and milk.
- Heat frying oil in a deep pot to 375°F (190°C).
- Toss the cut onions in the dry flour mixture, ensuring it gets between the petals. Shake off excess.
- Dip the floured onions into the egg wash, coating thoroughly.
- Return onions to the dry flour mixture for a second coating. Toss well and shake off excess.
- Fry in small batches for 3-4 minutes until deeply golden brown and crispy.
- Remove with a slotted spoon, drain on a wire rack, and serve hot with dipping sauce.