Cherry Pistachio Cheesecake
The Ultimate No-Bake Cherry Pistachio Cheesecake Recipe
When it comes to impressive desserts that require minimal effort but deliver maximum flavor, the No-Bake Cherry Pistachio Cheesecake stands in a league of its own. Imagine a dessert that brings together a buttery, crunchy crust, a lusciously creamy and tangy filling, and a sweet, vibrant fruit topping, all without ever having to turn on your oven. Whether you are hosting an elegant dinner party, attending a casual summer potluck, or simply looking to treat your family to something special on a weekend, this cheesecake is the ultimate crowd-pleaser.
There is a unique magic to no-bake desserts. They take the stress out of baking, eliminating the worries of water baths, cracked tops, or overbaking that often accompany traditional New York-style cheesecakes. Instead, you rely on the natural stabilizing properties of whipped cream and cold temperatures to create a dessert that is light, airy, and refreshingly cool. In this comprehensive guide, we will explore every single step of crafting this breathtaking dessert, dive deep into why these specific flavor combinations work so perfectly together, and share expert secrets to ensure your cheesecake sets up flawlessly every single time.
Why You Will Love This No-Bake Cherry Dessert
There are countless reasons why this recipe will quickly become a staple in your dessert repertoire. First and foremost is the incredible flavor profile. The richness of the cream cheese is beautifully balanced by the tart sweetness of the cherries. When you introduce the earthy, slightly sweet crunch of vibrant green pistachios and the milky, delicate notes of white chocolate shavings, you create a symphony of flavors that dance on the palate.
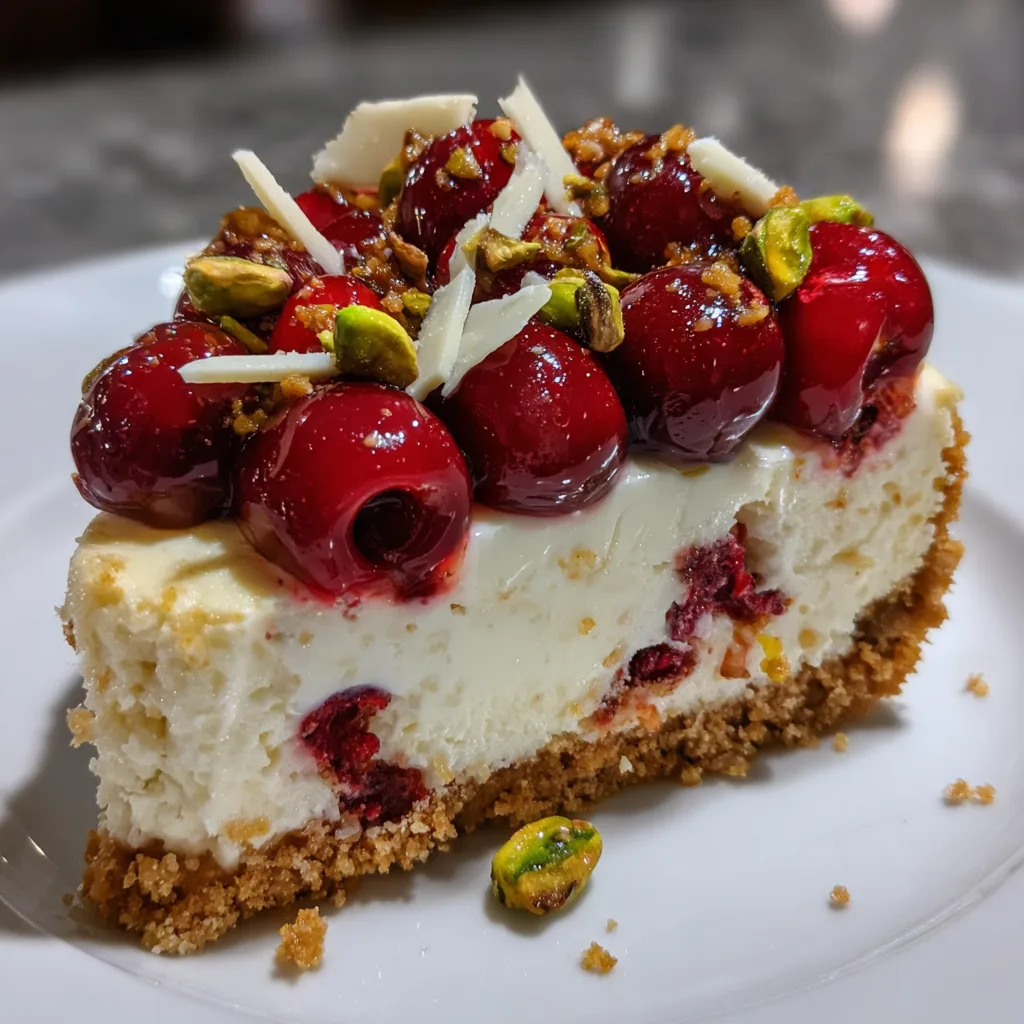
Secondly, the visual appeal of this dessert is absolutely stunning. The stark contrast between the pure white cheesecake filling, the deep, glossy ruby red of the cherry topping, and the bright, jewel-toned green of the pistachios makes this slice look like it came straight out of a high-end European patisserie. It is a showstopper that guarantees “oohs” and “aahs” before anyone even takes their first bite.
Finally, the convenience cannot be beaten. Traditional cheesecakes can be finicky and time-consuming, requiring precise oven temperatures and lengthy cooling periods. This no-bake version comes together in under 30 minutes of active prep time. The refrigerator does all the heavy lifting, making it the perfect make-ahead dessert for busy hosts.
The Magic of Flavor Combinations: Cherry, Pistachio, and White Chocolate
Understanding why a dessert works is just as important as knowing how to make it. The success of this No-Bake Cherry Pistachio Cheesecake lies in its masterful balance of taste and texture.
The Tart and Sweet Dynamic: Cherries possess a unique flavor profile that straddles the line between tart and sweet. This acidity is crucial in cutting through the heavy, rich fat content of the cream cheese and heavy cream. Without a fruit topping, a no-bake cheesecake can sometimes feel too rich. The glossy cherry compote acts as a palate cleanser, keeping each bite tasting fresh and exciting.
The Nutty Crunch: Pistachios are arguably one of the most elegant nuts available. They have a mild, slightly sweet, and earthy flavor that pairs exceptionally well with fruit. Beyond flavor, they provide an essential textural contrast. A creamy dessert needs a crunch to be truly satisfying, and the combination of the buttery graham cracker base and the chopped pistachios on top delivers exactly that.
The Creamy Sweetness: White chocolate is often misunderstood, but in this application, it shines brilliantly. Because white chocolate is made from cocoa butter, milk, and sugar (without the dark cocoa solids), it has a creamy, vanilla-forward profile that enhances the cheesecake filling without overpowering it. Shaving it over the top adds delicate, melt-in-your-mouth texture that bridges the gap between the soft filling and the crunchy nuts.
Essential Ingredients for the Perfect No-Bake Cheesecake
Because this recipe is unbaked, the quality and temperature of your ingredients matter immensely. Let’s break down the components.
The Buttery Crumb Crust
A great cheesecake needs a solid foundation. The crust provides structure and a contrasting crunch to the smooth filling.
- Graham Crackers or Digestive Biscuits: These are the classic choices. They offer a honeyed, slightly coarse crumb that absorbs butter beautifully. You can crush them yourself using a rolling pin or pulse them in a food processor.
- Melted Unsalted Butter: Butter acts as the glue that holds the crumbs together. Using unsalted butter allows you to control the sodium level.
- A Pinch of Salt: A tiny amount of salt in the crust highlights the buttery flavor and balances the sweetness of the filling.
The Velvety Cream Cheese Filling
This is the heart of the dessert. Achieving the perfect texture requires the right ingredients handled correctly.
- Full-Fat Cream Cheese: This is non-negotiable. You must use full-fat, brick-style cream cheese. Whipped cream cheese or low-fat varieties contain too much air and water, which will prevent your cheesecake from setting properly. Ensure it is at room temperature so it beats smoothly without lumps.
- Heavy Whipping Cream: This is what gives the no-bake cheesecake its structure. When whipped to stiff peaks and folded into the cream cheese, the fat in the cream chills and solidifies in the fridge, creating a firm but mousse-like texture. Your cream must be very cold to whip properly!
- Powdered Sugar (Confectioners’ Sugar): We use powdered sugar instead of granulated sugar because it dissolves instantly into the cold mixture, ensuring a perfectly smooth filling without any grittiness.
- Pure Vanilla Extract: Vanilla enhances the overall dairy flavors and makes the cheesecake taste complete.
The Glossy Cherry Topping
You have options here depending on how much time you have.
- Cherry Pie Filling: For the easiest, quickest route, a high-quality canned cherry pie filling works wonderfully. It already has that glossy, thick syrup that looks beautiful draped over a slice.
- Homemade Cherry Compote: If cherries are in season, making a quick compote by simmering pitted fresh (or frozen) sweet cherries with a little sugar, lemon juice, and a cornstarch slurry will elevate the dessert to a whole new level.
The Pistachio and White Chocolate Garnish
The finishing touches that make the dessert pop.
- Shelled Pistachios: Look for unsalted, roasted pistachios. The bright green color is essential for the visual presentation.
- White Chocolate Bar: Use a solid bar of good quality white chocolate, not chocolate chips, so you can easily create beautiful curls or shavings using a vegetable peeler.
Ingredients List
Gather the following ingredients to begin your culinary masterpiece:
For the Crust:
- – 2 cups graham cracker crumbs (about 14-15 full sheets)
- – 1/2 cup unsalted butter (melted)
- – 2 tablespoons granulated sugar
- – 1/4 teaspoon salt
For the Cheesecake Filling:
- – 16 oz (2 blocks) full-fat cream cheese (softened to room temperature)
- – 1 cup powdered sugar (sifted)
- – 1 teaspoon pure vanilla extract
- – 1 tablespoon lemon juice (freshly squeezed)
- – 1 and 1/4 cups heavy whipping cream (cold)
For the Topping and Garnish:
- – 1 can (21 oz) premium cherry pie filling (or 2 cups homemade cherry compote, chilled)
- – 1/3 cup shelled pistachios (roughly chopped)
- – 2 ounces high-quality white chocolate (for shaving)
- – Whole almonds and extra pistachios (optional, for plating)
Step-by-Step Instructions
Follow these detailed steps to ensure your cheesecake sets up perfectly and looks like it was made by a professional pastry chef.
- Prepare the Pan: Lightly grease the bottom and sides of a 9-inch springform pan. You can also line the bottom with a circle of parchment paper to make removing the cheesecake even easier later on.
- Mix the Crust: In a medium mixing bowl, combine the graham cracker crumbs, melted butter, granulated sugar, and salt. Stir with a fork until all the crumbs are evenly moistened and the mixture resembles wet sand.
- Form the Crust: Pour the crumb mixture into your prepared springform pan. Using the bottom of a measuring cup or a flat glass, press the crumbs firmly and evenly into the bottom of the pan and slightly up the sides. Place the pan in the freezer for 15-20 minutes to set while you make the filling.
- Whip the Heavy Cream: In a cold mixing bowl, use a hand mixer or stand mixer fitted with the whisk attachment to beat the cold heavy whipping cream until stiff peaks form. Be careful not to overbeat, or it will turn into butter. Transfer the whipped cream to another bowl and set aside.
- Beat the Cream Cheese: In the same mixing bowl (no need to clean it), beat the softened cream cheese on medium speed for about 2-3 minutes until completely smooth and creamy. There should be no lumps remaining.
- Add Sugar and Flavorings: Add the sifted powdered sugar, vanilla extract, and lemon juice to the cream cheese. Beat again on low speed until combined, then increase to medium speed and beat for another minute until light and fluffy. Scrape down the sides of the bowl with a rubber spatula.
- Fold the Mixtures Together: Add the whipped cream to the cream cheese mixture. Using a rubber spatula, gently fold the two together. Use a swooping motion—down the side, across the bottom, and up through the middle—to retain as much air as possible. Do not stir vigorously, or you will deflate the filling.
- Fill the Pan: Remove the crust from the freezer. Spoon the cheesecake filling over the crust. Use an offset spatula or the back of a spoon to smooth the top into an even layer.
- Chill Thoroughly: Cover the springform pan tightly with plastic wrap. Place it in the refrigerator to chill and set for a minimum of 6 hours, though overnight (8-12 hours) is highly recommended for the best, firmest slice.
- Add the Toppings: Once the cheesecake is fully set, carefully remove the sides of the springform pan. Just before serving, spoon the chilled cherry pie filling or compote evenly over the top of the cheesecake, leaving a small border around the edge if desired.
- Garnish and Serve: Sprinkle the chopped pistachios generously over the cherries. Take your white chocolate bar and a vegetable peeler, and shave curls of white chocolate directly over the cake. Slice with a sharp, warm knife (wipe clean between cuts) and serve immediately.
Expert Tips for a Flawless No-Bake Cheesecake
Even though no-bake cheesecakes are simpler than baked ones, a few crucial techniques will make the difference between a good dessert and a great one.
Room Temperature vs. Cold Ingredients: This is the golden rule of no-bake cheesecakes. Your cream cheese MUST be completely softened to room temperature. If it is cold, it will clump, and you will have a lumpy filling. Conversely, your heavy cream MUST be incredibly cold. Warm cream will not whip to stiff peaks, which is the structural backbone of your dessert.
Do Not Rush the Chill Time: The most common mistake people make with no-bake cheesecakes is cutting into them too early. Unlike baked cheesecakes that use eggs to set, this recipe relies entirely on the cold temperature of the fridge to solidify the butter in the crust and the fats in the dairy. Overnight chilling is always the safest bet.
The Warm Knife Trick: To get those picture-perfect, clean slices that you see in bakeries and food magazines, you need a hot knife. Fill a tall glass or pitcher with very hot water. Dip your sharp chef’s knife into the water to heat the blade, wipe it completely dry with a paper towel, and make your cut. Repeat the dipping and wiping process for every single slice.
Creative Variations and Substitutions
This recipe is a fantastic canvas for your culinary creativity. Here are a few ways you can switch things up:
Change the Crust: Not a fan of graham crackers? You can easily substitute them with crushed Oreo cookies (leave the cream in), Biscoff cookies (Speculoos), or vanilla wafers. If you use chocolate cookies, you will create a wonderful Black Forest vibe.
Different Fruits: If cherries aren’t your favorite, this exact same base works beautifully with fresh strawberry compote, blueberry sauce, or even a tangy lemon curd topping.
Nut Substitutions: If pistachios are unavailable, toasted slivered almonds or chopped pecans make excellent substitutes, adding their own unique crunch and flavor profile.
How to Store and Serve Your Cheesecake
Proper storage is essential to keep your no-bake cheesecake tasting fresh and maintaining its texture.
In the Refrigerator: Store any leftover cheesecake in the refrigerator. It is best to keep it in an airtight container or carefully draped with plastic wrap (use toothpicks to keep the wrap off the cherry topping). It will stay fresh and delicious for up to 5 days.
Can You Freeze It? Yes! No-bake cheesecakes freeze beautifully. It is actually best to freeze the cheesecake without the cherry topping. Wrap the plain, set cheesecake tightly in two layers of plastic wrap and one layer of aluminum foil. Freeze for up to 3 months. Thaw overnight in the refrigerator, then add the cherries, pistachios, and white chocolate right before serving.

Frequently Asked Questions (FAQ)
Why is my no-bake cheesecake runny?
The most common reasons for a runny filling are: the cream cheese wasn’t full-fat, the heavy cream wasn’t whipped to stiff peaks before folding, the mixture was over-mixed which deflated the cream, or the cheesecake simply hasn’t chilled in the fridge long enough. Minimum chill time is 6 hours, but overnight is always best.
Can I use Cool Whip instead of heavy cream?
Yes, you can substitute the 1 1/4 cups of heavy whipping cream with about 3 cups (an 8 oz tub) of thawed Cool Whip. Fold it into the cream cheese mixture just as you would the whipped cream. The texture will be slightly sweeter and more marshmallow-like, but it sets up very well.
Does no-bake cheesecake taste different than baked?
Yes, it does. Baked cheesecake has a denser, heavier texture and a slightly caramelized flavor from the eggs and baking process. No-bake cheesecake is much lighter, fluffier (almost like a mousse), and has a more pronounced, fresh cream cheese tang.
Conclusion: A Masterpiece on a Plate
This No-Bake Cherry Pistachio Cheesecake is proof that you do not need to spend hours sweating over a hot oven to create a dessert that is nothing short of spectacular. The vibrant colors, the rich and creamy textures, and the explosion of sweet, tart, and nutty flavors make every bite a memorable experience.
Whether you are a novice baker looking for a foolproof recipe or an experienced cook wanting a reliable, elegant dessert to add to your rotation, this recipe delivers on every promise. Gather your ingredients, clear some space in your fridge, and get ready to indulge in the easiest, most delicious cheesecake you will ever make!
No-Bake Cherry Pistachio Cheesecake
Ingredients
Equipment
Method
- Mix graham cracker crumbs, melted butter, granulated sugar, and salt in a bowl until it resembles wet sand.
- Press the crumb mixture firmly into the bottom of a 9-inch springform pan. Freeze for 15-20 minutes.
- In a cold bowl, whip the heavy cream until stiff peaks form. Set aside.
- In a separate large bowl, beat the softened cream cheese until completely smooth. Add powdered sugar, vanilla, and lemon juice; beat until light and fluffy.
- Gently fold the whipped cream into the cream cheese mixture using a rubber spatula until just combined. Do not overmix.
- Pour the filling over the chilled crust and smooth the top into an even layer.
- Cover tightly and refrigerate for at least 6 hours, preferably overnight, until firm.
- Before serving, remove the springform ring. Spoon the cherry topping evenly over the cheesecake.
- Garnish with chopped pistachios and white chocolate shavings. Slice with a hot, clean knife and serve.