Samoas Cookies
There is a distinct, universal joy that comes with the arrival of cookie season. For decades, one particular cookie has reigned supreme in the hearts and taste buds of millions: the iconic, caramel-drenched, coconut-topped, chocolate-drizzled masterpiece known as the Samoa (or Caramel deLite, depending on where you live). The beautiful marriage of a crisp, buttery shortbread base, a chewy, deeply flavorful toasted coconut and caramel topping, and the slight bitterness of dark chocolate is simply unparalleled. But what if you crave this magical combination outside of that narrow purchasing window? The answer is simple and incredibly rewarding: you make them yourself in your very own kitchen. This comprehensive guide will walk you through the art and science of creating the ultimate homemade Samoas cookies.
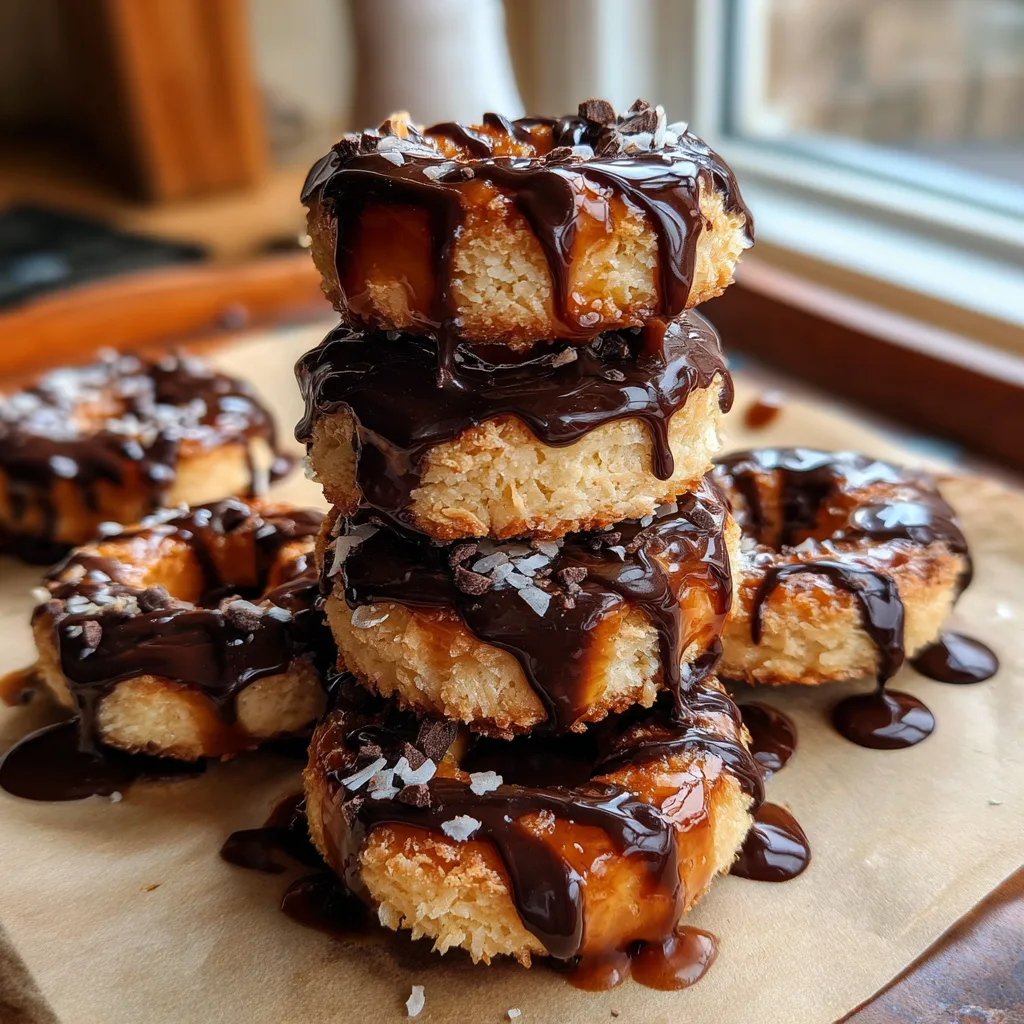
Understanding the Anatomy of a Samoa Cookie
Before diving into the mixing bowls, it is crucial to understand what makes this cookie so special. A perfect homemade Samoa is not just a single recipe; it is a meticulously crafted assembly of three distinct culinary components, each requiring its own attention to detail.
First, there is the base. The foundation of the cookie is a crisp, lightly sweetened shortbread ring. It cannot be too soft, or it will collapse under the weight and moisture of the topping. It cannot be too hard, or it will shatter aggressively when you take a bite. The perfect shortbread acts as a sturdy, buttery vehicle that provides a necessary textural contrast to the chewiness above it.
Second, we have the crown jewel: the caramel and toasted coconut topping. This is where the magic happens. The coconut must be toasted to a perfect golden brown to bring out its nutty, aromatic qualities. Un-toasted coconut will result in a cloying, overly sweet, and texturally flat cookie. The caramel binds the coconut together, transforming it into a cohesive, sticky, and luxurious layer. The caramel must be cooked to the right consistency—too thin, and it slides off the cookie; too thick, and it becomes a jaw-breaking chore to eat.
Finally, there is the chocolate. The chocolate serves two purposes: it coats the bottom of the cookie, sealing the shortbread and providing a solid, melt-in-your-mouth foundation, and it is drizzled over the top for aesthetic appeal and flavor balance. A high-quality dark or semi-sweet chocolate is essential here to cut through the intense sweetness of the caramel and coconut.
The Secrets to the Perfect Shortbread Base
Creating the perfect shortbread for your homemade Samoas cookies requires a light touch and the right ingredients. The dough is essentially a classic butter cookie. You will need unsalted butter, softened to room temperature. Why unsalted? It allows you to control the exact sodium content of your cookie, preventing a salty surprise. The butter is creamed together with a modest amount of sugar—we do not want the base to be overly sweet, as the topping brings more than enough sugar to the party.
Vanilla extract adds depth, while all-purpose flour provides the structure. A pinch of salt is non-negotiable; it enhances the buttery notes and balances the flavor profile. When mixing the dough, it is paramount not to overwork it. Overmixing develops the gluten in the flour, which will lead to a tough, bready cookie rather than a delicate, crisp one. You want to mix just until the flour disappears.
Once the dough is formed, chilling is mandatory. Chilling relaxes the gluten and solidifies the butter, making the dough much easier to roll out and preventing the cookies from spreading too much in the oven. To achieve the iconic doughnut shape, you will need two biscuit cutters: one larger one for the outer edge (about 2 to 2.5 inches) and a smaller one (about 3/4 inch) to punch out the center hole. Alternatively, the bottom of a large piping tip works wonderfully for the center hole.
Mastering the Caramel and Toasted Coconut
The soul of the homemade Samoas cookie lies in its golden, chewy topping. Let us start with the coconut. You must use sweetened flaked coconut for this recipe. Unsweetened coconut will yield a dry, less flavorful result. Toasting the coconut is a simple process, but it requires vigilance. Spread the coconut in an even layer on a large baking sheet and bake it at 325°F (160°C). You must stir it every few minutes. Coconut goes from beautifully golden to burnt and bitter in the blink of an eye. You are looking for a deep, even tan color. Once toasted, remove it from the hot baking sheet immediately to stop the cooking process.
For the caramel, while making caramel from scratch is a noble pursuit, using high-quality store-bought soft caramel candies (like the classic square ones) or high-quality caramel bits ensures a consistent, foolproof texture every time. Melting these caramels with a splash of heavy cream or milk thins the mixture just enough to make it workable without losing its sticky binding properties. A pinch of salt added to the melted caramel elevates the flavor, pushing it slightly towards a salted caramel profile, which pairs brilliantly with the toasted coconut.
The assembly is where things get delightfully messy. You will reserve a small amount of the plain melted caramel to act as the “glue.” A thin layer of this plain caramel is spread onto the cooled shortbread ring. Then, the toasted coconut is folded into the remaining caramel. This glorious, sticky mixture is then carefully piled onto the caramel-coated shortbread rings. Press it down gently to help it adhere and shape it to follow the ring of the cookie.
The Art of the Chocolate Dip and Drizzle
The final step in this culinary journey is the chocolate application. Do not skimp on the chocolate. A good quality semi-sweet chocolate chips or chopped dark chocolate baking bars will make a world of difference. To ensure the chocolate melts smoothly and sets up beautifully without becoming dull or streaky, we use a tiny bit of coconut oil or vegetable shortening mixed in during the melting process.
Melting chocolate can be done in the microwave in short, 20-second bursts, stirring vigorously between each interval, or over a double boiler. Once melted and smooth, you take each coconut-topped cookie and gently dip the bottom into the chocolate. Scrape off the excess—you want a thin, even coat that seals the bottom. Place the dipped cookies back onto a parchment-lined baking sheet.
Finally, the iconic drizzle. Transfer the remaining melted chocolate into a zip-top bag, snip off a tiny corner, and confidently drizzle parallel lines back and forth across the tops of the cookies. This step is incredibly satisfying and instantly transforms your kitchen creation into a professional-looking homemade Samoa cookie.
Ingredients for Homemade Samoas Cookies
For the Shortbread Cookie Base:
- – 1 cup (2 sticks) unsalted butter, softened to room temperature
- – 1/2 cup granulated sugar
- – 2 teaspoons pure vanilla extract
- – 2 cups all-purpose flour
- – 1/2 teaspoon salt
- – 2 tablespoons milk (if needed to bring dough together)
For the Coconut Caramel Topping:
- – 3 cups sweetened flaked coconut
- – 15 oz (about 1 1/2 bags) soft caramel candies, unwrapped (or caramel bits)
- – 3 tablespoons heavy cream or milk
- – 1/4 teaspoon salt
For the Chocolate Coating:
- – 10 oz semi-sweet chocolate chips or high-quality dark chocolate
- – 1 teaspoon coconut oil or vegetable shortening
Step-by-Step Instructions
- Toast the Coconut: Preheat your oven to 325°F (160°C). Spread the sweetened flaked coconut evenly on a large, rimmed baking sheet. Bake for 10-15 minutes, stirring every 3-4 minutes, until the coconut is mostly golden brown. Watch it closely, as it can burn quickly. Remove from the oven and transfer the coconut to a cool bowl to stop the cooking process. Set aside.
- Prepare the Shortbread Dough: Increase the oven temperature to 350°F (175°C). Line two large baking sheets with parchment paper. In a large mixing bowl, use an electric hand mixer or a stand mixer fitted with a paddle attachment to beat the softened butter and granulated sugar together until light, fluffy, and pale in color (about 2-3 minutes). Beat in the vanilla extract.
- Incorporate Dry Ingredients: In a separate medium bowl, whisk together the all-purpose flour and salt. With the mixer on low speed, gradually add the dry ingredients to the wet ingredients. Mix just until combined. The dough might seem slightly crumbly. If it will not hold together when squeezed, add 1-2 tablespoons of milk and mix until it forms a cohesive dough.
- Chill and Roll the Dough: Gather the dough and form it into two flat discs. Wrap tightly in plastic wrap and chill in the refrigerator for at least 30 minutes. Once chilled, lightly flour a clean work surface. Roll out one disc of dough to about 1/4-inch thickness.
- Cut the Cookies: Use a 2 to 2.5-inch round cookie cutter to cut out circles. Then, use a smaller 3/4-inch cutter (or the bottom of a large piping tip) to punch out the center holes, creating a ring shape. Place the rings onto the prepared baking sheets, spacing them about 1 inch apart. Re-roll the scraps and repeat until all dough is used.
- Bake the Shortbread: Bake the cookies at 350°F (175°C) for 10-12 minutes, or until the edges are just barely starting to turn light golden brown. Let the cookies cool on the baking sheet for 5 minutes before carefully transferring them to a wire rack to cool completely.
- Melt the Caramel: Unwrap the soft caramel candies and place them in a microwave-safe bowl along with the heavy cream and 1/4 teaspoon of salt. Microwave in 30-second increments, stirring well after each increment, until the caramel is completely melted and beautifully smooth.
- Assemble the Topping: Spread a very thin layer of the plain melted caramel over the top of each cooled shortbread ring. This acts as the glue to hold the topping on. Then, fold the toasted coconut into the remaining melted caramel in the bowl until all the coconut is evenly coated.
- Apply the Topping: Working somewhat quickly before the caramel sets, use a spoon and your fingers to press generous amounts of the sticky coconut-caramel mixture onto the top of each cookie. Shape it to match the ring of the cookie, ensuring the center hole remains open. Let the cookies sit until the caramel topping is firm.
- Melt the Chocolate: In a clean microwave-safe bowl, combine the semi-sweet chocolate chips and the coconut oil. Microwave in 30-second intervals, stirring vigorously after each, until the chocolate is completely melted, glossy, and smooth.
- Dip and Drizzle: Gently dip the bottom of each assembled cookie into the melted chocolate. Tap off any excess chocolate and place the cookie back onto a parchment-lined baking sheet, chocolate-side down. Once all cookies are dipped, transfer the remaining melted chocolate into a zip-top plastic bag or a piping bag. Snip off a very small piece of the corner and generously drizzle the chocolate in parallel stripes over the tops of the cookies.
- Set and Enjoy: Allow the cookies to rest at room temperature until the chocolate is completely set, or speed up the process by placing the baking sheets in the refrigerator for 15-20 minutes. Serve and enjoy your incredible homemade Samoas cookies!
Pro-Tips for the Best Homemade Samoas
Work in Batches with the Caramel: If your caramel and coconut mixture begins to cool down and becomes too stiff to easily spread onto the cookies, simply pop the bowl back into the microwave for 15-20 seconds to loosen it back up.
Do Not Skip the “Glue”: Applying that thin initial layer of plain melted caramel directly to the shortbread is a vital step. If you just try to pack the heavy, chunky coconut mixture onto a bare cookie, it will likely fall off when you take a bite.
The Salt Factor: A touch of salt in both the shortbread dough and the caramel topping cuts through the heavy sweetness of the dessert, adding a highly addictive complex flavor profile. Flaky sea salt sprinkled on top immediately after drizzling the chocolate is a fantastic modern variation.
Storage and Freezing Suggestions
These homemade Samoas cookies have an excellent shelf life. Because they contain dairy (in the butter and the cream in the caramel), they are best stored in an airtight container in the refrigerator if you are keeping them for more than a couple of days. They will stay fresh in the fridge for up to two weeks. When you are ready to eat one, simply let it sit at room temperature for 10-15 minutes to allow the caramel to soften slightly.
Can you freeze homemade Samoas? Absolutely! In fact, many fans prefer eating them straight from the freezer. Place the fully set cookies in a single layer on a baking sheet and freeze until solid. Then, transfer them to a freezer-safe zip-top bag or airtight container, placing parchment paper between the layers. They will keep in the freezer for up to 3 months. Enjoy them frozen or let them thaw at room temperature.
Creative Variations
While the classic is hard to beat, homemade baking allows for exciting customizations. For a gluten-free version, substitute the all-purpose flour with a high-quality 1:1 gluten-free baking flour blend containing xanthan gum. If you prefer milk chocolate or even white chocolate, feel free to substitute the dark chocolate chips, though keep in mind the overall cookie will be significantly sweeter.
For an adult twist, you can infuse the caramel with a tablespoon of dark rum or bourbon during the melting process. You can also experiment with different extracts in the shortbread, such as a drop of almond extract alongside the vanilla for a nutty complexity.
Why You Will Fall in Love with this Recipe
Creating homemade Samoas cookies is more than just baking; it is a fun, engaging, and deeply rewarding culinary project. The process of building the cookies layer by layer gives you an appreciation for the textures and flavors involved. The moment you take that first bite—experiencing the snap of the chocolate, the chew of the sweet caramel and nutty toasted coconut, and the buttery crumble of the shortbread—you will realize that while the boxed versions are good, the fresh, homemade versions are genuinely extraordinary. They make incredible gifts, show-stopping party treats, and the ultimate midnight snack. Happy baking!
Homemade Samoas Cookies
Ingredients
Equipment
Method
- Preheat oven to 325°F (160°C). Toast coconut on a baking sheet for 10-15 minutes, stirring frequently until golden. Let cool.
- Increase oven to 350°F (175°C). Cream softened butter and sugar until light and fluffy. Beat in vanilla extract.
- Whisk flour and salt together. Gradually mix into the wet ingredients until a dough forms. Add milk if dough is too crumbly.
- Chill dough for 30 minutes. Roll out to 1/4-inch thickness and cut into 2-inch rings with a 3/4-inch center hole.
- Bake cookies on parchment-lined sheets for 10-12 minutes until edges are pale golden. Cool completely on a wire rack.
- Melt unwrapped caramels, heavy cream, and salt in the microwave in 30-second intervals until smooth.
- Spread a thin layer of plain melted caramel onto each cookie. Fold toasted coconut into the remaining caramel.
- Press the sticky coconut-caramel mixture onto the top of each cookie ring. Allow to set.
- Melt chocolate chips with coconut oil until smooth. Dip the bottom of each cookie into the chocolate and place on parchment.
- Transfer remaining melted chocolate to a bag, snip the corner, and drizzle over the top of the cookies. Chill to set.