Shark Fin Brownies
Dive into Deliciousness: The Ultimate Shark Fin Brownies for Your Next Ocean Party
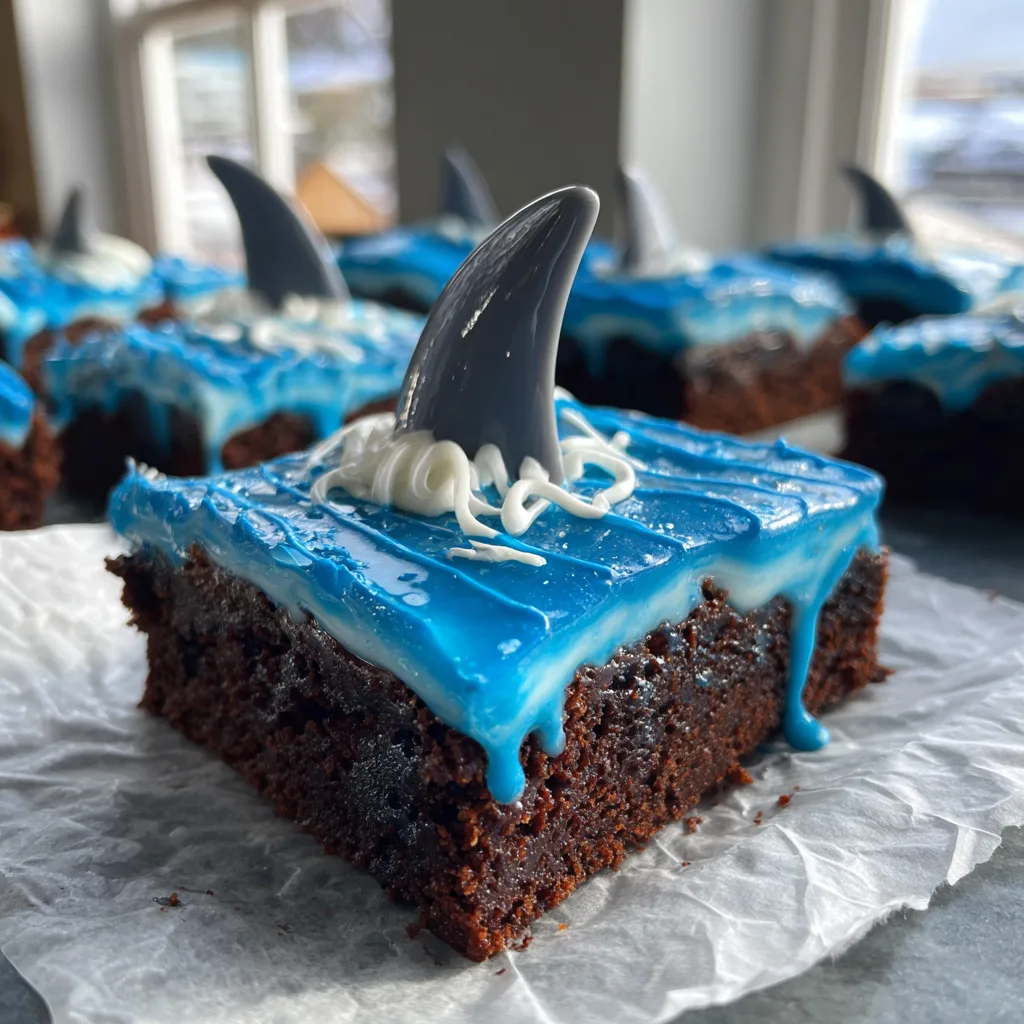
When it comes to planning a memorable party for kids, a summer pool gathering, or the ultimate Shark Week viewing marathon, the food you serve is just as important as the decorations. While chips and dips are always a staple, there is something truly magical about a themed dessert that captures the imagination of your guests. Enter the Shark Fin Brownie: a delightfully spooky, incredibly delicious, and visually striking treat that will have everyone at your event circling the dessert table. With a rich, dense chocolate base, a vibrant blue “ocean” frosting, and an ominous (yet sweet) grey fin breaking the surface, this dessert is guaranteed to make a massive splash.
What makes these Shark Fin Brownies so incredibly popular among parents and home bakers is their perfect ratio of visual impact to actual effort. You do not need a culinary degree or advanced pastry skills to create these masterpieces. By utilizing simple baking techniques, a little bit of food coloring, and some creative decorating, you can transform a classic pan of chocolate brownies into a scene straight out of an oceanic adventure. In this comprehensive guide, we will explore the science of baking the perfect sturdy brownie base, the secrets to mixing the ultimate aquatic blue frosting, the best materials for crafting your shark fins, and plenty of variations to make this recipe your own.
The Magic of Themed Desserts: Why These Brownies Make a Splash
There is a unique psychology behind themed foods, especially when catering to children and party-goers. A standard brownie, no matter how rich and fudgy, is a common sight. However, the moment you add a thematic element—like an oceanic landscape with a lurking shark—you elevate the dessert from a mere snack to an interactive experience. Themed desserts act as conversation starters, they double as table centerpieces, and most importantly, they create lasting memories.
For events like Shark Week, which has cultivated a massive cult following over the decades, these brownies serve as the perfect thematic accompaniment to a night of television viewing. They bring the thrill of the screen right onto your plate. Similarly, for a child’s ocean or mermaid-themed birthday party, incorporating “dangerous” elements like sharks provides a fun, playful balance to the cute and cuddly elements of the party. The stark contrast between the dark chocolate, the bright blue frosting, and the grey fin makes for an incredibly photogenic treat that will look fantastic in all your event photos.

Building the Base: The Great Debate Between Fudgy and Cakey
The foundation of any great decorated dessert is its structural integrity. When it comes to brownies, there are two main camps: fudgy and cakey. For these Shark Fin Brownies, a fudgy, dense base is absolutely non-negotiable. If your brownie is too light, airy, or crumbly (like a cakey brownie), it will not be able to support the weight of the frosting or the inserted shark fin without breaking apart.
A fudgy brownie relies on a higher fat-to-flour ratio. This usually means more butter and chocolate, and less flour and leavening agents like baking powder. When baked, this creates a tight, dense crumb that is incredibly moist and structurally sound. You can absolutely use your favorite boxed brownie mix to save time—in fact, boxed mixes often yield some of the most consistent and sturdy results! If you are using a box mix, a great trick to ensure a fudgy texture is to replace the water called for on the box with whole milk or even brewed coffee (which intensifies the chocolate flavor), and avoid overbaking.
If you prefer baking from scratch, a classic cocoa-based or melted-chocolate-based brownie recipe will work wonders. The key is to let the brownies cool completely in the pan before attempting to cut them or frost them. Cutting into a warm brownie will cause it to tear and crumble. For the cleanest cuts, you can even chill the baked brownie slab in the refrigerator for an hour before slicing it into perfectly uniform squares.
The “Ocean Water” Frosting Technique
Once your dense chocolate squares are baked and cooled, it is time to create the ocean. The blue frosting is what gives this dessert its vibrant, eye-catching appeal. You have a few options for the frosting base: a classic American buttercream, a cream cheese frosting, or even a store-bought tub of vanilla frosting if you are short on time.
To achieve the perfect “ocean water” blue, gel food coloring is highly recommended over liquid food coloring. Liquid food coloring can thin out your frosting, making it runny and difficult to spread thickly. Gel colors are highly concentrated, meaning you only need a drop or two to achieve a brilliant, saturated color without altering the consistency of your icing. Start with a tiny drop of royal blue or sky blue, and mix thoroughly. You can always add more color, but you cannot take it out once it is mixed in!
When spreading the blue frosting onto your brownie squares, do not aim for a perfectly smooth, flat surface. The ocean is not flat! Use an offset spatula or the back of a spoon to swoop and swirl the frosting, creating peaks and valleys that mimic rolling waves. To add the final touch to your water, use a small piping bag (or a ziplock bag with a tiny corner snipped off) filled with plain white icing to pipe delicate, squiggly lines across the top. This mimics the white foam and cresting waves of a turbulent ocean, adding incredible depth and realism to your edible seascape.
Crafting the Infamous Shark Fin
The defining element of this recipe is, of course, the shark fin. There are several different ways to achieve this look, depending on your skill level and what ingredients you have access to.
Option 1: Grey Fondant. This is the most professional-looking method and the one that best resembles the inspiration photos. You can purchase pre-colored grey fondant at most craft or baking supply stores. Simply roll it out to a thickness of about 1/4 inch, and use a sharp knife to cut out small triangle shapes with a slight curve on one side to mimic the dorsal fin. Leave the fondant fins out at room temperature for a few hours (or overnight) so they can harden and dry. This ensures they will stand straight up when pushed into the brownie.
Option 2: Candy Melts. If you don’t like the taste or texture of fondant, grey candy melts are a fantastic alternative. Melt the wafers according to the package directions, pour the melted candy into a piping bag, and pipe fin shapes onto a sheet of wax paper. Let them cool and harden in the refrigerator before peeling them off and using them.
Option 3: Cardstock (Non-Edible). If you are completely short on time or prefer not to fuss with edible decorations, you can easily cut shark fins out of grey cardstock paper. Simply glue them to toothpicks and stick them into the center of the brownies. Just be sure to warn your guests to remove the paper fins before taking a bite!
Ingredients You Will Need
- – 1 box (about 18 oz) of your favorite fudgy brownie mix (plus the oil, water/milk, and eggs required on the box)
- – 1.5 cups of vanilla buttercream or cream cheese frosting (store-bought or homemade)
- – Blue gel food coloring (Sky Blue or Royal Blue)
- – 1/4 cup of white decorator’s icing (in a piping bag or tube)
- – 4 ounces of grey fondant OR 1/2 cup of grey candy melts
Step-by-Step Instructions for Ocean Perfection
- Prepare the Fins: If using fondant, roll it out to a 1/4-inch thickness. Use a small knife to cut out curved triangular shapes resembling shark fins (about 1.5 inches tall). Place them on a piece of parchment paper and allow them to dry and stiffen at room temperature for at least 2 to 4 hours. If using candy melts, pipe the fin shapes onto parchment paper and chill until solid.
- Bake the Brownies: Preheat your oven according to the brownie mix directions. Line an 8×8 or 9×9 inch square baking pan with parchment paper, leaving an overhang on the sides to easily lift the brownies out later. Mix the brownie batter and bake as directed. You want them dense and fudgy, so do not overbake.
- Cool and Cut: Allow the brownies to cool completely in the pan on a wire rack. For the cleanest cuts, place the cooled pan in the refrigerator for 30-60 minutes. Use the parchment paper overhang to lift the brownie slab onto a cutting board. Use a large, sharp knife to cut them into even, square portions.
- Mix the Ocean Frosting: Place your vanilla frosting into a mixing bowl. Add 1-2 drops of blue gel food coloring and stir vigorously until you reach your desired shade of ocean blue. If you want a deeper color, add one more drop at a time.
- Frost the Brownies: Using an offset spatula or a butter knife, spread a generous layer of blue frosting over each individual brownie square. Swirl the spatula slightly to create a textured, wave-like surface.
- Pipe the Sea Foam: Take your white decorator’s icing and pipe thin, random, squiggly lines across the top of the blue frosting to mimic whitecaps and sea foam.
- Insert the Fins: Once your fondant or candy melt fins are completely firm, take one fin and gently press the flat bottom edge into the center of each frosted brownie. Push it down slightly into the brownie base so it stands up straight and securely.
- Serve and Scare: Arrange your finished Shark Fin Brownies on a platter and serve to your thrilled guests!
Elevating the Presentation: Creative Variations
While these brownies are spectacular as written, there are countless ways to customize them to fit your specific party theme even better.
Adding the Sandy Beach: If you want to create a shoreline effect, you can crush up a handful of graham crackers or vanilla wafers in a food processor until they resemble fine sand. Sprinkle a heavy line of this “sand” along one edge of the frosted brownie before inserting the shark fin in the “water” section.
Gummy Sea Creatures: To make the ocean scene even more vibrant, you can add other edible elements. Small Swedish Fish or gummy sharks can be placed in the blue frosting alongside the fin. This is especially popular with younger children who love gummy candies.
The “Bloody” Bite: For a slightly more gruesome (but fun) Shark Week vibe, you can use a tiny amount of red decorator’s gel to pipe a small line of “blood” right at the base of the shark fin where it meets the blue frosting. It adds a dramatic flair that teenagers and adults will appreciate!
Storage and Make-Ahead Tips for Busy Hosts
Planning a party involves juggling a lot of moving parts, so finding desserts that can be made in advance is a lifesaver. Fortunately, these Shark Fin Brownies are incredibly make-ahead friendly.
The brownie base itself can be baked up to three days in advance. Simply keep the uncut brownie slab tightly wrapped in plastic wrap or stored in an airtight container at room temperature to maintain its moisture. The fondant fins are actually best made a day or two in advance, as they need time to dry out and become rigid. You can keep the finished, dry fins in a loose Tupperware container at room temperature (do not refrigerate fondant, as condensation will make it sticky and wilted).
You can fully assemble the brownies (frosting, piping, and fin insertion) up to 24 hours before your event. Store the fully decorated brownies in an airtight container at room temperature. If your house is particularly warm and the frosting seems too soft, you can store them in the refrigerator, but be sure to pull them out an hour before serving so the brownies can come back to a soft, fudgy room temperature.
Conclusion
Creating show-stopping themed desserts does not have to involve hours of frustration or expensive bakery orders. With this Ultimate Shark Fin Brownie recipe, you have the power to create a visually stunning, deeply chocolatey treat right in your own kitchen. By combining the rich decadence of a perfectly baked brownie with the playful, engaging elements of ocean-blue frosting and a lurking shark fin, you are guaranteed to be the host of the year. So grab your food coloring, prepare your fondant, and get ready to take a delicious bite out of your next celebration!
Shark Fin Brownies
Ingredients
Equipment
Method
- If using fondant, roll it out to 1/4 inch thickness, cut into small fin shapes, and let dry at room temperature for at least 2 hours to stiffen.
- Preheat oven and prepare brownie mix according to package directions. Bake in a parchment-lined 8×8 pan.
- Allow brownies to cool completely, then chill in the fridge for 30 minutes before cutting into clean squares.
- Mix vanilla frosting with blue gel food coloring until a vibrant ocean blue color is achieved.
- Spread a generous layer of blue frosting onto each brownie, swirling slightly to create a textured water effect.
- Pipe thin, squiggly lines of white icing over the blue frosting to mimic sea foam and cresting waves.
- Gently press a firm, dry grey shark fin into the center of each frosted brownie until it stands upright.
- Serve immediately or store in an airtight container at room temperature.