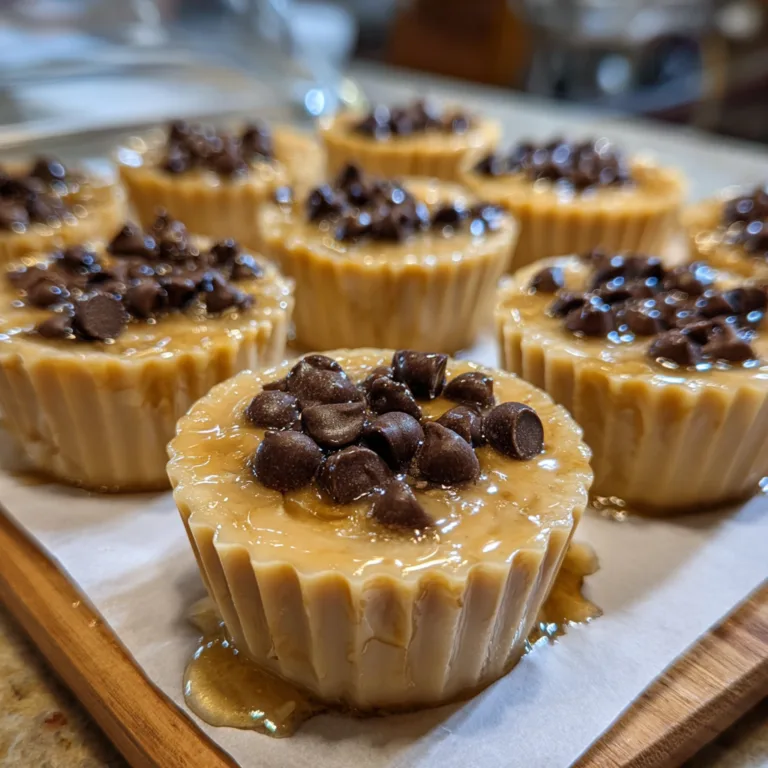
Homemade Take 5 Bars
The Ultimate Homemade Take 5 Candy Bars: A 5-Ingredient No-Bake Masterpiece
There is a specific kind of magic that happens when you combine sweet and salty flavors. It is a culinary phenomenon that tantalizes the taste buds, balances richness, and keeps you coming back for just one more bite. Among the pantheon of store-bought candy bars, the Take 5 stands as an absolute titan of this sweet-and-salty flavor profile. It brilliantly layers five distinct, beloved ingredients: crunchy pretzels, creamy peanut butter, salty roasted peanuts, chewy caramel, and smooth milk chocolate. It is a masterpiece of textural contrast and flavor balance. But what if we told you that you could recreate this iconic candy bar right in your own kitchen, using only five simple ingredients, and without ever turning on your oven?
Welcome to the ultimate guide for making Homemade Take 5 Candy Bars. This incredibly easy, completely no-bake recipe is about to revolutionize your dessert repertoire. Whether you are looking for a show-stopping homemade gift for the holidays, a fun weekend cooking project to do with the kids, or simply a deeply satisfying midnight snack to stash in your freezer, these copycat candy bars deliver on every single front. In this comprehensive article, we will delve into the science of why these flavors work so well together, break down the five essential components, provide foolproof step-by-step instructions, and share expert tips to ensure your candy-making experience is a resounding success.
The Unbeatable Magic of Sweet and Salty
Before we dive into the actual recipe, it is worth understanding exactly why the Take 5 candy bar is so universally adored. Human taste buds are wired to crave certain things, primarily sugar (for quick energy) and salt (for essential bodily functions). When you combine these two elements in a single bite, you create what food scientists call “flavor layering.”
Salt has a unique ability to act as a flavor enhancer. When added to sweet items, it doesn’t just make them taste salty; it actually amplifies the sweetness and brings forward the nuanced flavors of the other ingredients, like the roasted notes in the peanuts or the rich cocoa in the chocolate. Furthermore, the combination prevents palate fatigue. If a dessert is entirely sweet, you might only be able to eat a small amount before it becomes overwhelming. The salt in the pretzels and peanuts constantly resets your palate, making the next bite of chocolate and caramel taste just as vibrant and exciting as the first. This push-and-pull dynamic is exactly what makes these homemade candy bars dangerously addictive.
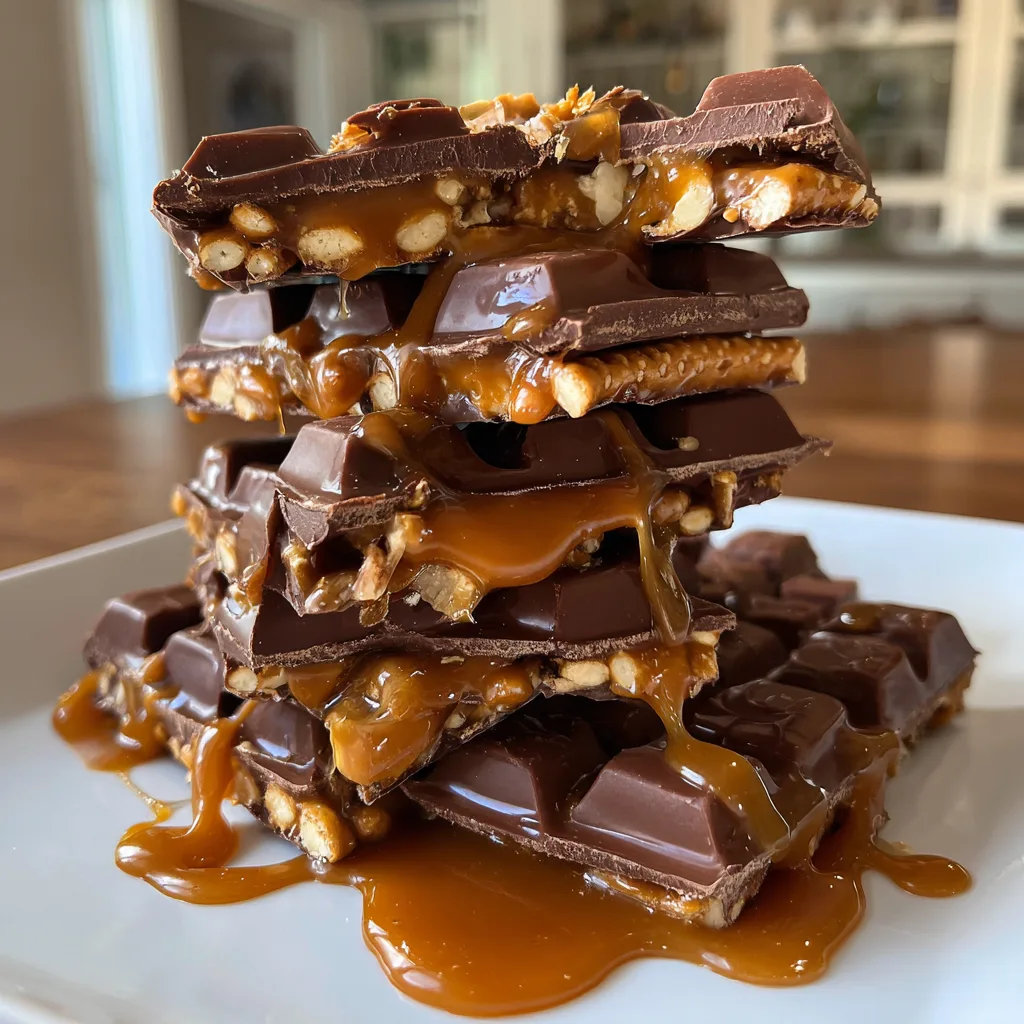
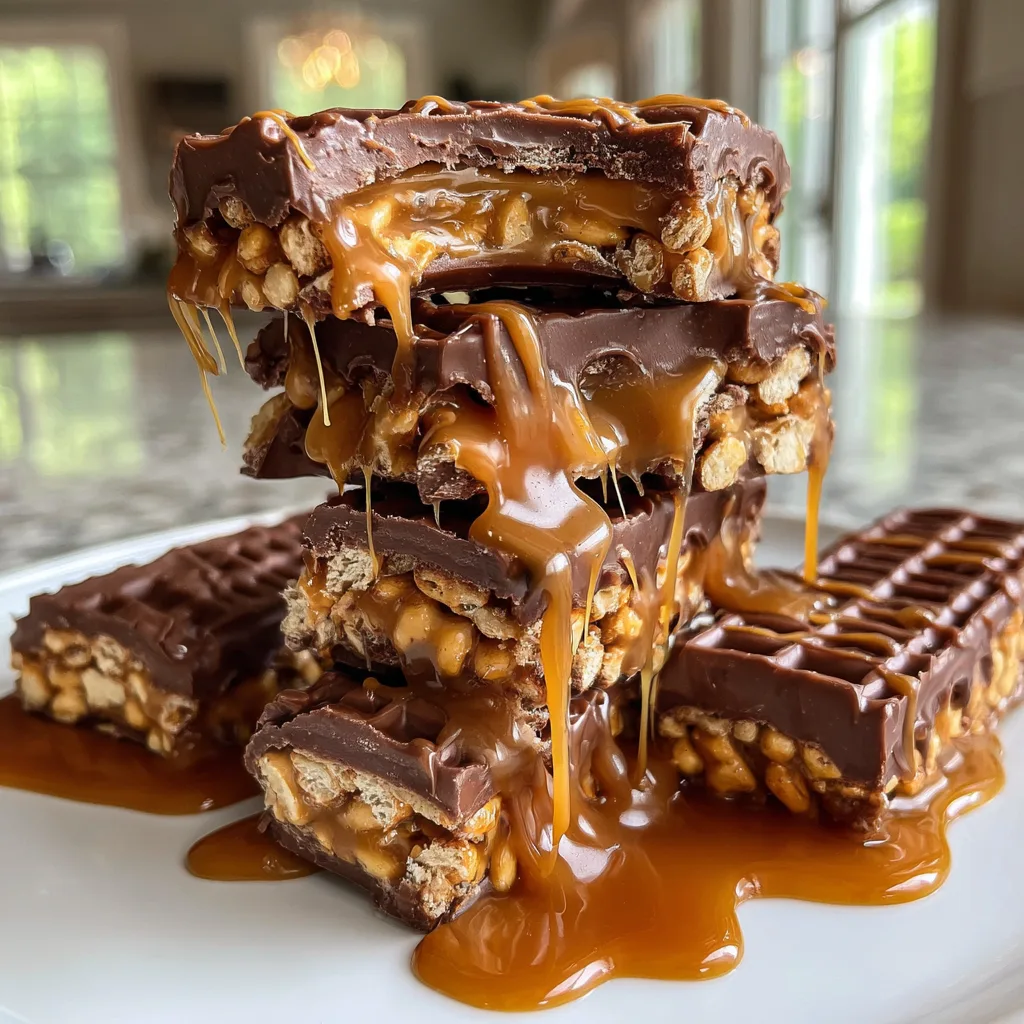
The Anatomy of the Perfect Bite: The 5 Magic Layers
The beauty of this recipe lies in its simplicity. As the name suggests, you only need five ingredients. However, because the ingredient list is so short, the quality of each component matters immensely. Let’s break down the layers.
1. The Pretzel Foundation: The base of our homemade candy bar is the pretzel. Specifically, you want to use the small, square “grid” pretzels (often sold under names like “Snaps”). These are structurally superior to standard twisted pretzels for this recipe because they lay perfectly flat, creating a solid, uniform foundation that holds the other layers beautifully without crumbling. They provide the essential salty crunch that kicks off the eating experience.
2. The Creamy Peanut Butter Layer: Next comes the peanut butter. You want to use a classic, commercial creamy peanut butter (like Jif or Skippy) rather than a natural, oil-separated variety. Natural peanut butters tend to be too runny and won’t set up properly, causing your candy bar layers to slide apart when you try to dip them in chocolate. The commercial varieties have stabilizers that help the peanut butter maintain its shape when chilled, acting as the perfect “glue” to hold the peanuts to the pretzel.
3. The Roasted Peanuts: While the peanut butter provides the creamy texture and flavor, whole roasted peanuts are necessary for crunch and an extra hit of salt. Opt for roasted, lightly salted peanuts. If you use unsalted peanuts, you will miss out on that crucial flavor balance. Roughly chopping them is optional, but leaving them whole or just slightly crushed provides a fantastic textural contrast to the smooth chocolate and soft caramel.
4. The Gooey Caramel: This is the layer that brings the chew and the deep, buttery sweetness. The easiest and most reliable method for home cooks is to use soft, individually wrapped caramel candies (like Kraft caramels). By unwrapping them and melting them down with just a tiny splash of milk or water, you create a thick, spreadable caramel layer that sets up beautifully in the fridge but remains delightfully stretchy and gooey when you bite into the finished candy bar.
5. The Chocolate Coating: The final element that brings it all together is the chocolate shell. Semi-sweet chocolate chips provide a wonderful, slightly bitter contrast to the intense sweetness of the caramel, while milk chocolate chips will give you a more authentic, classic candy bar flavor. The choice is yours. Adding a tiny bit of coconut oil or vegetable oil when melting the chocolate is a pro-tip that thins the chocolate out just enough to make dipping a breeze, while also ensuring the chocolate sets with a beautiful, glossy shine.
Why No-Bake Desserts Are a Home Cook’s Best Friend
Let’s take a moment to appreciate the sheer brilliance of no-bake desserts. During the hot summer months, the last thing anyone wants to do is turn on a 350-degree oven. But beyond temperature control, no-bake recipes are inherently less stressful. There is no worrying about cakes sinking in the middle, cookies spreading too thin, or burning the bottom of a pastry shell.
This Homemade Take 5 recipe relies entirely on assembly and temperature manipulation (chilling and freezing) rather than chemical leavening or baking times. This makes it a fantastic, low-pressure recipe for beginners or for those cooking with young children. The freezer does all the heavy lifting, firming up the layers so they can be easily sliced and coated in melted chocolate. It is a foolproof method that yields bakery-quality results with very little active effort.
Ingredients List
Gather your five essential ingredients before you begin. Having everything prepped (especially unwrapping those caramels!) will make the assembly process swift and incredibly fun.
- – 1 bag of square grid pretzels (like “Snaps”)
- – 1 cup creamy peanut butter (commercial brand, not natural/separated)
- – 1 cup roasted, salted peanuts
- – 1 bag (11 oz) soft caramel squares, unwrapped (plus 1-2 tablespoons of milk or water to help them melt smoothly)
- – 2 cups semi-sweet or milk chocolate chips
- – Optional but recommended: 1 tablespoon coconut oil or vegetable shortening (to thin the chocolate for easier dipping)
Step-by-Step Instructions
Follow these detailed steps to build your candy bars layer by perfect layer.
- Prepare Your Workspace: Line an 8×8-inch or 9×9-inch square baking dish with parchment paper, leaving enough overhang on the sides so you can easily lift the entire block of candy out later. Lightly spray the parchment paper with non-stick cooking spray.
- Lay the Foundation: Arrange the square pretzels in a single, tight, flat layer across the bottom of the prepared baking dish. You may need to break a few pretzels to fill in any gaps at the edges. You want a solid floor of pretzels.
- Add the Peanut Butter: If your creamy peanut butter is very stiff, place it in a microwave-safe bowl and microwave it for 15-20 seconds to soften it up slightly. This makes it easier to spread without shifting your carefully laid pretzels. Carefully dollop the peanut butter over the pretzels and use an offset spatula or the back of a spoon to spread it into an even layer.
- Press in the Peanuts: Evenly sprinkle the roasted, salted peanuts over the wet peanut butter layer. Use your hands to gently press the peanuts down into the peanut butter so they adhere and don’t fall off during the cutting process later.
- Melt the Caramel: Place the unwrapped soft caramels into a microwave-safe bowl. Add 1 to 2 tablespoons of milk or water. Microwave on HIGH in 30-second intervals, stirring vigorously after each interval, until the caramel is completely melted, smooth, and pourable. Be careful, as melted caramel is incredibly hot.
- Pour the Caramel Layer: Quickly pour the hot, melted caramel evenly over the peanut layer. Use your spatula to spread it gently to the edges, ensuring all the peanuts are covered.
- The First Chill: Place the entire baking dish into the freezer for at least 30 to 45 minutes, or until the caramel is completely firm to the touch. This step is crucial; if you try to cut the bars while the caramel is warm, it will be a sticky disaster.
- Cut into Bars: Once firm, use the parchment paper overhang to lift the giant candy slab out of the baking dish and onto a cutting board. Using a large, sharp chef’s knife, cut the slab into individual candy bars. You can cut them into long rectangles (like the original) or small bite-sized squares. After cutting, place the individual bars back into the freezer while you prepare the chocolate.
- Melt the Chocolate: In a clean microwave-safe bowl, combine the chocolate chips and the coconut oil (if using). Microwave in 30-second bursts, stirring very well after each burst, until the chocolate is smooth, glossy, and completely melted. Do not overheat, or the chocolate will seize and become clumpy.
- Dip and Coat: Remove a few candy bars from the freezer at a time. Using two forks, submerge a cold candy bar completely into the melted chocolate. Lift it out with the forks, tapping the forks gently on the edge of the bowl to let the excess chocolate drip off. Place the coated bar onto a baking sheet lined with fresh wax paper or parchment paper. Repeat until all bars are coated.
- The Final Set: Place the baking sheet of chocolate-coated bars into the refrigerator for about 15-20 minutes until the chocolate shell has completely hardened and set. Serve chilled or at room temperature!
Expert Tips for Candy Making Success
Even simple recipes can be elevated with a few professional techniques. Here is how to ensure your candy bars look and taste like they came straight from a gourmet chocolatier:
Mastering the Chocolate Dip: Dipping things in chocolate can sometimes be messy. Using the “two-fork method” is highly recommended. By resting the candy bar on the tines of a fork rather than a spoon, you allow the excess chocolate to drip back into the bowl easily. Tapping the fork against the bowl helps smooth out the chocolate on top of the bar. If your chocolate starts to get too thick while you are dipping, pop it back into the microwave for 10 seconds to loosen it up again.
The Double Boiler Alternative: If you are nervous about burning chocolate in the microwave, use a double boiler on the stove. Place a heatproof glass bowl over a pot of barely simmering water (make sure the water does not touch the bottom of the bowl). Add your chocolate chips and stir continuously until melted and smooth. This method provides gentle, even heat and reduces the risk of seizing.
Clean Cuts: Getting perfectly clean cuts through sticky caramel and crunchy pretzels can be tough. The secret is to use a very sharp, heavy chef’s knife. Run the blade of the knife under hot water, wipe it completely dry with a towel, and make your cut. Clean the blade and re-warm it between every single slice. The heat from the knife melts smoothly through the caramel rather than dragging it.
Creative Variations to Customize Your Bars
While the classic 5-ingredient combination is flawless, you can absolutely use this recipe as a base for your own culinary creations. Try these fun variations:
- The White Chocolate Macadamia: Swap the milk chocolate for white chocolate chips, use almond butter instead of peanut butter, and swap the peanuts for chopped macadamia nuts.
- The Dark Chocolate Sea Salt: Use 70% dark chocolate for the coating and sprinkle the tops of the freshly dipped bars with coarse flaky sea salt before the chocolate sets for an elegant, grown-up twist.
- The Crunchy Almond: Swap the peanuts for roasted, salted almonds and the peanut butter for crunchy almond butter.
Storage, Freezing, and Gifting Instructions
One of the best things about these Homemade Take 5 Candy Bars is their impressive shelf life, making them the ultimate make-ahead treat. Because they contain dairy (in the caramel and chocolate), they should ideally be stored in the refrigerator. Place them in an airtight container, separating layers with wax paper or parchment paper to prevent them from sticking to one another. They will keep perfectly in the fridge for up to three weeks.
If you want to keep them longer, they freeze exceptionally well. Wrap each individual candy bar tightly in plastic wrap, then place all the wrapped bars into a heavy-duty freezer bag. They will stay fresh in the freezer for up to three months. They are actually incredibly delicious eaten straight from the freezer on a hot day!
If you plan to give these as gifts during the holidays, let the chocolate set completely, then place each bar into an individual miniature cellophane treat bag and tie it off with a festive ribbon. Pack them in a decorative tin lined with tissue paper for a homemade gift that will leave your friends and family speechless.
Conclusion
Creating your own Homemade Take 5 Candy Bars is a remarkably rewarding experience. It demystifies the candy-making process and proves that you don’t need highly processed ingredients or complicated machinery to create a genuinely show-stopping dessert. By carefully layering the salty crunch of grid pretzels, the smooth richness of peanut butter, the hearty snap of roasted peanuts, the buttery chew of melted caramel, and the glossy finish of milk chocolate, you create a treat that is undeniably superior to its store-bought counterpart.
The next time you are craving that irresistible combination of sweet and salty, skip the checkout aisle at the grocery store and head to your own kitchen. With just five ingredients and a little bit of patience while the freezer does its job, you will be biting into the most indulgent, gooey, and satisfying homemade candy bar you have ever tasted. Happy no-baking!
Homemade Take 5 Candy Bars
Ingredients
Equipment
Method
- Line an 8×8-inch baking dish with parchment paper.
- Arrange a single, tight layer of square pretzels in the bottom of the dish.
- Spread the creamy peanut butter evenly over the pretzel layer.
- Sprinkle the roasted peanuts over the peanut butter, pressing them down gently so they stick.
- In a microwave-safe bowl, melt the unwrapped caramels (with a tiny splash of water or milk) in 30-second increments until smooth.
- Pour the melted caramel evenly over the peanut layer and spread to the edges.
- Freeze the dish for 30-45 minutes until the caramel is completely firm.
- Remove the candy slab using the parchment paper and cut it into individual bars with a sharp knife.
- Melt the chocolate chips in the microwave until smooth.
- Dip each cold candy bar into the melted chocolate to coat completely, tapping off excess, and place on wax paper to set.
- Refrigerate for 15-20 minutes until the chocolate shell is completely hardened before serving.