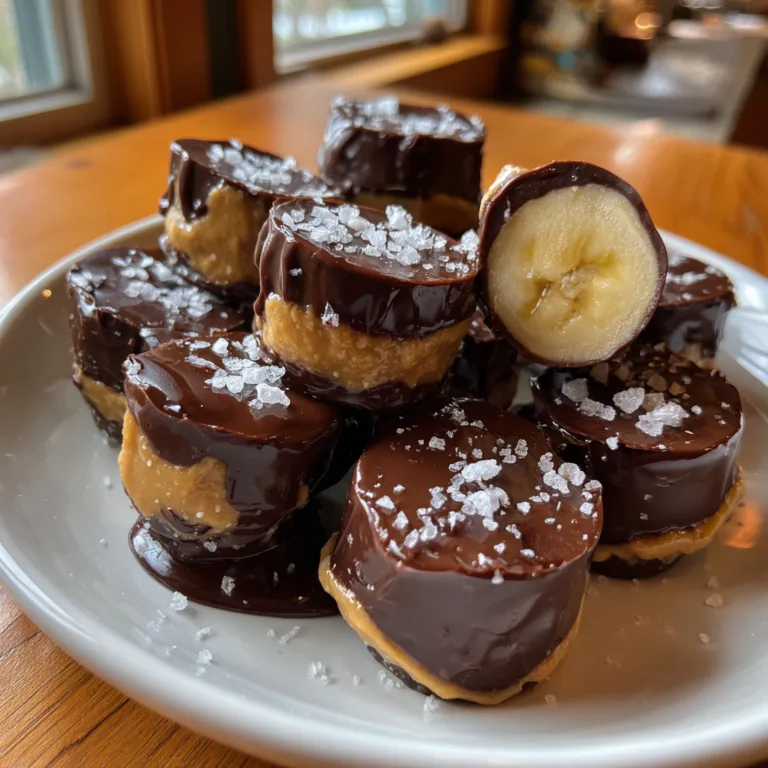
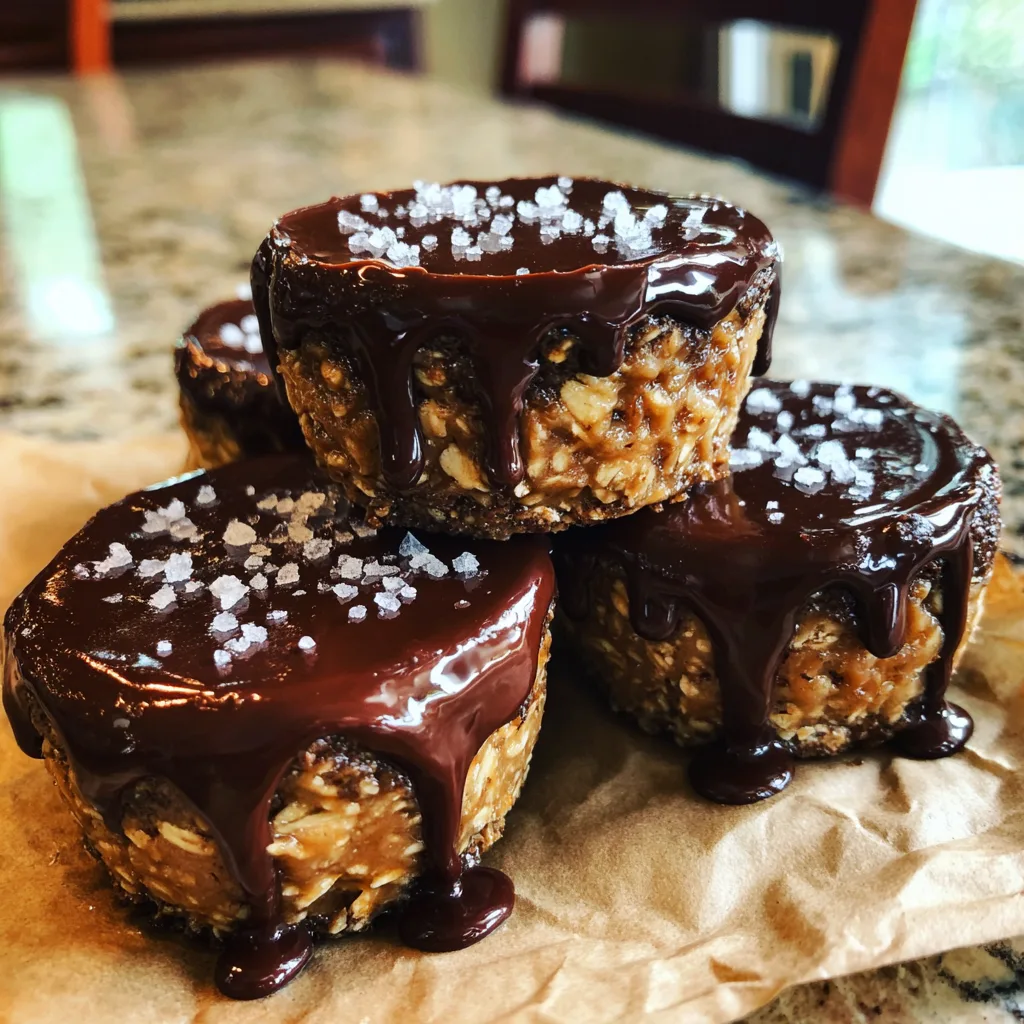
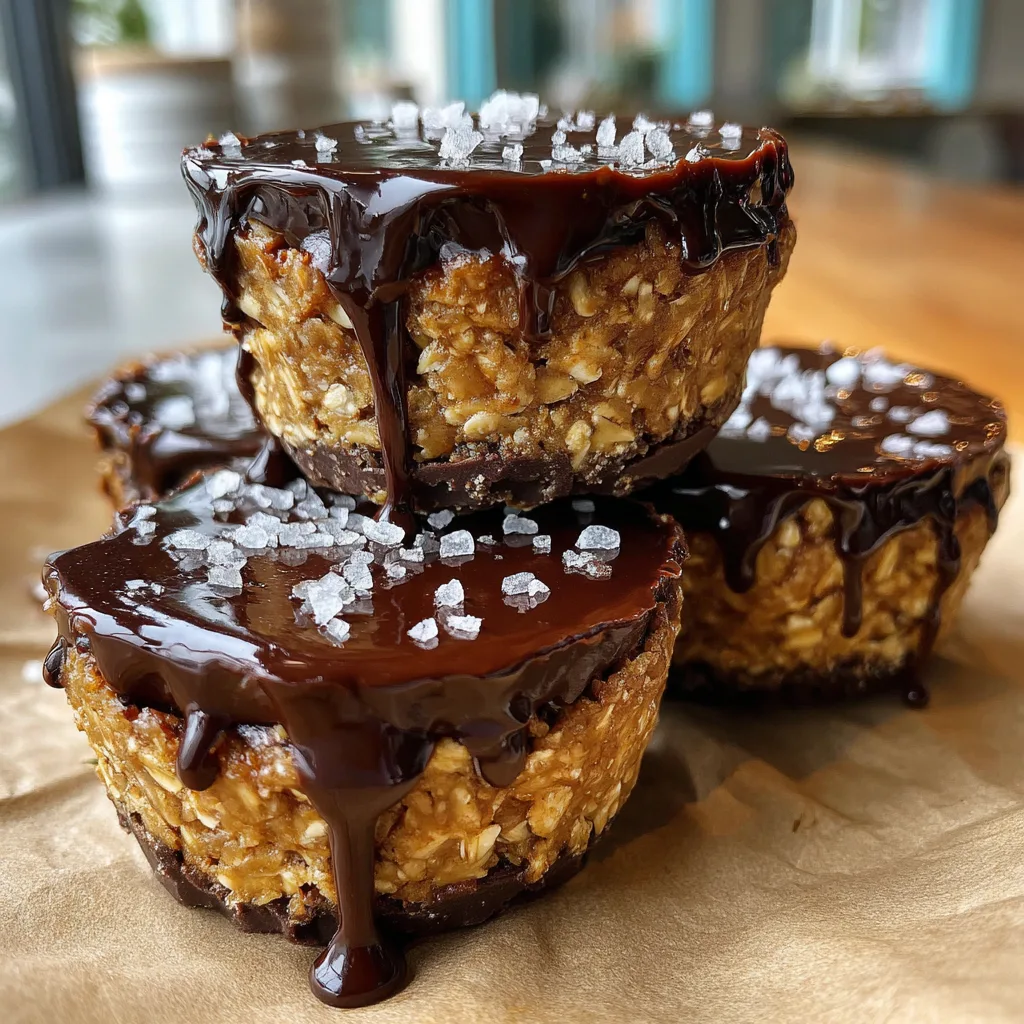
Peanut Butter Oat Cups
The Ultimate No Bake Peanut Butter Oat Cups
There is a unique and profound satisfaction that comes from creating a dessert that requires absolutely no time in the oven. When the craving for something sweet, rich, and deeply comforting strikes, turning on the oven and waiting for a bake cycle can feel like a monumental task. This is exactly where these incredible No Bake Peanut Butter Oat Cups come to the rescue. Perfectly balancing the nostalgic, universally adored flavor combination of creamy peanut butter and rich dark chocolate, these cups elevate the standard sweet treat by incorporating a hearty, satisfying base of rolled oats. The result is a dessert—or a decadent mid-day snack—that feels indulgent but is packed with wholesome, energy-sustaining ingredients.
What makes these oat cups truly spectacular is their incredible texture profile. The bottom layer is dense, chewy, and slightly sticky, binding earthy oats together with sweet maple syrup and roasted peanut butter. Sitting triumphantly on top of this hearty foundation is a thick, snappy layer of pure chocolate, which yields with a satisfying crack when you take your first bite. Finished with a mandatory sprinkle of coarse flaky sea salt, these cups hit every single flavor note: sweet, salty, nutty, and chocolatey. Whether you are meal-prepping snacks for a busy work week, looking for a healthier dessert alternative for your children, or simply needing a reliable, foolproof treat to keep in the freezer, these No Bake Peanut Butter Oat Cups are guaranteed to become a permanent fixture in your culinary repertoire.
The Unbeatable Appeal of No-Bake Desserts
The rise in popularity of no-bake desserts is not just a passing culinary trend; it is a practical response to the demands of modern life. Traditional baking is a science that requires precision, patience, and time. No-bake recipes, on the other hand, are incredibly forgiving and rely entirely on the natural binding properties of their ingredients and the magic of temperature manipulation (namely, chilling).
During the sweltering summer months, the last thing anyone wants to do is heat up their kitchen by turning the oven up to 350 degrees. No-bake treats offer a way to satisfy your sweet tooth while keeping your living space cool and comfortable. Furthermore, recipes like these oat cups are highly accessible for novice bakers or for cooking with children. There is no risk of burning a batch of cookies or dealing with a sunken cake. You simply measure, mix, press, and chill. It is instant gratification delayed only by the time it takes for the chocolate to set in the refrigerator.
A Match Made in Heaven: Peanut Butter and Chocolate
To understand why these oat cups are so irresistible, we must acknowledge the undisputed king of flavor pairings: peanut butter and chocolate. This combination works on a fundamental, physiological level. Chocolate contains cocoa butter, which melts at just below human body temperature, coating the mouth in a luxurious richness. It also provides deep, slightly bitter, complex notes, especially when using a high-quality dark chocolate.
Peanut butter brings roasted, savory, and inherently salty characteristics to the table. When you combine the two, the savory notes of the peanut butter cut through the intensity of the chocolate, preventing the treat from becoming overwhelmingly sweet. This phenomenon is known as sensory specific satiety—essentially, having contrasting flavors in a single bite prevents your palate from getting bored, which is exactly why it is so difficult to eat just one of these cups. The addition of rolled oats acts as a neutral, textural canvas that absorbs and highlights this iconic pairing perfectly.
Essential Ingredients for Perfect Oat Cups
Because this recipe utilizes a relatively short ingredient list and requires no cooking, the quality of the ingredients you choose will directly impact the final flavor. Here is a breakdown of what you need to construct the perfect oat cup.
The Chewy Oat Base
- – Rolled Oats (Old Fashioned Oats): It is crucial to use rolled oats rather than quick oats or steel-cut oats. Rolled oats provide the perfect, hearty, chewy texture. Quick oats can turn the base into a mushy paste, while steel-cut oats will remain far too hard and gritty to eat without cooking. If you are strictly gluten-free, ensure your oats are certified gluten-free, as cross-contamination is common in oat processing facilities.
- – Creamy Peanut Butter: The binder for your base. A standard, conventional creamy peanut butter (like Jif or Skippy) works incredibly well here because it is emulsified and prevents the oil from separating. If you choose to use natural peanut butter, you must make sure it is stirred vigorously until completely smooth and cohesive; otherwise, your base may crumble.
- – Pure Maple Syrup: This acts as the sweetener and the secondary binder. The thick, viscous nature of maple syrup works with the peanut butter to glue the oats together. It also provides a lovely, warm caramel undertone that refined sugar simply cannot replicate. Honey or agave nectar can be used as direct substitutes.
- – Vanilla Extract: Just a splash enhances the nutty and sweet flavors of the base.
- – A Pinch of Salt: Never skip salt in a no-bake dessert! It balances the sweetness of the syrup.
The Snappy Chocolate Topping
- – Dark Chocolate Chips: Using dark chocolate (around 60-70% cacao) provides a sophisticated bitterness that perfectly balances the sweet oat base. However, if you prefer a sweeter, more nostalgic profile, semi-sweet or even milk chocolate chips work wonderfully.
- – Coconut Oil: Adding a small amount of coconut oil to the chocolate before melting it is a professional trick. It thins the chocolate slightly, making it easier to pour and spread into a smooth, even layer. It also softens the set chocolate just enough so that when you bite into the cup, the chocolate layer doesn’t shatter completely and squeeze all the oat filling out the sides.
- – Flaky Sea Salt: This is the crowning glory. A sprinkle of large, pyramid-shaped salt crystals (like Maldon) on top of the wet chocolate before it sets adds visual elegance and an incredible crunch.
Step-by-Step Instructions for Flawless Execution
Creating these treats is incredibly straightforward. Follow these steps for perfect layers and a mess-free experience.
- Prepare Your Pan: Line a standard 12-cup muffin tin with paper or silicone muffin liners. Silicone liners are highly recommended for no-bake treats because they peel away flawlessly from the sticky base, leaving perfectly smooth edges.
- Mix the Liquid Base Ingredients: In a large mixing bowl, combine the creamy peanut butter, pure maple syrup, vanilla extract, and the pinch of salt. Use a sturdy spatula or a wooden spoon to stir them together until they form a smooth, uniform paste. If your peanut butter is very cold and stiff, you can microwave this mixture for 15-20 seconds to loosen it up.
- Incorporate the Oats: Pour the rolled oats into the peanut butter mixture. Fold everything together firmly. You need to ensure that every single oat is coated in the peanut butter and syrup mixture. If there are dry patches of oats, your cups will fall apart when you try to eat them.
- Press the Base: Divide the oat mixture evenly among the 12 muffin cups. This usually equates to about 1.5 to 2 tablespoons of the mixture per cup. Use the back of a spoon, or slightly damp fingers, to press the mixture down firmly and evenly into the bottom of the liners. Creating a flat, tightly packed surface is key to a structurally sound cup.
- Melt the Chocolate: In a microwave-safe bowl, combine the dark chocolate chips and the coconut oil. Microwave in 30-second increments, stirring thoroughly after each interval. Do not rush this process or you will scorch the chocolate. Once the chocolate is about 90% melted, remove it from the microwave and let the residual heat melt the remaining lumps as you stir until perfectly smooth and glossy.
- Add the Top Layer: Spoon the melted chocolate evenly over the packed oat bases, using about 1 tablespoon of chocolate per cup. Gently tap the entire muffin tin on the counter a few times; this forces the chocolate to settle into a perfectly flat, mirror-like layer and removes any trapped air bubbles.
- Garnish: Immediately sprinkle a pinch of flaky sea salt over the wet chocolate. You must do this before the chocolate begins to set, otherwise, the salt will simply bounce off.
- Chill to Set: Place the muffin tin in the refrigerator for at least 1 hour, or in the freezer for 30 minutes, until the chocolate is completely firm and solid to the touch.
- Serve: Once set, remove the cups from the tin, peel off the liners, and enjoy!
Customizing Your Oat Cups: Endless Possibilities
One of the greatest joys of this recipe is its versatility. Think of the peanut butter oat base as a blank canvas waiting for your creative touch. Here are several fantastic ways to customize your batch.
Nut Allergies and Substitutions: If you are catering to a peanut allergy, this recipe adapts flawlessly. You can substitute the peanut butter with an equal amount of almond butter, cashew butter, or pecan butter. For a completely nut-free environment, sunflower seed butter (SunButter) or soy nut butter works perfectly. Just note that sunflower seed butter has a very distinct, earthy flavor that pairs beautifully with dark chocolate.
Texture Add-Ins: If you want to increase the crunch factor in your oat base, consider folding in 1/4 cup of mix-ins along with the oats. Mini chocolate chips, crushed peanuts, toasted coconut flakes, chia seeds, hemp hearts, or even crispy rice cereal are incredible additions that add textural intrigue to every bite.
The “Stuffed” Cup: If you want to take these cups to an elite level of decadence, try hiding a surprise in the middle. Press only half of the oat mixture into the bottom of the cups. Add a small dollop (about half a teaspoon) of fruit jam or a whole roasted hazelnut in the center, then cover it with the remaining oat mixture before topping with chocolate. You just created a PB&J oat cup!
The Importance of Pressing the Base Firmly
If there is one technical area where people struggle with no-bake oat treats, it is structural integrity. If you have ever bitten into a no-bake cookie and had it immediately crumble into your lap, it is likely because the base was not compressed adequately.
Because there is no egg or flour to act as a heat-activated structural binder, you are relying entirely on the stickiness of the syrup and the physical pressure you apply. When packing the oat mixture into the muffin liners, do not be gentle. Use the back of a spoon, or even the bottom of a shot glass, to tamp the mixture down as hard as you can. It should feel like a dense, solid puck before you pour the chocolate over it.
Storage and Freezing Guidelines
These No Bake Peanut Butter Oat Cups are an exceptional make-ahead treat because their texture actually improves and stabilizes as they sit in the cold.
Refrigerator Storage: Store the fully set cups in an airtight container in the refrigerator. They will easily keep for up to two weeks. The oats will soften very slightly over time as they absorb the oils from the peanut butter, but they will remain absolutely delicious. It is highly recommended to serve these straight from the fridge; if they sit at room temperature for too long, the chocolate will begin to soften and the base can become slightly too sticky to hold cleanly.
Freezer Storage: This recipe is a dream for freezer meal-preppers. Place the fully set cups in a single layer in a freezer-safe ziplock bag or airtight container. They will last for up to 3 months. When you are ready to enjoy one, you can eat it straight out of the freezer (the chocolate will have a serious snap!) or let it sit on the counter for 5-10 minutes to soften slightly.
Health Benefits: Indulgence with Nutritional Value
While undoubtedly a dessert, the nutritional profile of these oat cups is vastly superior to a standard candy bar or baked good. By utilizing whole ingredients, you are fueling your body while satisfying your cravings.
Rolled oats are a nutritional powerhouse. They are an incredible source of complex carbohydrates and soluble fiber, specifically beta-glucan, which is known for its ability to help lower cholesterol and regulate blood sugar levels. This means you won’t experience the drastic sugar crash often associated with traditional desserts. Peanut butter provides a robust dose of plant-based protein and heart-healthy monounsaturated fats, which keep you feeling full and satiated. Finally, dark chocolate is rich in antioxidants, particularly flavonoids, which have been linked to improved brain function and heart health.
Frequently Asked Questions
Can I use a different liquid sweetener? Yes. While maple syrup is preferred for its flavor and viscosity, you can absolutely use honey. Note that honey is slightly thicker and sweeter than maple syrup, so your base may be a bit firmer and sweeter. Agave nectar also works, though it lacks the depth of flavor of honey or maple.
Why is my chocolate topping cracking when I bite into it? If your chocolate layer shatters into sharp shards that push the soft oat filling out, your chocolate layer is too hard. This happens when you forget to add the coconut oil (or peanut butter) to the chocolate chips when melting. The added fat softens the chocolate’s structure, allowing it to yield smoothly when bitten.
Do I absolutely need to use paper or silicone liners? It is highly, highly recommended. If you press the sticky oat mixture directly into a bare metal muffin tin, even if greased, it will be exceptionally difficult to pry the cups out without destroying them. If you don’t have liners, you can line an 8×8 inch square baking pan with parchment paper, press the entire mixture in, top with chocolate, and cut them into squares (bars) after they set.
Conclusion
Mastering these No Bake Peanut Butter Oat Cups is about to change your snack game forever. They are the epitome of high-reward, low-effort culinary creation. With their irresistible layers of chewy, nutty oats and smooth, salty chocolate, they satisfy on every conceivable level. So skip the oven, grab a mixing bowl, and in less than twenty minutes of active prep time, you can have a batch of these glorious, wholesome treats chilling in your fridge, ready to save the day whenever a craving strikes.
No Bake Peanut Butter Oat Cups
Ingredients
Equipment
Method
- Line a 12-cup muffin tin with paper or silicone liners.
- In a large mixing bowl, stir together the creamy peanut butter, maple syrup, vanilla extract, and a pinch of salt until smooth.
- Add the rolled oats to the wet mixture and fold until every oat is evenly coated.
- Divide the oat mixture evenly among the 12 muffin cups. Use the back of a spoon to press the mixture down very firmly into a flat, solid layer.
- In a microwave-safe bowl, combine the chocolate chips and coconut oil. Microwave in 30-second increments, stirring in between, until completely melted and smooth.
- Spoon the melted chocolate evenly over the packed oat bases. Gently tap the pan on the counter to flatten the chocolate layer.
- Immediately sprinkle flaky sea salt over the wet chocolate tops.
- Place the muffin tin in the refrigerator for at least 1 hour, or until the chocolate is completely set and firm. Remove from liners and serve cold.