Rice Cooker Mango Sticky Rice
The Ultimate Rice Cooker Mango Sticky Rice Recipe
Introduction: A Taste of Thailand in Your Kitchen
If you have ever wandered the vibrant, bustling streets of Bangkok or enjoyed a meal at your favorite local Thai restaurant, chances are you have encountered the absolute marvel that is Mango Sticky Rice (Khao Niao Mamuang). It is arguably one of the world’s most perfect desserts. The brilliance of this dish lies in its masterful balance of contrasting elements: warm, chewy, subtly salty-sweet coconut rice paired with cool, refreshing, brightly acidic, and floral slices of ripe mango. Add a drizzle of rich, thickened coconut cream and a sprinkle of toasted sesame seeds or crispy mung beans, and you have a symphony of flavors and textures that is truly unforgettable.
Traditionally, preparing authentic Thai sticky rice involves a somewhat lengthy and specialized process. It requires soaking the raw glutinous rice overnight and then steaming it slowly in a special bamboo basket set over a pot of boiling water. While this traditional method is a beautiful culinary art form and yields fantastic results, it can be intimidating and time-consuming for the everyday home cook who just wants a quick dessert on a Tuesday night.
This is where modern technology meets traditional flavor. Enter the Rice Cooker Mango Sticky Rice method. By utilizing a standard countertop rice cooker, we completely demystify the process, eliminating the need for specialized bamboo steamers and drastically cutting down the preparation time. The result is perfectly tender, chewy, and deeply flavorful sticky rice that rivals anything you would find at a street food stall, all achieved with the push of a single button. Prepare to impress your family, your guests, and yourself with this incredibly easy, foolproof approach to a beloved Southeast Asian classic.
Understanding Glutinous Rice: The Star of the Show
Before you begin, it is absolutely critical to understand that you cannot make this recipe with standard long-grain white rice, jasmine rice, basmati, or even standard short-grain sushi rice. Mango sticky rice specifically requires “glutinous rice,” also commonly labeled as “sweet rice” or “sticky rice.”
Despite the name, glutinous rice does not contain any gluten. The term “glutinous” simply refers to its glue-like, sticky texture when cooked. This unique texture is due to its starch composition. Rice starches are made up of two main components: amylose and amylopectin. Standard rice varieties contain a fair amount of amylose, which causes the grains to cook up separate and fluffy. Glutinous rice, however, contains virtually no amylose and an exceptionally high amount of amylopectin. When heated with water, this amylopectin breaks down and becomes incredibly sticky, binding the individual grains together into a delightful, chewy mass.
When shopping for this crucial ingredient, look for bags labeled “Thai Sweet Rice,” “Glutinous Rice,” or “Sticky Rice” at your local Asian grocery store or in the international aisle of a well-stocked supermarket. The raw grains are distinctively opaque and chalky white, unlike the translucent appearance of standard raw jasmine rice. Using the correct rice is the single most important factor in the success of this dessert.
The Role of the Rice Cooker: Simplifying the Process
So, how does a standard rice cooker replace the traditional bamboo steamer? The magic lies in the water-to-rice ratio. When steaming traditionally, the rice absorbs moisture from the steam over a long period. In a rice cooker, the rice sits directly in the water. Because glutinous rice requires much less water to cook than standard rice (otherwise it turns to a mushy porridge), we must adjust the liquid levels carefully.
For this rice cooker method, we use a much tighter ratio of water to rice. Furthermore, while traditional steaming requires soaking the rice for 4 to 24 hours to ensure the grains soften evenly, the rice cooker method allows us to get away with a much shorter soak—sometimes as little as 30 to 45 minutes, just enough to plump the grains slightly before the machine does the heavy lifting. This drastically reduces your waiting time. The rice cooker maintains a steady, even heat, perfectly hydrating the grains and producing a slightly firmer chew that holds up beautifully when the sweet coconut sauce is folded in.
The Holy Trinity: Rice, Coconut, and Mango
To master this dessert, one must understand how the three main components interact to create harmony.
1. The Sweet Coconut Rice: Once the sticky rice is cooked, it is not served plain. While it is still piping hot, a rich, sweet, and slightly salty coconut syrup is gently folded into the grains. The hot rice absorbs this syrup like a sponge, transforming from plain starch into a fragrant, sweet, creamy delight. The salt in this syrup is crucial; it prevents the dessert from becoming cloyingly sweet and enhances the floral notes of the coconut.
2. The Salted Coconut Topping: In addition to the syrup mixed into the rice, authentic mango sticky rice is always served with an extra coconut sauce drizzled on top just before eating. This topping sauce is thicker, richer, and decidedly saltier than the syrup in the rice. It is thickened slightly with cornstarch or rice flour. When you take a bite, the salty hit from this topping perfectly balances the intense sweetness of the ripe mango.
3. The Ripe Mango: The mango is the crown jewel. In Thailand, the Nam Dok Mai or Ok Rong varieties are highly prized for their incredibly smooth, fiberless flesh and honey-like sweetness. In North America and Europe, the best readily available substitutes are Ataulfo mangoes (often sold as Champagne or Honey mangoes). These small, kidney-shaped mangoes turn a deep golden yellow and develop a slightly wrinkled skin when perfectly ripe. Avoid large Tommy Atkins mangoes if possible, as they tend to be stringy and lack the necessary depth of flavor and smooth texture for this delicate dessert.
Ingredients You Will Need
Gather the following ingredients to create your rice cooker masterpiece. Quality matters here, especially when it comes to the coconut milk and the fruit.
- – 1 cup Glutinous rice (Sweet rice/Sticky rice)
- – 1 cup Water (for cooking the rice)
- – 1 can (13.5 oz / 400ml) Full-fat coconut milk (Do not use “lite” or carton coconut milk; you need the rich creaminess of canned full-fat)
- – 1/2 cup Granulated white sugar (for the rice syrup)
- – 2 tablespoons Granulated white sugar (for the topping sauce)
- – 3/4 teaspoon Kosher salt (divided use)
- – 1 teaspoon Cornstarch
- – 1 tablespoon Water (to mix with the cornstarch)
- – 2-3 Large, deeply ripe Ataulfo/Champagne mangoes
- – 1 tablespoon Toasted sesame seeds (or traditional crispy split mung beans) for garnish
Step-by-Step Instructions
Follow these numbered steps carefully to achieve flawless, restaurant-quality mango sticky rice using your trusty countertop appliance.
- Wash and Soak the Rice: Place the glutinous rice in a fine-mesh strainer or a bowl. Wash the rice under cold running water, swishing it gently with your hands. The water will be very milky at first. Continue washing and draining until the water runs mostly clear (about 3-4 washes). Place the washed rice in your rice cooker pot, add the 1 cup of water, and let it sit and soak for 30 to 45 minutes.
- Cook the Rice: After the soaking period, do not drain the water. Simply place the pot into your rice cooker, close the lid, and press the standard “White Rice” or “Cook” setting. Let the machine do its job. When it clicks to “Warm,” let the rice sit undisturbed with the lid closed for another 10 minutes to allow the steam to finish the cooking process.
- Prepare the Sweet Coconut Syrup: While the rice is cooking, prepare the liquid that will flavor it. In a small saucepan over medium heat, combine 3/4 cup of the full-fat coconut milk (reserve the rest of the can for the topping), the 1/2 cup of granulated sugar, and 1/2 teaspoon of salt. Heat the mixture gently, stirring constantly, just until the sugar and salt are completely dissolved. Do not let it boil rapidly. Once dissolved, remove from heat.
- Mix the Rice and Syrup: As soon as the rice has finished its 10-minute resting period, transfer the hot sticky rice into a medium mixing bowl. Immediately pour the warm sweet coconut syrup over the hot rice. Use a silicone spatula to gently fold the liquid into the rice. At first, it will look like a soupy mess—do not panic! Cover the bowl with a clean kitchen towel or plastic wrap and let it sit at room temperature for 20 to 30 minutes. The hot rice will absorb all the liquid, becoming plump, shiny, and perfectly sweet.
- Prepare the Topping Sauce: In the same small saucepan (no need to wash it), add the remaining coconut milk from the can, the remaining 2 tablespoons of sugar, and the remaining 1/4 teaspoon of salt. Place over medium-low heat. In a tiny bowl, mix the 1 teaspoon of cornstarch with 1 tablespoon of water to create a slurry. Pour this slurry into the warming coconut milk. Whisk continuously until the sauce begins to bubble gently and thickens to the consistency of heavy cream. Remove from heat and transfer to a small pitcher or pouring bowl.
- Prepare the Mangoes: Peel the ripe mangoes using a sharp knife or a vegetable peeler. Slice the cheeks off the flat pit in the center. Cut the mango cheeks horizontally into neat, even slices, keeping them slightly fanned out for a beautiful presentation.
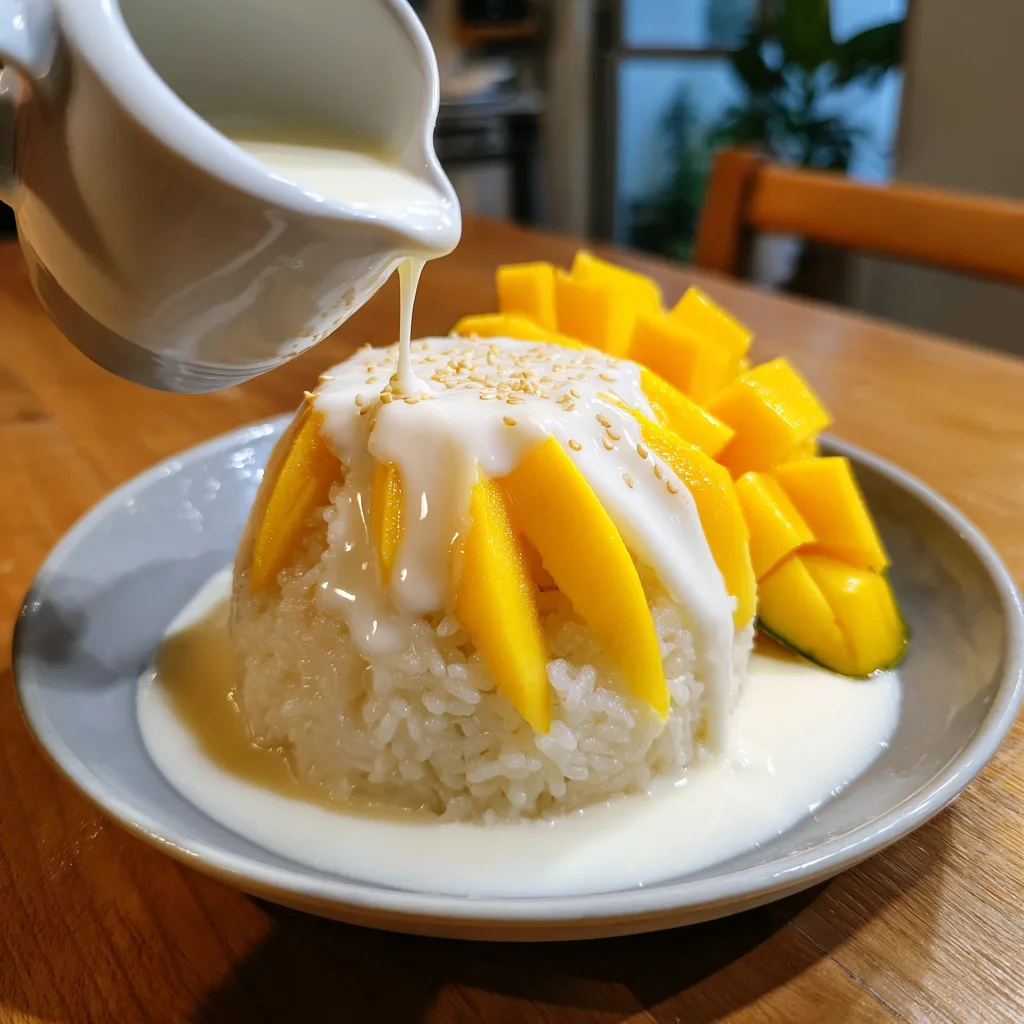
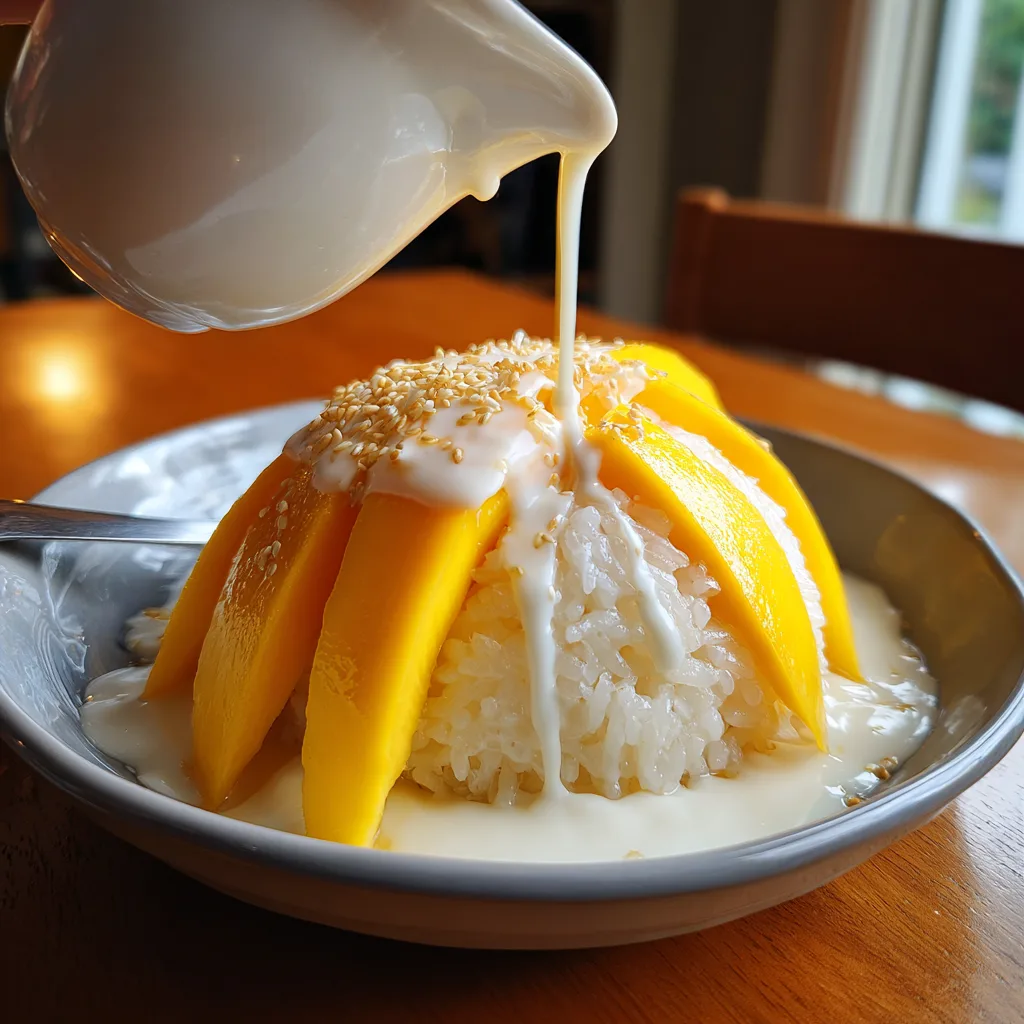
- Assemble and Serve: Scoop a generous mound of the sweetened, rested sticky rice onto a serving plate or shallow bowl (you can use a small bowl coated lightly with oil as a mold for a perfect dome shape). Place the fanned slices of fresh mango next to the rice. Drizzle the warm, thick, salted coconut topping sauce generously over the rice and the fruit. Finally, sprinkle the toasted sesame seeds over the top for a nutty crunch. Serve immediately.
Pro Tips for the Best Results
To elevate your dessert from good to spectacular, keep these chef secrets in mind:
The Temperature is Key: Mango sticky rice is best enjoyed when there is a contrast in temperatures. The sticky rice should be served warm or at room temperature, never cold. The coconut topping sauce should also be slightly warm. The mango, however, should be slightly chilled or at room temperature. This interplay of warm, rich rice and cool, refreshing fruit is part of the magic.
Do Not Refrigerate the Rice: Glutinous rice undergoes a process called retrogradation when exposed to cold temperatures. If you put leftover sticky rice in the refrigerator, the starches crystallize, turning the rice incredibly hard, dry, and crunchy. It will lose all its wonderful chewiness. If you must store it, keep it in an airtight container at room temperature for up to one day. If you absolutely have to refrigerate it, you will need to reheat it thoroughly in the microwave covered with a damp paper towel to re-steam the grains and bring back the soft texture.
A Touch of Pandan: If you want an incredibly authentic flavor, try to find fresh or frozen pandan leaves at your local Asian market. Tying one or two pandan leaves into a knot and adding it to the rice cooker while the rice cooks, or infusing it into the coconut syrup as it warms, imparts a stunning, vanilla-like, grassy aroma that is the hallmark of traditional Thai sweets.
Fun Variations to Try
Once you have mastered the basic recipe, you can easily play with colors and flavors to create stunning visual presentations.
Black Sticky Rice: You can substitute half of the white glutinous rice with black glutinous rice (which is naturally a deep, dark purple). Black sticky rice has a nuttier flavor and a slightly firmer chew. Note that black sticky rice often requires a longer soaking time, so soak the mixed rice for at least 2 hours before cooking in the rice cooker.
Butterfly Pea Flower: To create a visually striking, bright blue sticky rice, steep dried butterfly pea flowers in the 1 cup of water you use to cook the rice. Remove the flowers before starting the rice cooker. The rice will absorb the natural, vibrant blue dye without altering the flavor of the dish.
Conclusion
Making authentic Mango Sticky Rice at home no longer requires special equipment or hours of hovering over a bamboo steamer. By harnessing the convenience of your everyday rice cooker, you can bring the vibrant, sweet, and comforting flavors of a Thai street market straight to your dining table in record time. The combination of chewy, coconut-infused rice, perfectly ripe, juicy mangoes, and that glorious, salty-sweet cream sauce is an indulgence that is surprisingly simple to achieve. So grab a couple of fresh mangoes, dust off your rice cooker, and treat yourself to one of the most beloved and delicious desserts the culinary world has to offer.
Rice Cooker Mango Sticky Rice
Ingredients
Equipment
Method
- Wash the glutinous rice until the water runs clear. Place in the rice cooker pot with 1 cup of water and let soak for 30-45 minutes.
- Start the rice cooker on the standard ‘white rice’ setting. Once finished, let the rice rest on warm for 10 minutes without opening the lid.
- While the rice cooks, gently heat 3/4 cup coconut milk, 1/2 cup sugar, and 1/2 tsp salt in a small saucepan until dissolved. Do not boil.
- Transfer the hot, cooked rice to a bowl. Pour the warm syrup over the rice and fold gently. Cover and let sit for 20-30 minutes to absorb the liquid.
- In the same saucepan, add the remaining coconut milk, 2 tbsp sugar, and 1/4 tsp salt. Whisk in the cornstarch slurry. Heat gently until thickened into a sauce.
- Peel and slice the fresh mangoes.
- Serve a mound of the warm sticky rice with the sliced mango. Drizzle generously with the thick coconut topping sauce and garnish with toasted sesame seeds.