Andes Mint Chocolate Cake
The Ultimate Andes Mints Chocolate Mint Cake Recipe
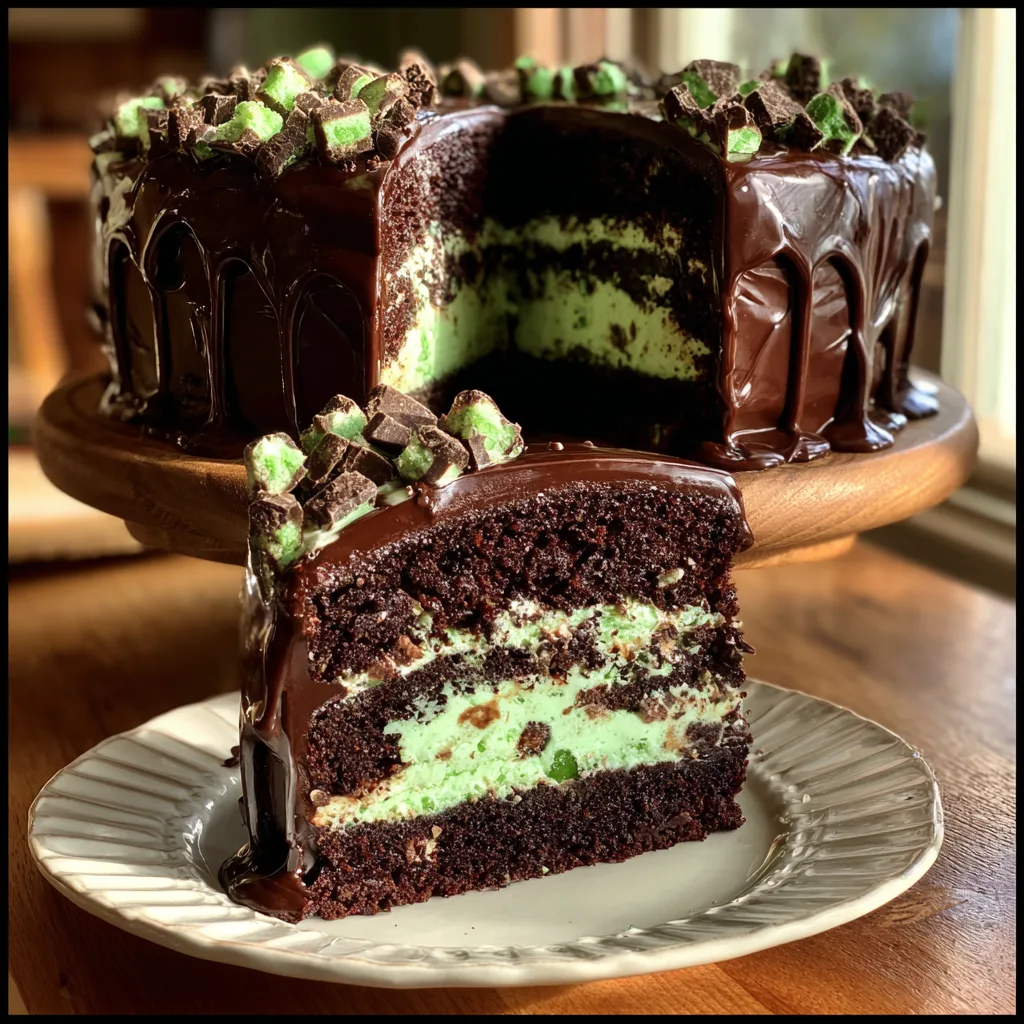
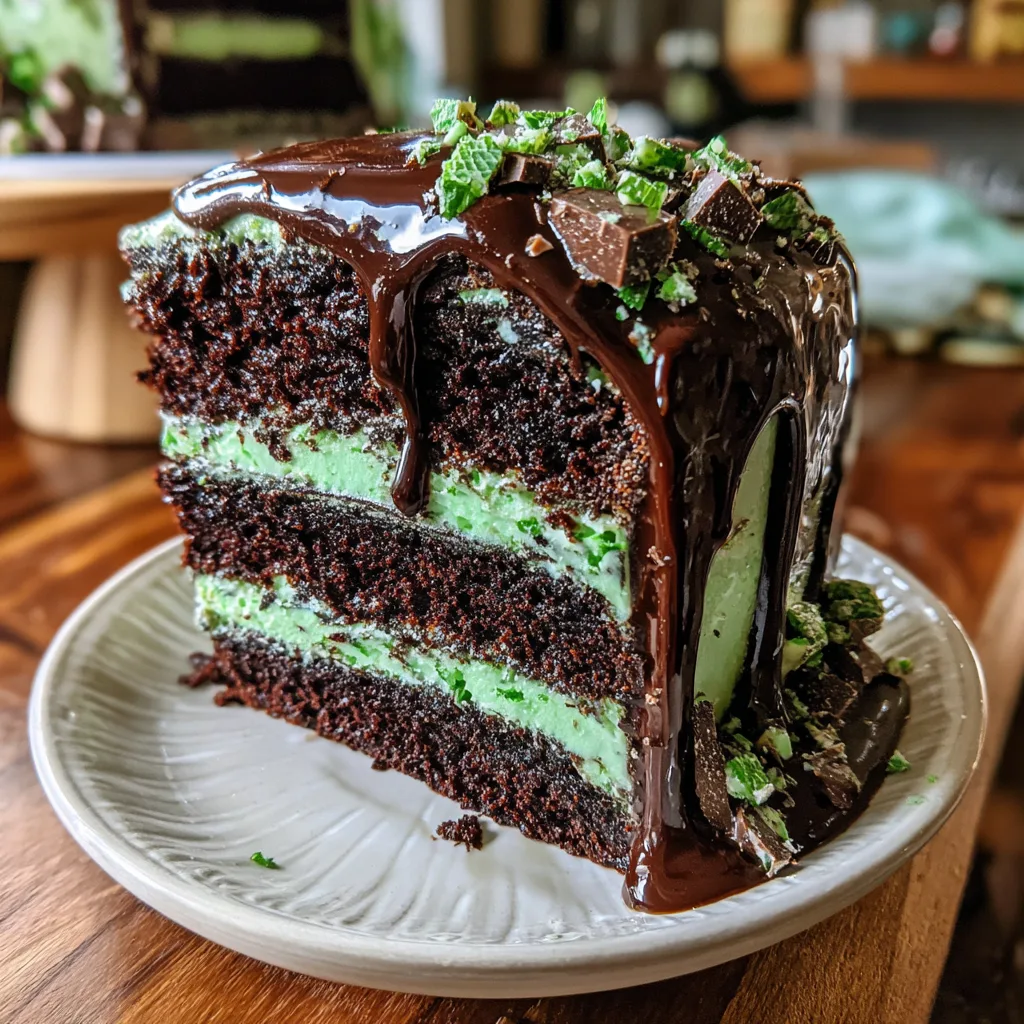
There are few flavor combinations in the culinary world as universally beloved and refreshing as chocolate and mint. The deep, rich, slightly bitter notes of cocoa perfectly complement the cool, bright, and invigorating essence of peppermint. This Ultimate Andes Mints Chocolate Mint Cake captures that magic in every single bite. Featuring three towering layers of incredibly moist, fudgy chocolate cake enveloped in a silky, melt-in-your-mouth green mint buttercream frosting, this dessert is a true showstopper. Whether you are baking for a holiday gathering, a special birthday, or simply because you have an intense craving for something sweet and refreshing, this cake delivers on all fronts.
What makes this specific recipe stand out from the crowd is the careful balance of textures and flavors. We don’t just rely on mint extract; we fold actual chopped Andes mints directly into the buttercream and use them as a gorgeous, textured garnish on the outside of the cake. This ensures that every forkful provides that signature creamy, chocolatey-mint snap that Andes candies are famous for. Prepare to impress your family, your friends, and your own tastebuds with a dessert that looks like it came from a high-end bakery but is entirely achievable in your own home kitchen.
The Fascinating History of Mint and Chocolate
Before we dive into the mixing bowls, it is worth appreciating the cultural context of this iconic flavor pairing. The marriage of chocolate and mint dates back surprisingly far. Mesoamerican cultures, who were the original consumers of cacao, often mixed their bitter chocolate beverages with various spices, chilies, and indigenous herbs. When chocolate made its way to Europe in the 16th century, it was initially consumed as a hot beverage, and Europeans began adding sugar, cinnamon, and eventually, mint to make the drink more palatable and refreshing.
Fast forward to the mid-20th century, and the pairing truly exploded in popularity in the United States. The introduction of mint chocolate chip ice cream in the 1970s cemented the duo as a summertime staple, while candies like peppermint patties and Andes Chocolate Mints turned it into a year-round obsession. Andes Mints, with their distinctive three-layer design—a green mint center sandwiched between two thin layers of cocoa-based candy—became a staple after-dinner treat in restaurants across America. This cake pays homage to that classic candy, recreating its visual appeal and signature flavor profile in the form of a decadent layer cake.
Why This Recipe Works: The Science of Baking
Baking is both an art and a science. The chocolate cake layers in this recipe are designed to be exceptionally moist and tender, and that is achieved through a few key ingredients. First, we use buttermilk. The acidity in buttermilk reacts with the baking soda to give the cake a beautiful lift, while also tenderizing the gluten in the flour, resulting in a softer crumb. Second, we use vegetable oil instead of butter in the cake batter. While butter provides great flavor, oil remains liquid at room temperature, ensuring the cake stays incredibly moist even days after baking.
Finally, the addition of hot water (or hot coffee, if you prefer) at the very end of the batter-mixing process is a crucial step. The hot liquid blooms the cocoa powder, releasing its full, intense chocolate flavor, while also creating a thin batter that bakes up incredibly light and fluffy.
Ingredients
Gathering high-quality ingredients is the first step to achieving bakery-level results. Here is everything you will need for both the cake and the frosting:
For the Chocolate Cake Layers:
- – 2 cups all-purpose flour
- – 2 cups granulated sugar
- – 3/4 cup unsweetened natural cocoa powder (sifted)
- – 2 teaspoons baking powder
- – 1 1/2 teaspoons baking soda
- – 1 teaspoon salt
- – 1 cup buttermilk (room temperature)
- – 1/2 cup vegetable oil (canola or standard vegetable oil)
- – 2 large eggs (room temperature)
- – 2 teaspoons pure vanilla extract
- – 1 cup hot boiling water (or hot freshly brewed coffee)
For the Andes Mint Buttercream Frosting:
- – 1 1/2 cups unsalted butter (3 sticks, softened to room temperature)
- – 4 to 5 cups powdered sugar (sifted)
- – 1 1/2 teaspoons peppermint extract (adjust to taste, but do not confuse with spearmint)
- – 1 teaspoon pure vanilla extract
- – 3 to 4 tablespoons heavy whipping cream
- – 2 to 3 drops green gel food coloring (optional, for that classic mint look)
- – 1 1/2 cups chopped Andes Mints (about 1 to 1.5 standard boxes), divided use
Instructions
Follow these step-by-step instructions carefully to ensure your cake turns out perfectly moist, fluffy, and beautifully decorated.
- Prep the Pans and Oven: Preheat your oven to 350°F (175°C). Generously grease three 8-inch round cake pans. Line the bottoms with circles of parchment paper, and grease the parchment paper as well. This guarantees your delicate chocolate cakes will release without tearing.
- Whisk the Dry Ingredients: In a large mixing bowl or the bowl of a stand mixer, whisk together the all-purpose flour, granulated sugar, unsweetened cocoa powder, baking powder, baking soda, and salt. Ensure there are no large lumps of cocoa powder remaining.
- Combine the Wet Ingredients: In a separate medium bowl, whisk together the room temperature buttermilk, vegetable oil, room temperature eggs, and vanilla extract until completely smooth and homogeneous.
- Mix Wet and Dry: Pour the wet ingredient mixture into the dry ingredients. Using a hand mixer or a stand mixer fitted with the paddle attachment, beat on medium speed for about 2 minutes. The batter will be very thick at this stage.
- Add the Hot Water: Reduce the mixer speed to the lowest setting. Carefully and slowly pour in the hot boiling water (or hot coffee). Continue to mix on low just until the water is fully incorporated. Stop the mixer and use a rubber spatula to scrape down the sides and bottom of the bowl to ensure everything is mixed. The batter will seem very thin and watery—this is exactly how it should look!
- Bake the Cakes: Divide the batter evenly among the three prepared 8-inch cake pans. You can use a kitchen scale to be precise, or simply eyeball it. Bake in the preheated oven for 30 to 35 minutes, or until a wooden toothpick inserted into the center of the cakes comes out clean or with a few moist crumbs clinging to it.
- Cool the Cakes: Remove the pans from the oven and let the cakes cool in the pans for exactly 10 minutes. After 10 minutes, carefully invert them onto wire cooling racks, remove the parchment paper, and allow them to cool completely to room temperature. Do not attempt to frost warm cakes, or your buttercream will melt into a puddle.
- Make the Mint Buttercream: While the cakes cool, prepare the frosting. In a large bowl or stand mixer, beat the softened butter on medium-high speed until it is pale, light, and creamy (about 3-4 minutes).
- Add Sugar and Flavorings: Gradually add the sifted powdered sugar, about one cup at a time, mixing on low speed until combined before adding the next cup. Once all the sugar is added, pour in the peppermint extract, vanilla extract, and 3 tablespoons of heavy whipping cream. If using, add a few drops of green gel food coloring.
- Whip to Perfection: Turn the mixer up to medium-high speed and beat the frosting for 3 to 5 minutes until it is incredibly light, fluffy, and smooth. If the frosting seems too stiff, add the remaining tablespoon of heavy cream.
- Fold in the Mints: Gently fold 3/4 cup of the chopped Andes mints into the finished buttercream using a spatula. Save the remaining chopped mints for decorating the outside of the cake.
- Assemble the Cake: Place the first cooled cake layer onto a serving platter or cake stand. Spread an even layer of the mint buttercream over the top (about 3/4 cup of frosting). Place the second cake layer on top and repeat with another layer of frosting. Finally, place the third cake layer on top.
- Frost and Decorate: Frost the top and sides of the entire cake with the remaining mint buttercream. You can use an offset spatula to create rustic swirls or a bench scraper for perfectly smooth sides. Take the remaining chopped Andes mints and press them gently into the bottom edge of the cake and sprinkle them generously over the top.
- Chill and Serve: For the best slicing results, place the finished cake in the refrigerator for 30 minutes to allow the buttercream to set slightly before cutting and serving.
Pro Tips for the Perfect Cake
To elevate your baking from good to great, keep these professional tips in mind:
Room Temperature Ingredients: This is a non-negotiable rule of baking. Using room temperature eggs and buttermilk allows them to emulsify properly with the other ingredients, creating a smooth batter that traps air. This air expands in the oven, giving you a fluffy cake. If you forget to take your eggs out, place them in a bowl of warm water for 10 minutes.
Do Not Overmix: Once you add the flour to the wet ingredients, mix only until just combined. Overmixing develops the gluten in the flour, which will lead to a dense, tough cake rather than a tender, crumbly one.
The Coffee Trick: If you want to enhance the chocolate flavor without making the cake taste like coffee, substitute the 1 cup of hot water with 1 cup of hot brewed coffee. Coffee naturally amplifies the rich, earthy notes of cocoa powder.
Gel vs. Liquid Food Coloring: When tinting your buttercream, always opt for gel food coloring rather than liquid drops. Gel coloring is highly concentrated, meaning you only need a tiny amount to achieve a vibrant green hue, and it won’t thin out the consistency of your carefully whipped buttercream.
Exciting Variations to Try
While this recipe is phenomenal as written, baking is all about creativity! Here are a few ways you can customize this Andes Mint Chocolate Cake to suit your preferences:
Dark Chocolate Ganache Drip: For a more dramatic presentation and an extra hit of chocolate, add a chocolate drip. Make a simple ganache by melting equal parts semi-sweet chocolate chips and heavy cream. Let it cool slightly, then use a spoon or a squeeze bottle to drip it down the edges of the chilled, frosted cake before topping with the chopped candies.
Mint Oreo Crunch: If you love texture, consider adding crushed Mint Oreos into the filling layers along with the buttercream. The cookie pieces will soften slightly but still provide a satisfying crunch that pairs beautifully with the smooth cake.
White Chocolate Mint: Not a fan of dark chocolate? You can modify the frosting by swapping out the standard buttercream for a white chocolate peppermint buttercream. Melt high-quality white chocolate, let it cool, and whip it into the butter before adding the powdered sugar.
Serving Suggestions
This cake is incredibly rich and deeply satisfying, meaning a small slice goes a long way. When serving at a dinner party or holiday event, present the cake on a beautiful wooden pedestal or a pristine white ceramic plate to make the green and brown colors pop.
Because the cake features intense flavors, it pairs beautifully with simple, unsweetened beverages. A hot cup of black coffee, a shot of espresso, or a tall glass of ice-cold whole milk are the perfect companions to cut through the sweetness of the buttercream and the richness of the cocoa. For an adult gathering, consider pairing a slice with an Irish Coffee or a robust stout beer, which often shares chocolatey, roasted flavor notes that mirror the cake perfectly.
Storage and Freezing Instructions
If you find yourself with leftovers (which is a rare occurrence with this dessert!), proper storage is key to maintaining the cake’s moisture and flavor.
Room Temperature: Because this frosting is made with butter and powdered sugar (and only a tiny bit of cream), the frosted cake is perfectly safe to keep at room temperature for up to 3 days. Keep it covered with a glass cake dome or in a large airtight container to prevent the cake from drying out.
Refrigeration: If your kitchen is particularly warm, or if you want to extend the cake’s lifespan, you can store it in the refrigerator for up to 5 days. However, cold temperatures firm up both the butter in the frosting and the oil in the cake. Always allow refrigerated cake slices to sit at room temperature for at least 30 to 45 minutes before eating to ensure the best texture and flavor.
Freezing: This cake freezes exceptionally well! You can freeze individual slices by wrapping them tightly in plastic wrap, then placing them in a zip-top freezer bag for up to 3 months. Thaw individual slices overnight in the refrigerator or on the counter for a few hours. If you want to make the cake layers ahead of time, let the baked, unfrosted layers cool completely, wrap them in a double layer of plastic wrap and a layer of aluminum foil, and freeze. Thaw the layers at room temperature before frosting and assembling.
Conclusion
The Andes Mints Chocolate Mint Cake is more than just a dessert; it is an experience. The striking visual contrast of the dark chocolate against the pastel green frosting draws you in, while the nostalgic, refreshing flavor keeps you coming back for another bite. By following these careful instructions, respecting the science of the ingredients, and putting love into the assembly, you will create a magnificent centerpiece that will be remembered long after the last crumb is gone. Happy baking!
Andes Mints Chocolate Mint Cake
Ingredients
Equipment
Method
- Preheat oven to 350°F (175°C). Grease and parchment-line three 8-inch round cake pans.
- In a large bowl, whisk together the flour, sugar, cocoa powder, baking powder, baking soda, and salt.
- In a separate bowl, whisk the buttermilk, oil, eggs, and vanilla until smooth.
- Pour the wet ingredients into the dry ingredients and beat on medium speed for 2 minutes.
- Reduce speed to low and carefully stream in the hot boiling water. Mix just until combined (batter will be thin).
- Divide batter evenly among the prepared pans. Bake for 30-35 minutes or until a toothpick comes out clean.
- Cool cakes in pans for 10 minutes, then invert onto wire racks to cool completely.
- For the frosting, beat the softened butter for 3-4 minutes until pale and creamy.
- Gradually add powdered sugar, then add the peppermint extract, vanilla, heavy cream, and food coloring. Beat for 3-5 minutes until fluffy.
- Fold 3/4 cup of the chopped Andes mints into the buttercream.
- Place one cake layer on a stand, top with frosting, and repeat with remaining layers. Frost the entire outside of the cake.
- Decorate by pressing the remaining chopped Andes mints into the bottom edges and sprinkling over the top of the cake. Chill for 30 minutes before slicing.