Blackstone Griddle Pizza
The Ultimate Guide to Homemade Pizza on the Blackstone Griddle
When you think of making pizza at home, your mind probably jumps to a traditional indoor oven, a specialized high-heat pizza oven, or perhaps a baking stone. But what if we told you that one of the absolute best ways to achieve a crispy, golden-brown crust with perfectly melted, bubbly toppings is sitting right in your backyard? Enter the Blackstone griddle. Cooking homemade pizza on a flat top griddle is a game-changing culinary technique that combines the smoky, outdoor fun of a barbecue with the high-heat, direct-contact searing power of a professional pizzeria.
If you have never tried making personal pizzas on your griddle, you are missing out on one of the most interactive, delicious, and efficient ways to feed your family or entertain guests. The expansive surface area of a flat top allows you to cook multiple custom pizzas simultaneously, meaning no one has to wait for their pie to finish baking in a solitary indoor oven. In this comprehensive guide, we are going to dive deep into the art and science of Blackstone pizza. From selecting the perfect dough to mastering the “dome” technique for melting your cheese, prepare to revolutionize your pizza nights forever.

Why Cook Pizza on a Flat Top Griddle?
You might be wondering why you should abandon your trusty kitchen oven for the outdoor griddle. The answer lies in thermodynamics and surface contact. Standard home ovens typically max out at 500 or 550 degrees Fahrenheit. While this is hot, the heat transfer from the air to the dough is relatively slow. A Blackstone griddle, however, utilizes thick rolled steel. When heated, this steel acts much like a cast-iron skillet, retaining massive amounts of thermal energy and transferring it directly to whatever touches it.
When you place your raw pizza dough onto the oiled, screaming-hot surface of the griddle, a Maillard reaction happens almost instantly. The crust fries slightly in the oil, developing a gorgeous, crispy, golden exterior while the inside remains chewy and airy. This direct conductive heat is something a standard oven simply cannot replicate without a pre-heated baking steel. Furthermore, the sheer size of the griddle allows for an assembly-line style of cooking. You can have a “dough station,” a “topping station,” and a “finished” zone all on the same cooking surface by managing your burner temperatures.
The Secret to the Perfect Griddle Crust
The foundation of any great pizza is the dough. When cooking on a flat top, you have a few options. Store-bought, pre-made pizza dough (often found in the deli section of your local grocery store) works wonderfully and is incredibly convenient for a quick weeknight dinner. If you prefer, making your own dough from scratch allows you to control the hydration and fermentation, leading to complex flavor profiles.
The key to success on the griddle is the thickness and size of your dough. Because the heat is coming strictly from the bottom, a massive, thick-crust pizza will likely burn on the bottom before the dough cooks all the way through to the top. The solution is to make mini, personal-sized pizzas. Aim for dough rounds that are about 6 to 8 inches in diameter and rolled relatively thin (about 1/4 inch thick).
Another crucial secret is the “par-bake” and flip. Unlike an oven where you top the raw dough and bake it all at once, griddle pizza requires a different approach. You first lay the raw, stretched dough onto the oiled griddle. Once the bottom is golden and bubbly (usually 2-3 minutes), you flip the dough over. You then apply your sauce, cheese, and toppings to the newly cooked side while the raw side cooks against the griddle. This ensures a thoroughly cooked crust that stands up perfectly to heavy toppings without becoming soggy.
Essential Equipment for Blackstone Pizza
To pull off the perfect griddle pizza, you need a few tools beyond just the grill and the food. Being prepared will make the process smooth, fast, and incredibly enjoyable.
- A Melting Dome (Basting Cover): This is non-negotiable. Because the griddle only provides heat from the bottom, your cheese will not melt properly before the crust burns. A dome traps the steam and ambient heat, creating a mini convection oven right on your griddle top to melt the cheese and warm the toppings.
- Long Metal Spatulas: Essential for easily lifting, checking, and flipping the dough without tearing it.
- A Squeeze Bottle for Water: Used in conjunction with the melting dome. A quick squirt of water on the griddle right before covering with the dome creates an instant burst of steam.
- A Squeeze Bottle for Oil: For easily laying down a thin, even layer of cooking oil (like olive oil, avocado oil, or canola oil) before placing the dough.
- An Infrared Thermometer (Optional but helpful): To check the exact surface temperature of your griddle. You want to aim for around 400°F to 425°F (200°C to 220°C).
Ingredients
The Foundation:
- – 1 pound pizza dough (store-bought or homemade, divided into 4 small portions)
- – 2 tablespoons olive oil (or high-heat cooking oil for the griddle surface)
- – 1/2 cup pizza sauce (your favorite brand or homemade)
The Cheese:
- – 1 cup fresh mozzarella cheese (torn into small pieces, or shredded low-moisture mozzarella)
The Toppings (Feel free to customize!):
- – 1/4 cup pepperoni slices
- – 1/4 cup sliced black olives
- – 1/4 cup fresh mushrooms (thinly sliced)
- – 1/4 cup red bell pepper (sliced into thin strips)
- – 1/4 cup white onion (thinly slivered)
- – 1 teaspoon Italian seasoning or dried oregano (for garnish)
Step-by-Step Instructions
- Preheat the Griddle: Fire up your Blackstone or flat top griddle. Set the burners to medium-low. You want a surface temperature of roughly 400°F (200°C). If it is too hot, the crust will burn instantly. Allow the griddle to heat evenly for at least 10 minutes.
- Prepare the Dough: While the griddle is heating, take your divided portions of pizza dough and stretch or roll them out into small, 6 to 8-inch circles. Keep them relatively thin. Do not worry if they aren’t perfectly round; rustic shapes add character!
- Oil the Surface: Once the griddle is at the proper temperature, use your squeeze bottle to lay down a thin layer of olive oil or your preferred cooking oil in the area where you will place the pizzas.
- The First Sear: Carefully place the stretched dough rounds directly onto the oiled griddle. Let them cook undisturbed for 2 to 3 minutes. You will see bubbles start to form on the top surface, and the bottom should turn a beautiful golden brown.
- Flip and Turn Down the Heat: Using your large spatula, flip the dough over. Immediately turn the burners under the pizzas to low (or even off, relying on residual heat) so the bottom doesn’t burn while you assemble.
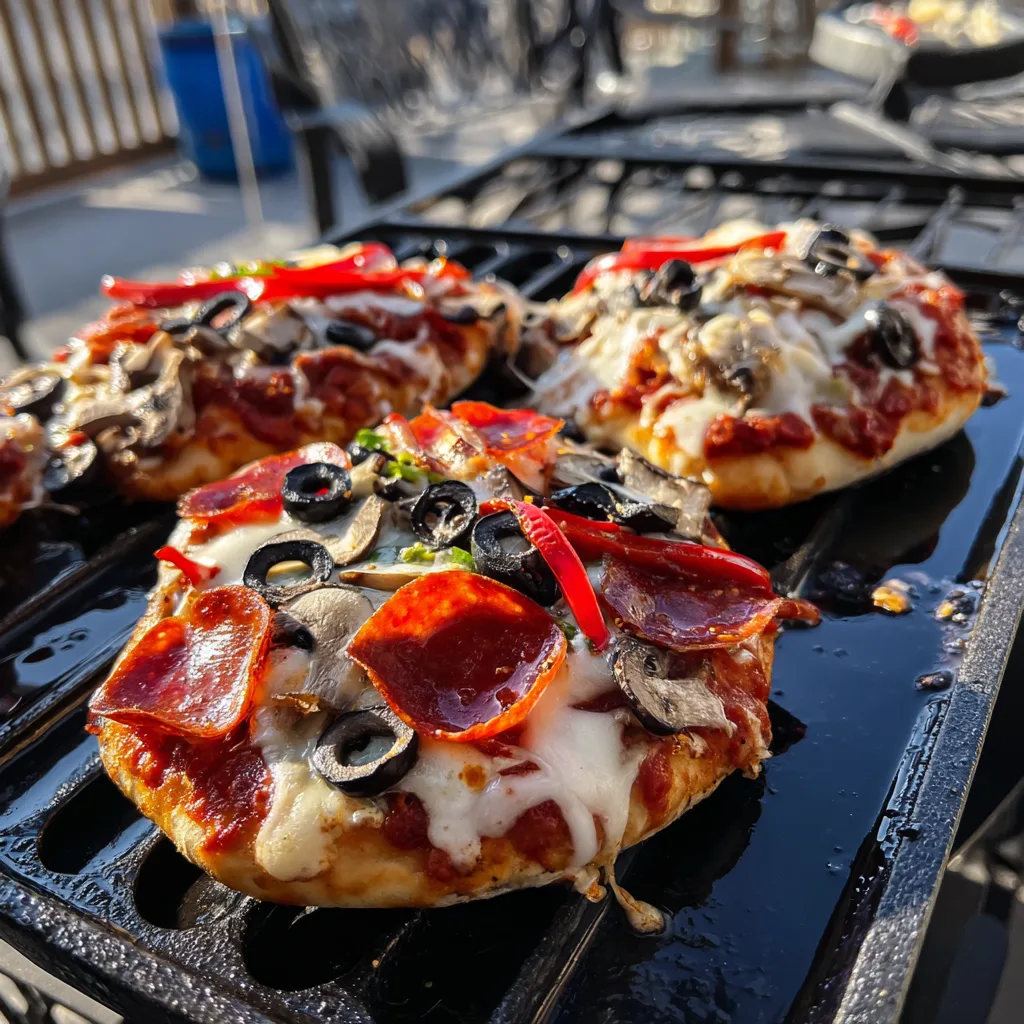
- Add the Toppings: Working quickly, spread a thin layer of pizza sauce over the newly cooked side of the dough. Add your mozzarella cheese, followed by the pepperoni, black olives, sliced mushrooms, red bell pepper strips, and slivered onions.
- The Dome Method: Squirt a small splash of water directly onto the bare griddle surface near the pizza (not on the pizza itself) and immediately cover the pizza with your melting dome. The trapped steam will melt the cheese and cook the vegetables in just 1 to 2 minutes.
- Final Crisp and Serve: Remove the dome. Check the bottom of the crust to ensure it is cooked through and crispy. If it needs more time, let it sit for another minute. Once done, remove from the griddle, sprinkle with a pinch of Italian seasoning, slice, and serve hot!
Mastering the Dome Technique
The “dome and steam” technique is the magic trick of griddle cooking. It solves the primary limitation of a flat top—the lack of ambient overhead heat. When you squirt water under the dome, it rapidly turns into steam. Steam transfers heat much more efficiently than dry air. This blast of hot vapor hits the top of the pizza, instantly wilting raw vegetables, cooking pepperoni, and turning solid cheese into a gooey, bubbling masterpiece without drying it out. Always use a dome that is large enough to completely cover the pizza without touching the toppings.
Creative Topping Combinations
The beauty of making personal pizzas is that everyone gets exactly what they want. You are not limited to the standard pepperoni and vegetable supreme. Try a BBQ Chicken Pizza by swapping the tomato sauce for barbecue sauce, adding grilled chicken, red onions, and a mix of cheddar and mozzarella cheese. For a lighter, gourmet option, try a White Pizza with olive oil, minced garlic, ricotta, mozzarella, and fresh spinach. Or, embrace a sweet and savory Hawaiian profile with Canadian bacon, fresh pineapple chunks, and a drizzle of hot honey right after it comes off the griddle.
Frequently Asked Questions (FAQ)
Can I use a different type of dough, like gluten-free or cauliflower crust?
Yes, you can absolutely use alternative crusts. However, gluten-free and cauliflower crusts often require lower heat and gentler handling. Pre-made gluten-free crusts might just need to be warmed on the griddle rather than undergoing the raw flip method. Keep a close eye on them to prevent burning.
My dough is sticking to the griddle. What went wrong?
Sticking usually occurs for two reasons: the griddle wasn’t hot enough when you put the dough down, or you didn’t use enough oil. Ensure your griddle has had ample time to preheat and that there is a solid, thin layer of oil acting as a barrier between the dough and the steel.
How do I prevent the bottom from burning while the cheese melts?
Heat management is critical. Once you flip the dough to add toppings, you MUST turn the heat down to low. The residual heat of the steel will be more than enough to cook the second side while the dome does the work of melting the top. If your griddle is still too hot, move the pizza to a cooler zone of the flat top.
Can I prep everything ahead of time for a party?
Absolutely! A griddle pizza party is fantastic. Have all your dough balls portioned and resting on a floured tray. Pre-chop all vegetables, slice the meats, and have your sauce and cheese ready in individual bowls. Guests can assemble their own “raw” toppings on a plate, and you simply act as the griddle master, cooking the dough, flipping, and applying their chosen ingredients.
Conclusion
Taking your pizza-making skills outside to the Blackstone griddle is a revelation. It turns a standard meal into an interactive, wildly delicious event. By understanding heat management, utilizing the flip method, and mastering the steam dome, you can produce pizzas with crusts that rival your favorite local joints—crispy on the outside, chewy on the inside, and loaded with perfectly melted toppings. So gather your family, prep your favorite ingredients, fire up the flat top, and get ready to experience the ultimate homemade griddle pizza.
Homemade Blackstone Griddle Pizza
Ingredients
Equipment
Method
- Preheat your Blackstone griddle to medium-low heat (aiming for around 400°F surface temperature).
- Divide the pizza dough into 4 equal portions and stretch them into thin 6 to 8-inch circles.
- Lightly oil the griddle surface and place the dough circles directly on the heat. Cook for 2-3 minutes until the bottom is golden brown and bubbly.
- Using a large spatula, flip the dough over. Immediately turn the burners down to low.
- Quickly spread pizza sauce over the cooked side, then add mozzarella, pepperoni, olives, mushrooms, peppers, and onions.
- Squirt a little water onto the bare griddle near the pizza and immediately cover the pizza with a melting dome to trap the steam.
- Let steam for 1-2 minutes until the cheese is melted and bubbly.
- Remove the dome, ensure the bottom crust is fully cooked, sprinkle with Italian seasoning, and serve immediately.