Retro Tulip Filet Crochet Table Runner – Step-by-Step Pattern
Introduction
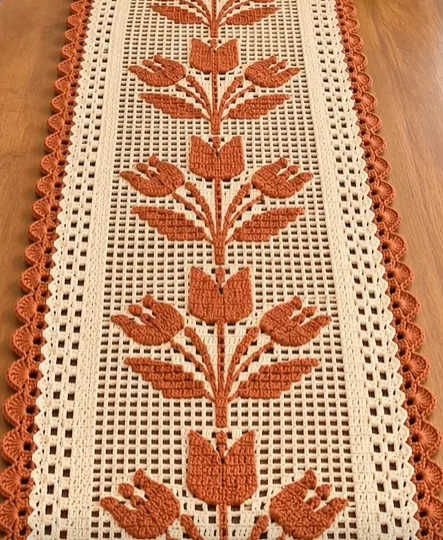
This eye-catching crochet project is a rectangular table runner featuring a graphic pattern of stylized tulip flowers arranged along the center. Two primary colors—warm cream and burnt orange—create a strong visual contrast, while the filet crochet mesh gives the piece a lacy, retro feel. Each tulip and stem is meticulously worked in solid stitches against the open mesh background, and the entire runner is framed with a decorative, scalloped border in the contrasting orange shade. The final result is a vibrant, vintage-style accent—perfect for dressing up your dining table, sideboard, or coffee table.
The recurring tulip motif adds a sense of symmetry and rhythm, making this project especially appealing for anyone who appreciates floral designs or the timeless look of filet crochet. The mesh structure creates an interesting play of texture and transparency, while the pop of color from the motifs makes the design unmistakably bold. Whether used for seasonal decor, casual or formal gatherings, or simply to add a touch of handmade charm to your home, this table runner is as beautiful as it is practical.
Making this table runner is a meditative process, combining the enjoyment of filet crochet’s open spaces with solid motif work and a classic picot shell border. While it has a traditional look, the color choice lets you easily match it to any modern or vintage aesthetic in your decor.
Project Overview
This table runner is assembled in sections. The main body is worked in rows using filet crochet (alternating open mesh and solid mesh) in the background shade. Tulip motifs are added as you go by switching to the contrast color for blocks of filled stitches according to a charted design. After the main panel is completed, a solid border is crocheted around all sides, followed by a decorative picot shell edging for a classic, finished look.
Skill Level
Intermediate. Previous experience with filet crochet or following charts is very helpful. Knowledge of basic stitches and color changes is required, and the border features intermediate-level scallop and picot techniques. Motivated advanced beginners could attempt this with patience and attention to detail.
Materials
- Yarn: DK weight cotton or mercerized cotton yarn is recommended for crisp stitch definition and durability.
- Main Color (MC – cream): approximately 340–375 grams (1,110–1,225 yards)
- Contrast Color (CC – burnt orange): approximately 110–125 grams (360–400 yards)
- Crochet hook size: 3.5 mm (E-4) or size needed to obtain gauge
- Tapestry needle for weaving in ends
- Sharp scissors
- Stitch markers (optional but helpful for chart repeats)
- Blocking materials: rust-proof pins, blocking mats, spray bottle
Finished Size
Approximate finished dimensions: 34 cm x 100 cm (13.5″ x 39.5″)
To adjust the size: Add or subtract sets of mesh squares in the main panel (multiples of 6 for the width, multiples of the motif chart for the length).
Gauge
Using filet mesh technique: 4 mesh squares (open or solid) × 4 mesh squares = 5 x 5 cm (2″ x 2″)
Gauge is not critical, but variations affect the finished size. If your piece is becoming too large or small, adjust hook size accordingly.
Stitches and Abbreviations
- ch – chain
- sl st – slip stitch
- sc – single crochet
- dc – double crochet
- tr – treble crochet
- sk – skip
- sp – space
- st(s) – stitch(es)
- MC – main color
- CC – contrast color
- rep – repeat
Important Pattern Notes
- Ch 3 at the beginning of every row counts as dc unless otherwise noted.
- Filet mesh: Each open square = (dc, ch 2, sk 2), solid square = 3 dc in 3 sts.
- Follow the motif chart or written instructions for color changes, working solid sections in CC and mesh in MC. Carry unused yarn along the top of the stitches or use separate bobbins if preferred.
- Always turn at the end of rows; right side and wrong side are the same due to the mesh structure.
- Use stitch markers every 10 or 20 squares to help keep track of long mesh sections and chart repeats.
- For color changes, carefully twist MC and CC on the WS to avoid holes.
Detailed Crochet Pattern
Part 1: Main Mesh Panel with Tulip Motif (Center)
Foundation Chain:
With MC, ch 82 (for 26 mesh squares across; add 1 for turning, 3 for first dc of the row = 82). Adjust in multiples of 3 for different widths.
Row 1: Dc in 5th ch from hook (first ch-3 counts as dc, skips 2 ch), *ch 2, sk next 2 ch, dc in next ch*; rep * to * across. (26 mesh squares made, 27 dc)
Row 2 (and all mesh-only rows): Ch 3 (counts as dc), turn. *Ch 2, sk next 2 ch, dc in next dc*; rep across to end. (Maintain 26 squares per row)
Tulip Motif Chart Repeat:
- Work in filet mesh, but follow the tulip motif chart to replace certain open mesh squares with solid mesh squares in CC to form the flowers and stems. Each filled (solid) square: work 1 dc in each of next 3 sts below (using CC).
- Each tulip is approx. 5 mesh squares wide and 6 mesh tall, spaced with mesh between.
- The central stem is 1 solid square wide, running up the center, worked in CC. Each tulip sits on the stem, with additional slanting stem details splitting diagonally from the base of the tulip (these can be created by working solid mesh squares at a 45-degree offset from the central stem).
- Use the following written guide for motif placement, based on the visible image. (For all rows not mentioned, continue in mesh with MC.)
Motif Placement (Sample Chart for 5 Tulip Rows):
Refer to RS facing. Tulip rows occur every 13 mesh rows, separated by 6 mesh-only rows. Adjust for desired length.
For each tulip row:
- Identify row center (14th square). Work stems: On tulip-row, switch to CC for center square (and side stems as in visible image—approximately 2 mesh squares outward and 2 rows below main tulip position).
- For tulip flower: From main stem, work a block of 5 consecutive solid squares in CC (centered). This makes the petal bowl. On the next row up, split the 5 squares: 2 squares on each side (for petals), leave center open. The row above, place 1 square in center (for upper petal tip).
- Repeat this arrangement for each motif group up the runner.
Continue until you have 5–6 full motif repeats, ending with enough plain mesh rows so motifs are balanced from each end.
Part 2: Mesh Side Borders
With MC, rotate runner so you are working along the long edge. Attach MC at one short end, ch 3, *dc evenly along selvedge edge (place 1 dc per dc row end, 2 dc per turning ch). When you reach the corner, ch 3, dc in corner st.* Repeat around all four sides, join to start with sl st. Do not fasten off.
Part 3: Lacy Scalloped Border
Join CC at any corner. Ch 1, sc in same st. *Skip next st, 5 dc in next st, skip 1 st, sc in next st*; rep from * to * around all four sides. At each corner, add an extra dc shell (so you have 2 shells separated by an sc at the corner) for fullness. Join with sl st to first sc at end of round.
Optional: For a picot accent, after each shell, before the next sc, ch 2, sl st in first ch (forms a small picot). This makes the edge more ornate, as seen in the original piece.
Part 4: Finishing Details
Check for any loose ends at color changes and secure them gently on the wrong side using a tapestry needle. Neatly weave all yarn tails into the corresponding color mesh squares.
Assembly and Finishing
Gently stretch the runner to shape on a blocking mat. Pin all edges neatly, mist with water, and allow to dry fully—the filet mesh especially benefits from careful blocking. Shape the border points and ensure that the tulips remain visually centered in the panel.
If side borders or corners are slightly wavy, lightly steam or wet-block as needed to relax the stitches. Avoid stretching the solid motif too far so as to preserve the bold look of the tulips.
Customization Ideas
- Change up the colors: Try fresh spring greens, yellow, or blue for a completely different look.
- Vary the yarn: A lighter cotton thread will yield a more delicate, lace-like runner, while heavier yarn makes it sturdier for everyday use.
- Adjust for different shapes: Make a single square motif for a coaster, or create two matching panels for a pillow front and back.
- Expand to a blanket: Join several of these mesh-and-motif panels together with whipstitch or a simple mesh sashing for a retro afghan.
- Make wall art: Frame a single tulip motif or two in an embroidery hoop or shadow box for instant retro decor.
Troubleshooting Tips
- Curling edges: This is common with filet mesh; careful blocking almost always solves it. If curling persists, check your tension—try one hook size larger for a softer mesh.
- Uneven edges: Be sure your turning chains are correct and placed consistently at the row ends. Place the first and last dc of each row cleanly in the edge sts.
- Motif too large or small: Check your gauge, adjust hook size as needed. Count mesh squares often to keep motif centered and ensure proportions match the template.
- Loose or gappy color changes: Carefully twist yarns when switching to prevent holes, and work over carried yarn to secure.
- Uneven tension: Relax your hands, practice even yarn feed, and consider lightly steaming the finished panel before blocking.
Care Instructions
Hand wash in cool water with mild detergent. Gently squeeze (do not wring), roll in a towel to remove excess water, then block flat to dry. Sleep with light steam touch-ups as needed. Avoid bleach or tumble drying to prevent yarn damage and stitch distortion.
Final Notes
For best results, count mesh squares at the start of each row and check motif placement regularly against the visual sample. Keeping stitches snug and consistent will ensure clean tulip shapes and even mesh. Use the image as a reference for motif arrangement and color balance, and don’t hesitate to add your own creativity. With patience, a bit of blocking, and a sharp eye on stitch counts, your table runner will become an heirloom-worthy accent or an unforgettable handmade gift.