Amigurumi Spiral Christmas Tree Ornament
📖 INTRODUCTION
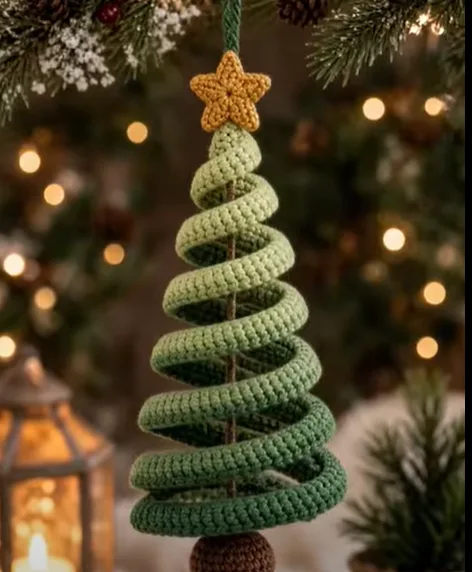
Bring a touch of architectural whimsy to your holiday decor with this 3D Amigurumi Spiral Christmas Tree. Unlike traditional flat or solid-cone crochet trees, this design features a plump, fully stuffed continuous tube that coils gracefully through the air like a kinetic spring. The brilliant structure uses a hidden internal wire to hold the sweeping spiral shape, while a rustic central piece of twine anchors the piece from top to bottom, preventing the spring from stretching out.
This ornament is a delightful exploration of texture and geometry. The eye is drawn from the classic golden star topper, down through the gradient green coils—transitioning from soft sage at the top to deep forest green at the bottom—and finally resting on a simple, round brown trunk. It feels simultaneously modern, rustic, and playful.
Because of its structured yet bouncy nature, it makes an unforgettable handmade gift, a standout addition to a craft fair inventory, or a striking centerpiece for your own evergreen tree. You can easily personalize this project by using different gradient yarns, adding tiny sewn-on beads as “ornaments,” or adjusting the length of the tube to create an oversized statement piece.
🔍 MAIN PATTERN OVERVIEW
This pattern is broken down into three distinct crocheted components that are brought together during a specialized assembly process.
First, you will crochet the Star Topper, created by making two flat five-pointed stars and joining them together around a small amount of stuffing for a 3D effect. Next is the Trunk Base, a simple amigurumi sphere worked in brown yarn to anchor the bottom of the tree.
The largest component is the Spiral Body. This is a very long, continuous 8-stitch amigurumi tube. You will stuff it and insert a flexible craft wire as you crochet. The gradient color effect is achieved by transitioning from light green to dark green. Finally, a piece of sturdy jute twine is run straight down the center of the coil, connecting the star to the trunk and giving the ornament its signature floating structure.
🎯 SKILL LEVEL
Intermediate
While the stitches themselves are basic, this pattern requires patience and precision. Working a long, narrow tube around a wire can be fiddly, and the final assembly requires careful alignment to achieve the perfect conical spiral.
Techniques Involved:
- Working in continuous rounds (spiral)
- Magic Ring (MR)
- Basic amigurumi increases and invisible decreases
- Crocheting around a structural wire
- Stuffing narrow tubes smoothly
- Multi-part kinetic assembly
📏 FINISHED SIZE
- Total Height: Approximately 7 inches (18 cm) from the bottom of the trunk to the tip of the star (excluding the hanging loop).
- Base Width: Approximately 3.5 inches (9 cm) across the widest bottom coil.
- Note: The final size is highly dependent on how tightly you coil the wired tube during the assembly phase.
🧮 GAUGE
- For the Spiral Tube: 6 sc sts and 6 rounds = 1 inch (2.5 cm).
- Gauge Note: Exact dimensions are not strictly critical, but your stitches must be tight enough that the white fiberfill stuffing and the internal metal wire do not show through the fabric. If you can see holes, drop down half a hook size.
🧶 REQUIRED YARN AMOUNTS
Estimates based on medium #4 worsted weight acrylic or cotton blend:
- Green (Tree Body): Approximately 60 yards (55 meters) total. To achieve the gradient look, use 20 yards of Light Green, 20 yards of Medium Green, and 20 yards of Dark Green, OR use a continuous gradient/ombre yarn cake.
- Gold/Mustard Yellow (Star): Approximately 12 yards (11 meters).
- Brown (Trunk): Approximately 10 yards (9 meters).
- Dark Green (Hanging Loop): 1 yard.
🧰 MATERIALS
- Hook: US E/4 (3.5 mm) crochet hook.
- Yarn: Medium #4 worsted weight in Gold, Brown, and Green(s).
- Wire: Approximately 32 inches (81 cm) of 12-gauge or 14-gauge bendable craft wire or aluminum floral wire.
- Central Support: 12 inches (30 cm) of sturdy brown jute twine or thick hemp cord.
- Stuffing: High-quality polyester fiberfill.
- Tools: Tapestry needle, wire cutters, needle-nose pliers, and a wooden chopstick (essential for stuffing the narrow tube).
🔤 ABBREVIATIONS – US TERMS
- MR – magic ring
- ch – chain
- sl st – slip stitch
- sc – single crochet
- hdc – half double crochet
- inc – increase (2 sc in the same st)
- dec – invisible decrease (sc 2 sts together using front loops only)
- st(s) – stitch(es)
- FO – fasten off
📝 NOTES BEFORE YOU BEGIN
- Continuous Rounds: All components are worked in a continuous spiral. Do not join rounds with a slip stitch unless explicitly instructed. Use a stitch marker to mark the first stitch of each round.
- Wire Safety: Always use needle-nose pliers to bend the sharp, cut ends of your craft wire into tiny, tight loops. This prevents the sharp metal from poking through the yarn and scratching you.
- Stuffing Strategy: Do not wait until the tube is finished to stuff it. You must add small amounts of fiberfill every 2-3 inches as you crochet, using a chopstick to pack it evenly.
🪡 COMPLETE PATTERN
🌟 Star Topper (Make 2)
We make two flat stars and seam them together to create a rigid, puffy topper.
Yarn/Color: Gold / Mustard Yellow
Starting Point: Center of the star
Round 1: Start with a MR. Work 10 sc into the ring. Pull tight to close. (10)
Round 2:Sl st in the next st. Ch 3. Working down the chain: sc in the 2nd ch from hook, hdc in the next ch. Skip the next sc on the Round 1 base. Repeat from * 4 more times to create 5 points.
Join: Sl st into the very first sl st of Round 2.
FO the first star and weave in ends. Do NOT FO the second star.
Joining the Stars:
Place the two stars wrong-sides together. Continuing with the working yarn from the second star, ch 1. Sc the two pieces together by working through both thicknesses around the perimeter of the star. Place 3 sc in the tip of each point to keep them sharp. Before closing the final point, stuff the center of the star very lightly. Join with a sl st, FO, and leave a 6-inch tail.
🪵 Trunk Base
A simple weighted sphere to ground the ornament.
Yarn/Color: Brown
Starting Point: Bottom center
Round 1: MR 6. (6)
Round 2: inc in each st around. (12)
Round 3: (1 sc, inc) x6. (18)
Rounds 4-6: sc in each st around. (18) [3 rounds total]
Round 7: (1 sc, dec) x6. (12)
Stuff firmly to create a dense base.
Round 8: dec x6. (6)
FO, leaving a long tail. Weave the tail through the front loops of the remaining 6 stitches, pull tight to close, and hide the end inside.
🌲 Wired Spiral Body
This is a single, continuous tube. If manually striping colors, change from Light to Medium Green at Round 50, and Medium to Dark Green at Round 100.
Yarn/Color: Light Green (to start)
Starting Point: The narrow top tip of the tree
Preparation: Take your 32-inch piece of wire. Using pliers, bend a tiny 1/4-inch loop at one end and crimp it flat.
Round 1: MR 8. (8)
Rounds 2-10: sc in each st around. (8)
Pause here. Insert the looped end of the wire into the tube you just created. Add a tiny pinch of stuffing around it.
Rounds 11 – 150 (approximate): Continue to sc in each st around. (8)
Crucial Step: Every 2 inches, pause to pack fiberfill around the wire using your chopstick. The tube should be plump but not bursting. Push the fabric down slightly as you go to ensure it covers the wire densely.
Length Check: Continue crocheting rounds until your stuffed tube measures approximately 28 inches (71 cm) long. (You may need more or fewer rounds depending on your gauge).
Finishing the Tube: Use wire cutters to trim the wire, leaving 1/2 inch exposed. Bend that exposed wire into a tiny, tight loop using your pliers, pushing it back inside the tube.
Final Round: dec x4. (4)
FO, pull the hole closed over the wire loop, and weave in the tail securely.
🎨 STYLING / ASSEMBLY / STABILITY / FINAL SHAPING
This is where the magic happens. The assembly dictates the entire shape of the ornament.
1. Shaping the Coil: Take your long, straight green tube. Starting at the dark green end (the base), begin wrapping it around a cone-shaped object (like a styrofoam craft cone, a large funnel, or a rolled piece of cardboard) to form a spiral. The coils should get progressively tighter and smaller as you reach the light green top. Slide it off the cone. The wire will hold this spring-like shape.
2. Anchoring the Trunk: Cut a 12-inch piece of your brown jute twine. Thread it onto a large tapestry needle. Push the needle straight up through the exact bottom center of the brown Trunk Base, coming out the top center. Tie a large, double knot in the very bottom of the twine so it cannot pull through the trunk.
3. Installing the Central Support: Stand your green coil upright. Thread the twine (with the trunk attached at the bottom) straight up through the empty air in the center of the green coils. Attachment: Sew the dark green bottom tip of the coiled tube securely to the top of the brown trunk, slightly off-center so the twine can run straight up.
4. Attaching the Star & Setting Tension: Bring the twine up to the light green top of the spiral. Thread the twine through the very bottom point of the Gold Star. The Kinetic Check: Lift the ornament by the twine above the star. The green spiral should hang beautifully. If it droops too much, pull the twine tighter through the star. Once you have the perfect tension (where the coils are evenly spaced and the twine is taut and straight), tie a secure knot in the twine right at the base of the star and hide it inside the star’s stuffing.
5. Finishing Touches: Sew the light green top tip of the spiral securely to the back bottom of the Gold Star. Thread a 10-inch piece of Dark Green yarn through the top point of the star and knot it to create a hanging loop.
Final Shaping Checklist: ✅ Is the central twine taut and straight when hung? ✅ Does the gradient transition smoothly from light at the top to dark at the bottom? ✅ Are the wire ends completely hidden inside the crocheted fabric? ✅ Are the coils evenly spaced, resting parallel to the ground?
💡 HELPFUL CROCHET TIPS
- 💡 Avoid Overstuffing: If you pack too much fiberfill into the tube, the stitches will stretch, exposing the white stuffing and the metal wire. Stuff just enough to round out the tube.
- 💡 Smooth Wire Insertion: If the wire keeps catching on the yarn inside the tube, wrap the looped tip of the wire in a tiny piece of masking tape before inserting it.
- 💡 The Chopstick is Mandatory: Do not attempt to stuff a 28-inch tube at the very end. It is physically impossible. You must stuff in small, 2-inch increments as you crochet.
- 💡 Twine Substitution: If you don’t have jute twine, a piece of thick, dark brown yarn will work, but twine provides a better rigid visual line and stretches less under the weight of the base.
- 💡 Customizing the Gradient: If you want a perfectly controlled gradient without weaving in ends, use the “magic knot” technique to join your light, medium, and dark green yarns seamlessly.
🧼 CARE INSTRUCTIONS
- Cleaning: Spot clean only with a slightly damp cloth. Do not submerge this ornament in water. Submerging it will cause the internal metal wire to rust, which will bleed through the yarn and ruin the piece.
- Storage: Store standing upright or lying flat in a rigid box. Do not crush this ornament under heavy decorations, as bending the internal wire drastically out of shape can be difficult to correct perfectly next season.
❓ FAQ
❓ Do I absolutely have to use wire?
Yes. Without the internal wire, the amigurumi tube will just hang limply like a string. The wire is what forces the crochet into a rigid, hovering spiral.
❓ Can I use pipe cleaners instead of craft wire?
Pipe cleaners are generally too weak to hold the heavy, stuffed coils in place. You can twist 3 or 4 pipe cleaners together for better rigidity, but a single strand of 14-gauge craft wire is highly recommended for a crisp shape.
❓ My central string is sagging when I set the tree down. Is that normal?
Yes! This is a kinetic ornament designed to be hung. When resting on a table, the spring will compress and the central string will slacken. The tension is only activated when suspended from the hanging loop.
❓ How can I make a massive version of this for a table centerpiece?
To scale this up, use Super Bulky (Size 6) yarn, an 8.0mm hook, and a much thicker armature wire (like heavy-duty aluminum fencing wire). Increase the tube size from 8 sc to 12 sc, and construct it using the exact same methods.