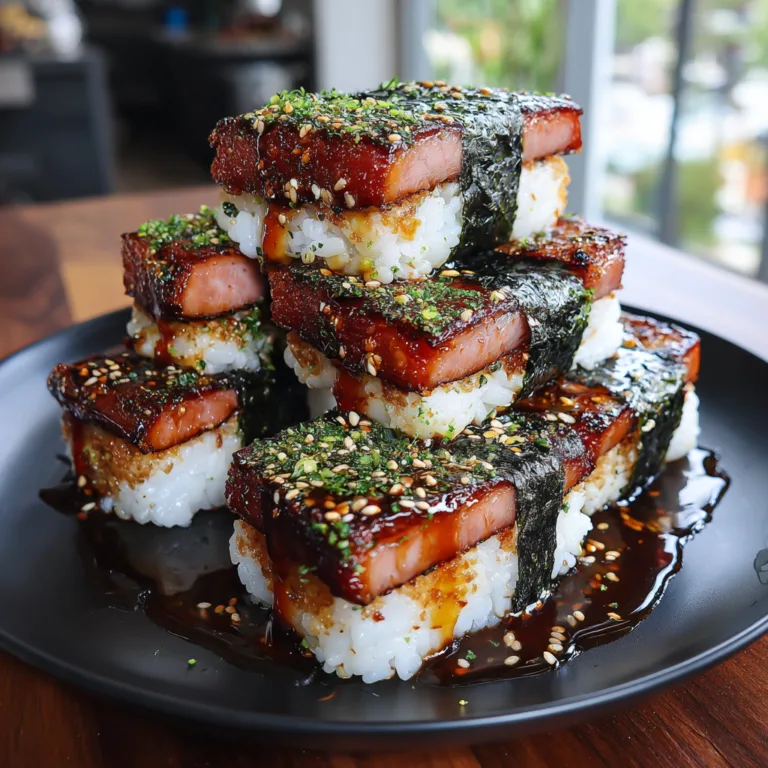
Baked Sushi Bites
Baked Salmon Sushi Bites: The Viral “Sushi Cup” Revolution
Every once in a while, a food trend sweeps the internet that actually lives up to the hype. Enter the Baked Salmon Sushi Bite. Also known as “Sushi Cups” or “Sushi Muffins,” this dish deconstructs the traditional sushi roll and rebuilds it into a warm, crispy, bite-sized format that is incredibly easy to make at home.
If you have ever been intimidated by the bamboo rolling mats and the precise technique required for traditional sushi, this recipe is your savior. We are taking all the beloved flavors of a spicy salmon roll—the vinegared rice, the umami-rich fish, the nutty sesame, and the creamy heat of spicy mayo—and baking them inside a crisp nori shell using a standard muffin tin. The result? A textural masterpiece featuring crunch, fluffiness, and melt-in-your-mouth salmon, all in one bite.
In this guide, we will walk you through exactly how to recreate this viral sensation. Whether you are looking for a fun family dinner, a show-stopping party appetizer, or a high-protein meal prep option, these sushi cups are guaranteed to impress.
Why This Recipe Works
Why has this specific method taken over social media feeds and home kitchens alike? It comes down to accessibility and texture.
- No Rolling Required: The “cup” format eliminates the hardest part of making sushi. You simply press the seaweed into a muffin tin.
- Texture Contrast: Traditional sushi is usually cold. This version offers a warm, comforting experience where the nori gets toasted and crispy in the oven, contrasting perfectly with the soft rice and tender salmon.
- Economical: You can stretch a smaller amount of high-quality salmon to feed a whole family when it is combined with rice and presented this way.
- Great for Leftovers: Unlike raw sashimi which must be eaten immediately, these baked bites reheat surprisingly well, making them a viable lunch option for the next day.
Ingredients
The ingredient list is relatively simple, relying on Asian pantry staples to deliver big flavor.
The Sushi Base
- 2 cups Sushi Rice (Short Grain) – This is crucial. Long-grain rice will fall apart. You need the starchiness of short-grain rice to hold the cup shape together.
- 2 cups Water – For cooking the rice.
- 3 tbsp Rice Vinegar – To season the rice.
- 1 tbsp Sugar & 1 tsp Salt – Dissolved into the vinegar for that classic sushi rice taste.
- 3-4 Sheets Nori (Seaweed) – Roasted seaweed sheets, cut into 4 squares each.
The Salmon Filling
- 1 lb Salmon Fillet – Skin removed, cut into small 1/2 inch cubes. You can use fresh Atlantic or Sockeye salmon.
- 2 tbsp Soy Sauce – Or Tamari for a gluten-free option.
- 1 tsp Sesame Oil – Adds a deep, roasted nutty aroma.
- 1 tsp Garlic Paste – Or freshly minced garlic.
- 1 tsp Ginger Paste – Adds a fresh zing to cut the richness of the fish.
The Toppings
- 1/3 cup Kewpie Mayo – Japanese mayonnaise is richer and creamier than American mayo, but regular mayo works in a pinch.
- 1-2 tbsp Sriracha – Adjusted to your heat preference.
- Green Onions – Finely chopped for freshness.
- Sesame Seeds – Black or white toasted seeds.
- Optional: Furikake seasoning or diced avocado (add avocado after baking).
Instructions
Step 1: Perfect the Rice
Good sushi starts with the rice. Rinse your short-grain rice under cold water until the water runs clear—this removes excess starch so it doesn’t become a gummy paste.
- Cook: Combine rinsed rice and water in a rice cooker or pot and cook according to package instructions.
- Season: While the rice is cooking, whisk together the rice vinegar, sugar, and salt in a small bowl until dissolved.
- Fold: When the rice is done, transfer it to a large bowl. Pour the vinegar mixture over it and gently fold it in with a paddle. Do not mash the rice. Let it cool slightly to room temperature.
Step 2: Prepare the Salmon
While the rice cools, get your protein ready.
- Cube: Remove the skin from your salmon fillet and cut the meat into small, uniform cubes (about the size of a dice).
- Marinate: In a mixing bowl, combine the salmon cubes with soy sauce, sesame oil, garlic, and ginger. Toss gently to coat. Let it sit for 5-10 minutes while you prep the tin.
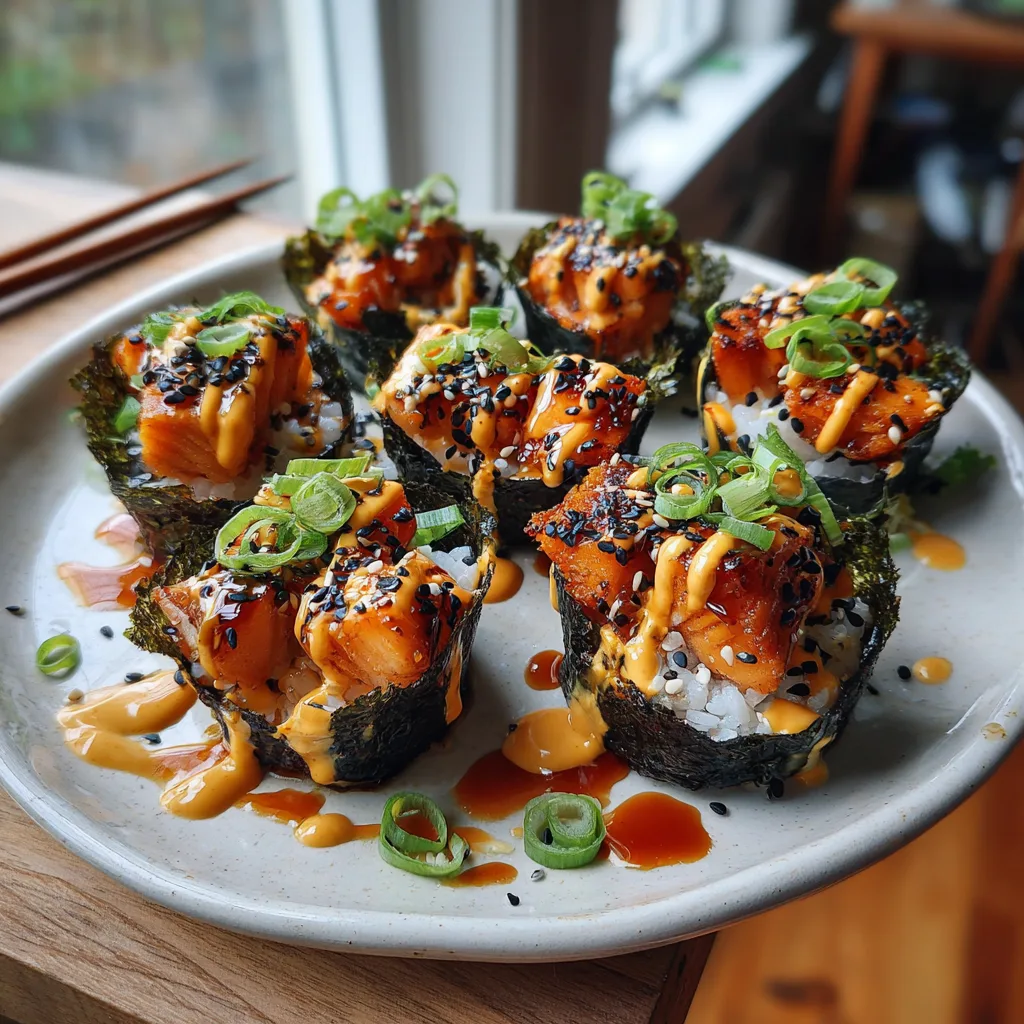
Step 3: Assemble the Cups
This is the fun part—like an arts and crafts project!
- Preheat: Set your oven to 400°F (200°C).
- Cut Nori: Take your large sheets of nori and cut each one into 4 equal squares using kitchen shears.
- Form Cups: Place a nori square into each slot of a standard muffin tin.
- Add Rice: Wet your fingers slightly (to prevent sticking) and press about 1-2 tablespoons of seasoned rice into the nori. Press it down and up the sides slightly to create a nest.
- Add Salmon: Spoon the marinated salmon cubes on top of the rice. Don’t overfill, or they will be hard to eat.
Step 4: Bake and Garnish
- Bake: Place the muffin tin in the oven and bake for 12–15 minutes. The salmon should be opaque and cooked through, and the nori edges should be crisp.
- Make Sauce: While baking, mix the mayonnaise and Sriracha in a small bowl.
- Top: Remove from the oven. Drizzle generous amounts of spicy mayo over the hot salmon. Garnish with sesame seeds and green onions.
- Serve: Carefully lift the cups out of the tin and serve immediately while the nori is crisp.
Tips for Success
The Nori Trick: If you find your nori is getting too soggy before you bake it, work quickly. Do not let the rice sit in the nori for 30 minutes before baking. Assemble and get it into the oven immediately.
Rice Consistency: If your rice is too hot when you assemble, it will steam the nori and make it chewy. Let the rice cool to room temperature first.
Cutting the Salmon: Keep your salmon cubes small. Large chunks won’t nestle into the cups well and may fall off when you take a bite.
Variations to Try
Once you master the base recipe, the sky is the limit for fillings:
- Spicy Tuna: Use high-quality tuna steaks, cubed and marinated similarly to the salmon.
- Surimi (Imitation Crab): For a “California Roll” style cup, mix shredded imitation crab with a little mayo before baking, then top with avocado and cucumber after it comes out of the oven.
- Vegetarian: Use marinated tofu cubes or shiitake mushrooms for a savory plant-based option.
- Cheesy Twist: Some variations include placing a small piece of cream cheese in with the salmon before baking for a “Philly Roll” vibe.
Serving Suggestions
These bites are rich, so you want to serve them with sides that cut through the creaminess.
- Edamame: Steamed soybeans with sea salt are the classic pairing.
- Cucumber Salad: A quick sunomono (cucumber vinegar salad) provides a refreshing crunch.
- Miso Soup: A warm bowl of miso soup rounds this out into a complete meal.

Storage and Reheating
Storage: Store leftovers in an airtight container in the refrigerator for up to 2 days.
Reheating: The nori will lose its crispiness in the fridge. To revive it, reheat the bites in an air fryer at 350°F for 3-4 minutes, or in a toaster oven. Microwaving is possible but will result in a softer texture.
Freezing: It is not recommended to freeze these, as the texture of the rice and the nori will deteriorate significantly upon thawing.
These Baked Salmon Sushi Bites are a testament to how fun home cooking can be. They break the rules of traditional sushi in the best way possible, delivering a hot, savory, and crispy experience that is sure to become a new favorite in your household.
Baked Salmon Sushi Bites
Ingredients
Equipment
Method
- Rinse rice until water runs clear. Cook with water according to package directions.
- Mix rice vinegar, sugar, and salt. Fold into cooked hot rice. Let cool to room temperature.
- Preheat oven to 400°F (200°C). Cut nori sheets into squares.
- Cube salmon and toss with soy sauce, sesame oil, and ginger.
- Place nori squares into muffin tin slots. Press 2 tbsp of rice into each to form a cup.
- Fill cups with marinated salmon cubes.
- Bake for 12-15 minutes until salmon is cooked and nori is crisp.
- Mix mayo and Sriracha. Drizzle over baked cups and top with green onions and sesame seeds.