Berrylicious Cheesecake Tacos
The concept of “dessert tacos” has taken the culinary world by storm, and for good reason. They are handheld, customizable, and offer a playful twist on traditional plating. While many associate tacos with savory carnitas or spicy beef, the structural integrity of a folded, crispy shell provides the perfect vessel for sweet fillings. Our Berrylicious Cheesecake Tacos take this trend to the next level by using a specialized graham cracker crust shell that mimics the classic cheesecake base we all know and love.
Why You Will Love This Recipe
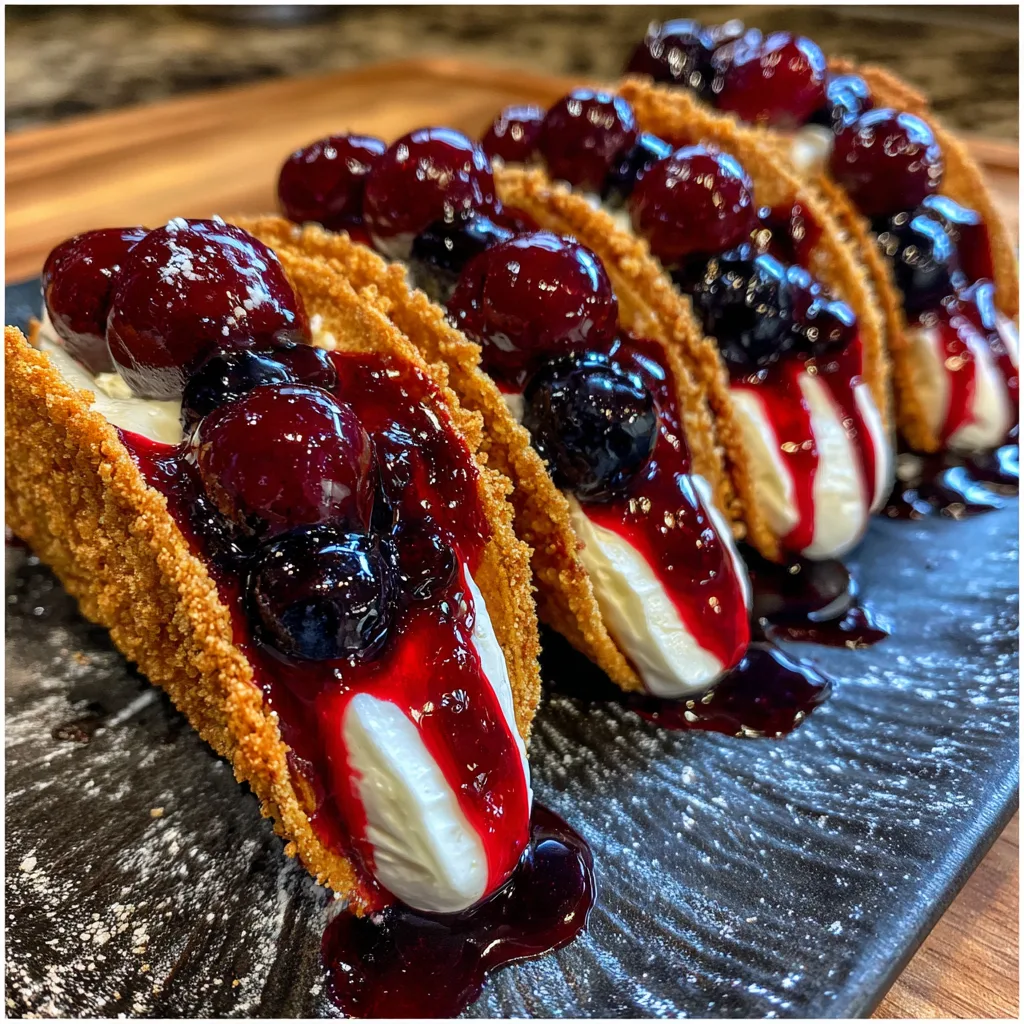
There are several reasons why this recipe stands out in a crowded field of dessert options. First and foremost is the texture contrast. Most cheesecakes are soft throughout, perhaps with a thin crust at the bottom. With these tacos, every bite delivers a satisfying crunch followed by a creamy center. Secondly, the visual appeal is undeniable. The contrast between the golden shells, the snowy white filling, and the deep reds and purples of the berry topping makes for a “Pinterest-perfect” presentation without requiring professional pastry chef skills.
Additionally, these are portion-controlled. Unlike a giant slice of New York-style cheesecake that can feel heavy, these mini tacos allow guests to indulge in a few bites of decadence without feeling over-full. They are also incredibly easy to adapt to different seasons—swap the berries for peaches in the fall or chocolate ganache in the winter.
Ingredients for Berrylicious Cheesecake Tacos
To achieve the best results, we recommend using high-quality ingredients. The quality of your cream cheese and the freshness of your berries will directly impact the final flavor profile.
For the Graham Cracker Taco Shells:
- – 2 cups Graham cracker crumbs (finely crushed)
- – 1/4 cup Granulated sugar
- – 1/2 cup Unsalted butter (melted)
- – 1 tsp Cinnamon (optional, for extra warmth)
- – Cooking spray
For the Creamy Cheesecake Filling:
- – 8 oz Cream cheese (softened to room temperature)
- – 1/2 cup Powdered sugar (sifted)
- – 1 tsp Pure vanilla extract
- – 1/2 cup Heavy whipping cream (chilled)
- – 1/2 tsp Lemon zest (for a bright tang)
For the Berrylicious Topping:
- – 1/2 cup Strawberry jam or preserves (high quality)
- – 1/2 cup Fresh blueberries
- – 1/4 cup Fresh strawberries (diced small)
- – 1 tbsp Lemon juice
Step-by-Step Instructions
- Prepare the Shells: Preheat your oven to 375°F (190°C). In a medium mixing bowl, combine the graham cracker crumbs, granulated sugar, and melted butter. Stir until the mixture resembles wet sand.
- Shape the Tacos: Take a standard muffin tin and flip it upside down. Spray the spaces between the muffin cups with cooking spray. Press about 2-3 tablespoons of the mixture into small circles on a flat surface, then carefully transfer them to drape over the “valleys” between the upturned muffin cups to form a taco shape. Bake for 8–10 minutes until golden brown.
- Cool and Set: This is the most important step. Allow the shells to cool completely on the muffin tin. Once cool, they will harden and hold their shape. Carefully slide them off.
- Make the Cheesecake Mousse: In a large bowl, beat the softened cream cheese, powdered sugar, vanilla extract, and lemon zest until smooth and lump-free.
- Fold in the Cream: In a separate chilled bowl, whip the heavy cream until stiff peaks form. Gently fold the whipped cream into the cream cheese mixture using a spatula. This keeps the filling light and airy.
- Prepare the Berry Topping: In a small bowl, toss the fresh blueberries and diced strawberries with the lemon juice and strawberry jam. Let it sit for 10 minutes to create a glossy, syrupy glaze.
- Assemble: Transfer the cheesecake filling into a piping bag with a large star tip. Pipe a generous amount into each graham cracker shell.
- Top and Serve: Spoon the berrylicious fruit mixture over the top of the cream. Serve immediately for maximum crunch.
Pro-Tips for Success
Creating Berrylicious Cheesecake Tacos is straightforward, but these expert tips will ensure your first batch is flawless:
1. Temperature Matters: Ensure your cream cheese is truly at room temperature. If it is even slightly cold, you will end up with tiny lumps in your filling that are impossible to whisk out later. Conversely, your heavy cream must be ice-cold to whip into stable peaks.
2. Shell Reinforcement: If your shells feel too fragile, you can lightly brush the inside with melted white chocolate and let it set before adding the filling. This creates a moisture barrier that keeps the shell crunchy for hours.
3. The Muffin Tin Hack: If you don’t have a muffin tin, you can use a taco rack or even crumpled aluminum foil shaped into ridges to hold the shells while they bake and cool.
Variations and Substitutions
While the berry version is a classic, the beauty of this recipe lies in its versatility. Here are some ways to switch things up:
- Chocolate Lovers: Use chocolate graham cracker crumbs for the shell and top with raspberries and chocolate shavings.
- Tropical Twist: Replace the berries with diced mango and pineapple, and add a sprinkle of toasted coconut to the cheesecake filling.
- Caramel Apple: For a fall version, use an apple compote topping with a drizzle of salted caramel.
- Keto-Friendly: Use almond flour and erythritol for the shell, and a sugar-free sweetener for the filling.
Cultural Context: The Rise of the Dessert Taco
The taco is one of Mexico’s greatest gifts to the culinary world, traditionally a humble street food consisting of a corn or flour tortilla and various fillings. As global cuisines began to blend, the “taco” shape became a canvas for creativity. The Choco Taco, invented in the 1980s, was one of the first mainstream “dessert tacos,” paving the way for gourmet versions like our Berrylicious Cheesecake Tacos.
Today, dessert tacos are a staple at food festivals and high-end bistros. They represent a shift toward “experiential eating”—food that is fun to hold, fun to share, and visually stimulating. By combining the American love for cheesecake with the functional design of the taco, we create a dessert that is both nostalgic and modern.
Serving Suggestions
These tacos are best served on a flat platter. To prevent them from sliding around, you can place a small “dot” of the cheesecake filling on the plate and “glue” the taco shell to it. For a party, consider a Build-Your-Own Taco Bar. Place the shells in a rack, put the filling in a bowl with a scoop, and have various toppings (berries, chocolate chips, nuts, sprinkles) in smaller bowls so guests can customize their own treats.

Frequently Asked Questions (FAQ)
Can I make these in advance?
You can make the shells and the filling up to 2 days in advance. However, do not assemble them until you are ready to serve. The moisture from the cream will eventually soften the graham cracker shell.
What if I can’t find graham cracker crumbs?
You can use crushed digestive biscuits or vanilla wafers as an excellent substitute. The ratio of butter to crumbs remains the same.
Can I freeze the cheesecake tacos?
While you can freeze the filling, we do not recommend freezing the assembled tacos as the shells will become soggy upon thawing.
How do I stop the shells from breaking?
Make sure you press the crumb mixture firmly when shaping them. If they are too loose, they will crumble. The sugar in the recipe acts as a “glue” when it melts in the oven, so don’t skip it!
In conclusion, Berrylicious Cheesecake Tacos are more than just a sweet treat; they are a conversation starter. With their golden, crunchy shells and vibrant berry topping, they offer a multi-sensory experience that delights the palate and the eyes. Give this recipe a try for your next event and watch them disappear in minutes!
Berrylicious Cheesecake Tacos
Ingredients
Equipment
Method
- Preheat oven to 375°F (190°C). Mix graham crumbs, sugar, and melted butter.
- Press mixture into circles and drape over the back of an upside-down muffin tin to form taco shapes.
- Bake for 8-10 minutes until golden. Cool completely before removing from the tin.
- Beat cream cheese, powdered sugar, and vanilla until smooth.
- In a separate bowl, whip heavy cream to stiff peaks, then fold into the cream cheese mixture.
- Mix berries with jam to create a glossy topping.
- Pipe filling into shells and top with the berry mixture.
- Serve immediately to maintain the crunch of the shell.