Carrot Patch Cupcakes
The Ultimate Carrot Patch Cupcakes with Strawberry Carrots
Springtime baking is all about bringing vibrant colors, fresh flavors, and a touch of whimsy into the kitchen. As the weather warms up and the flowers begin to bloom, our desserts should reflect the joy and renewal of the season. Enter the ultimate springtime treat: Carrot Patch Cupcakes with Strawberry Carrots. These adorable, incredibly creative cupcakes are not just a feast for the taste buds; they are an absolute visual delight that will steal the show at any Easter gathering, spring picnic, or children’s birthday party.
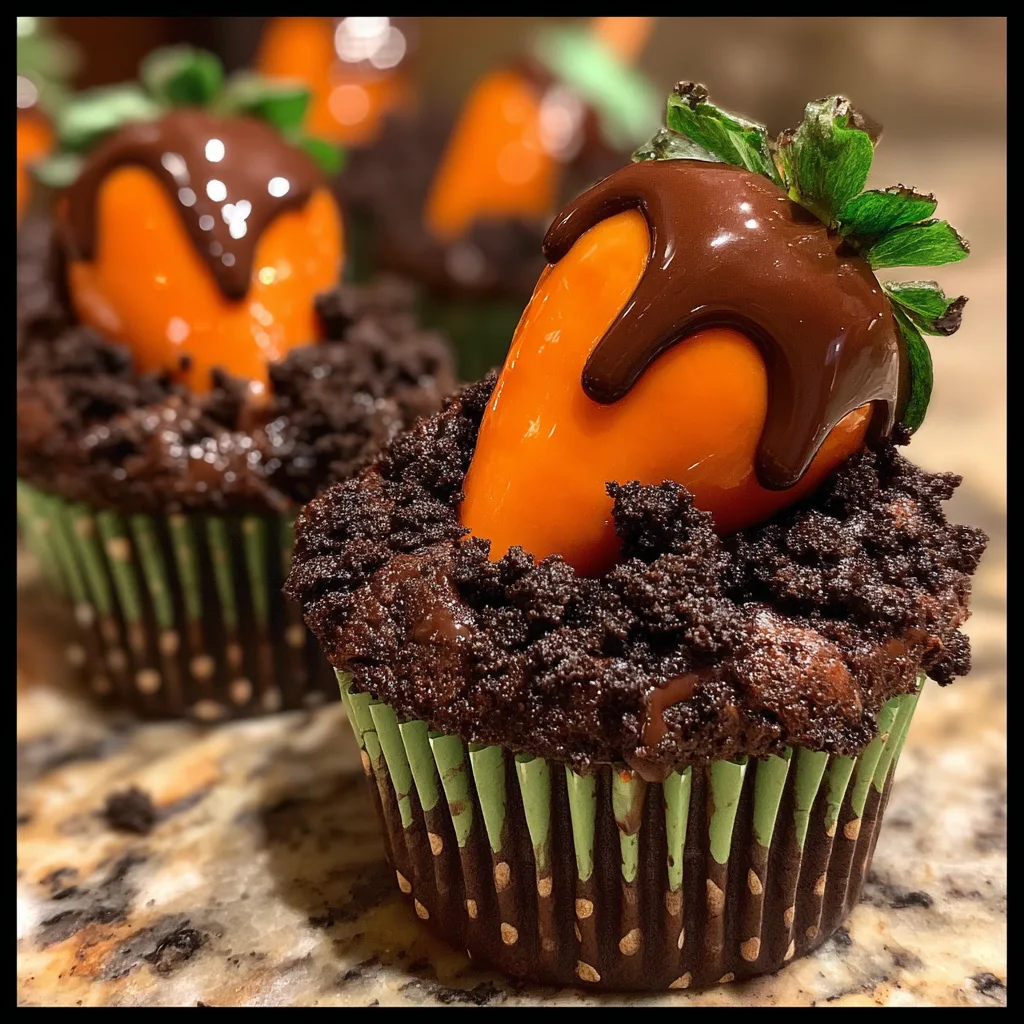
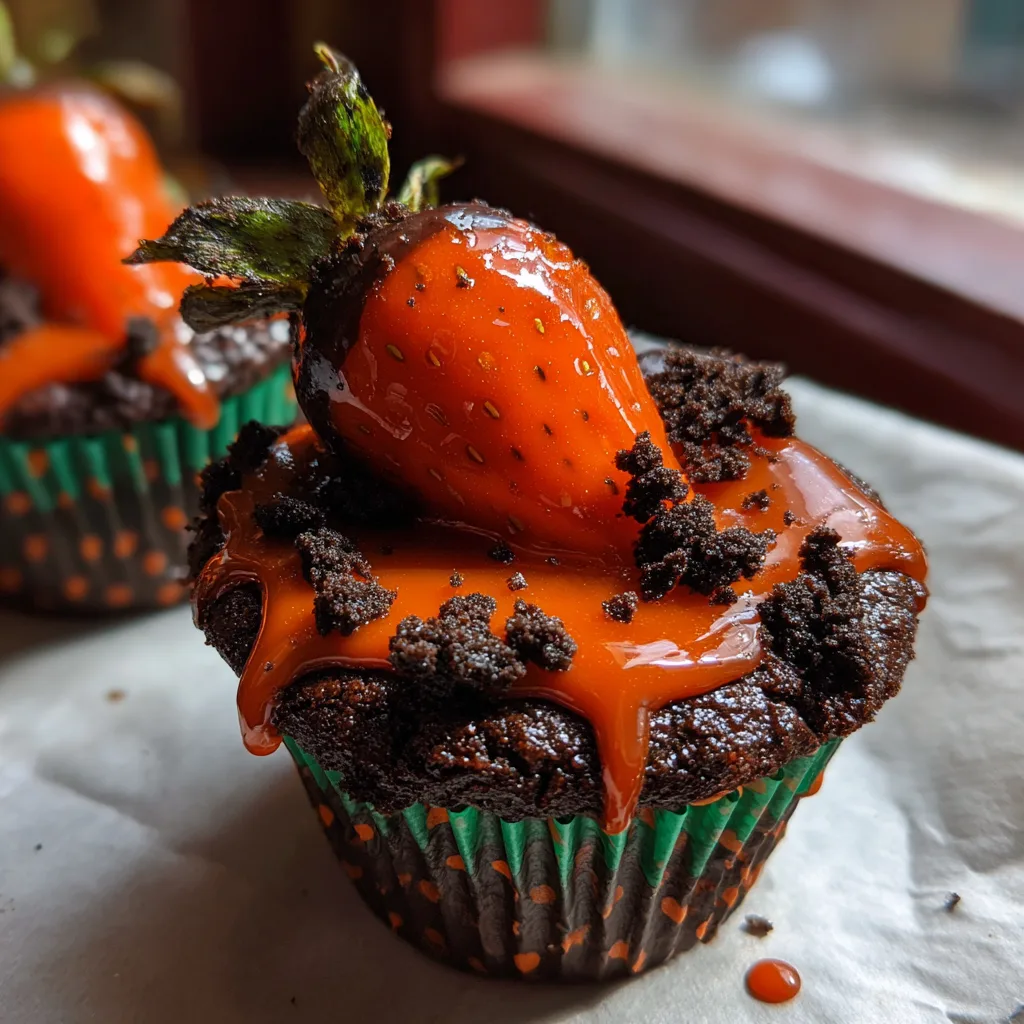
At first glance, these treats look like tiny, freshly tilled garden plots with bright orange carrots poking out of the rich, dark soil. But the magic lies in the illusion. The “dirt” is actually a decadent layer of rich chocolate frosting generously coated in crushed chocolate sandwich cookies (like Oreos). And the “carrot”? A fresh, juicy strawberry dipped in vibrant orange candy melts, complete with its natural green leafy stem serving as the carrot top. It is a brilliant trompe l’œil that bridges the gap between playful creativity and gourmet indulgence.
Why You Will Fall in Love with This Springtime Dessert
There are countless reasons to add these Carrot Patch Cupcakes to your baking repertoire. First and foremost is the sheer fun factor. In a world where desserts can sometimes feel overly serious or complicated, these cupcakes invite you to play with your food. They spark joy, elicit gasps of surprise from guests, and are almost guaranteed to bring a smile to anyone’s face, regardless of their age.
Beyond the aesthetics, the flavor and texture combinations are phenomenal. You have the soft, tender crumb of a moist chocolate cupcake, the creamy, smooth sweetness of the chocolate buttercream, the satisfying crunch of the cookie crumb “dirt,” and finally, the crisp snap of the orange chocolate giving way to the bright, juicy, tart-sweet burst of a fresh strawberry. It is a textural masterpiece in every single bite. The pairing of chocolate and strawberry is a classic for a reason, but presenting it in this unique garden-themed format elevates the experience to a whole new level.
Furthermore, this recipe is surprisingly accessible. While the finished product looks like it came from a high-end novelty bakery, the individual components are very straightforward. It relies on fundamental baking techniques and clever assembly rather than advanced pastry skills. This makes it an incredibly rewarding project for home bakers of all skill levels.
Deep Dive into the Star Components
To truly master these cupcakes, it is essential to understand the individual elements that make up the whole “carrot patch” illusion. Each layer serves a specific purpose, both visually and gastronomically.
The Chocolate Cupcake Base: The foundation of our garden needs to be rich, dark, and moist to mimic the look of deep soil. A good quality chocolate cupcake recipe (or even a doctored-up box mix if you are short on time) is crucial here. You want a cake that has a tender crumb but is sturdy enough to hold the generous layer of frosting, the cookie crumbs, and the weight of the strawberry carrot.
The Chocolate Frosting “Mud”: The frosting acts as the literal glue that holds this entire visual together. A classic, rich chocolate buttercream is ideal. It needs to be spreadable enough to cover the cupcake evenly but thick enough to hold the cookie crumbs securely. The dark brown color of the frosting perfectly simulates the wet mud beneath the topsoil.
The Cookie Crumb “Topsoil”: This is where the magic really starts to happen. Crushed chocolate sandwich cookies (with the cream filling either left in for a slightly clumpy, realistic soil look, or removed for fine, dry dirt) provide an incredibly realistic texture. When pressed into the frosting, it transforms the cupcake from a standard baked good into a miniature garden bed. The slight bitterness of the dark cocoa cookies balances the sweetness of the frosting beautifully.
The Strawberry “Carrots”: The pièce de résistance. Selecting the right strawberries is key. You want berries that are relatively uniform in shape—ideally tapering down to a point, much like a real carrot. Leaving the green leafy stems intact is absolutely essential for the illusion. The orange coating is typically achieved using orange candy melts, which provide a smooth, shiny finish and set up firmly, or white chocolate tinted with oil-based orange food coloring.
Essential Ingredients You Will Need
- 1 batch of your favorite Chocolate Cupcakes (baked and cooled)
- 2 cups Chocolate Buttercream Frosting
- 1 package (about 14 oz) Chocolate Sandwich Cookies (like Oreos)
- 12-15 Fresh Strawberries (medium-sized, with stems intact)
- 1 bag (12 oz) Orange Candy Melts
- 1 tablespoon Coconut oil or vegetable shortening (optional, for thinning the candy melts)
Step-by-Step Assembly Instructions
- Prepare the “Dirt”: Place the chocolate sandwich cookies into a food processor and pulse until they resemble coarse dirt. If you don’t have a food processor, place the cookies in a large, heavy-duty ziplock bag and crush them thoroughly with a rolling pin. Transfer the cookie crumbs to a shallow bowl and set aside.
- Frost the Cupcakes: Take your completely cooled chocolate cupcakes and frost them generously with the chocolate buttercream. You do not need to be perfectly neat here; in fact, a slightly domed and uneven surface will look more like a natural patch of dirt.
- Create the Soil Layer: Take a frosted cupcake and gently press the top of it directly into the bowl of crushed cookies. Roll the edges slightly to ensure no frosting is visible. Repeat with all the cupcakes. You now have your “dirt patches” ready for planting.
- Prep the Strawberries: This is the most crucial step for dipping success. Wash your strawberries thoroughly, but do not remove the green stems. Crucially, you must dry the strawberries completely. Even a single drop of water will cause the melted chocolate or candy melts to seize and turn into a lumpy mess. Pat them dry with paper towels and let them air dry completely.
- Melt the Orange Coating: Place the orange candy melts in a microwave-safe bowl. Microwave on 50% power in 30-second intervals, stirring thoroughly after each interval, until the melts are completely smooth and liquid. If the candy melts seem too thick, stir in a teaspoon of coconut oil or shortening to thin it out to a dipping consistency.
- Dip the “Carrots”: Hold a completely dry strawberry by its green leafy stem. Dip it straight down into the melted orange candy, ensuring the red flesh is completely covered but the green stem remains clean. Pull it straight up and gently tap the wrist of your holding hand to allow the excess orange coating to drip off back into the bowl. Place the dipped strawberry onto a sheet of parchment paper or wax paper to set. Repeat with the remaining strawberries.
- Add the Details (Optional but Recommended): Once the dipped strawberries have set completely, transfer the remaining melted orange candy into a small piping bag or a ziplock bag with a tiny corner snipped off. Drizzle fine lines horizontally back and forth across the orange strawberries to mimic the natural ridges found on real carrots. Allow this detail work to set.
- Plant the Garden: Once the strawberry “carrots” are completely dry and firm, it’s time to assemble. You can either gently press the strawberry directly into the top of the dirt cupcake, or, for a more secure fit, use a small spoon or melon baller to scoop out a tiny well in the center of the cupcake before placing the strawberry inside. Scatter a few extra cookie crumbs around the base of the strawberry to make it look like it was just pulled from the earth.
Pro Tips for Working with Chocolate and Candy Melts
Working with melted coatings can sometimes be intimidating for beginners, but a few professional tips will ensure your strawberry carrots turn out perfectly smooth and glossy every single time.
Firstly, understand the difference between candy melts and real white chocolate. Candy melts are formulated with vegetable oils instead of cocoa butter, making them much easier to melt and eliminating the need for complex tempering. They are the easiest option for this project. If you choose to use real white chocolate, you must ensure you temper it correctly so it sets up hard and shiny. Furthermore, if you are coloring white chocolate, you must use oil-based food coloring; traditional water-based food coloring will cause the chocolate to seize instantly.
Temperature control is vital. When melting in the microwave, patience is your best friend. Always use 50% power. Chocolate burns surprisingly quickly, and once it burns, it becomes thick, grainy, and unusable. Stirring frequently redistributes the heat and helps the chocolate melt smoothly.
If your dipped strawberries form a large “foot” (a puddle of chocolate at the base) when you place them on the parchment paper, it means you didn’t tap off enough excess chocolate. Don’t worry! Once the chocolate is completely set, you can gently snap off that excess rim with your fingers or a paring knife for a cleaner look.
Involving Kids in the Kitchen
This recipe is a spectacular project for getting children involved in the kitchen. The playful nature of the recipe makes it incredibly engaging for young bakers. While an adult should handle the melting of the chocolate, kids can be heavily involved in almost every other step.
Children absolutely love crushing the cookies for the dirt. Whether they are pressing the button on the food processor or whacking a bag of cookies with a rolling pin, it’s a sensory activity they will thoroughly enjoy. They can also take charge of dipping the frosted cupcakes into the cookie crumbs to create the garden beds.
Baking with children is not just about producing a dessert; it is about building confidence, teaching basic kitchen safety, and creating lasting memories. The sheer pride on a child’s face when they “harvest” their chocolate-covered strawberry carrot from the cupcake dirt they helped create is truly priceless.
Variations and Creative Twists
The beauty of this recipe lies in its adaptability. You can easily tweak the components to suit different tastes or dietary requirements.
Different Cake Flavors: While chocolate is the most realistic “dirt” base, you are not strictly bound to it. A moist carrot cake base is a brilliant thematic twist! You could also use a spiced zucchini cake or even a classic vanilla cupcake. The thick layer of chocolate frosting and cookie crumbs will still provide the soil illusion regardless of the cake underneath.
The “Dirt” Alternatives: If you aren’t a fan of chocolate sandwich cookies, you can use crushed graham crackers mixed with a little cocoa powder for a sandier soil look. Crushed chocolate wafers also work beautifully.
Vegan Adaptations: This recipe can easily be made vegan. Use a vegan chocolate cupcake recipe, whip up a dairy-free chocolate buttercream using vegan butter, ensure your sandwich cookies are vegan (many commercial brands actually are!), and use vegan white chocolate colored with vegan-friendly food coloring for the strawberries.
Storing and Serving Suggestions
Because this recipe utilizes fresh strawberries, storage requires a bit of care. These cupcakes are undeniably best enjoyed on the day they are assembled.
If you need to make them ahead of time, it is highly recommended to prepare the components separately. You can bake and frost the cupcakes and coat them in the cookie crumb dirt up to a day in advance; store them in an airtight container at room temperature. You can dip the strawberry carrots a day in advance as well, storing them lightly covered in the refrigerator. However, wait to “plant” the strawberries in the cupcakes until an hour or two before serving. If you assemble them too early, the moisture from the fresh strawberry stem can eventually compromise the chocolate coating or seep into the cake.
When ready to serve, display them on a large platter lined with extra crushed cookie “dirt” for a truly immersive garden patch presentation. They are guaranteed to be the center of attention and the first dessert to disappear from the table.
Conclusion
The Carrot Patch Cupcakes with Strawberry Carrots are a testament to the joy of creative baking. They combine classic, beloved flavors—chocolate cake, creamy frosting, and fresh strawberries—with a playful, visually stunning presentation that captures the essence of spring. Whether you are an experienced baker looking for a fun seasonal project or a parent wanting to create magical memories in the kitchen with your children, this recipe delivers on every front. Gather your ingredients, prepare your “soil,” and get ready to harvest the most delicious and delightful crop of cupcakes you will ever make.
Carrot Patch Cupcakes
Ingredients
Equipment
Method
- Crush the chocolate sandwich cookies in a food processor until they resemble fine dirt. Place in a shallow bowl.
- Frost the cooled chocolate cupcakes generously with chocolate buttercream.
- Dip the top of each frosted cupcake into the crushed cookies, pressing gently so the ‘dirt’ adheres completely to the frosting.
- Ensure strawberries are completely washed and dried. Any moisture will ruin the candy melt coating.
- Melt the orange candy melts in the microwave at 50% power in 30-second intervals until smooth. Stir in coconut oil if it is too thick.
- Holding the strawberry by the green stem, dip it into the orange candy melts until coated. Tap off excess and place on parchment paper to set.
- Once set, use extra melted orange candy in a small piping bag to drizzle horizontal lines across the strawberries for a realistic carrot look.
- Scoop a tiny well in the center of the ‘dirt’ on the cupcake, and gently press the set strawberry carrot into the center.