Cheesecake Stuffed Chocolate Strawberries
Beyond Dipped: A Stuffed Strawberry Revolution
While classic chocolate dipped strawberries have held the crown of easy elegance for decades, it is time for a gourmet upgrade. Introducing the No-Bake Cheesecake Stuffed Chocolate Strawberry: a three-part culinary creation that is visually striking, utterly decadent, and, best of all, incredibly simple to prepare. This dessert moves beyond the single texture of a strawberry and chocolate shell to offer a multi-sensory experience. Imagine biting through the firm, glossy dark chocolate shell into the soft, velvety richness of a vanilla-infused no-bake cheesecake filling, all balanced by the sweet, acidic pop of a perfectly ripe strawberry.
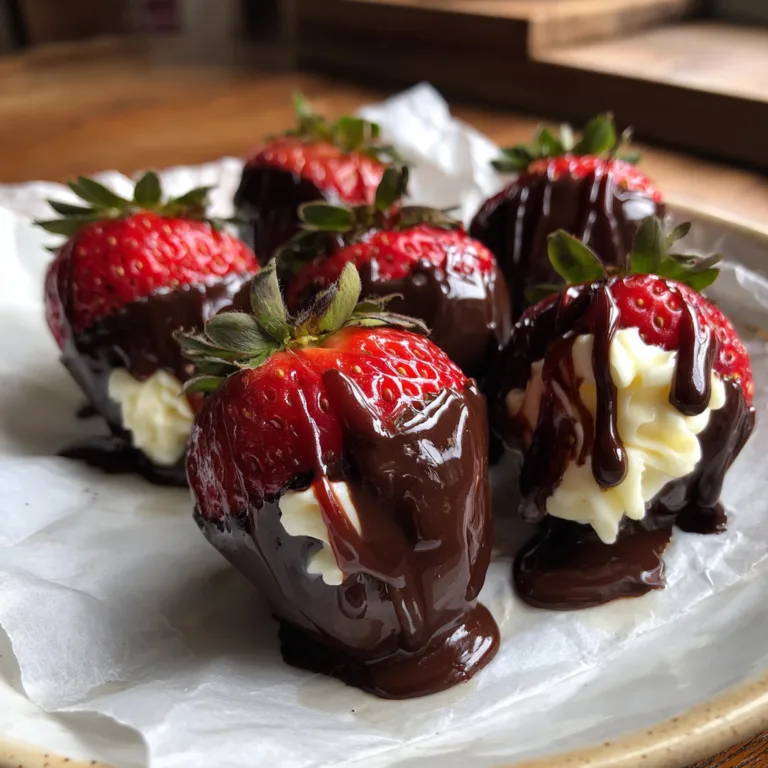
This is not just a dessert; it is a conversation starter. The contrast of the vivid red strawberry, the pristine white filling, and the deep, rich chocolate is a visual masterpiece. As you see in the provided image_1.png, achieving those perfect, uniform chocolate drips cascading down the cream cheese filling is an art form, but one that is surprisingly achievable. In this comprehensive masterclass guide, we will break down exactly how to create these show-stopping treats, ensuring you master every step from sourcing ingredients to achieving that flawless presentation.
The Secret Sauce (or rather, Filling)
The heart of this dessert, and what elevates it from a mere berry to a full cheesecake replacement, is the filling. We are not talking about simple whipped cream; we are crafting a proper no-bake cheesecake. This means choosing your ingredients wisely.
Full-fat, block cream cheese (like Philadelphia) is non-negotiable. Soften it to room temperature perfectly. If you try to use cold cream cheese, your filling will be lumpy and difficult to pipe. If you use low-fat cream cheese, the filling will be runny and won’t hold its shape inside the strawberry. The balance of powdered sugar is also critical. Sift the sugar before mixing to prevent fine lumps, and taste as you go. You want a sweet-not-cloying profile that complements, not overpowers, the berry. Finally, use pure vanilla extract or, for an even more luxurious touch, vanilla bean paste for a more complex aroma and visible black flecks. This filling is the base upon which all variations can be built.
Sourcing and Selection: Key to Gourmet Success
You cannot create a five-star dessert without five-star ingredients. The stars of this show are, of course, the strawberries and the chocolate.
For the strawberries, you want large, plump, uniform berries with their green stems and leaves still vibrantly attached and intact. Avoid strawberries that are too small or irregular, as they will be difficult to core and stuff. Look for strawberries with a perfectly smooth, red skin and no soft spots. A little unripe green at the top is acceptable, but the berry must be mostly ripe. As we see in image_1.png, the presence of the green stems adds a beautiful natural element to the final presentation, so handle them with care.
The chocolate must be of a high quality. Semi-sweet or dark chocolate (between 60-70% cacao) is the classic choice, as it provides a sophisticated bitterness that contrasts beautifully with the sweet cream. Look for quality chocolate chips or, for the smoothest, most professional finish, couverture chocolate. Couverture chocolate contains a higher percentage of cocoa butter, ensuring it melts evenly and dries to a brilliant, snappy finish. While standard chips are acceptable, they can be difficult to melt smoothly and can lead to a less polished look.
Masterclass Guide: Hollowing and Dipping Like a Pro
This section is where the magic happens. Hollowing and stuffing are delicate, and dipping for that perfect drip requires precision. Here is the technical breakdown to achieve image-perfect results.
1. Cleaning and Preparation: Wash and dry the strawberries with extreme care. The green tops are fragile. Then, pat them completely dry. This is vital. Water is the enemy of chocolate; any trace of moisture will cause the chocolate to seize and turn into a clumpy, difficult mess. Allow them to air dry on a paper towel for 30 minutes.
2. Hollowing: To hollow the strawberries, you need a small, very sharp paring knife. A huller won’t work for this because you need to create a hollow cavity down the core, not just remove the top. Insert the paring knife into the strawberry at a point about one-third of the way from the base, on the side, at a shallow angle. Carefully cut around the core without puncturing the bottom or the other side. Gently remove the center flesh. Repeat on the opposite side to make a passage. This creates a tunnel through the middle while keeping the leafy cap and pointed base in their places. This is the trick to making them look like a cohesive whole.
3. Piping and Chilling: This step is a must. Fill a pastry bag fitted with a large round tip (or a ziploc bag with a large corner cut) with your cheesecake filling. Pipe the filling from one end into the hollowed strawberry until it is completely filled and forms a nice clean end. Tap the berry gently on the counter to help the filling settle. Now, chill the stuffed berries for at least 15 minutes. This firms up the filling, making the subsequent dipping much cleaner and preventing the warm chocolate from melting the cream.
4. Chocolate Dipping: The signature drip in image_1.png is all about temperature. Melt your chocolate over a double boiler or in short bursts in the microwave, stirring in between, until it is perfectly smooth and warm, but not piping hot. A tablespoon of coconut oil added while melting can help create a smoother, more fluid dipping chocolate. Holding the chilled strawberry by its green leafy top, dip the bottom portion halfway up into the chocolate. Allow the excess to drip off into the bowl. Then, using a tiny metal skewer or your paring knife, guide a small bead of chocolate from the rim and let it drip down the white cream cheese filling. This must be done quickly and with a steady hand. The cold cream will help set the drip in place. For the look in image_1.png, where the drip is very pronounced, you want the chocolate to be quite fluid.
Gourmet Additions and Party Planning
Once you have mastered the basics, you can begin to customize.
Flavor Variations: Instead of plain vanilla, try a lemon-zest infused cream cheese for a bright, citrusy alternative. Or, fold a teaspoon of finely crushed freeze-dried raspberries into the filling for a double-berry punch. For a boozy twist, add a teaspoon of Amaretto to the filling.
Topping Ideas: Before the chocolate sets, roll the bottom of the strawberry in graham cracker crumbs for a textured ‘crust’, or in crushed pistachios for a color and flavor contrast. Or, drizzle the final hardened chocolate shell with white chocolate.
Party Ready: These are the perfect party food because they are beautiful, bite-sized, and no-bake. To serve for a party, arrange them in neat rows on a marble slab or a crinkled piece of parchment paper, as seen in image_1.png. These are best served within 2-4 hours of making, as the strawberries will begin to soften once their cores are removed. Keep them refrigerated until moments before serving. To make them stand upright, you can slightly trim the pointed chocolate-dipped base, but this requires precision. The simple presentation on parchment is the most dependable and, as the image shows, beautiful choice.
Final Party Tips for Success
Do not try to make these too far in advance; they are at their peak for only a few hours. The chocolate is best when snappy, and the berries when firm. Serve them with a crisp, dry sparkling wine or a light dessert cocktail. With this guide, you can confidently prepare a dessert that is not just delicious but also a stunning work of art, a perfect blend of natural beauty and culinary skill.
Ingredients
- 1 lb large, ripe strawberries (with green stems attached)
- 8 oz full-fat cream cheese (softened to room temperature)
- 1/2 cup powdered sugar (sifted)
- 1 teaspoon pure vanilla extract (or vanilla bean paste)
- 1 cup semi-sweet chocolate chips (or high-quality dark chocolate, chopped)
- 1 tablespoon coconut oil (optional, for smoother dipping)
- Graham cracker crumbs (optional, for textured bottom crust texture)
Instructions
No-Bake Cheesecake Stuffed Chocolate Strawberries
Ingredients
Equipment
Method
- Wash and dry large strawberries completely, keeping the green stems and leaves attached. Cut a horizontal slit near the top and bottom to remove a middle core, creating a hollow cavity through the center.
- In a medium bowl, cream softened cream cheese, powdered sugar, and vanilla extract with a hand mixer until smooth and fluffy. Transfer to a piping bag.
- Stuff strawberries completely with the cream cheese mixture using the piping bag. Lightly tap the base to settle. Chill for 10-15 minutes.
- Melt chocolate chips (and coconut oil, if using) in a microwave-safe bowl in 20-30 second intervals, stirring in between, until smooth.
- Holding strawberries by their green tops, dip the bottom portion halfway up into the melted chocolate. Allow the signature drips to cascade down the sides.
- Stand strawberries upright on a parchment-lined baking sheet and chill for at least 30 minutes until set. Serve immediately or keep refrigerated.
Notes
- Prep Strawberries: Wash and dry the large strawberries with great care, keeping the green leafy tops and stems perfectly intact. Lay them out on a paper towel and allow them to air dry completely for 30 minutes; any moisture will ruin the chocolate.
- Hollow the Berries: Using a small, sharp paring knife, insert the blade on the side of the strawberry, about one-third of the way from the pointed base. Carefully cut in a circle around the core without puncturing the other side or the bottom. Gently remove the center core and flesh, creating a tunnel-like cavity through the middle. Repeat this for all strawberries.
- Prepare the Filling: In a medium bowl, use a hand mixer to beat the softened cream cheese until perfectly smooth. Sift in the powdered sugar and add the vanilla extract. Beat until fully combined, smooth, and fluffy.
- Stuff the Berries: Transfer the cream cheese filling to a large piping bag fitted with a large round tip (or a ziploc bag with a large corner cut off). Pipe the filling into the hollowed centers of the strawberries from one side until completely filled. Tap the berry gently on the counter to help the filling settle.
- Chill the Berries: Place the stuffed strawberries on a small baking sheet lined with parchment paper. Chill in the refrigerator for at least 15 minutes. This firmed-up filling will make dipping cleaner.
- Melt Chocolate: In a microwave-safe bowl, melt the semi-sweet chocolate chips (and optional coconut oil) in 20-30 second bursts, stirring well in between each burst, until the chocolate is smooth, fluid, and warm but not hot.
- Dip for Signature Drips: Hold a chilled, stuffed strawberry by its green leafy top. Dip the entire bottom pointed end (about halfway up the strawberry) into the melted chocolate. Allow the excess to drip back into the bowl. To create the signature drips seen in image_1.png, use a tiny skewer to guide a bead of chocolate from the rim of the chocolate cup, allowing it to drip cascade-like down the cream cheese filling towards the pointed end. The cold cream cheese will set the drip.
- Set and Serve: Place the chocolate-dipped, stuffed strawberries standing upright on a fresh sheet of parchment paper. If graham cracker crumbs are desired for the base, dip the wet chocolate pointed-end into the crumbs now. Chill in the refrigerator for at least 30 minutes to set the chocolate. Serve within 2-4 hours for best texture.