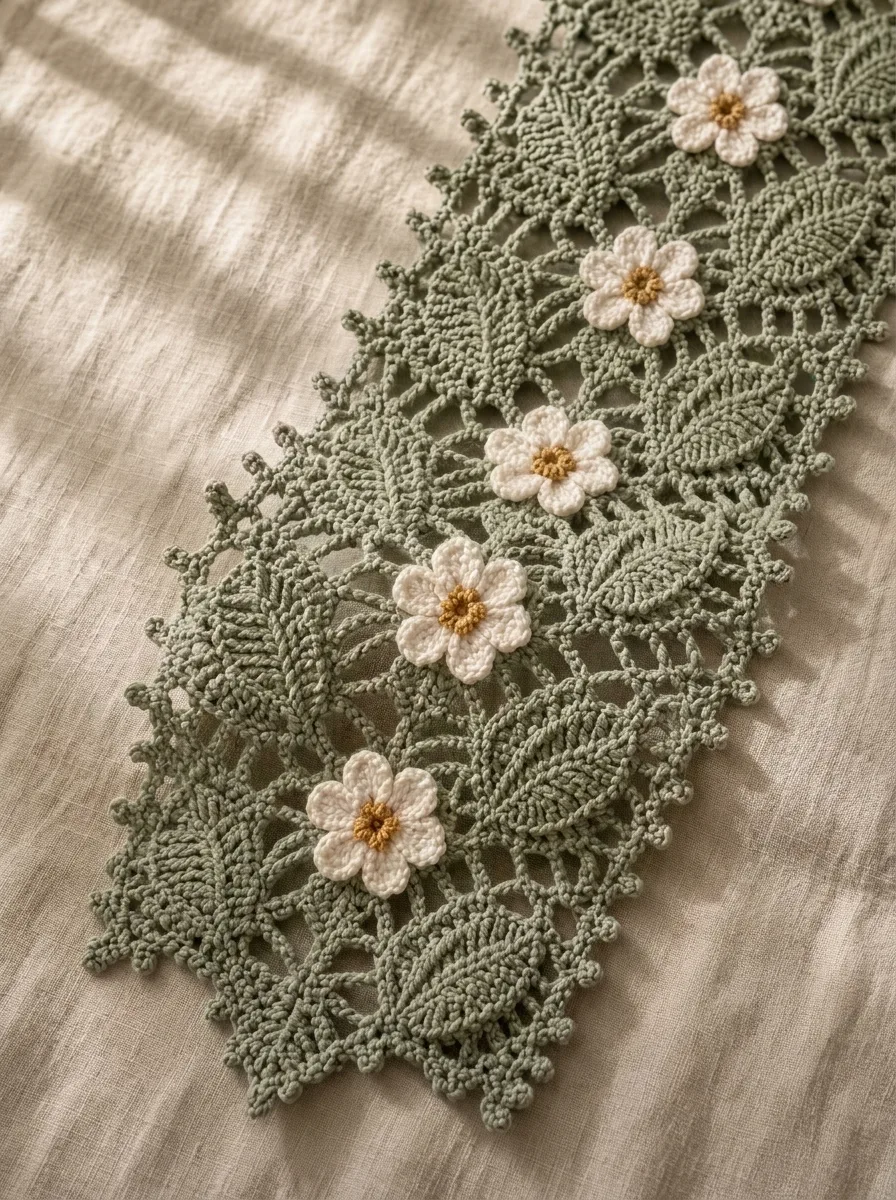
Cottagecore Sage Leaf & Daisy Lace Table Runner
📖 B. INTRODUCTION
There is something purely magical about bringing the beauty of the outdoors onto your dining table, and this Cottagecore Sage Leaf & Daisy Lace Table Runner does exactly that. Inspired by vintage botanical lace and sunlit spring afternoons, this breathtaking project combines the delicate structure of crochet leaf motifs with the cheerful pop of three-dimensional daisies. Whether you are dressing up your dining room for a spring brunch, creating a handmade heirloom for a wedding gift, or simply adding a touch of whimsy to your everyday decor, this runner is a showstopper.
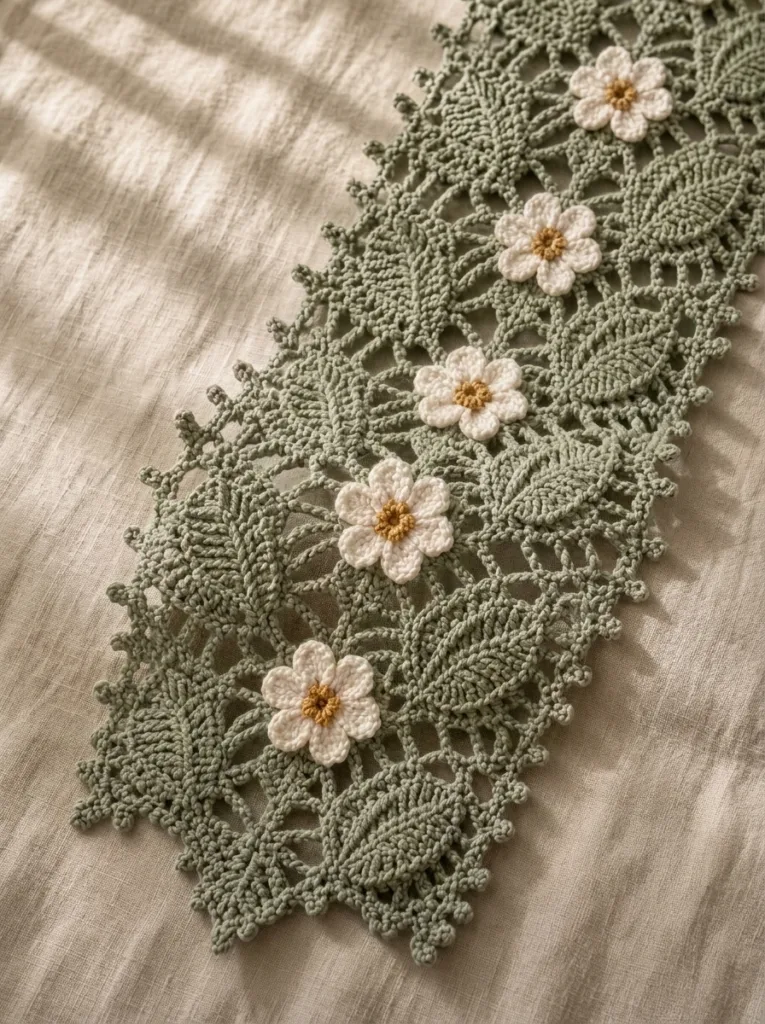
Looking closely at the design, the most striking features are the intricate, openwork leaf shapes that branch beautifully through the sage green mesh, all framed by a delicate, rustic picot border. The true focal point, however, is the row of puffy, textured white and yellow daisies applied down the center. These flowers lift off the fabric, creating a lovely tactile element that breathes life into the classic lace background.
While lace crochet can look intimidating, this design is built on a very logical, repetitive stitch sequence. Once you get the hang of the leaf-and-mesh repeats, the runner works up wonderfully. Plus, it offers endless personalization! You can easily adjust the length to fit an entryway console or a grand banquet table, swap the sage green for a moody terracotta to fit autumn, or change the daisy colors to match your home’s palette.
Grab a cup of tea, your favorite cotton yarn, and let’s bring this botanical dream to life!
🔍 C. MAIN PATTERN OVERVIEW
This pattern is divided into three distinct, manageable parts to keep the construction process enjoyable and organized:
- Part 1: The Leaf Lace Runner Base: This is the main body of the project, crocheted flat in rows. It uses a repeating sequence of double crochet clusters and chain spaces to create the solid leaf shapes surrounded by an open, airy mesh.
- Part 2: The Picot Edging: Worked in the round around the entire perimeter of the finished runner base, this border adds a clean finish and the charming, tiny pointed picots seen along the edge.
- Part 3: The 3D Daisies: These plump, six-petal flowers are crocheted separately in the round using puff or cluster stitches to give them their raised texture. They are then securely sewn down the center line of the runner.
🎯 D. SKILL LEVEL
Intermediate
This pattern requires a solid understanding of basic crochet stitches, chain spaces, and working in rows. You will also need to feel comfortable crocheting clusters and following a multi-row repeat to form the lace shapes.
Techniques Involved:
- Working flat in rows and in continuous rounds (for the flowers)
- Creating chain-space mesh (filet-style base)
- Working double crochet and treble crochet clusters
- Creating picot stitches for the border
- Sewing and applique attachment
- Wet blocking lace (crucial for the final look)
📏 E. FINISHED SIZE
Dimensions: Approximately 12 inches (30.5 cm) wide by 48 inches (122 cm) long, including the border.
Customization Notes:
- Length: You can easily make the runner longer or shorter by adding or subtracting row repeats. (Instructions for adjusting the foundation chain are provided in the Notes Before You Begin section).
- Width: The width is determined by your starting chain. The pattern includes instructions for modifying the width by adding multiples of the stitch repeat.
- Factors affecting size: Hook size, yarn weight, and your natural tension will change the final dimensions. Heavy starching and aggressive blocking can also stretch the lace by an additional 1 to 2 inches in both directions.
🧮 F. GAUGE
Gauge: 2 full leaf motifs (one 14-stitch repeat + 3 edge stitches) = 4.5 inches (11.5 cm) wide; 8 rows = 4 inches (10 cm) tall unblocked.
Gauge Note: For lace table runners, exact gauge is not strictly critical unless you are trying to match a specific table dimension. What matters most is that your stitches are consistent and that the fabric is slightly relaxed. Because this is lace, the true beauty and final measurements will emerge after wet blocking. If your fabric feels too stiff or tight while working, go up a half hook size.
🧶 G. REQUIRED YARN AMOUNTS
For this project, a Light DK (Weight 3) or Sport (Weight 2) 100% mercerized cotton yarn is highly recommended. Cotton provides the best stitch definition and holds up exceptionally well to blocking and starching.
- Main Color (MC) – Sage Green: Approximately 650 – 700 yards. (Used for the main lace runner body and the picot border).
- Contrast Color A (CCA) – Soft White: Approximately 80 – 100 yards. (Used for the daisy petals).
- Contrast Color B (CCB) – Mustard Yellow: Approximately 25 – 35 yards. (Used for the daisy centers).
Note: Yarn amounts are estimates based on the stated finished size. If you choose to lengthen the runner or add more flowers, you will need additional yarn.
🧰 H. MATERIALS
- Yarn: DK or Sport weight cotton yarn in Sage, White, and Mustard (see amounts above).
- Hook: 3.5 mm (US E-4) crochet hook (or size needed to obtain gauge/preferred drape).
- Tapestry Needle: For weaving in ends and sewing the flowers to the lace base.
- Scissors: A sharp pair of craft scissors.
- Stitch Markers: 4-6 markers to mark corners during the border phase, and for planning flower placement.
- Blocking Supplies: Rust-proof T-pins, a blocking mat, and optionally, a spray bottle with water and mild fabric starch (highly recommended for table runners).
🔤 I. ABBREVIATIONS – US TERMS
- ch: chain
- st(s): stitch(es)
- sl st: slip stitch
- sc: single crochet
- hdc: half double crochet
- dc: double crochet
- tr: treble (triple) crochet
- sk: skip
- sp(s): space(s)
- inc: increase (2 stitches in the same stitch)
- MR: Magic Ring (or magic circle)
- YO: yarn over
- Picot: ch 3, sl st into the 3rd ch from the hook (or sl st into the front loop and left vertical bar of the single crochet just made).
- 3-tr cl (3 Treble Cluster): *YO twice, insert hook into st, YO, pull up a loop, (YO, pull through 2 loops) twice; repeat from * two more times in same st. YO, pull through all 4 loops on hook.
📝 J. NOTES BEFORE YOU BEGIN
- Turning Chains: The ch 3 at the beginning of a row always counts as your first double crochet (dc) unless otherwise stated.
- Modifying Width: The foundation chain requires a multiple of 14 stitches, plus 5 extra chains (3 for the turning chain, 2 for the edge offset). To make it wider, add chains in groups of 14.
- Modifying Length: Simply continue repeating Rows 2 through 9 until you reach your desired length, ending on a Row 9 repeat so the ends mirror each other.
- Working into Chains: For the neatest edge, work your foundation row into the back bump of the starting chain. When skipping chains in the lace pattern, ensure you pull the chain spaces slightly taut so the leaf motifs pop.
- Assembly: The daisies are crocheted completely separately and sewn on at the very end. This allows you to block the green lace perfectly flat before adding the textured 3D elements.
🪡 K. COMPLETE PATTERN
🌱 The Sage Leaf Lace Runner Base
What you are making: The main rectangular lace body of the table runner.
Yarn: Main Color (Sage Green)
Foundation Row: Ch 75 (This is five 14-st repeats + 5 extra chains). Row 1: Dc in 4th ch from hook (the skipped 3 chs count as first dc), dc in next 2 ch. *Ch 3, sk 3 ch, sc in next ch, ch 3, sk 3 ch, dc in next 7 ch. Rep from * across, ending the last repeat with dc in the last 4 ch instead of 7. Turn. (You should have 6 solid dc blocks separated by chain-and-sc spaces). Row 2: Ch 3 (counts as dc here and throughout), dc in next 2 sts. *Ch 4, sk the ch-3 sp, sc in next sc, ch 4, sk the ch-3 sp, sk 1 dc, dc in next 5 dc. Rep from * across, ending last repeat with dc in last 3 sts (the last st is the top of the turning ch). Turn. Row 3: Ch 3, dc in next st. *Ch 3, sc in next ch-4 sp, ch 3, sc in next ch-4 sp, ch 3, sk 1 dc, dc in next 3 dc. Rep from * across, ending last rep with dc in last 2 sts. Turn. Row 4: Ch 3, dc in next st. *Ch 3, sk ch-3 sp, 5 dc in next sc (this creates the base of a new alternating leaf), ch 3, sk ch-3 sp, sk 1 dc, dc in next dc (the very tip of the old leaf). Rep from * across, ending last rep with dc in last 2 sts. Turn. Row 5: Ch 3, dc in next st. *Ch 4, 2 dc in first dc of the 5-dc group, dc in next 3 dc, 2 dc in last dc (you now have 7 dc), ch 4, sk the single dc. Rep from * across, ending with dc in last 2 sts. Turn. Row 6: Ch 3, dc in next st. *Ch 3, sc in ch-4 sp, ch 3, sk 1 dc of the leaf, dc in next 5 dc, ch 3, sc in next ch-4 sp, ch 3, sk the gap. Rep from * across, ending with dc in last 2 sts. Turn. Row 7: Ch 3, dc in next st. *Ch 3, sc in next ch-4 sp, ch 3, sc in next ch-4 sp, ch 3, sk 1 dc, dc in next 3 dc. Rep from * across, ending with dc in last 2 sts. Turn. Row 8: Ch 3, dc in next 2 sts (working the 2nd into the ch-sp). *Ch 3, sk ch-3 sp, 5 dc in next sc, ch 3, sk ch-3 sp, dc in the center dc of the 3-dc group. Rep from * across, ending with dc in last 3 sts. Turn. Row 9: Ch 3, dc in next 2 sts. *Ch 4, sk the single dc, ch 4, 2 dc in first dc of the 5-dc group, dc in next 3 dc, 2 dc in last dc (7 dc). Rep from * across, ending with dc in last 3 sts. Turn.
Rows 10 – 97: Repeat Rows 2 through 9 to continue the alternating leaf and diamond mesh pattern. You can stop sooner or continue longer depending on your table size. Make sure to finish on a Row 9 repeat so the runner is symmetrical.
Do not fasten off.
✨ The Picot Edging
What you are making: The textured, delicate border around the runner.
Yarn: Main Color (Sage Green)
Starting point: Where you just left off on the lace body.
Round 1:
- Top Edge: Ch 1, sc in same st. Sc evenly across the top edge, placing 3 sc in the corner stitch.
- Side Edge: Rotate to work down the long side of the runner. Work 2 sc around every dc post down the side. Place 3 sc in the corner stitch.
- Bottom Edge: Sc evenly across the foundation chain edge. Place 3 sc in the corner stitch.
- Other Side Edge: Work 2 sc around every dc post up the second long side. Place 2 sc in the final corner (the first sc of the round acts as the 3rd corner st). Sl st to the first sc to join.
Round 2 (The Picot Round):
- Ch 1, sc in first st.
- *Ch 1, sk 1 st, sc in next st, ch 3, sl st into 3rd ch from hook (picot made), sc in next st. Rep from * around the entire perimeter.
- Note for Corners: When you reach the 3-sc groups at the corners, work (sc, picot, sc) all into the very center stitch of the corner to give it a sharp, defined point.
- Sl st to the first sc to join. Fasten off and weave in the green ends.
🌸 The 3D Daisies (Make 7 to 9)
What you are making: The textured flowers to sew down the center.
Yarn: Mustard Yellow (CCB) and Soft White (CCA)
Quantity: Make as many as needed to space them about 5 to 6 inches apart down the center of your runner. For a 48-inch runner, 7 or 8 flowers usually look best.
Flower Center: R1: With Mustard Yellow (CCB), create a MR. Ch 1, work 6 sc into the ring. Pull tight to close. (6 sts) R2: 2 hdc in each st around. Sl st to the first hdc to join. (12 sts) Fasten off CCB, leaving a short tail to weave in.
Flower Petals: R3: Attach Soft White (CCA) to any st from R2 with a sl st.
- Petal 1: Ch 3. Work a 3-tr cl into the same stitch. Ch 3, sl st into the next st.
- Petal 2: Sl st into the next st. Ch 3, work a 3-tr cl into the same st. Ch 3, sl st into the next st.
- Petals 3-6: Repeat the instructions for Petal 2 four more times around the center.
- You will end up with 6 plump petals. Sl st into the base of the very first ch-3 to close the round.
- Fasten off, leaving a long white tail (about 12 inches) for sewing the flower to the runner.
🎨 L. STYLING / ASSEMBLY / STABILITY / FINAL SHAPING
The magic of lace happens in the assembly and blocking phase! Do not skip these steps, as unblocked lace will look crumpled and the leaves won’t show their beautiful definition.
Step 1: Blocking the Lace Base (Crucial!)
- Before attaching the flowers, submerge your sage green runner in lukewarm water with a drop of gentle soap or no-rinse wash.
- Gently squeeze out excess water (do not wring). Roll it in a clean dry towel and press to remove more moisture.
- Lay it flat on blocking mats. Using rust-proof T-pins, pin the four corners down to establish your rectangle.
- Gently stretch and pin the long sides, placing a pin in every 2nd or 3rd picot along the edge. Pull the lace open so the chain spaces are taut and the leaf motifs flatten out beautifully.
- Optional but recommended: Mist lightly with fabric starch for a crisp, professional table-ready finish. Allow it to dry completely (usually 24-48 hours).
Step 2: Placing the Daisies
- Once the green runner is dry and unpinned, lay it out flat on a table.
- Take your finished daisies and arrange them down the exact vertical center of the runner.
- Position them so they rest in the “diamond” chain spaces between the leaf motifs. Space them out evenly (approx. every 5-6 inches, or every other leaf repeat).
- Pin each flower in place through its yellow center so the white petals remain free and 3D.
Step 3: Sewing the Daisies
- Using the long white tail left on your daisies and a tapestry needle, carefully sew the center of the flower to the sage green lace underneath.
- ⚠️ Important: Only stitch through the back loops of the yellow center and the inner base of the white petals. Do not sew the tips of the petals down. Letting the petals lift slightly off the table runner gives it that beautiful 3D cottagecore effect seen in the reference photo.
- Tie off securely on the back side of the runner and weave in the ends neatly so they are invisible from the front.
✅ Final Finishing Checklist:
- ✅ All ends are securely woven in and trimmed.
- ✅ Runner is blocked flat, corners are perfectly square.
- ✅ Picot edging is distinct and points outward.
- ✅ Daisies are aligned in a straight line down the center.
- ✅ Flower petals are unattached at the tips, maintaining a 3D pop.
💡 M. HELPFUL CROCHET TIPS
- 💡 Count Your Chains: Lace is unforgiving if a stitch is skipped by accident. Periodically check your stitch counts, especially at the end of a row, to ensure your leaf motifs are stacking properly.
- 💡 Tension Control: Try to maintain an even, relaxed tension. If your chain spaces are too tight, the fabric will pucker. If they are too loose, the leaves will look sloppy.
- 💡 Weaving Ends in Lace: Because lace has so many holes, weave your tails into the solid double-crochet blocks (the leaves) rather than trying to hide them along the thin chain-space strands.
- 💡 Puffier Petals: If you want your daisy petals to look even more pronounced and chubby, substitute the 3-tr cl for a 4-tr cl (yarn over and pull up 4 partial treble crochets instead of 3).
- 💡 Starching: Liquid spray starch is your best friend for table linens! It prevents the edges from curling over time and keeps the geometric lace pattern crisp even after being handled.
- 💡 Petal Fluffing: After sewing your flowers on, use the blunt end of your crochet hook to gently push out the treble clusters from behind. This “fluffs” them up so they look incredibly full.
🧼 N. CARE INSTRUCTIONS
Because this table runner will likely live in a dining space, it may eventually encounter a spill.
- Washing: Always hand wash lace items. Submerge in cold or lukewarm water using a gentle detergent (like Soak or Eucalan). Gently agitate the water with your hands, but never scrub or wring the fabric, as this will distort the lace and ruin the 3D flowers.
- Drying: Lift carefully, supporting the weight of the wet cotton. Roll in a thick towel and press to remove moisture.
- Re-blocking: Every time you wash this runner, you will need to re-block it flat with pins to restore the crisp edges and openwork leaf pattern.
- Storage: Roll the table runner loosely around a cardboard tube (like a wrapping paper tube) rather than folding it. Folding creates hard creases in starched lace that can be difficult to remove without re-wetting.
❓ R. FAQ
❓ Can I use acrylic yarn instead of cotton? While you can use acrylic, it is not recommended for this specific project. Acrylic yarn does not block well, meaning the lace chain-spaces won’t open up and look crisp. Cotton is much better at holding the structural shape of lace and handles the heat of a dining table (if hot dishes are placed nearby) safely.
❓ How do I make the table runner wider? The pattern is worked over a multiple of 14 stitches. To make the runner wider, simply add chains in multiples of 14 to your foundation chain before beginning Row 1. Keep in mind that a wider base may require additional rows of daisies side-by-side rather than a single line down the center!
❓ Can I attach the daisies using a hot glue gun? Because this is a fabric item that may need to be washed, sewing the daisies on with a tapestry needle and yarn is highly recommended. Hot glue can dry hard, look messy through the lace holes, and may peel off in the wash.
❓ Why does my lace look ruffled and wavy instead of flat? If your runner is wavy before blocking, you may be crocheting your chain spaces too loosely or you may have accidentally added extra stitches. Count your clusters carefully. If the counts are correct, don’t worry! Wet blocking will stretch the solid stitches and pull the chains taut, flattening out most minor ruffling.
❓ Is this pattern suitable for a beginner? This pattern is best suited for an intermediate crocheter. A beginner who is very comfortable with counting stitches and working double crochets could tackle it, but the openwork lace requires a good eye for reading stitches and understanding row repeats.