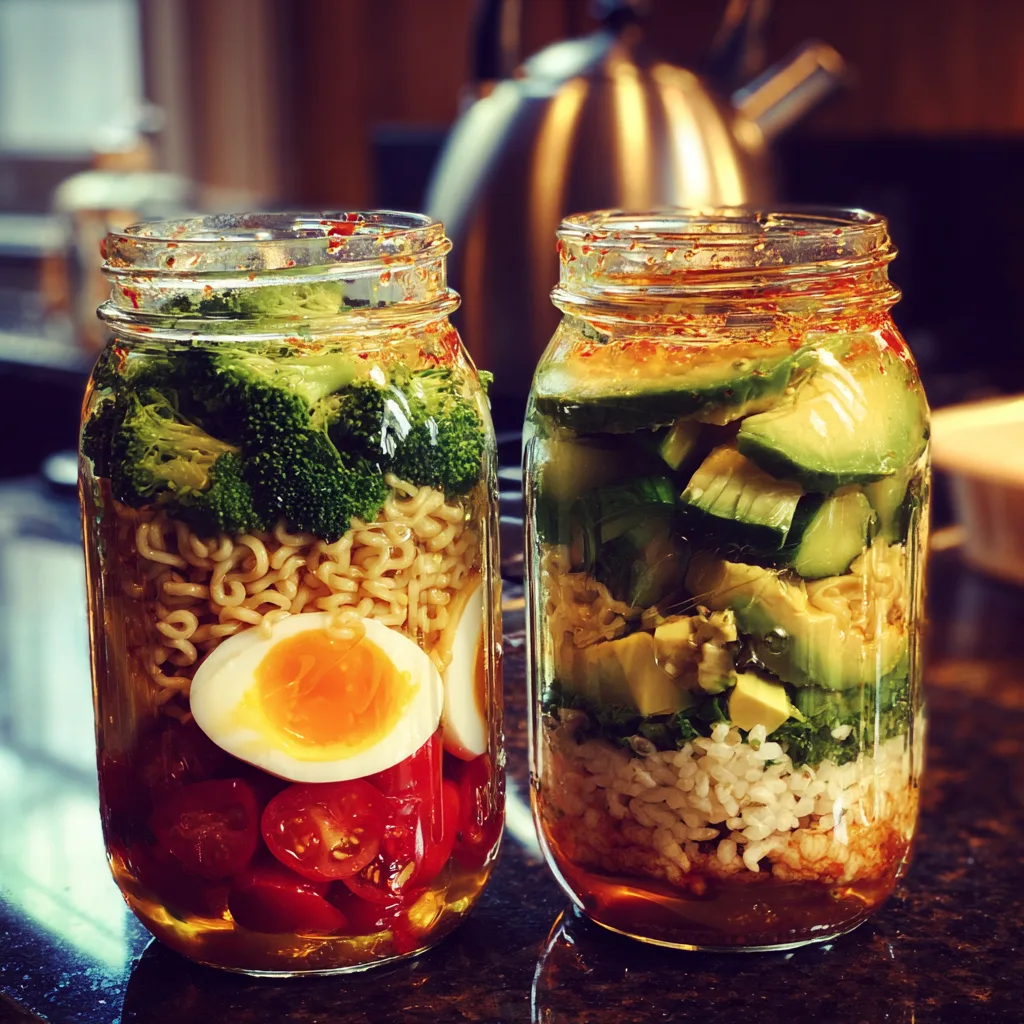
Duo of Mason Jar Lunches
The Ultimate Guide to Mason Jar Lunches: Portable, Pretty, and Perfectly Prepped
In today’s fast-paced world, finding the time to enjoy a healthy, delicious, and visually appealing lunch can feel like an impossible task. We often resort to sad desk salads, expensive takeout, or heavily processed convenience meals. But what if the secret to a perfect midday meal was sitting right in your pantry? Enter the mason jar lunch. This revolutionary approach to meal prep has taken the culinary world by storm, offering a solution that is as practical as it is photogenic. By mastering the art of the mason jar lunch, you can transform your workweek nutrition, save money, and look forward to every lunch break.
Mason jar lunches are not just a passing social media trend; they are a highly effective method for portion control, freshness preservation, and flavor enhancement. In this comprehensive guide, we will explore everything you need to know about packing the perfect portable meal. We will dive deep into the science of layering, provide you with two incredibly distinct and mouth-watering recipes—a refreshing layered fiesta salad and a comforting “just add water” instant noodle soup—and equip you with the tips and tricks necessary to become a meal prep master.
Why Choose Mason Jars for Your Meal Prep?
You might be wondering, why go through the trouble of using a glass jar when plastic containers are readily available? The benefits of utilizing mason jars for your lunches extend far beyond their undeniable aesthetic appeal.
First and foremost, glass is non-porous and impermeable. Unlike plastic, which can absorb strong odors (like onions or garlic) and become stained by rich sauces (like tomato sauce or turmeric-heavy curries), glass remains completely neutral. This means your jar will never retain the ghost of lunches past. Furthermore, glass is free from BPA and other potentially harmful chemicals that can leach into your food, especially when heated.
Secondly, mason jars offer an airtight seal. The two-piece lid system, originally designed for the rigorous canning process, ensures that air is locked out. Oxygen is the enemy of fresh produce, causing rapid oxidation and wilting. By creating a tight seal, mason jars keep your greens crisp, your vegetables crunchy, and your ingredients vibrant for days longer than traditional containers.
Finally, the vertical orientation of a mason jar forces you to layer your food strategically. This verticality is the secret weapon of the mason jar lunch, preventing the dreaded “soggy salad” syndrome by keeping wet dressings far away from delicate greens until you are ready to eat.
The Science and Art of Layering a Mason Jar
To achieve mason jar perfection, you must follow the golden rules of layering. Think of your jar as a multi-story building, where the foundation must be strong enough to support the upper levels without collapsing into a mushy mess.
Layer 1: The Base (Dressings and Sauces)
Always, without exception, start with your liquid. Whether it’s a vinaigrette, a creamy ranch dressing, or a thick soup base paste, it belongs at the very bottom. This isolates the moisture.
Layer 2: The Hardy Vegetables (The Shield)
Next, add robust ingredients that won’t absorb the liquid quickly or that actually benefit from marinating. Think cherry tomatoes, cucumbers, carrots, bell peppers, chickpeas, or beans. These act as a barricade between the dressing and the rest of your meal.
Layer 3: The Soft Vegetables and Fruits
Now you can add softer produce like avocados, corn, peas, or berries. These are protected from the dressing by the hardy layer below.
Layer 4: The Grains and Proteins
Add your quinoa, rice, pasta, chicken, tofu, or hard-boiled eggs here. Keeping them away from the dressing ensures they maintain their intended texture.
Layer 5: The Delicate Greens
The absolute top layer should always be your leafy greens—spinach, arugula, lettuce, or fresh herbs. Placed here, they remain crisp and completely dry until you shake the jar or dump it into a bowl.
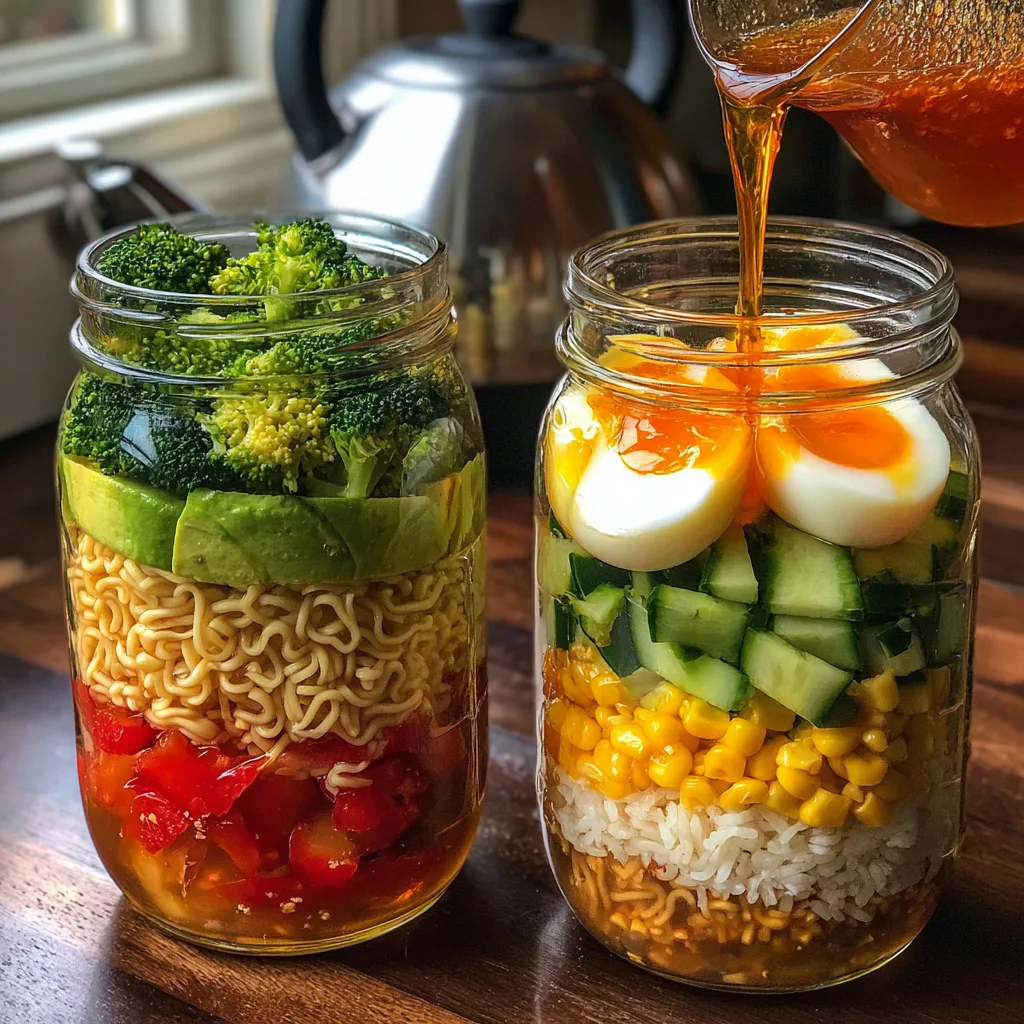
Recipe 1: The Vibrant Layered Fiesta Bowl Jar
Our first recipe is a cool, crisp, and incredibly satisfying take on a burrito bowl. It’s packed with fiber, healthy fats, and complex carbohydrates to keep your energy levels stable throughout the afternoon.
Ingredients
- – 1/4 cup lime cilantro vinaigrette (or your favorite dressing)
- – 1/2 cup diced fresh red tomatoes
- – 1/2 cup diced cucumber
- – 1/2 cup canned black beans, rinsed and drained
- – 1/2 avocado, diced and tossed in lime juice (to prevent browning)
- – 1/2 cup cooked white or brown rice, cooled
- – Optional: Fresh cilantro for garnish
Instructions
- Prepare the Dressing: Pour the lime cilantro vinaigrette directly into the bottom of a clean, wide-mouth quart-sized mason jar.
- Add the Acidic Layer: Carefully drop the diced tomatoes into the dressing. The tomatoes are sturdy enough to sit in the liquid without losing their structural integrity.
- Build the Crunchy Barrier: Layer the diced cucumber over the tomatoes.
- Add the Protein and Fiber: Spoon in the rinsed black beans, creating a distinct, dark layer.
- Introduce Healthy Fats: Add the diced avocado. Make sure it has been tossed with a little lime juice to keep its bright green color appealing until lunchtime.
- Top with Grains: Gently pack the cooked and cooled rice on top of the avocado. Press down lightly if necessary to fit everything in.
- Seal and Store: Secure the lid tightly and store in the refrigerator for up to 3 days. When ready to eat, simply shake vigorously or pour into a bowl and mix!
Recipe 2: The “Just Add Water” Instant Noodle Soup Jar
For those days when the office is freezing and you crave something warm and comforting, this homemade instant noodle soup is a game-changer. It utilizes the mason jar as both a storage vessel and a cooking pot.
Ingredients
- – 1 tablespoon chicken or vegetable bouillon paste (or miso paste)
- – 1 teaspoon soy sauce
- – 1/2 teaspoon toasted sesame oil
- – 1/2 cup fresh broccoli florets, chopped small
- – 1 block of instant ramen noodles (discard the seasoning packet)
- – 1 soft-boiled egg, halved
- – 1 cup boiling water (added right before eating)
Instructions
- Create the Flavor Base: In the bottom of your mason jar, combine the bouillon paste, soy sauce, and toasted sesame oil. This thick paste will act as your soup concentrate.
- Layer the Vegetables: Add the chopped broccoli florets directly on top of the flavor base. Because they are raw, keeping them at the bottom ensures they will be exposed to the most heat when the water is added later.
- Add the Noodles: Break the instant ramen noodle block in half if necessary to fit it into the jar. Place the noodles over the broccoli.
- Top with Protein: Gently place the two halves of your soft-boiled egg on top of the noodles.
- Seal and Transport: Seal the jar and keep it in the fridge until you leave for work.
- The “Cook” Step: When it is time for lunch, remove the lid. Carefully pour boiling water from a kettle directly into the jar, covering the noodles and vegetables.
- Steep and Enjoy: Loosely place the lid back on the jar (do not seal it tight, as steam needs to escape) and let it sit for 3 to 5 minutes. Use a fork to stir up the flavor base from the bottom, mixing everything into a rich, hot broth. Enjoy straight from the jar!
Essential Tips for Mason Jar Meal Prep Success
To ensure your meal prep journey is as smooth as possible, keep these expert tips in mind.
Always Choose Wide-Mouth Jars: While standard jars are beautiful, getting a fork in and out of a narrow opening is frustrating. Wide-mouth jars, typically in the pint or quart sizes, are essential for easily packing and consuming your meals.
Cool Your Ingredients: Never put warm grains, roasted vegetables, or hot proteins into a jar that you plan to seal and refrigerate. The residual heat will create condensation, which leads to soggy greens and premature spoilage. Let everything come to room temperature first.
Pack it Tight: The less air circulating inside the jar, the longer your food will stay fresh. Don’t be afraid to gently press down your layers as you build them, maximizing the space.
To Dump or Not to Dump? While you can certainly eat your layered salads straight from the jar, the experience is often vastly improved by pouring the contents into a standard bowl. This allows the dressing at the bottom to naturally cascade over the rest of the ingredients, coating everything perfectly without making a mess on your desk.
Creative Variations to Keep Your Lunches Exciting
Once you understand the basic layering principles, the possibilities are virtually endless. Here are a few variations to spark your culinary imagination:
The Mediterranean Mezze Jar: Start with a lemon-herb vinaigrette, layer chickpeas, diced red onion, Kalamata olives, cucumbers, cherry tomatoes, quinoa, and top with fresh spinach and crumbled feta cheese.
The Breakfast Overnight Oats Jar: Mason jars aren’t just for lunch! Combine rolled oats, almond milk, chia seeds, and a splash of maple syrup at the bottom. Top with fresh berries and sliced almonds for a grab-and-go breakfast.
The Deconstructed Sushi Bowl: Start with a base of soy sauce and sriracha mayo. Layer edamame, shredded carrots, diced cucumber, imitation crab or cooked shrimp, cold sushi rice, and top with crushed seaweed snacks.
Serving Suggestions and Pairings
While a quart-sized mason jar meal is usually satisfying enough on its own, you can always elevate your lunch break with simple pairings. If you are having the Fiesta Bowl Jar, bring along a small bag of tortilla chips for scooping and added crunch. If you are enjoying the Noodle Soup Jar, a side of edamame or a small, simple side salad complements the warm broth beautifully.
For beverages, consider pairing your healthy meal with an equally refreshing drink. A secondary, smaller mason jar filled with iced green tea or fruit-infused water completes the aesthetic and keeps you hydrated.
Fun Facts and Cultural Context: The History of the Mason Jar
It is fascinating to consider how a 19th-century invention became a modern symbol of hipster culture and health-conscious meal prepping. The mason jar was invented and patented by a tinsmith named John Landis Mason in 1858. Before his invention, food preservation was a risky business involving wax seals and corks that frequently failed.
Mason’s stroke of genius was the threaded zinc cap and the rubber ring on the underside of the lid, which created the first reliable, reusable airtight seal. This revolutionized home canning, allowing families to safely preserve their summer harvests to survive long winters.
Over 150 years later, while we still use them for canning jams and pickles, the mason jar has experienced a massive cultural resurgence. It has become a staple at rustic weddings, a trendy drinking glass in hip cafes, and, of course, the ultimate vessel for portable, photogenic lunches. Its endurance is a testament to the brilliance of simple, functional, and durable design.
Conclusion
Incorporating mason jar lunches into your weekly routine is more than just a diet hack; it is a lifestyle adjustment that prioritizes your health, your wallet, and your time. By taking an hour on a Sunday afternoon to chop, cook, and layer your ingredients, you are giving your future self the gift of a stress-free, delicious midday meal. Whether you prefer the crisp, refreshing crunch of a layered salad or the comforting warmth of an instant noodle soup, the mason jar is your canvas. So, grab some jars, head to the produce aisle, and start layering your way to a better lunch break today!
Duo of Mason Jar Lunches
Ingredients
Equipment
Method
- For the Fiesta Salad Jar: Pour vinaigrette directly into the bottom of a clean, wide-mouth mason jar.
- Layer the diced tomatoes, then the cucumber, followed by the black beans.
- Add the diced avocado, ensuring it’s coated in lime juice to prevent browning.
- Top with cooked, cooled rice. Seal tightly and refrigerate. Shake or pour into a bowl when ready to eat.
- For the Noodle Soup Jar: Combine bouillon paste, soy sauce, and sesame oil at the bottom of the jar.
- Layer chopped raw broccoli florets, then the instant ramen noodles (broken to fit).
- Place the halved soft-boiled egg on top. Seal and refrigerate.
- When ready to eat, pour boiling water over the ingredients, cover loosely, let steep for 3-5 minutes, stir well, and enjoy.