Easter Blossom Cookies
Easter Blossom Cookies: The Perfect Pastel Spring Treat
When the weather begins to warm and pastel colors start popping up in store windows, it can only mean one thing: spring has officially arrived, and Easter is just around the corner. It is a time for fresh starts, blooming flowers, and, of course, delightful seasonal baking. While chocolate bunnies and marshmallow chicks are undeniable staples of the holiday, there is nothing quite like a freshly baked, homemade cookie to anchor your holiday dessert table. Enter the Easter Blossom Cookie—a vibrant, cheerful, and incredibly delicious twist on a beloved classic that is guaranteed to become a new family tradition.
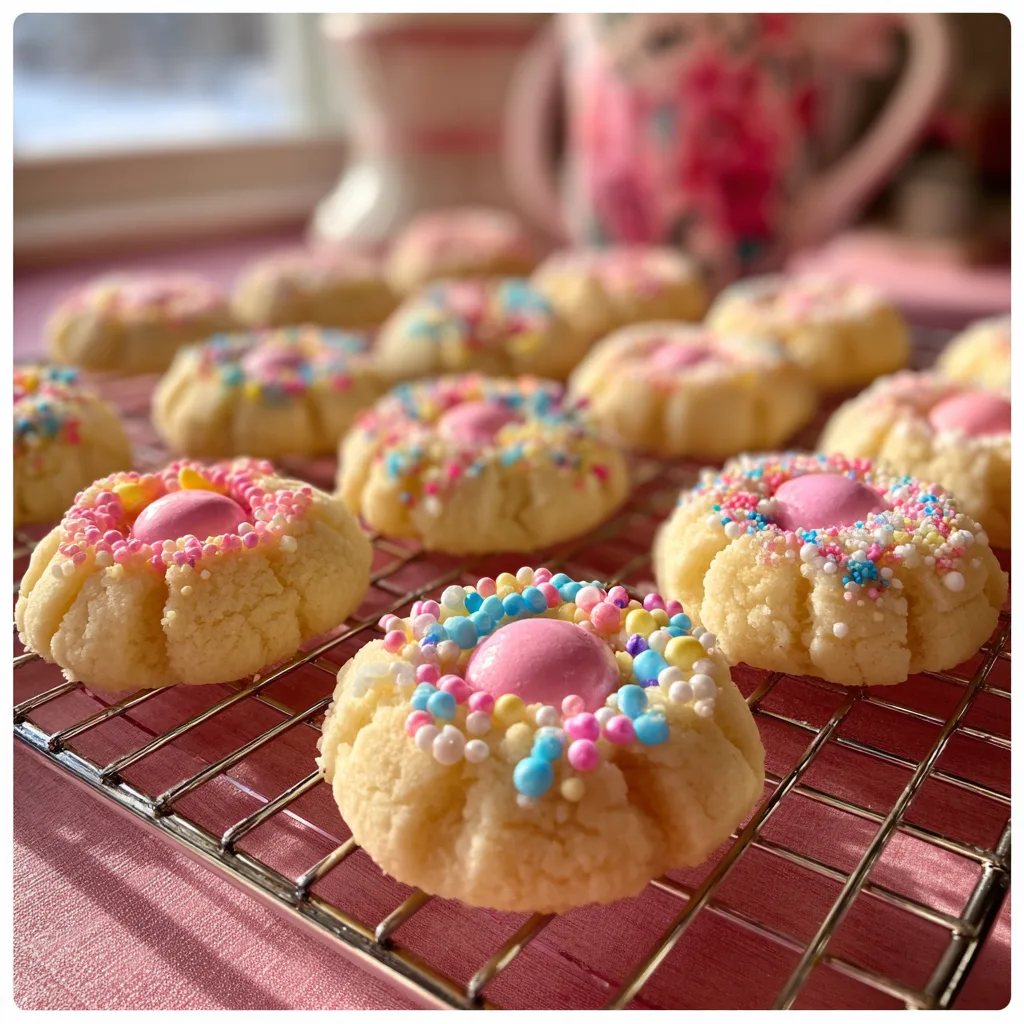
If you grew up loving the iconic Peanut Butter Blossom (that perfect peanut butter cookie crowned with a chocolate kiss), you are going to fall head over heels for this springtime variation. We have swapped the heavy peanut butter base for a light, tender, and chewy sugar cookie, rolled it in festive pastel sprinkles, and topped it with a vibrant, fruity Strawberry Hershey’s Kiss. In this comprehensive guide, we will walk you through everything you need to know to bake these picture-perfect cookies. We will cover the science of the perfect sugar cookie base, tips for keeping your Kisses intact, and fun ways to get the whole family involved in the baking process.
The Anatomy of a Perfect Blossom Cookie
The “blossom” cookie is a masterful study in contrasting textures and complementary flavors. To create the perfect Easter Blossom, we need to understand its three main components and how they work together to create a unified, melt-in-your-mouth experience.
The Soft Sugar Cookie Base: Unlike cut-out sugar cookies, which need to be firm enough to hold complex shapes, the base of a blossom cookie needs to be soft, pillowy, and slightly chewy. We achieve this texture by using a balanced ratio of butter to flour, and by introducing a small amount of milk into the dough. The milk adds moisture, ensuring the cookie remains tender even after it cools. A touch of baking soda provides just enough lift to make the cookie puffy, creating the perfect cradle for the candy center.
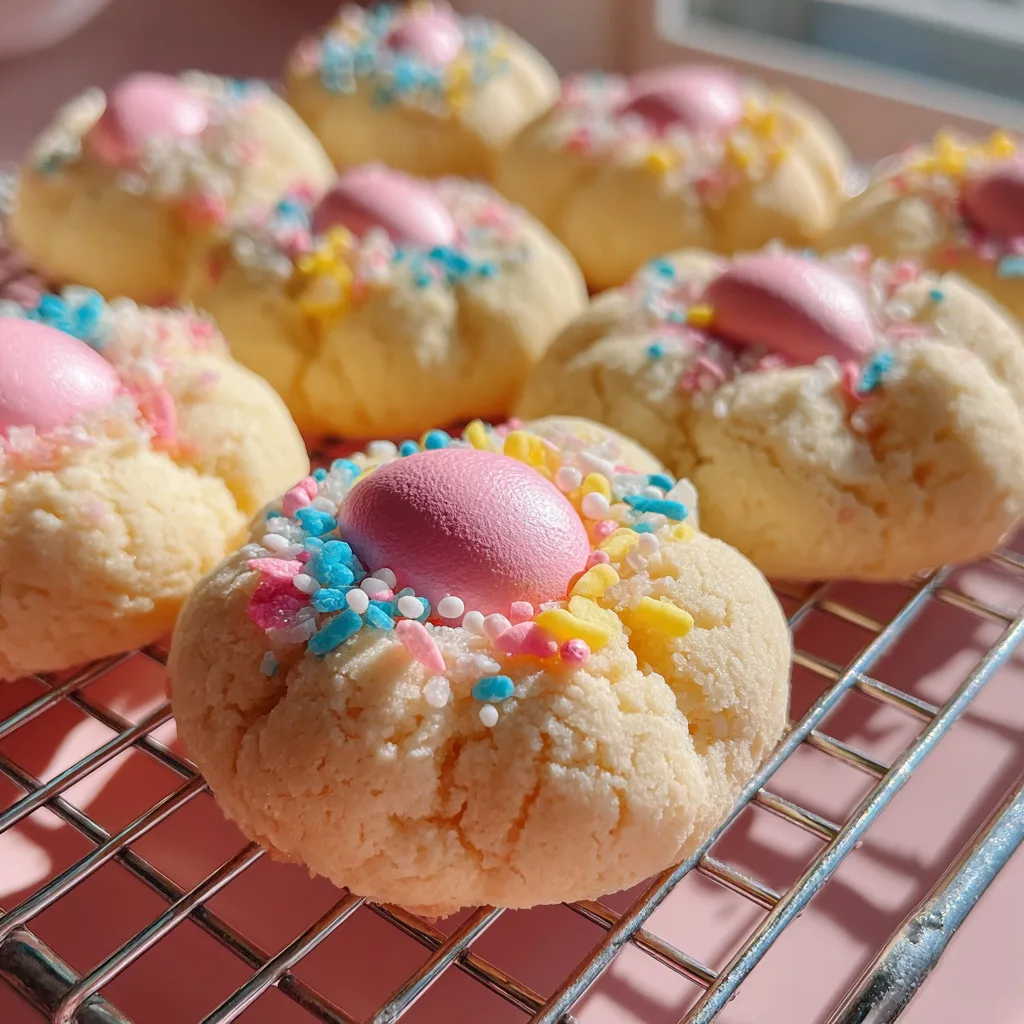
The Pastel Sprinkles: The sprinkles aren’t just for decoration; they provide a crucial textural element. Rolling the dough balls in nonpareils (those tiny, hard, round sprinkles) before baking adds a delightful, delicate crunch that contrasts beautifully with the soft cookie and the smooth chocolate. The pastel colors—pinks, yellows, light blues, and greens—instantly signal that this is a festive spring dessert.
The Strawberry Kiss: The crowning glory of this cookie is the Strawberry Hershey’s Kiss. These seasonal candies are typically a white chocolate base infused with sweet strawberry flavor and a bright pink hue. When pressed into the hot cookie straight out of the oven, the bottom of the Kiss melts just enough to adhere to the cookie, creating a seamless bond. The fruity, creamy flavor of the strawberry pairs perfectly with the buttery vanilla notes of the cookie base.
Mastering the Ingredients
The beauty of this recipe lies in its simplicity. You likely have most of the ingredients in your pantry right now. Let’s break down the lineup:
Butter: Use unsalted butter, and ensure it is softened to room temperature before you begin. Softened butter creams together with the sugar much more effectively, trapping air that helps the cookies rise and stay light.
Sugar: Standard white granulated sugar is all you need here. It provides sweetness and helps create those beautiful, slightly crisp crinkly edges.
Flour: Standard all-purpose flour provides the structure. Be sure to measure your flour correctly using the “spoon and level” method so you don’t end up with dense, dry cookies.
The Flavor Enhancers: A whole egg binds the dough, a splash of milk keeps it tender, vanilla extract adds depth of flavor, and a pinch of salt balances the sweetness.
Ingredients
- – ½ cup (1 stick) butter, softened to room temperature
- – 1 cup granulated sugar
- – 1 large egg, room temperature
- – 2 Tablespoons milk
- – 1 teaspoon pure vanilla extract
- – 2 cups all-purpose flour
- – ¼ teaspoon baking soda
- – ¼ teaspoon salt
- – 1 bag Strawberry Hershey’s Kisses (unwrapped)
- – ½ cup pastel nonpareil sprinkles (or colored sanding sugar)
Instructions
Follow these steps to bake your perfect batch of Easter Blossoms:
- Prep Your Kisses: Before you do anything else, unwrap your Strawberry Kisses. Place them in a bowl and pop them in the freezer. Freezing the Kisses helps them retain their shape when they are pressed into the hot cookies later.
- Preheat and Prep: Preheat your oven to 350°F (175°C). Line two large baking sheets with parchment paper or silicone baking mats. Pour your pastel sprinkles into a small, shallow bowl.
- Cream the Butter and Sugar: In a large mixing bowl (or the bowl of a stand mixer), beat the softened butter and granulated sugar together on medium-high speed for about 2-3 minutes, until the mixture is pale, light, and fluffy.
- Add the Wet Ingredients: Add the egg, milk, and vanilla extract to the butter mixture. Beat on medium speed until everything is well combined. Scrape down the sides of the bowl with a rubber spatula as needed.
- Mix the Dry Ingredients: In a separate medium bowl, whisk together the flour, baking soda, and salt. Gradually add the dry ingredients to the wet ingredients, mixing on low speed until just combined. Do not overmix; the dough should be soft but manageable.
- Roll the Dough: Scoop out about 1 tablespoon of dough at a time and roll it between your palms into a smooth ball. Drop the dough ball into the bowl of sprinkles and roll it around until it is completely and evenly coated.
- Bake: Place the sprinkle-coated dough balls onto the prepared baking sheets, leaving about 2 inches of space between each cookie. Bake for 8-10 minutes, or until the edges are set and the bottoms are just barely golden. The cookies will look slightly puffy and underbaked in the center—this is exactly what you want!
- The Crucial Step: Remove the baking sheets from the oven. Working quickly, gently press a frozen Strawberry Kiss into the center of each hot cookie. The edges of the cookie will crack slightly as you press down, creating that classic “blossom” look.
- Cool Completely: Allow the cookies to cool on the baking sheet for 5 minutes before transferring them to a wire rack to cool completely. The residual heat from the cookie will slightly melt the bottom of the Kiss, gluing it in place. Do not move or touch the Kisses until the cookies are 100% cool, or they will lose their shape!
Tips for Perfection and Troubleshooting
Why did my cookies spread too much? If your cookies flattened out into puddles, your butter might have been too warm (melted) rather than just softened. Alternatively, your kitchen might be very warm. If your dough feels too soft or sticky, pop the bowl in the refrigerator for 30 minutes before rolling the balls.
My Kisses melted into a puddle! This happens if you press the Kisses into the cookies while they are still in the oven, or if you try to move the cookies while the chocolate is still soft. Freezing the Kisses beforehand (Step 1) is the best trick to prevent them from melting completely from the residual heat of the baked cookie.
Can I make the dough ahead of time? Absolutely! You can make the cookie dough, cover it tightly with plastic wrap, and keep it in the refrigerator for up to 3 days. When you are ready to bake, let the dough sit at room temperature for about 15 minutes so it is soft enough to scoop and roll.
Creative Variations
This recipe is highly adaptable. If you can’t find Strawberry Kisses, or just want to mix things up, try these variations:
Classic Chocolate: Swap the Strawberry Kisses for classic Milk Chocolate or Dark Chocolate Kisses. The combination of vanilla sugar cookie, crunch, and rich chocolate is always a winner.
Lemon Blossoms: Add 1 tablespoon of fresh lemon zest to the cookie dough when you add the wet ingredients. Top with a white chocolate Kiss or a lemon-flavored candy for a bright, citrusy spring treat.
Caramel Surprise: Use Hershey’s Kisses filled with caramel for a gooey, decadent surprise in the center of every bite.
Serving and Storage
These Easter Blossoms look absolutely stunning arranged on a platter surrounded by jelly beans or chocolate eggs for your holiday gathering. They are also incredibly sturdy once fully cooled, making them perfect for packing into Easter baskets or spring care packages.
To store, place the fully cooled cookies in an airtight container at room temperature. They will stay soft and fresh for up to 5 days. If you need to stack them, place a piece of wax paper or parchment paper between the layers to protect the Kisses. You can also freeze the baked cookies in a freezer-safe container for up to 3 months. Thaw at room temperature before enjoying.
Baking Easter Blossoms is a wonderful way to celebrate the season. It is a simple, approachable recipe that yields beautiful, bakery-quality results. So gather your sprinkles, unwrap those Kisses, and enjoy the sweet taste of spring!
Easter Blossom Cookies
Ingredients
Equipment
Method
- Unwrap Strawberry Kisses and place them in the freezer to chill.
- Preheat oven to 350°F (175°C) and line baking sheets with parchment paper.
- In a large bowl, cream together the softened butter and sugar until light and fluffy.
- Beat in the egg, milk, and vanilla extract until well combined.
- In a separate bowl, whisk together the flour, baking soda, and salt. Gradually mix dry ingredients into the wet ingredients until a soft dough forms.
- Roll dough into 1-inch balls, then roll each ball in the pastel sprinkles until fully coated.
- Place on baking sheets 2 inches apart and bake for 8-10 minutes until edges are set.
- Remove from oven and immediately press a frozen Strawberry Kiss into the center of each hot cookie.
- Allow cookies to cool completely on the baking sheet before moving, so the Kisses can set.