Easy Frog Sandwiches
The Ultimate Frog Sandwiches: Fun, Easy, and Kid-Friendly Party Sliders
Every parent, caregiver, and party host knows the universal struggle: how do you make simple, wholesome food appealing to children? The answer often lies not in changing the ingredients, but in transforming the presentation. Enter the adorable, hilarious, and universally loved Frog Sandwich. These delightful little sliders take everyday lunch staples—soft buns, deli meats, cheese, pickles, and olives—and turn them into a plate full of wide-eyed, tongue-sticking-out amphibians that are practically begging to be eaten.
Whether you are trying to coax a picky eater into finishing their lunch, planning a pond-themed birthday party, preparing a memorable school lunchbox, or just looking for a fun culinary craft to do with your kids on a rainy Saturday, these frog sandwiches are the perfect solution. They require zero cooking, minimal preparation time, and absolutely no special culinary skills. In this comprehensive guide, we will explore exactly how to build these charming creations, discuss why playing with food is actually beneficial for children, provide endless flavor variations, and offer tips for making your next batch of frog sliders the talk of the playground.
The Magic of Playing with Food: Why Kids Love Frog Sandwiches
For generations, we have been told not to play with our food. However, modern child nutritionists and pediatric dietitians are flipping that old adage on its head. When children interact with their meals in a fun, sensory, and imaginative way, it drastically reduces mealtime anxiety and encourages them to try new things.
The frog sandwich is a masterclass in culinary psychology for kids. A standard ham and cheese sandwich might seem boring or unappetizing to a toddler. But when that exact same ham and cheese is folded to look like a mouth, with a juicy pickle “tongue” and silly olive “eyes,” the food stops being a chore and starts being a toy. It sparks their imagination. They might make frog noises before taking a bite, or playfully make the sandwich “hop” across the plate. This positive reinforcement builds a healthy, joyful relationship with eating.
Furthermore, these sandwiches are interactive to build. Gathering around the kitchen island to skewer olives onto toothpicks and arrange pickle slices is a fantastic fine-motor skill activity for young children. When kids are involved in the cooking and preparation process, they feel a sense of ownership over the meal, which makes them exponentially more likely to eat it without complaints.
The Anatomy of the Perfect Frog Slider: Ingredient Deep Dive
The beauty of this recipe is its sheer simplicity. You only need a handful of basic ingredients, most of which are likely already sitting in your refrigerator. Let us break down the anatomy of our edible amphibians to ensure you get the perfect look and taste every single time.
1. The Body: Soft Slider Buns
The bun is the foundation of your frog. You want to look for small, round slider buns or sweet Hawaiian rolls. Their petite, domed shape perfectly mimics the rounded back of a little green frog. It is crucial that the buns are soft. Crusty artisanal bread will not work here, as it is too hard for little mouths to bite through easily and won’t hold the shape of the frog “mouth” when stuffed with ingredients. If you want to go the extra mile, you can occasionally find green-tinted vegetable buns at specialty bakeries, or you can lightly brush the tops of standard buns with a tiny drop of green food coloring mixed with milk before serving.
2. The Smile: Deli Meat and Cheese
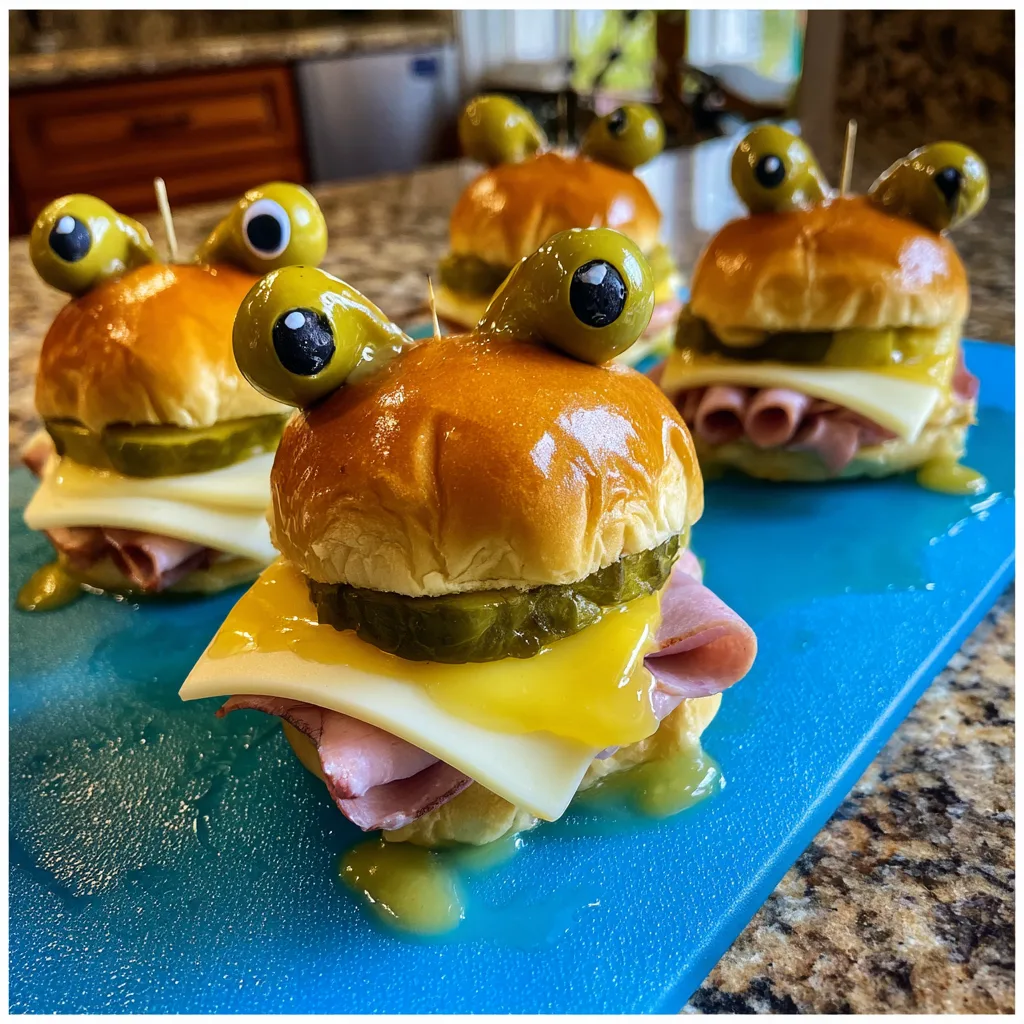
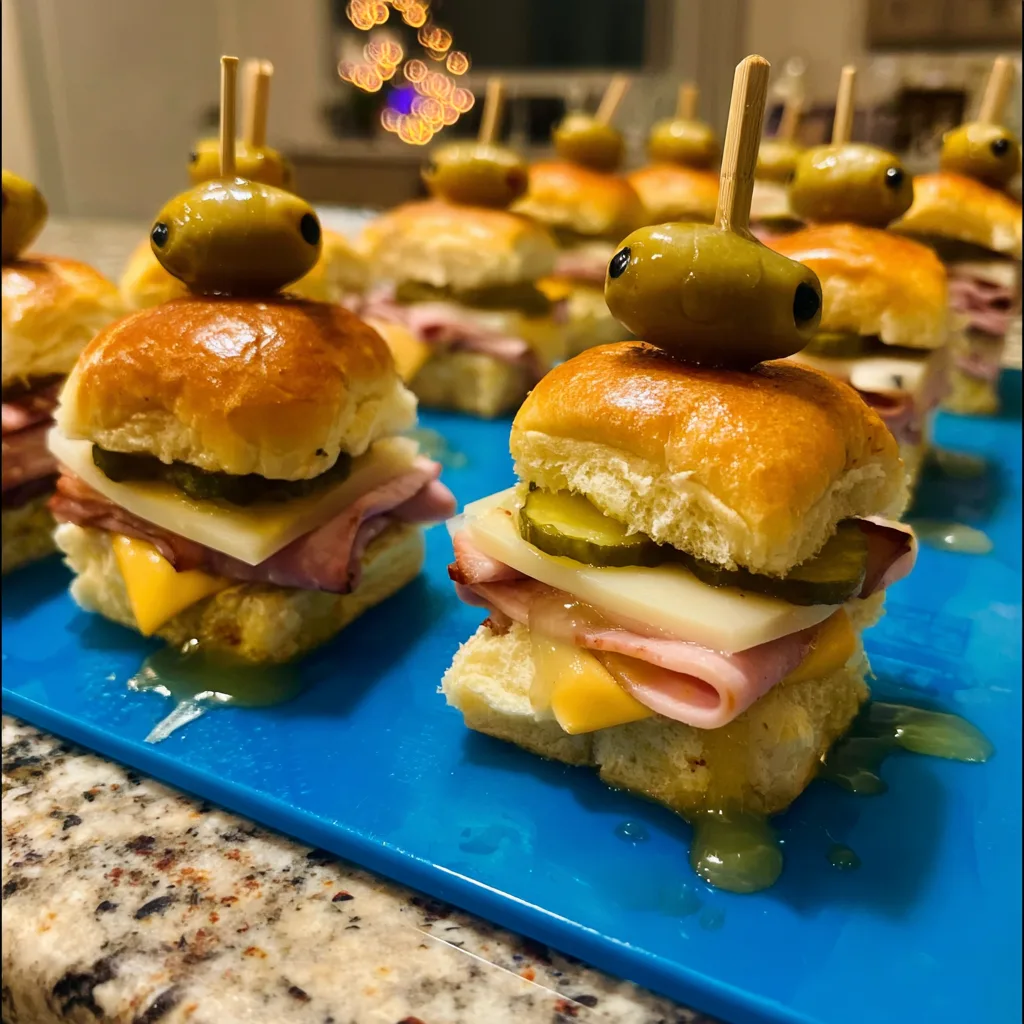
To create the wide, cartoonish mouth of the frog, you need ingredients that fold nicely. Thinly sliced deli meats are your best friend here. Classic honey ham, smoked turkey breast, or mild bologna work beautifully. By folding a circular slice of meat in half, and then in half again (creating a quarter-circle or a ruffled fan shape), you give the sandwich volume and create the illusion of a plump lower lip. Overlying this with a square of mild white cheese—such as provolone, white cheddar, or Swiss—adds a color contrast that makes the “tongue” pop visually.
3. The Tongue: The Essential Pickle Slice
This is arguably the most important feature of the frog sandwich. A frog is simply not a frog without its long, fly-catching tongue sticking out. For this, you need long, flat pickle slices, often sold as “sandwich stackers” or lengthwise slices. Dill pickles offer a fantastic, vinegary crunch that cuts through the richness of the meat and cheese, while bread-and-butter pickles offer a sweeter alternative for kids who prefer milder flavors. The pickle should be tucked between the meat and the top bun, hanging out generously over the bottom lip.
4. The Eyes: Pimento-Stuffed Olives and Toothpicks
To give your frog its wide-eyed, slightly goofy expression, nothing beats a classic green olive stuffed with a red pimento. The green olive matches the pond-life theme, while the bright red pimento naturally looks like a pupil. To attach them, simply slide the olives onto standard wooden toothpicks and pierce them directly into the top of the bun, spacing them apart like real frog eyes. Crucial Safety Note: Always remind children that there are toothpicks in the food before they eat, and for very young toddlers, you may want to remove the toothpicks and lay the olives flat on the plate right before consumption.
Ingredients You Will Need
To make a batch of these ribbiting treats, gather the following simple components:
- – 12 small Slider buns or sweet Hawaiian rolls
- – 12 slices Deli ham, turkey, or bologna (thinly sliced)
- – 6 slices Mild white cheese (provolone, Swiss, or white cheddar), cut in half
- – 12 long Pickle slices (sandwich stackers)
- – 24 Green olives stuffed with pimentos
- – 24 Wooden toothpicks
- – Optional condiments: Mayonnaise, mustard, or butter for the inside of the buns
Step-by-Step Instructions
Assembly is quick and perfectly suited for an assembly-line setup if you are making these for a large party.
- Prepare Your Station: Clean your workspace and lay out all your ingredients. Slice the slider buns completely in half so you have a distinct top and bottom for each sandwich. If using condiments, lightly spread mayonnaise or mustard on the inside of the buns to prevent them from drying out.
- Fold the Meat: Take a slice of your chosen deli meat and fold it in half, then fold it in half again loosely so it has a slightly ruffled, dimensional look. Place this ruffled meat directly onto the bottom half of the slider bun.
- Add the Cheese: Take your half-slice of cheese and place it squarely on top of the folded meat. Let the corners of the cheese hang slightly over the edge to create the look of a wide mouth.
- Place the Tongue: Take one long pickle slice and place it on top of the cheese so that at least half of the pickle is hanging out over the front edge of the sandwich. This is the frog’s tongue.
- Close the Sandwich: Gently place the top bun over the pickle, cheese, and meat. Press down very lightly—you want the front to stay slightly propped open to accommodate the “tongue.”
- Create the Eyes: Take two toothpicks. Skewer one pimento-stuffed green olive onto the top of each toothpick, ensuring the red pimento is facing forward.
- Attach the Eyes: Carefully stick the two toothpicks into the top of the bun, near the back or middle, spacing them out to look like frog eyes staring back at you. Push the toothpicks down far enough so they are stable, but leave enough room so the olives sit just above the bun.
- Serve and Enjoy: Arrange your frog sandwiches on a colorful platter or cutting board and watch them disappear!
Creative Variations and Allergy-Friendly Swaps
One of the greatest things about the frog sandwich concept is that it is merely a template. You can customize the ingredients to suit any dietary restriction, palate, or pantry inventory.
The Vegetarian Frog: Swap the deli meat for a thick slice of cucumber or a generous smear of green avocado hummus. The avocado hummus adds a wonderful green hue to the inside of the mouth, keeping perfectly on theme. You can still use the cheese and pickle tongue.
The Peanut Butter and Jelly Frog: For a sweet twist, make classic PB&J sliders. Spread peanut butter on the bottom bun and bright red strawberry jelly on the top. For the “tongue,” use a thinly sliced strawberry or a piece of fruit leather hanging out of the mouth. For the eyes, you can use toothpicks to skewer large green grapes or mini marshmallows with a dot of chocolate frosting for the pupil.
The Fancy Frog: Making these for an adult gathering or a baby shower? Elevate the ingredients. Use brioche buns, thinly sliced prosciutto or smoked salmon, a smear of herbed cream cheese, and a cornichon for the tongue. The olive eyes can remain exactly the same.
Dairy-Free and Gluten-Free: These are incredibly easy to adapt. Simply use your favorite brand of gluten-free slider buns, omit the cheese entirely (or use a vegan cheese slice), and proceed with the meat, pickles, and olives.
Perfect Occasions for Frog Sandwiches
These playful sliders are versatile enough to fit into a multitude of events and daily routines.
Themed Birthday Parties: If you are throwing a “Princess and the Frog,” “Enchanted Forest,” “Reptile and Amphibian,” or general “Pond Life” birthday party, these are an absolute must-have on the buffet table. They serve as both décor and sustenance.
School Lunchboxes: Packing a frog sandwich in a bento box is a guaranteed way to make your child smile at noon. To keep the sandwich intact in a lunchbox, you might need to use shorter toothpicks or pack the “eyes” in a separate little compartment for your child to assemble themselves at the lunch table, which adds a fun interactive element to their school day.
Halloween Parties: Frogs and toads are classic witch familiars. Serve these up at a spooky October gathering alongside a bowl of “swamp juice” (green fruit punch) and “witches’ brew” for a thematic, savory snack that balances out all the Halloween candy.
Making it a Full Meal: Thematic Side Dishes
If you want to lean fully into the pond theme, you can build an entire meal around your frog sandwiches. Consider serving them with:
- Lily Pad Kiwis: Slice fresh kiwi fruit into thick rounds. Cut a small triangle out of the edge of each slice to make them look exactly like green lily pads floating on a plate.
- Swamp Logs: Classic “Ants on a Log” (celery sticks filled with peanut butter and topped with raisins) fit perfectly into a nature or pond theme.
- Caterpillar Grapes: Skewer green grapes onto a long wooden skewer to look like a crawling caterpillar.
- Pond Water Beverage: Mix equal parts lemonade and blue sports drink to create a fun, bright green “pond water” for the kids to drink.
Storage and Make-Ahead Advice
If you are preparing for a party, you want to do as much in advance as possible. However, sandwiches can easily become soggy.
You can pre-fold the deli meat and pre-slice the cheese the night before, storing them in airtight containers in the fridge. You can also prepare all your olive “eyes” on toothpicks in advance. However, it is highly recommended that you assemble the buns, meat, and particularly the wet pickles right before serving. Pickles have a high moisture content, and if left sitting on the bread for hours, they will turn the bottom lip of your frog into a mushy mess.
If you must assemble them an hour or two ahead of time, use a generous layer of mayonnaise or butter on the inside of both buns; the fat acts as a moisture barrier, protecting the bread from the wet pickle and meat juices. Keep the assembled frogs covered lightly with plastic wrap in the refrigerator until party time.
Conclusion
Food should be nourishing, but there is no rule that says it cannot also be incredibly fun. The Frog Sandwich is a testament to the fact that a little bit of creativity can turn a mundane lunch into a memorable event. By utilizing simple, affordable ingredients and a touch of imagination, you can create a platter of food that will elicit giggles, encourage healthy eating, and make you the absolute hero of the kitchen. So grab your slider buns, fold that ham, stick out those pickle tongues, and get ready for a truly ribbiting mealtime experience!
Fun Frog Sandwiches for Kids
Ingredients
Equipment
Method
- Slice all slider buns in half. Optional: spread a thin layer of mayo or butter inside to prevent sogginess.
- Fold a slice of deli meat in half, and then in half again to create a ruffled look, and place it on the bottom bun.
- Place a half-slice of cheese on top of the folded meat, letting the corners hang slightly over the edge.
- Lay a long pickle slice over the cheese so that half of it hangs completely out the front of the bun to look like a tongue.
- Place the top bun over the fillings, leaving the front slightly propped open so the tongue is visible.
- Skewer each green olive onto a toothpick. Stick two toothpicks into the top of each bun to create the frog eyes.
- Serve immediately! Remind young children to remove the toothpicks before eating.