Gooey Brownie Pie
When it comes to desserts that universally evoke a sense of pure, unadulterated joy, chocolate always reigns supreme. There are chocolate cakes, chocolate chip cookies, and classic square brownies. But what happens when you take the dense, rich, intensely chocolatey profile of a traditional fudgy brownie and bake it in the elegant, sliceable form of a pie? You get the spectacular, crowd-pleasing phenomenon known as the Gooey Brownie Pie. This recipe is a masterclass in indulgence, boasting a perfectly crackly, paper-thin top crust that shatters beautifully under your fork, giving way to an unbelievably molten, deeply fudgy interior that practically melts in your mouth.
Whether you are hosting an elegant dinner party, throwing a casual weekend barbecue, or simply looking to satisfy an intense late-night chocolate craving, this Gooey Brownie Pie is the ultimate solution. It delivers all the comforting nostalgia of a childhood bake sale brownie, but presents it with the sophistication of a restaurant-quality dessert. In this comprehensive guide, we are going to explore every facet of creating the perfect brownie pie. From the science behind achieving that coveted shiny crust to the importance of choosing the right chocolate, you will learn exactly how to master this decadent treat.
The Magic of a Brownie in Pie Form
You might be wondering: why bake a brownie in a pie dish instead of a traditional square or rectangular pan? The answer lies in the unique texture and presentation that a pie dish provides. When baked in a round, sloping pie dish or tart pan, the edges of the brownie batter get beautifully chewy and slightly crisp, while the center remains incredibly dense and gooey. The geometry of a round pan means that the heat distributes differently than in a square pan with sharp corners, resulting in a more uniform gradient from the chewy edge to the molten center.
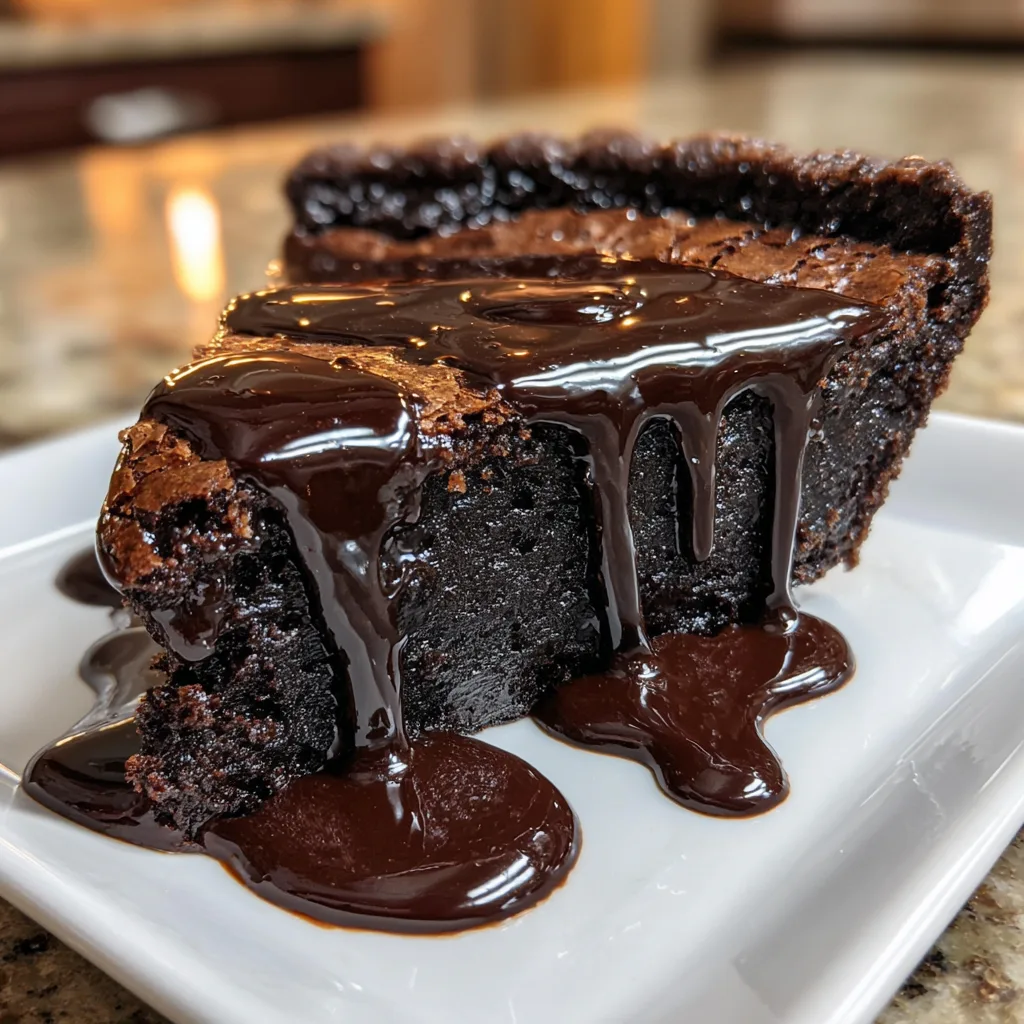
Furthermore, serving a brownie in wedge-shaped slices instantly elevates the dessert. It feels more intentional and celebratory. A wedge of Gooey Brownie Pie, especially when placed on a beautiful plate and heavily drizzled with warm chocolate sauce, looks like a dessert you would pay a premium for at a high-end steakhouse or a cozy bistro. It transforms a humble grab-and-go snack into a sit-down, fork-and-knife culinary experience.
The Science Behind the Perfect Crackly Top
One of the true hallmarks of an exceptional brownie—whether in a square pan or a pie dish—is the delicate, tissue-thin, crackly top crust. This shiny, meringue-like layer is highly sought after by bakers, and achieving it is actually a matter of science, not luck.
The crackly top is essentially a very thin layer of meringue that forms on the surface of the brownie batter during baking. To create this, two things must happen: the sugar must be completely dissolved, and the eggs must be whipped sufficiently to create a foam. When you whisk the sugar vigorously into the eggs (and warm melted butter or chocolate), the sugar crystals dissolve into the liquid of the eggs. As the pie bakes, the moisture near the surface evaporates, leaving behind a delicate crust of crystallized sugar and egg protein. If you merely stir your sugar into the batter without dissolving it, you will end up with a matte, dull finish. Beating the eggs and sugar together until pale and slightly fluffy is the absolute secret to unlocking that gorgeous, shattered-glass appearance.
Fudgy vs. Cakey: Why Gooey Wins
The brownie world is generally divided into two camps: fudgy and cakey. For a Gooey Brownie Pie, the fudgy camp is the only acceptable route. A cakey brownie pie would essentially just be a standard chocolate cake baked in a round tin. It lacks the dense, truffle-like richness that makes a pie version so special.
To ensure a fudgy, gooey texture, this recipe relies on a very specific ratio of fats to dry ingredients. We use a high proportion of butter and melted chocolate, and a minimal amount of flour. Flour provides structure through gluten; too much of it, and you get a dry, crumbly crumb. We also omit chemical leaveners entirely. There is no baking powder or baking soda in this recipe. Leaveners introduce air and lift, which creates a cakey texture. By relying solely on the eggs for a tiny bit of natural lift, the pie remains wonderfully dense, heavy, and delightfully underbaked in the very center.
Deep Dive: Selecting Your Ingredients
With a recipe this simple, the quality of your ingredients is paramount. Each element plays a crucial role in the final flavor and texture of the pie.
The Chocolate: This recipe uses a two-pronged approach to chocolate for maximum depth of flavor: melted chocolate and cocoa powder. The melted chocolate (preferably a high-quality semi-sweet or bittersweet bar, around 60-70% cacao) provides the rich, buttery texture and the gooeyness. The cocoa powder (Dutch-processed is best for a dark, smooth flavor) brings the intense, punchy chocolate notes without adding extra fat or liquid. Never use chocolate chips to melt into the batter; they contain stabilizers designed to help them keep their shape, which can make your batter seize or become grainy.
The Butter: Always opt for unsalted butter. Different brands of salted butter have vastly different sodium levels, making it impossible to control the saltiness of your dessert. Butter not only adds flavor but also tenderizes the crumb, ensuring the pie is soft and rich rather than tough.
The Sugar: Granulated sugar is classic, but a mix of granulated and light brown sugar can add a wonderful hint of molasses and extra moisture. The sugar doesn’t just sweeten the pie; it is responsible for the tender texture and, as mentioned, that beautiful shiny crust.
The Eggs: Eggs act as the sole binder in this recipe. They provide the necessary structure to hold the heavy fats and sugars together. Always use room-temperature eggs; cold eggs will cause the warm melted butter and chocolate to seize up, ruining the smooth consistency of your batter.
Ingredients
Gather the following ingredients to create your Gooey Brownie Pie.
– 1/2 cup (1 stick) unsalted butter
– 4 oz high-quality semi-sweet or bittersweet chocolate baking bar (chopped)
– 1 cup granulated sugar
– 1/4 cup light brown sugar, packed
– 3 large eggs, room temperature
– 1 teaspoon pure vanilla extract
– 1/4 cup Dutch-processed cocoa powder
– 1/2 cup all-purpose flour
– 1/2 teaspoon kosher salt
– Chocolate syrup or hot fudge sauce (for heavy drizzling upon serving)
Instructions
Follow these numbered steps carefully to achieve the perfect gooey texture and crackly top.
1. Preheat and Prepare: Preheat your oven to 350°F (175°C). Generously grease a 9-inch pie dish or a springform tart pan with non-stick baking spray or butter. If you want to ensure the easiest removal, you can line the bottom of the dish with a circle of parchment paper.
2. Melt the Chocolate and Butter: In a medium microwave-safe bowl, combine the chopped chocolate bar and the butter. Microwave in 30-second intervals, stirring thoroughly after each burst, until the mixture is completely smooth and melted. Alternatively, you can melt them together in a heatproof bowl set over a saucepan of simmering water (a double boiler). Set the mixture aside to cool slightly.
3. Whip the Eggs and Sugar: In a large mixing bowl, combine the granulated sugar, brown sugar, and room-temperature eggs. Using a whisk or a hand mixer, beat the mixture vigorously for about 3 to 4 minutes. The mixture should become pale yellow, slightly thickened, and the sugar should feel mostly dissolved. This step is crucial for the crackly crust.
4. Combine Wet Ingredients: Slowly pour the slightly cooled melted chocolate and butter mixture into the egg and sugar mixture. Whisk gently until completely combined and smooth. Stir in the vanilla extract.
5. Add the Dry Ingredients: Sift the cocoa powder, all-purpose flour, and kosher salt directly over the wet ingredients in the bowl. Using a rubber spatula, gently fold the dry ingredients into the batter. Stop folding as soon as no dry streaks of flour remain. Overmixing at this stage will develop the gluten and result in a tough pie.
6. Bake: Pour the batter into your prepared pie dish, using the spatula to smooth it into an even layer. Bake in the center of the preheated oven for 30 to 35 minutes. The edges should look set and slightly puffed, but the center should still have a slight jiggle to it when you gently shake the pan. A toothpick inserted about an inch from the edge should come out with moist crumbs, but if inserted into the very center, it should come out wet.
7. Cool and Serve: This is the hardest part. You must let the brownie pie cool in the dish on a wire rack for at least 1 to 2 hours before slicing. It needs this time to set up; if you cut it while it is piping hot, it will completely fall apart. Once cooled and set, slice into wedges, drizzle heavily with warm chocolate sauce, and serve.
Expert Tips for Baking and Slicing
To elevate your Gooey Brownie Pie from good to spectacular, keep these expert tips in mind:
– Do Not Overbake: The enemy of a gooey brownie is the oven. Remember that the pie will continue to cook from the residual heat of the pan even after you take it out of the oven. If a toothpick comes out completely clean from the center while it’s in the oven, it is already overbaked. Pull it out when it looks slightly underdone in the middle.
– The Hot Knife Trick: For bakery-style, perfectly clean slices, run a large, sharp chef’s knife under very hot water. Wipe the blade completely dry with a towel, and make your first cut. Repeat this process—rinse with hot water, wipe dry, slice—for every single cut. The heat of the blade melts cleanly through the fudgy interior without dragging crumbs everywhere.
– Patience is a Virtue: It is incredibly tempting to dig in right away, but cooling is mandatory. The center is literally liquid chocolate when it comes out of the oven. It needs time to solidify into that luxurious, fudgy texture. If you prefer it warm, let it cool completely to set, slice it, and then microwave individual slices for 10-15 seconds.
Decadent Variations to Try
The beauty of this recipe is that it serves as a spectacular blank canvas for a variety of flavor profiles. Here are a few ways to customize your pie:
– Nutty Crunch: Fold 1/2 cup of toasted, chopped walnuts or pecans into the batter just before pouring it into the pie dish. The crunch provides a wonderful textural contrast to the gooey chocolate.
– Salted Caramel Swirl: Before baking, dollop 1/3 cup of thick, room-temperature caramel sauce over the top of the batter in the pie dish. Use a butter knife to gently swirl the caramel through the batter. Sprinkle with flaky sea salt as soon as it comes out of the oven.
– Espresso Boost: Add 1 to 2 teaspoons of instant espresso powder to the batter along with the dry ingredients. Coffee acts as a flavor enhancer for chocolate, making the pie taste deeper and more robust without actually tasting like a cup of coffee.
– Peanut Butter Marbling: Warm 1/3 cup of creamy peanut butter in the microwave for a few seconds until pourable. Swirl it into the top of the brownie batter before baking for a classic chocolate-peanut butter combination.
Serving Suggestions
While a slice of this pie is phenomenal on its own, dressing it up makes it an unforgettable dessert experience. The contrast of temperatures and textures is key to a truly decadent plating.
Always serve this pie slightly warmed. If you’ve baked it ahead of time, microwave a slice for 15 seconds. Top the warm pie with a generous scoop of premium vanilla bean ice cream. The heat from the pie will cause the ice cream to slowly melt, creating a creamy sauce that seeps into the crackly crust. Next, take a bottle of high-quality, warmed chocolate fudge sauce and drizzle it heavily over the entire plate. Don’t be shy—the visual appeal of a glossy, wet chocolate drizzle makes the dessert completely mouth-watering. You can also garnish with fresh raspberries, a dollop of fresh whipped cream, or a dusting of powdered sugar.
Storage and Freezing Instructions
Because this pie is so rich, you will likely have leftovers. Fortunately, it stores beautifully.
Room Temperature: You can keep the pie covered tightly with plastic wrap or aluminum foil at room temperature for up to 3 days. The fudgy texture will remain intact.
Refrigerator: For longer storage, keep it in an airtight container in the fridge for up to a week. The cold environment will make the pie incredibly dense and chewy—almost like a piece of chocolate fudge. Bring it to room temperature or warm it before eating.
Freezing: This pie freezes exceptionally well. Wrap individual slices tightly in plastic wrap, then place them in a freezer-safe bag. They will keep for up to 3 months. Thaw overnight in the fridge or on the counter for a few hours. You can also freeze the entire pie wrapped in a double layer of foil if you are making it well in advance for a party.
Fun Facts and Cultural Context
The brownie is a distinctly American invention, steeped in culinary legend. The most famous origin story traces the brownie back to the Palmer House Hotel in Chicago during the 1893 World’s Columbian Exposition. Bertha Palmer, a prominent Chicago socialite, asked the hotel’s pastry chef to create a dessert suitable for ladies attending the fair—something smaller than a piece of cake but retaining cake-like characteristics, and easy to eat from a boxed lunch. The result was a dense, fudgy confection topped with walnuts and an apricot glaze, which is still served at the Palmer House today.
The transition from a square brownie to a “Brownie Pie” is a relatively modern adaptation, likely born in Southern American kitchens where pies are a staple dessert format. By placing a brownie in a pie dish, bakers married the beloved texture of the brownie with the elegant presentation of a pie, creating a hybrid dessert that appeals to a wide variety of sweet tooths.
Frequently Asked Questions (FAQs)
Do I need a pie crust for this recipe?
No! This is a “crustless” pie. The brownie batter bakes up to form its own delicate crust on the top and slightly chewy edges on the sides and bottom. Adding a pastry crust would detract from the fudgy density we are aiming for.
Why did my pie sink in the middle after cooling?
A slight sinking in the middle is totally normal and actually desirable! Because there are no chemical leaveners and the center is meant to be gooey and slightly underbaked, it will naturally deflate a bit as it cools. This creates a wonderful, dense texture.
Can I use an 8-inch pie dish instead of a 9-inch?
Yes, you can use an 8-inch dish, but the pie will be thicker. You will likely need to add 5 to 10 minutes to the baking time. Keep a close eye on it and test it with a toothpick to ensure the edges don’t burn before the center sets.
Conclusion
The Gooey Brownie Pie is proof that sometimes, the best desserts are simply reinvented classics. By tweaking the ratios to maximize fudginess, relying on the science of dissolved sugar for a beautiful crackly top, and presenting it in elegant, drizzle-covered slices, you can turn a standard brownie into a show-stopping masterpiece. This recipe is forgiving, highly customizable, and guaranteed to satisfy even the most intense chocolate cravings. So preheat your oven, chop up some good quality chocolate, and get ready to bake your new favorite dessert.
Gooey Brownie Pie
Ingredients
Equipment
Method
- Preheat oven to 350°F (175°C). Grease a 9-inch pie dish or tart pan.
- In a microwave-safe bowl, melt the chopped chocolate and butter in 30-second intervals until smooth. Let cool slightly.
- In a large bowl, vigorously whisk the granulated sugar, brown sugar, and eggs for 3-4 minutes until pale and slightly thickened.
- Slowly pour the melted chocolate mixture into the egg mixture, whisking gently until combined. Stir in vanilla.
- Sift the cocoa powder, flour, and salt over the wet ingredients. Fold gently with a spatula just until no dry streaks remain.
- Pour batter into the prepared pie dish and smooth the top.
- Bake for 30-35 minutes until the edges are set and the center is slightly jiggly. Do not overbake.
- Let cool completely on a wire rack for 1-2 hours before slicing.
- Slice into wedges and serve with a heavy drizzle of chocolate syrup.