Hibiscus Flower Cupcakes
Hibiscus Flower Cupcakes: A Taste of Tropical Paradise at Home
There are certain desserts that do more than just satisfy a sweet tooth; they transport you. They can whisk you away from a rainy afternoon or a pile of laundry to a place of sun, sand, and complete relaxation. These Hibiscus Flower Cupcakes are exactly that kind of magic. While a standard cupcake can be delicious, topping it with an ultra-realistic, buttercream-piped hibiscus flower turns a simple treat into a profound culinary experience. This isn’t just a recipe; it’s a passport to paradise, a creative escape, and the perfect centerpiece for your next summer gathering, tropical-themed party, or simply to bring a smile to someone’s face.
Imagine biting into a soft, airy vanilla cupcake, perfectly moist and delicately sweetened, only to have your taste buds met with a velvety-smooth, rich Italian meringue buttercream. But the real star is the presentation. Each cupcake features a stunning, intricately piped hibiscus flower that looks so real, you might think you’ve stumbled into a tropical garden. In this comprehensive guide, we will explore everything you need to know to create these spectacular, show-stopping Hibiscus Flower Cupcakes, from mastering the piping technique to selecting the perfect flavors and understanding the cultural significance of this beautiful flower. Get ready to elevate your baking and bring a taste of the tropics home!
Why You Will Absolutely Love This Hibiscus Flower Cupcake Recipe
This recipe is destined to become a summer staple in your kitchen for a multitude of compelling reasons. First and foremost is the “wow” factor. There are few things as satisfying as placing a tray of these stunning cupcakes on a table and watching everyone’s faces light up. They are an instant conversation starter and look like they came straight out of a high-end, custom bakery, not a home kitchen. Creating them is a point of personal pride, allowing you to master a new, impressive skill.
Secondly, the flavor profile is perfectly balanced and refreshing. While we often think of tropical desserts as overly sweet or heavy, these cupcakes are the exact opposite. The light vanilla sponge provides a delicate base, and the buttercream can be subtly flavored with hibiscus or just kept as a pristine vanilla to allow the visually stunning flower to be the focus. The tartness of a fruit filling (if you choose to add one) perfectly cuts through the rich buttercream, creating a complex and deeply satisfying flavor experience. This makes them ideal for summer when heavy desserts can feel overwhelming.
Furthermore, this recipe is a celebration of creativity. Once you have the basic piping technique down, you can customize the colors, shapes, and sizes of your flowers. You can experiment with different flavor combinations for the cake and filling, making each batch truly your own. It is a form of edible art that allows you to express yourself in a beautiful and delicious way.
The Art of Buttercream Flowers: Pushing Your Piping Skills
Let’s address the elephant in the room: creating realistic buttercream flowers can feel intimidating. Many home cooks are deterred by the thought of piping petals that don’t just look like blobs of frosting. The key to success is twofold: having the right kind of buttercream and practicing specific techniques.
First, the buttercream. This is not the time for American buttercream, which can be unstable, too soft, and crusts quickly. You need a stable, smooth, and workable frosting like Italian Meringue Buttercream or Swiss Meringue Buttercream. These buttercreams are made with cooked egg whites and sugar, which creates a velvety structure that holds a piped shape exceptionally well, even at room temperature. They are also less sweet and much smoother, which prevents a grainy texture and allows the delicate colors and details of your flower to shine.
Second, the technique. Realism is achieved through layering. You are not just piping a simple rose; you are creating five distinct petals that overlap naturally, a delicate stamen, and a textured pistil. We use a rose petal nozzle (like a #104, #121, or #122) which has a thin edge and a wider base. This allows you to control the thickness and angle of each petal, creating the soft, curved edges of a real hibiscus. It takes some practice to get the muscle memory, but once you do, the results are deeply rewarding.
Understanding Your Buttercream Options: Meringue vs. American
As mentioned, choosing the right buttercream is critical for this project. American Buttercream (ABC) is simple: just butter and powdered sugar beaten together. It’s too soft for intricate piping, and the sugar can make it too grainy. Most importantly, it can melt quickly, especially if you are having a summer party outdoors.
Italian Meringue Buttercream (IMBC) is a game-changer. It’s made by whipping hot sugar syrup into egg whites to create a cooked meringue, then adding butter. It’s light, airy, and incredibly stable. Its smooth texture means your petals will be perfect every time, and it holds colored dyes better without changing the consistency. Swiss Meringue Buttercream (SMBC) is very similar, just made differently (gently heating sugar and egg whites over a double boiler first), and is also an excellent choice. If you are serious about making beautiful buttercream flowers, investing the time to make a meringue-based buttercream is essential.
The Recipe: Step-by-Step Guide to Hibiscus Cupcake Perfection
This recipe focuses on creating a classic vanilla sponge base and a stable, silky Italian Meringue Buttercream for the flowers.
Ingredients You Will Need
Gather these essentials for both the cake and the stunning frosting.
- – Vanilla Cupcakes (makes 12):
- – 1 & 1/2 cups all-purpose flour
- – 1 teaspoon baking powder
- – 1/2 teaspoon salt
- – 1 cup granulated sugar
- – 1/2 cup (1 stick) unsalted butter, softened
- – 2 large eggs, room temperature
- – 1/2 cup whole milk, room temperature
- – 1 teaspoon pure vanilla extract
- – Italian Meringue Buttercream (for flowers):
- – 1 cup granulated sugar
- – 1/4 cup water
- – 3 large egg whites, room temperature
- – 1 & 1/2 cups (3 sticks) unsalted butter, softened and cut into chunks
- – 1 teaspoon pure vanilla extract
- – Food Coloring (gel form preferred: deep pink/magenta, yellow, peach)
Instructions
Follow these detailed, numbered steps to create flawless cupcakes with magnificent floral art.
- Bake the Cupcakes: Preheat your oven to 350°F (175°C). Line a standard muffin tin with 12 paper liners. In a medium bowl, whisk together the flour, baking powder, and salt. Set aside.
- Cream Butter and Sugar: In a large mixing bowl (or the bowl of a stand mixer fitted with the paddle attachment), cream the softened butter and granulated sugar together on medium-high speed until light and fluffy, about 3-4 minutes. Scrape down the sides of the bowl.
- Add Eggs and Vanilla: Add the eggs one at a time, mixing well after each addition. Stir in the vanilla extract.
- Add Dry and Wet Ingredients: With the mixer on low speed, add half of the dry ingredients, followed by the milk, and then the remaining dry ingredients. Mix just until combined; do not overmix.
- Bake and Cool: Divide the batter evenly among the 12 cupcake liners. Bake for 18-20 minutes, or until a toothpick inserted into the center comes out clean. Transfer to a wire rack and cool completely. The cupcakes must be cool to the touch before frosting.
- Make the Meringue: To make the buttercream, ensure all equipment is clean and fat-free. Place the egg whites in the clean bowl of your stand mixer fitted with the whisk attachment. In a small, heavy-bottomed saucepan, combine the 1 cup sugar and 1/4 cup water. Stir gently to combine. Place over medium-high heat and bring to a boil. *Self-correction:* For Italian meringue, you should not stir the sugar once it boils to prevent crystallization. Insert a candy thermometer. When the sugar syrup reaches about 230°F (110°C), begin whipping the egg whites on high speed until they form stiff, glossy peaks.
- Add Sugar Syrup: Continue boiling the sugar syrup until it reaches exactly 240°F (115°C, soft-ball stage). With the mixer on high speed, carefully pour the hot sugar syrup in a slow, steady stream down the side of the bowl, avoiding the whisk. Continue whipping on high speed until the outside of the bowl is cool to the touch and the meringue is massive and stable (this can take 10-15 minutes).
- Add Butter: Switch to the paddle attachment. With the mixer on medium-low speed, begin adding the softened butter, a chunk at a time, until all butter is incorporated. The mixture may look curdled or separated at some point; don’t panic! Just keep mixing, and it will magically come together into a smooth, luscious buttercream. Stir in the vanilla.
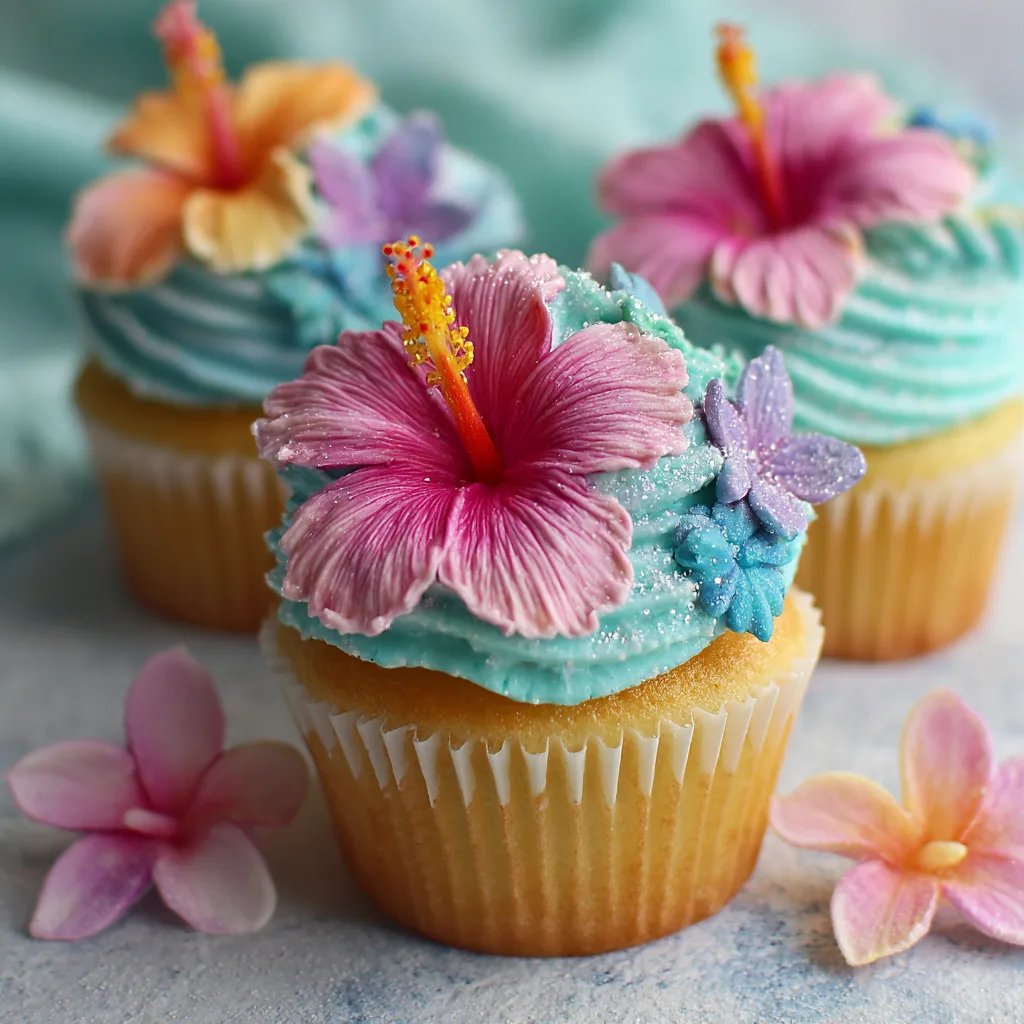
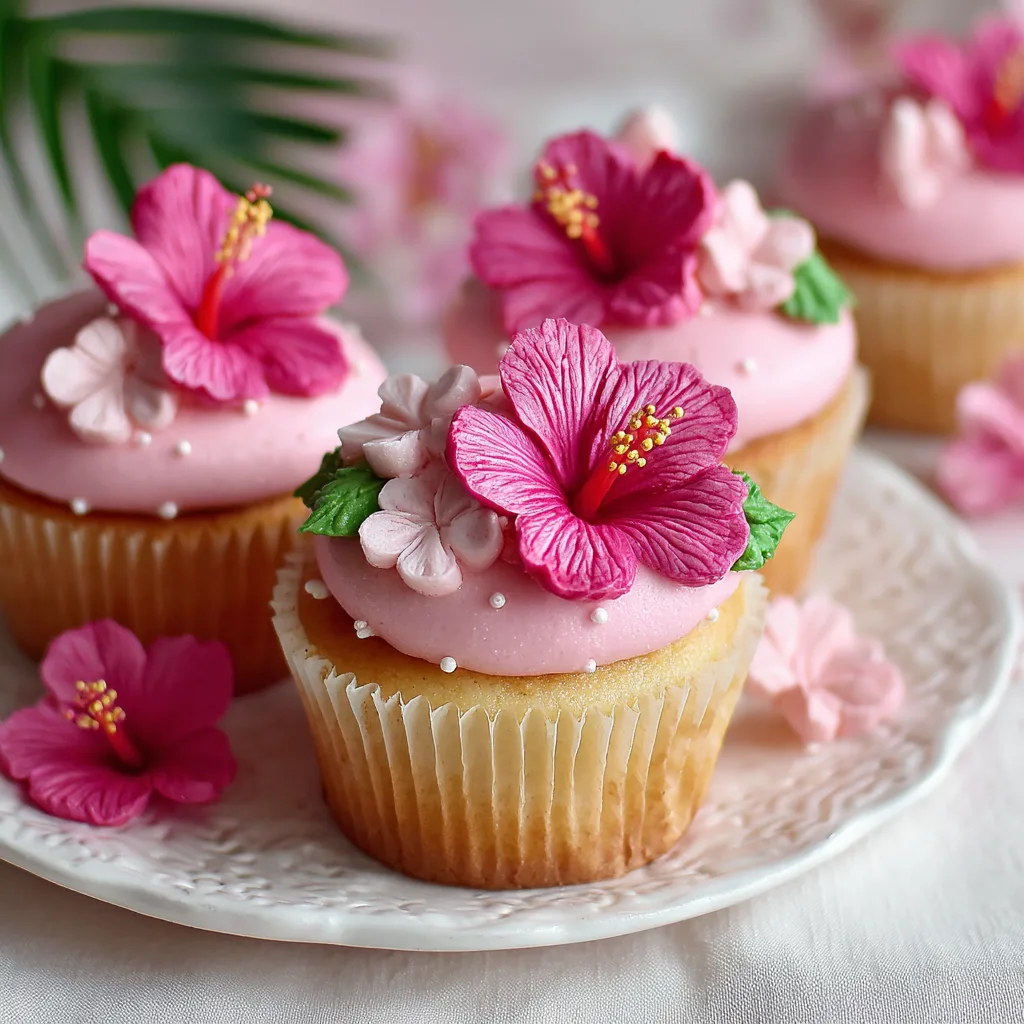
- Color the Buttercream: Divide the finished buttercream into separate bowls for your flower colors. For realism, you need a few shades. The images show a deep magenta/pink, a lighter peachy-pink, and yellow for the stamen. Use a small toothpick to add a tiny amount of gel coloring to each bowl and mix until uniform.
- Pipe the Flowers: Fit a large piping bag with your rose petal nozzle. Fill it with your colored buttercream. Hold the bag at a 45-degree angle. Start by piping a central column (the pistil) using a star or round tip in yellow. Switch to the petal nozzle. Beginning near the center, pipe five distinct petals that curl outwards and upwards, overlapping slightly at the base. Aim for softness in the edges of your petals. Add delicate yellow stamen lines with a small round tip at the end.
- Garnish and Serve: Carefully place each piped flower onto a cooled cupcake. Store in an airtight container at cool room temperature or in the refrigerator. Best served within 2 days.
Pro Tips for Piping Success
Creating realistic buttercream flowers is all about control and confidence. These tips will help you achieve breathtaking results.
Chill Your Beaters and Bowl: When whipping the meringue, ensure your bowl and whisk are perfectly clean and free of any fat, which will prevent the egg whites from forming peaks. Placing them in the freezer for 15 minutes before starting can help the process.
Practice Makes Perfect: Don’t try to pipe directly onto your cupcakes first. Practice piping flowers on small squares of parchment paper. You can then carefully chill the flowers in the fridge until they are stiff, which makes transferring them to the cupcakes much easier and less messy.
Use the Right Nozzle: While a rose nozzle works, the images suggest a broader petal shape than a standard rose. Experiment with #104, #121, or #122. Angle the nozzle so the thin edge is facing upwards and outwards for a more realistic, delicate petal edge.
Creative Customizations and Flavor Ideas
Once you have the piping technique mastered, the fun really begins. Here are some incredibly creative ways to customize your Hibiscus Flower Cupcakes.
Hibiscus Infusion: To truly lean into the theme, infuse the milk for your cupcakes with dried hibiscus flowers. This will add a subtle, tart, and fruity flavor that is completely unique. You can also make a hibiscus simple syrup to brush onto the cupcakes before frosting.
Fruit Filling Surprise: A small pocket of fruit jam or curd inside the cupcake adds a delightful textural contrast and a burst of complementary flavor. Raspberry, mango, or passionfruit are exceptional choices that cut through the rich buttercream beautifully.
Ombré and Varied Flowers: As shown in the images, the beauty is in the variation. Create different bowls of colored buttercream and pipe some flowers in all one color, others with a mix, and vary the petal shapes slightly for a more natural, garden-grown look.
The Meaning and History of the Hibiscus Flower
Beyond its beauty, the hibiscus flower carries significant cultural meaning and has a long history of culinary and medicinal use. Primarily associated with tropical climates, the hibiscus is the national flower of several nations, including Malaysia and South Korea. In Hawaii, the different colors symbolize different meanings, such as a traditional symbol of power and respect. In many cultures, a flower worn behind the ear communicates a woman’s relationship status.
Culinary-wise, the calyces of the Hibiscus sabdariffa species are prized for making a bright red, tart, and cranberry-like tea known as karkade in North Africa or jamaica in Mexico. It is packed with vitamin C and antioxidants. Using dried hibiscus powder in your buttercream or cake batter is a fantastic way to introduce both natural coloring and a unique, tart flavor that perfectly balances the sweetness of a cupcake. Learning the history behind the flower you are piping makes the process even more meaningful.
What to Serve Alongside Your Floral Creations
Because these cupcakes are so visually stunning, they don’t require heavy accompaniments. A light, refreshing beverage is best to balance the sweetness of the buttercream.
A pitcher of chilled Hibiscus Iced Tea is the obvious and perfect choice. A dry, crisp rosé wine would also be an exceptionally elegant pairing. If you want a non-alcoholic option, a sparkling limeade or lemonade complements the fruitiness of the potential fillings and the floral aesthetic perfectly. Serve these cupcakes on a clean white or light blue platter to really make the vibrant colors of the flowers pop.
Storage and Make-Ahead Instructions
Storable desserts are a must for parties, and these floral treats can be carefully planned for the best results.
Making Ahead: You can bake the cupcakes up to 2 days in advance, cool them, wrap them tightly in plastic wrap, and store them at room temperature. The Italian Meringue Buttercream can be made up to 1 week in advance. Store it in an airtight container in the refrigerator. When you are ready to pipe, remove it from the fridge and let it come to room temperature, then rewhip it until it is smooth and silky again.
Storing Leftovers: Leftover decorated cupcakes should be stored in an airtight container in the refrigerator. They are best served within 2 days, as the cake will start to dry out after that, but they can be kept for up to 4 days. If the flowers get slightly soft, placing them in the fridge for 30 minutes will firm them right back up.
Conclusion
Creating these Hibiscus Flower Cupcakes is more than just baking; it is an act of creativity and a joyful expression of tropical beauty. By conquering your fear of buttercream flowers and mastering the art of the perfect meringue buttercream, you are unlocking a new level of culinary artistry. With their realistic petals, refreshing flavors, and unparalleled “wow” factor, these cupcakes are guaranteed to be the star of any summer gathering, bringing a taste of paradise to everyone who is lucky enough to try one. So put your piping bag to the test, embrace the vibrant colors, and create your very own edible tropical masterpiece today!
Hibiscus Flower Cupcakes
Ingredients
Equipment
Method
- Preheat oven to 350°F (175°C). Line a standard muffin tin with paper liners.
- Whisk together the all-purpose flour, baking powder, and salt in a medium bowl.
- In a large bowl, cream together softened butter and granulated sugar until light and fluffy. Mix in the eggs one at a time, followed by the vanilla extract.
- Alternately add the dry ingredients and whole milk, mixing just until combined.
- Divide batter among 12 liners and bake for 18-20 minutes. Cool completely on a wire rack.
- Prepare the Italian Meringue Buttercream by whipping egg whites to stiff peaks while boiling sugar and water to 240°F (115°C). Slowly whip the hot syrup into the meringue until cool.
- Switch to paddle and mix in softened butter chunks until smooth. Stir in vanilla. Divide and color buttercream.
- Fit a piping bag with a rose petal nozzle. Pipe five petals for each hibiscus flower, overlapping them naturally, and finish with delicate yellow stamen. Place on cooled cupcakes.