Mini Bloomin Onions
The Ultimate Mini Bloomin’ Onions Guide
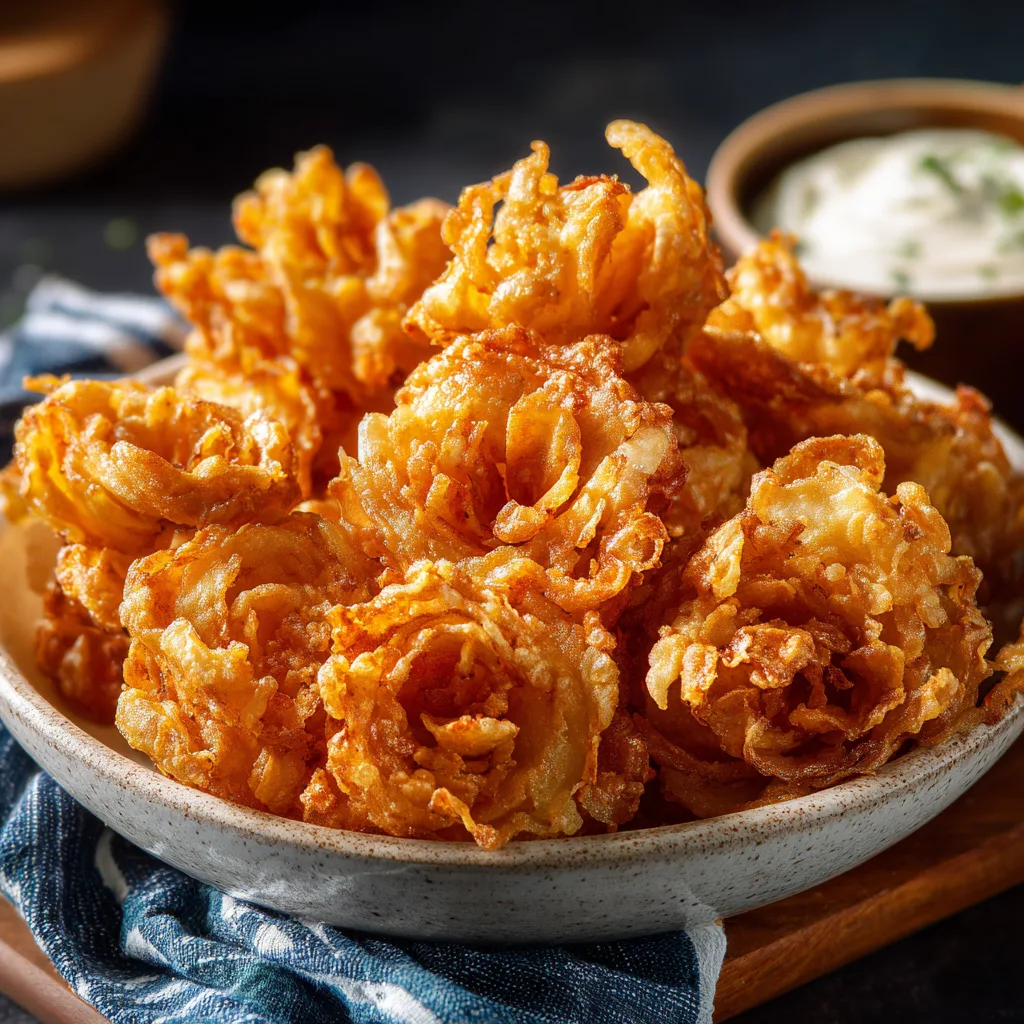
Welcome to the most comprehensive, crispy, and flavor-packed guide you will ever read on creating the ultimate party appetizer: Mini Bloomin’ Onions. If you love the iconic, massive steakhouse bloomin’ onion but hate the messy, overwhelming experience of eating a giant one, you have found the perfect solution. In this extensive masterclass, we will dissect every single element of these magnificent, golden-brown, bite-sized treats. We will explore the best type of small onions to use, the secret to a perfectly spiced, thick batter that actually sticks to the petals, and the precise frying techniques needed to achieve that flawless, crunchy, blooming effect.
Why Mini is Vastly Superior to the Original
The traditional, large bloomin’ onion is a spectacle, but it often suffers from a few fatal flaws: the center can remain raw and gooey, the outer batter tends to fall off, and it’s a massive commitment for a small group. Enter the Mini Bloomin’ Onion.
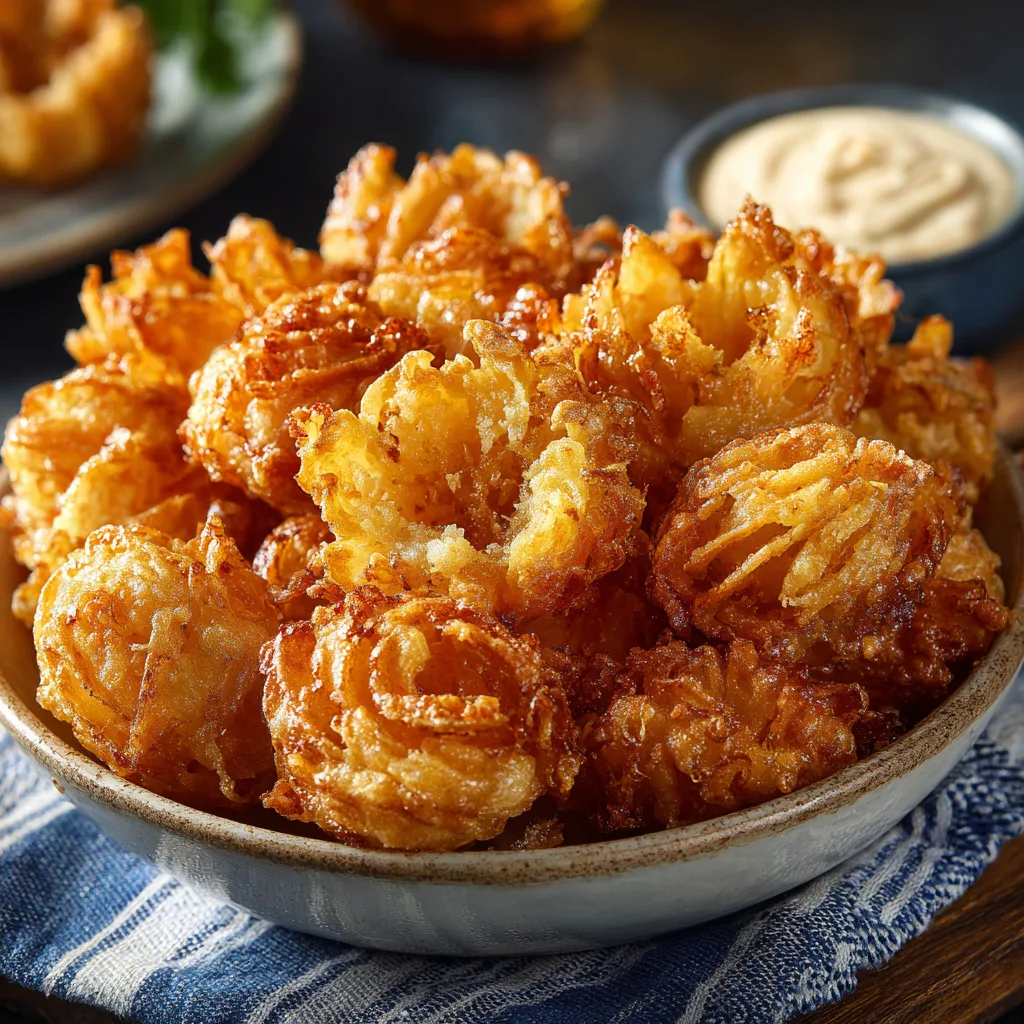
By using smaller onions, you drastically improve the crust-to-onion ratio. Every single bite is guaranteed to be incredibly crunchy and deeply flavorful. Furthermore, they cook much faster and more evenly, ensuring that the inner petals are sweet and tender while the outside remains perfectly shattered and crisp. They are the ultimate pop-in-your-mouth finger food, making them an absolute showstopper for game days, holiday parties, or any gathering where you want to seriously impress your guests.
Deep Dive into the Ingredients: Building the Crunch
Creating the perfect mini bloomin’ onion requires more than just tossing a vegetable in a deep fryer. The magic lies in the preparation and the layering of flavors.
1. The Star: Pearl Onions or Small Shallots
For the best results, you want to use large pearl onions, boiling onions, or very small, round shallots. They need to be small enough to be eaten in one or two bites, but large enough that you can carefully slice them into a “bloom.” White or yellow varieties work best as they offer a balanced, slightly sweet pungency that mellows out beautifully when cooked.
2. The Soaking Liquid: Buttermilk
A seasoned buttermilk soak serves two critical purposes. First, the slight acidity of the buttermilk helps to tenderize the raw onion and mellow out any harsh, bitter notes. Second, the thickness of the buttermilk acts as the perfect glue, ensuring that the dry flour mixture adheres deeply into every crevice of the bloomed onion petals.
3. The Breading: Seasoned Flour
A plain flour dredge will result in a bland appetizer. You need a robust, aggressively seasoned flour mixture to mimic that classic steakhouse flavor. This means a heavy hand with paprika (for that gorgeous golden-brown color), garlic powder, onion powder, dried oregano, a touch of cayenne pepper for heat, and plenty of salt and black pepper.
The Art of the “Bloom” Cut
The most crucial step in this recipe is how you cut the onions. You must slice off the top (the pointy end) to create a flat surface, while leaving the hairy root end entirely intact. The root is what holds all the petals together. Placing the onion cut-side down, you will make a series of vertical cuts (usually 4 to 8, depending on the size of the onion) stopping about 1/4 inch from the root base. When you flip the onion over and gently press down, the cut sections will fan out, creating the “bloom”.
Equipment You Will Need
- A Deep Dutch Oven or Deep Fryer: Essential for maintaining a steady oil temperature.
- A Deep-Fry Thermometer: The only way to guarantee perfectly crispy, non-greasy onions is by frying at the exact right temperature (375°F / 190°C).
- A Spider Strainer or Slotted Spoon: For safely removing the delicate onions from the hot oil.
- A Very Sharp Paring Knife: Crucial for making precise cuts without crushing the small onions.
Ingredients List
- – 1 lb large pearl onions or small boiling onions
- – 1 cup buttermilk
- – 1 large egg
- – 1.5 cups all-purpose flour
- – 1 tbsp paprika
- – 1 tsp garlic powder
- – 1 tsp onion powder
- – 1/2 tsp cayenne pepper
- – 1/2 tsp dried oregano
- – 1 tsp kosher salt
- – 1/2 tsp freshly ground black pepper
- – Peanut or vegetable oil (for frying)
Step-by-Step Instructions for Crispy Perfection
- Prep the Onions: Peel the onions. Slice off the top 1/4 inch of each onion, keeping the root end intact. Place the onion cut-side down on a cutting board. Make 4 intersecting cuts (creating 8 wedges) straight down, stopping just before you hit the root. Gently press down on the center to encourage the petals to open and “bloom.”
- The Wet Mix: In a medium bowl, whisk together the buttermilk and the egg until fully combined.
- The Dry Mix: In a separate, wide bowl, whisk together the all-purpose flour, paprika, garlic powder, onion powder, cayenne pepper, oregano, salt, and black pepper.
- The Dredge: Dip each bloomed onion into the buttermilk mixture, ensuring the liquid gets all the way down into the petals. Let the excess drip off. Then, thoroughly coat the onion in the seasoned flour mixture, gently separating the petals with your fingers to ensure the flour gets deep inside. Shake off the excess. For an extra thick crust, you can repeat this dip-and-dredge process a second time.
- Heat the Oil: Fill a heavy-bottomed pot or Dutch oven with at least 3 inches of frying oil. Heat the oil to exactly 375°F (190°C).
- Fry to Golden Perfection: Carefully lower 3 to 4 onions at a time into the hot oil (do not overcrowd the pot). Fry for 3 to 4 minutes, or until the onions are a deep, rich golden brown and incredibly crispy.
- Drain and Serve: Use a spider strainer to carefully remove the onions and place them on a wire rack set over paper towels to drain excess oil. Serve immediately while hot and crispy, alongside a creamy dipping sauce.
Final Thoughts on Your New Favorite Appetizer
Mastering these Mini Bloomin’ Onions is a culinary triumph that will elevate any gathering. They require a bit of patience during the cutting and breading process, but the reward is a mountain of incredibly crunchy, savory, golden-brown bites that your guests won’t be able to stop eating. Pair them with a zesty horseradish or creamy ranch dipping sauce, and prepare for them to disappear instantly.
Crispy Mini Bloomin’ Onions
Ingredients
Equipment
Method
- Peel the onions and slice off the top, leaving the root intact. Place cut-side down and make 4 intersecting cuts (8 wedges) stopping just before the root. Press gently to fan out the petals.
- Whisk together the buttermilk and egg in a bowl.
- In a separate wide bowl, mix the flour, paprika, garlic powder, onion powder, cayenne, oregano, salt, and pepper.
- Dip each onion into the buttermilk mixture, then dredge thoroughly in the seasoned flour, making sure to get the mixture between the petals. Shake off excess.
- Heat at least 3 inches of oil in a heavy pot to 375°F (190°C).
- Fry the onions in small batches for 3 to 4 minutes until golden brown and crispy.
- Remove with a slotted spoon, drain on a wire rack, and serve immediately with dipping sauce.