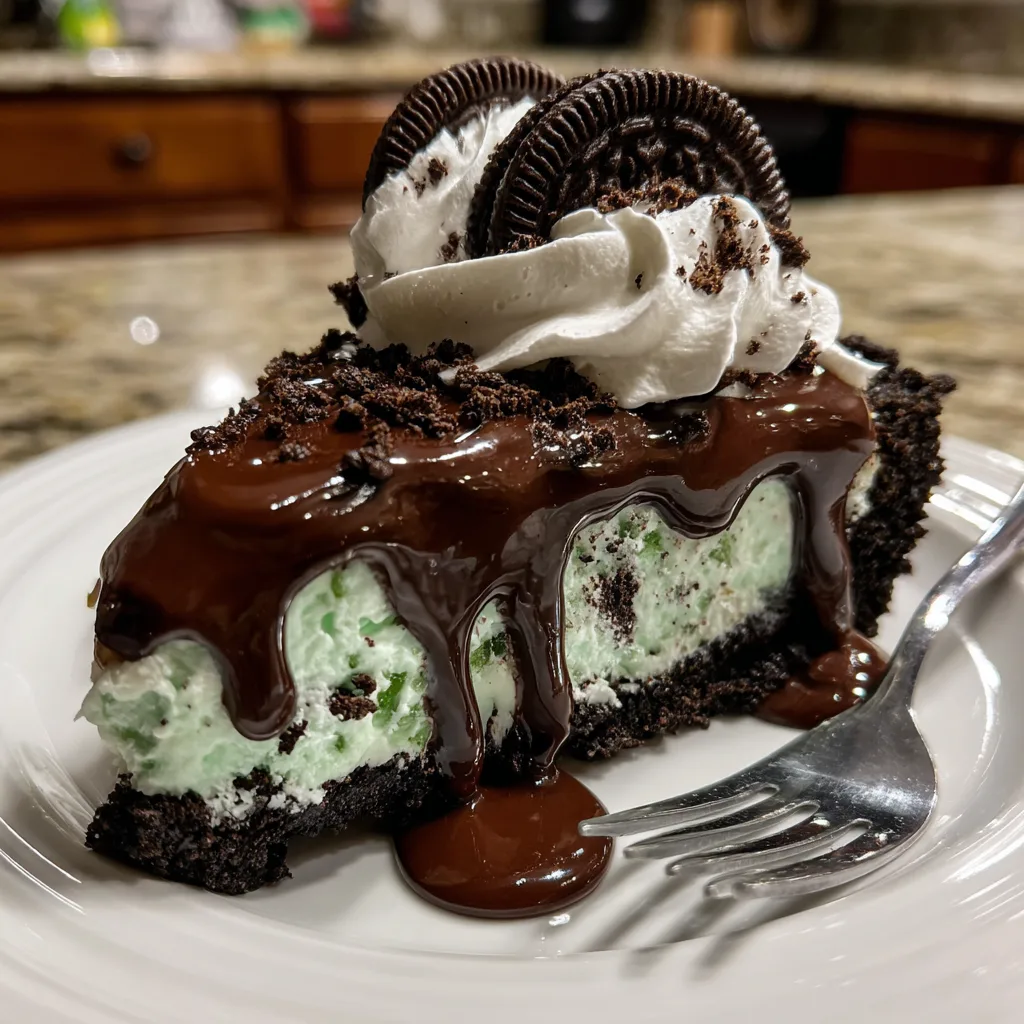
No-Bake Grasshopper Pie
The Ultimate No-Bake Grasshopper Pie: A Mint Chocolate Dream
Welcome to the ultimate guide for making the most decadent, refreshing, and visually stunning dessert you will ever serve: the No-Bake Grasshopper Pie. If you are a fan of the classic mint and chocolate flavor combination, you have just stumbled upon your new favorite recipe. This glorious pie features a buttery, dark chocolate cookie crust, a luscious and fluffy mint-green filling studded with cookie crumbs, a rich chocolate ganache topping, and beautiful whipped cream rosettes. Best of all? It requires absolutely no baking, making it the perfect dessert for warm summer months, busy holiday seasons, or anytime you want an impressive treat without turning on the oven.
In this comprehensive, 1500+ word guide, we will dive deep into everything you need to know to master this dessert. From the fascinating history behind the Grasshopper name to step-by-step instructions, troubleshooting tips, and creative variations, this article is designed to guarantee your success in the kitchen. Get ready to impress your family, friends, and dinner guests with a pie that looks like it came from a high-end bakery but was made effortlessly in your own kitchen.
The Fascinating History of the Grasshopper Pie
Before we dive into the ingredients and techniques, let us take a moment to appreciate the cultural context and history of this delightful dessert. The Grasshopper Pie takes its name from the famous “Grasshopper” cocktail, a sweet, mint-flavored after-dinner drink. The cocktail was reportedly invented in 1918 by Philip Guichet, the owner of Tujague’s, a landmark restaurant in the French Quarter of New Orleans. The classic cocktail features equal parts green crème de menthe, white crème de cacao, and heavy cream, shaken with ice and served in a chilled glass.
Fast forward to the mid-20th century, particularly the 1950s and 1960s, and the United States saw a massive boom in chiffon pies and icebox desserts. Home cooks and recipe developers began transforming popular cocktail flavors into family-friendly (or sometimes boozy) desserts. The Grasshopper Pie was born out of this trend. It captured the vibrant green color and the creamy mint-chocolate essence of the cocktail but translated it into a fluffy, marshmallow-based or cream-cheese-based filling set inside a chocolate crumb crust. Today, we celebrate this vintage classic by updating it with a rich ganache and an easy, no-bake method that preserves all the nostalgic flavor with modern convenience.
Why You Will Fall in Love with This Recipe
There are countless pie recipes out there, but this No-Bake Grasshopper Pie stands head and shoulders above the rest. Here is why this recipe will quickly become a staple in your dessert repertoire:
- Incredible Flavor Contrast: The cool, refreshing bite of peppermint perfectly cuts through the intense, rich darkness of the chocolate crust and ganache. It is a balanced flavor profile that prevents the dessert from feeling overly sweet or cloying.
- Textural Perfection: You get the crunchy, crumbly texture of the cookie crust, the light-as-air, cloud-like fluffiness of the mint filling, the smooth silkiness of the chocolate ganache, and the slight bite of the cookie chunks hidden inside the pie.
- No-Bake Convenience: Whether it is the middle of July and you refuse to turn on the oven, or you are preparing a massive Thanksgiving feast and all your oven space is occupied, this pie is your savior. It relies entirely on the refrigerator and freezer to set up.
- Make-Ahead Friendly: In fact, this pie is better when made ahead of time. It needs several hours to chill and set properly, making it the ultimate stress-free dessert for entertaining. You can even freeze it for weeks in advance!
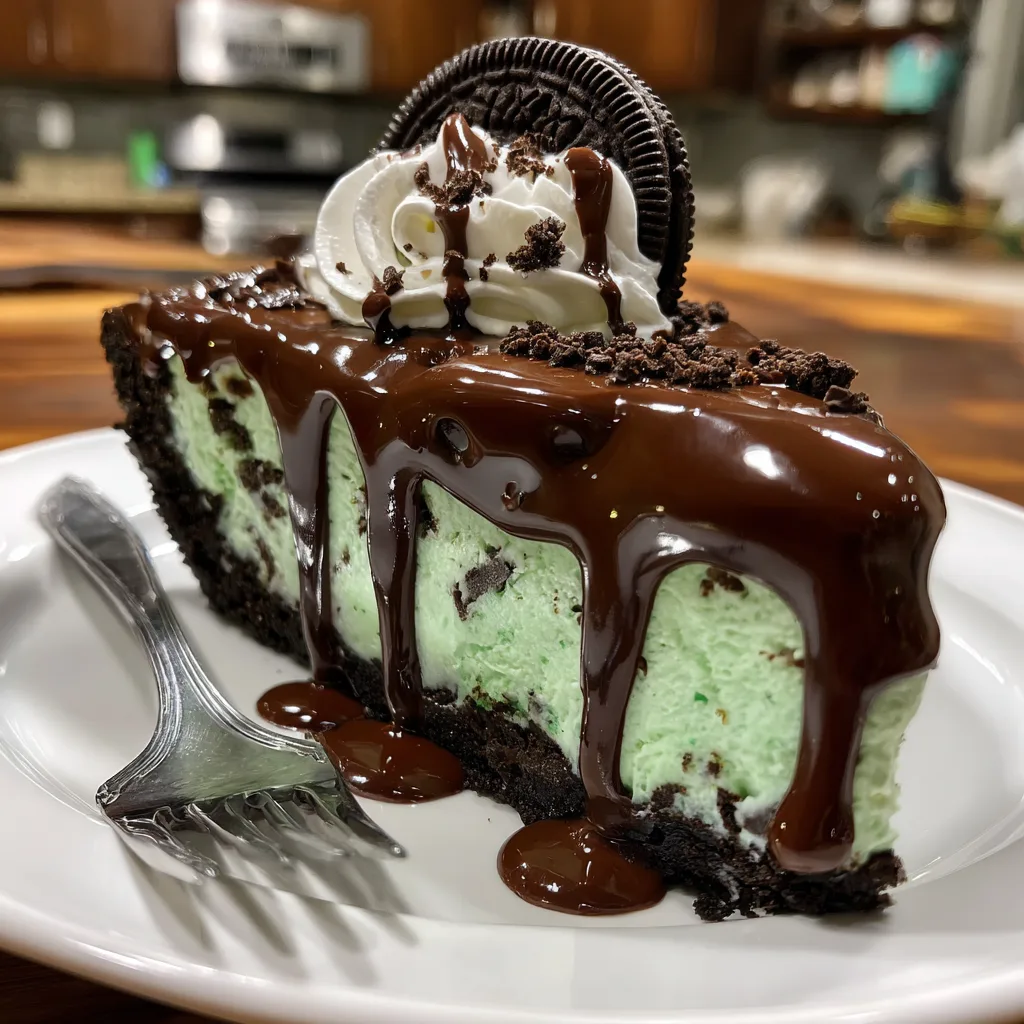
- Visually Striking: The vivid mint green interior contrasting with the deep, dark chocolate creates a show-stopping presentation. The whipped cream rosettes and half-cookies on top make it look incredibly professional.
Essential Equipment You Will Need
To ensure your pie-making process goes as smoothly as possible, gather the following kitchen tools before you begin:
- 9-Inch Pie Dish: A standard glass, ceramic, or aluminum pie pan works perfectly. You can also use a springform pan if you prefer to easily remove the sides for serving.
- Food Processor: This is the quickest way to turn your cookies into fine crumbs for the crust. If you don’t have one, a large zip-top bag and a rolling pin will do the trick.
- Hand Mixer or Stand Mixer: Essential for whipping the heavy cream to stiff peaks and beating the cream cheese mixture until completely smooth.
- Mixing Bowls: You will need at least two large mixing bowls—one for the whipped cream and one for the cream cheese mixture.
- Silicone Spatula: Crucial for gently folding the whipped cream into the filling without deflating the air you just whipped into it.
- Piping Bag and Star Tip: Optional, but highly recommended for piping the beautiful whipped cream rosettes on top of the finished pie.
Ingredients
This recipe uses simple, accessible ingredients that come together to create pure magic. Here is exactly what you need to pick up from the grocery store:
For the Chocolate Cookie Crust:
- – 24 whole chocolate sandwich cookies (like Oreos), filling included
- – 5 tablespoons unsalted butter, melted
- – A pinch of salt
For the Mint Chocolate Filling:
- – 8 oz (1 block) full-fat cream cheese, softened to room temperature
- – 1 can (14 oz) sweetened condensed milk
- – 1 ½ teaspoons pure peppermint extract (do not use spearmint, or it will taste like toothpaste!)
- – 1 teaspoon vanilla extract
- – 4-6 drops of green gel food coloring (adjust for your desired shade of green)
- – 2 cups heavy whipping cream, very cold
- – 12 whole chocolate sandwich cookies, roughly chopped
For the Chocolate Ganache Topping:
- – 1 cup semi-sweet chocolate chips (or finely chopped high-quality dark chocolate)
- – 1/2 cup heavy whipping cream
- – 1 tablespoon unsalted butter, for extra shine
For the Garnish:
- – 1/2 cup heavy whipping cream, whipped to stiff peaks with 1 tablespoon powdered sugar
- – 6 whole chocolate sandwich cookies, cut in half
Step-by-Step Instructions
Follow these detailed steps to achieve Grasshopper Pie perfection. Remember, patience during the chilling phases is the key to a firm, sliceable pie.
Step 1: Prepare the Crust
- Place the 24 whole chocolate sandwich cookies (with their creamy filling intact) into the bowl of your food processor. Pulse until they are reduced to fine, sandy crumbs. If doing this by hand, place them in a heavy-duty bag and crush them thoroughly with a rolling pin.
- Transfer the cookie crumbs to a mixing bowl. Pour in the melted butter and a tiny pinch of salt. Stir with a fork until the mixture resembles wet sand and the butter is evenly distributed.
- Pour the crumb mixture into your 9-inch pie dish. Using the back of a measuring cup or your fingers, press the crumbs firmly and evenly into the bottom and up the sides of the dish.
- Place the crust in the freezer to set for at least 20 minutes while you prepare the filling.
Step 2: Whip the Cream
- In a large, chilled mixing bowl, beat the 2 cups of cold heavy whipping cream using a hand mixer or stand mixer fitted with the whisk attachment.
- Beat on medium-high speed until stiff peaks form. This means when you lift the beaters, the cream stands straight up without flopping over. Be careful not to over-whip, or it will turn into butter. Set this aside in the refrigerator.
Step 3: Create the Mint Base
- In a separate large mixing bowl, beat the room-temperature cream cheese until it is completely smooth and creamy, about 2-3 minutes. Scraping down the sides of the bowl is essential here to avoid lumps.
- Gradually pour in the sweetened condensed milk while continuing to beat the mixture on medium speed until fully combined and silky.
- Add the peppermint extract, vanilla extract, and green food coloring. Beat again until the color is uniform. Start with 4 drops of color and add more if you prefer a more vibrant, neon green.
Step 4: Combine and Fill
- Remove your whipped cream from the fridge. Take about one-third of the whipped cream and gently stir it into the green cream cheese mixture to lighten it up.
- Using a silicone spatula, very gently fold the remaining whipped cream into the green mixture. Use a sweeping “figure-eight” motion to avoid knocking the air out of the whipped cream.
- Once mostly incorporated, gently fold in the chopped chocolate sandwich cookies.
- Remove your pie crust from the freezer and pour the fluffy mint filling into it. Smooth the top with an offset spatula.
- Place the pie in the refrigerator to chill for at least 4 hours, or ideally overnight, until the filling is firm and set.
Step 5: Make the Ganache Topping
- Once the pie is completely firm, prepare the ganache. Place the chocolate chips in a heat-proof glass or metal bowl.
- In a small saucepan, heat the 1/2 cup of heavy cream over medium heat until it is just simmering (do not let it come to a rapid boil).
- Pour the hot cream over the chocolate chips. Let it sit completely undisturbed for 5 minutes.
- Add the tablespoon of butter, then gently whisk the mixture starting from the center and working your way outwards until you have a smooth, glossy, liquid chocolate ganache.
- Let the ganache cool for about 5-10 minutes so it is not piping hot, then pour it evenly over the top of the chilled pie. Tilt the pie slightly to help the ganache spread to the edges.
- Return the pie to the refrigerator for another 30 minutes to let the ganache set.
Step 6: Decorate and Serve
- Once the ganache is firm, prepare your garnish. Whip the remaining 1/2 cup of heavy cream with the powdered sugar until stiff peaks form.
- Transfer the sweetened whipped cream to a piping bag fitted with a large star tip.
- Pipe decorative rosettes all around the outer border of the pie.
- Gently press a halved chocolate sandwich cookie into each whipped cream rosette.
- Slice with a sharp knife (wiping the blade clean between cuts for perfect slices) and serve cold!
Pro Tips for the Best Grasshopper Pie
Even though this is an easy, no-bake recipe, the devil is in the details. Follow these expert tips to ensure your pie turns out flawlessly every single time:
- Room Temperature Cream Cheese: This is non-negotiable. If your cream cheese is even slightly cold, it will not blend smoothly with the condensed milk, leaving you with unpleasant little white lumps in your beautifully green filling. Take it out of the fridge at least two hours before you begin.
- Cold Heavy Cream: In direct contrast to the cream cheese, your heavy whipping cream must be as cold as possible. Cold cream whips faster and holds its volume much better. You can even chill your mixing bowl and beaters in the freezer for 10 minutes beforehand.
- Peppermint vs. Spearmint: Always double-check your extract bottle. Peppermint extract gives that classic holiday or candy-mint flavor. Spearmint or generic “mint” extract will make your pie taste exactly like toothpaste.
- Clean Slices: Because of the sticky ganache and the soft filling, getting clean slices can be tricky. Run a sharp chef’s knife under hot tap water, wipe it dry with a towel, and make a cut. Repeat the heating and wiping process for every single slice.
- Do Not Skimp on Chilling Time: This pie relies on the cold to hold its shape. Rushing the chilling process will result in a soupy, messy pie when you try to slice it.
Exciting Recipe Variations
Once you have mastered the classic No-Bake Grasshopper Pie, you can start experimenting! Here are a few fun ways to switch up the recipe to suit different tastes or occasions:
- The Boozy “Adult” Version: Want to stay true to the pie’s cocktail roots? Replace the peppermint extract with 3 tablespoons of Green Crème de Menthe and 2 tablespoons of White Crème de Cacao. You may need to add slightly more green food coloring since the liqueur won’t be as vibrant as the extract.
- Different Crusts: Not a fan of Oreos? You can use a classic graham cracker crust, a chocolate graham cracker crust, or even a crust made from crushed thin mint cookies for a double dose of mint flavor.
- Brownie Bottom: For a truly decadent twist, replace the cookie crust with a thin layer of baked, fudgy brownies. Let the brownies cool completely before adding the no-bake filling on top.
- Mint Chocolate Chip: Instead of mixing chopped cookies into the filling, fold in 1 cup of mini semi-sweet chocolate chips for a texture reminiscent of mint chocolate chip ice cream.
Serving Suggestions
The Grasshopper Pie is incredibly rich, so a little goes a long way. Serve this pie as the grand finale to a heavy meal, like a steak dinner or a holiday roast, as the mint acts as a wonderful palate cleanser. Because it is served chilled, it pairs beautifully with a hot beverage. Serve a slice alongside a strong, dark roast coffee, a shot of espresso, or even a mug of hot cocoa for the ultimate chocolate lovers’ experience. For adult gatherings, serving it alongside the actual Grasshopper cocktail or an Irish Coffee is a playful and delightful touch.
Storage and Freezing Instructions
One of the greatest benefits of this No-Bake Grasshopper Pie is how well it stores. You can make it well in advance, reducing your day-of-event stress to zero.
In the Refrigerator: Store leftovers, or the fully prepared pie, in the refrigerator loosely covered with plastic wrap or in a specialized pie keeper. It will stay fresh and delicious for up to 5 days. Be aware that the cookie crust may begin to soften slightly after day 3, but it will still taste fantastic.
In the Freezer (Highly Recommended!): This pie freezes exceptionally well, and many people actually prefer eating it frozen, almost like an ice cream cake! To freeze, do not add the final whipped cream rosettes or cookie garnishes yet. Wrap the ganache-topped pie tightly in a layer of plastic wrap, followed by a layer of aluminum foil. Freeze for up to 3 months. When ready to serve, you can slice and serve it straight from the freezer for an ice-cream texture, or let it thaw in the refrigerator for a few hours. Add the fresh whipped cream rosettes just before serving.
Conclusion
The No-Bake Grasshopper Pie is a testament to the fact that you do not need complex baking techniques or hours sweating over a hot oven to produce a masterpiece. With its vibrant color, intoxicating aroma of peppermint, and the luxurious pairing of creamy filling with rich chocolate ganache, it is a dessert that demands attention and satisfies the strongest sweet tooth. By following this comprehensive guide, using the right ingredients at the right temperatures, and allowing for ample chilling time, you are guaranteed a picture-perfect, mouth-watering pie.
So the next time you are asked to bring dessert to a potluck, or you simply want to treat yourself to something extraordinary on a weekend afternoon, gather your cookies, cream, and peppermint extract. Dive into the delightful process of making this vintage classic, and enjoy every single cool, creamy, chocolatey bite!
No-Bake Grasshopper Pie
Ingredients
Equipment
Method
- Crush 24 whole sandwich cookies into fine crumbs. Mix with melted butter and a pinch of salt.
- Press crumb mixture firmly into a 9-inch pie dish. Freeze for 20 minutes to set.
- Whip 2 cups of cold heavy cream to stiff peaks. Set aside in the refrigerator.
- In a separate bowl, beat softened cream cheese until smooth. Gradually beat in sweetened condensed milk.
- Add peppermint extract, vanilla extract, and green food coloring to the cream cheese mixture. Beat until color is uniform.
- Gently fold the whipped cream into the green mixture using a spatula, being careful not to deflate it. Fold in chopped cookies.
- Pour the filling into the frozen crust and smooth the top. Refrigerate for at least 4 hours.
- For the ganache, heat 1/2 cup cream until simmering and pour over chocolate chips. Let sit 5 minutes, add butter, then whisk until smooth.
- Pour slightly cooled ganache over the chilled pie. Refrigerate 30 minutes to set.
- Garnish the pie border with piped whipped cream rosettes and halved cookies before serving.