No Bake Reese’s Chocolate Truffles Recipe
The Ultimate Guide to No Bake Reese’s Chocolate Truffles
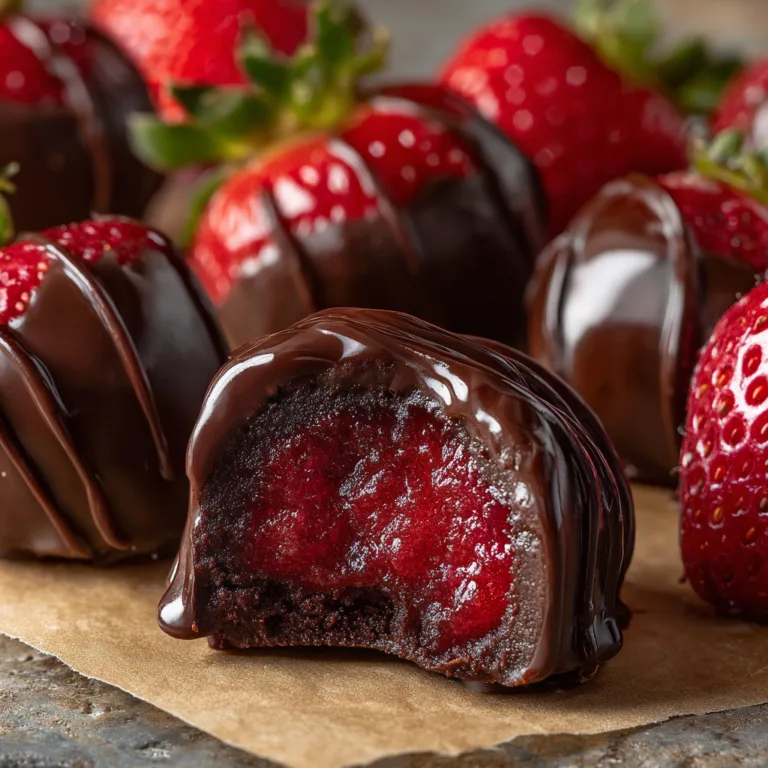
There are few flavor combinations in the culinary world as iconic, beloved, and universally craved as chocolate and peanut butter. It is a marriage of textures and tastes that transcends trends. If you are a fan of the classic orange-wrapped cups, prepare to have your world changed. These No Bake Reese’s Chocolate Truffles are not just a copycat; they are an elevation of the classic candy. Imagine a creamy, slightly gritty (in the best way), salty-sweet peanut butter filling encased in a snap-crisp shell of rich chocolate. Now, imagine making them in your own kitchen without ever turning on the oven.
This comprehensive guide will walk you through everything you need to know to master these truffles. From selecting the right peanut butter to tempering chocolate for that professional snap, we are diving deep into the art of the no-bake truffle. Whether you are prepping for a holiday cookie exchange, looking for a quick summer dessert, or just satisfying a Tuesday night craving, this recipe is your new secret weapon.
Why You Will Fall in Love With This Recipe
In a world of complicated pastries and time-consuming cakes, the no-bake truffle stands out as a beacon of simplicity and indulgence. Here is why this specific recipe deserves a permanent spot in your recipe box:
- Zero Oven Time: As the name implies, keep your kitchen cool. This is perfect for hot summer days or when your oven is already occupied with the holiday turkey.
- Minimal Ingredients: You likely have 90% of these ingredients in your pantry right now. It relies on staples like peanut butter, butter, and powdered sugar.
- Texture Contrast: The magic lies in the contrast between the soft, melt-in-your-mouth interior and the hard chocolate shell.
- Freezer Friendly: These truffles freeze beautifully, meaning you can make a massive batch and keep them on hand for emergency cravings for months.
- Kid-Friendly: Since there are no raw eggs and no hot ovens involved (other than melting chocolate), this is a safe and fun recipe to get children involved with rolling the dough.
The Science of the Perfect Peanut Butter Filling
While this recipe is simple, the chemistry matters. The filling mimics the texture of a Reese’s cup, which is distinct from straight peanut butter. A Reese’s interior is dry enough to hold its shape but moist enough to melt on the tongue. To achieve this, we use a specific ratio of fat (butter and peanut butter) to dry ingredients (powdered sugar and graham cracker crumbs).
The graham cracker crumbs are the secret ingredient here. They provide structure and that signature slightly sandy texture that separates a candy filling from a jar of peanut butter. Without them, the filling would be too sticky and cloyingly sweet. The butter adds richness and helps the filling set firm when chilled, making it dippable.
Ingredients
Gather these simple staples to get started. Quality matters, so choose brands you love eating on their own.
For the Peanut Butter Center:
- Creamy Peanut Butter (1 cup): Use a standard commercial brand like Jif or Skippy. Natural peanut butters that separate with oil on top are not recommended for this recipe as they can make the filling too oily and unstable.
- Unsalted Butter (1/2 cup / 1 stick): Softened to room temperature. Using unsalted allows you to control the sodium level, though if you only have salted, just omit the extra pinch of salt.
- Powdered Sugar (2 cups): Also known as confectioners’ sugar. This thickens the mixture and provides sweetness without the grit of granulated sugar.
- Graham Cracker Crumbs (1 cup): You can buy these pre-crushed or crush your own sheets in a food processor. They are essential for texture.
- Vanilla Extract (1 tsp): Adds depth and aromatic warmth to the peanut butter.
- Salt (1/4 tsp): A pinch of salt cuts through the sugar and enhances the peanut flavor.
For the Chocolate Coating:
- Semi-Sweet or Milk Chocolate Chips (2 cups): Choose based on your preference. Semi-sweet balances the sweet filling well, while milk chocolate offers that classic candy bar taste. High-quality chocolate couverture discs are even better if you can find them.
- Coconut Oil or Vegetable Shortening (1 tbsp): This is crucial. It thins the melted chocolate, making it easier to dip, and gives the final shell a glossy, shiny finish.
Step-by-Step Instructions
Follow these steps closely to ensure your truffles are perfectly shaped and smoothly coated.
Step 1: Prepare the Filling Mixture
Start by lining a large baking sheet with parchment paper or a silicone baking mat. Make sure this baking sheet fits in your freezer! In a large mixing bowl, combine the softened butter and creamy peanut butter. Use a hand mixer or a stand mixer fitted with the paddle attachment to beat them together until the mixture is smooth, creamy, and uniform in color. This usually takes about 2–3 minutes.
Step 2: Add Dry Ingredients
Add the vanilla extract and salt. Slowly add the powdered sugar and graham cracker crumbs. It is best to do this in two batches to avoid a cloud of sugar flying out of the bowl. Mix on low speed initially, then increase to medium. The mixture will look crumbly at first but will come together into a dough-like consistency. You should be able to pinch it, and it should hold its shape.
Step 3: Roll and Chill
Using a small cookie scoop or a tablespoon, scoop out portions of the dough. Roll them between your palms to form smooth balls, approximately 1 inch in diameter. Place the balls onto your prepared baking sheet. If the dough is sticking to your hands, dust your palms with a little powdered sugar.
Crucial Step: Place the baking sheet in the freezer for at least 30 to 45 minutes. The balls need to be very cold and firm before dipping. If they are too soft, they will fall apart in the warm chocolate.
Step 4: Melt the Chocolate
While the balls are freezing, prepare your coating. Place the chocolate chips and coconut oil in a microwave-safe bowl. Microwave in 30-second intervals, stirring vigorously in between each interval. Do not overheat, or the chocolate will seize (become grainy). usually, 90 seconds total is enough. Stir until completely smooth and glossy.
Step 5: The Dip
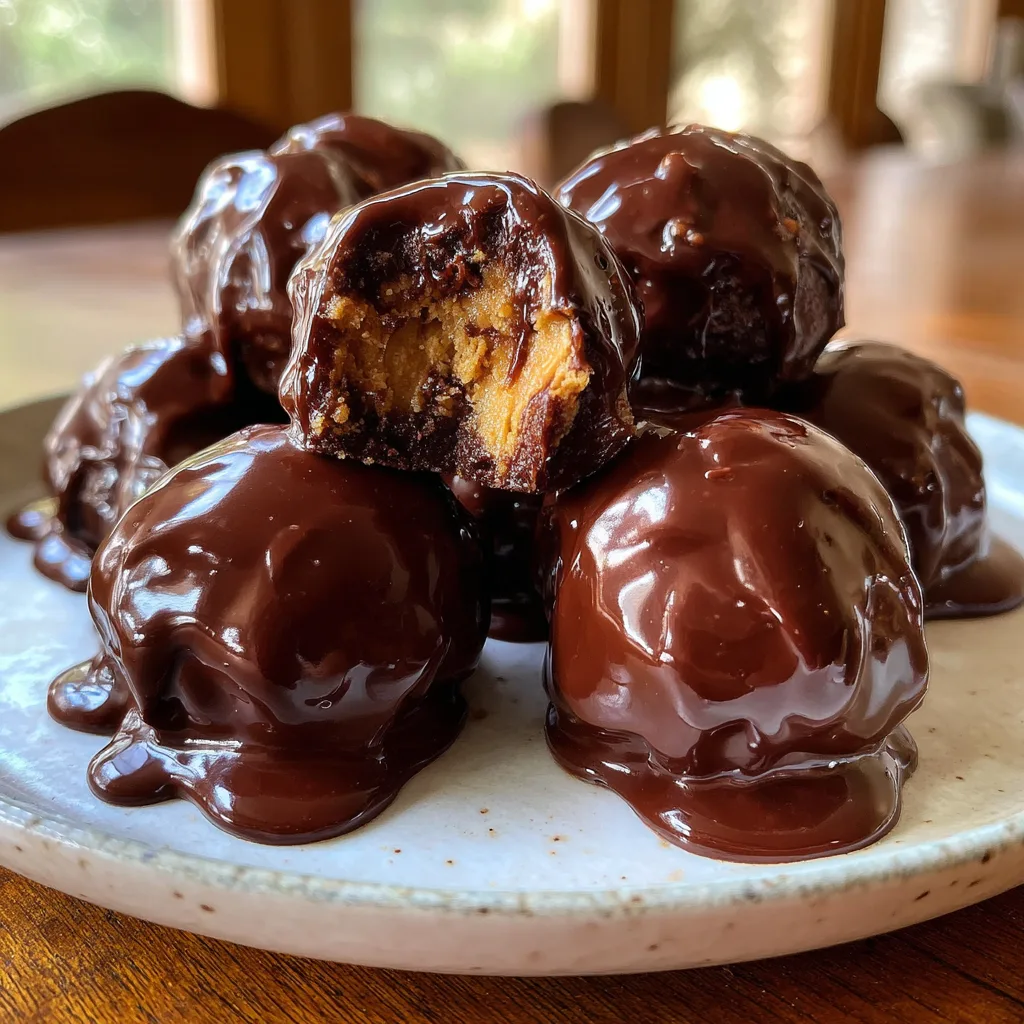
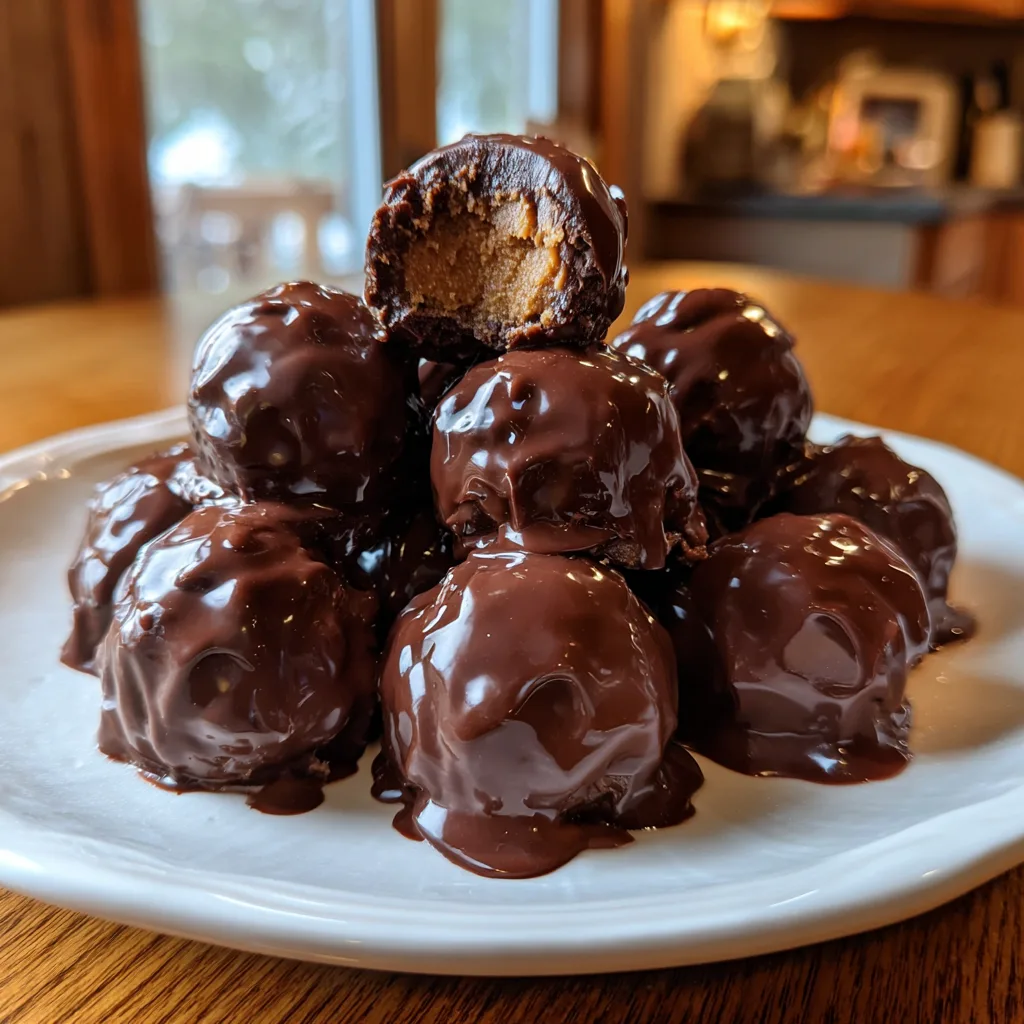
Remove the peanut butter balls from the freezer. Working quickly (so they don’t thaw), drop one ball into the melted chocolate. Use a fork to roll it around until fully coated. Lift the truffle out with the fork, tapping the handle of the fork against the edge of the bowl to shake off excess chocolate. This ensures a thin, even shell rather than a thick, gloppy one.
Step 6: Set and Serve
Place the coated truffle back onto the parchment paper. If you want to add sprinkles, sea salt, or a drizzle of contrasting chocolate, do it now while the chocolate is wet. Repeat until all truffles are coated. Refrigerate the tray for 15 minutes to let the chocolate set completely.
Expert Tips for Success
Even simple recipes have nuances. Here are a few professional tips to make your home kitchen feel like a chocolatier’s shop:
- The Toothpick Trick: If you find using a fork messy, insert a toothpick into the cold peanut butter ball. Dip it using the toothpick as a handle. Once placed on the paper, twist the toothpick out and use a dab of chocolate to cover the hole.
- Prevent Seizing: Ensure absolutely no water gets into your melting chocolate. Even a single drop of water can cause the chocolate to seize and turn into a paste. Ensure your bowls and utensils are bone dry.
- Paraffin Wax? Old-school recipes often use food-grade paraffin wax for a shiny shell. While effective, coconut oil is a more natural and readily available alternative that adds a nice sheen and mouthfeel.
- Room Temperature Butter: Do not microwave your butter to melt it for the filling; it must be softened but solid. Melted butter will make the dough greasy and it won’t hold its shape.
Variations to Try
Once you have mastered the base recipe, try these fun twists:
1. The “Crunch” Factor: Mix 1/2 cup of Rice Krispies cereal into the peanut butter filling for a crispy, crunchy texture similar to a Whatchamacallit bar.
2. Dark Chocolate Sea Salt: Dip the truffles in 70% dark chocolate and sprinkle flaky Maldon sea salt on top before it sets. The bitter chocolate and salt cut the sweetness beautifully.
3. White Chocolate Drizzle: Dip in milk chocolate, then melt a small amount of white chocolate. Snip the corner of a ziplock bag and drizzle the white chocolate over the finished truffles for a professional look.
4. Cookie Dough Mashup: Substitute the graham cracker crumbs with heat-treated flour and add mini chocolate chips inside the filling for a cookie-dough style truffle.
Storage and Freezing
These truffles are incredibly resilient, making them perfect for gifting.
Refrigerator: Store in an airtight container in the fridge for up to 2 weeks. They taste best when slightly chilled.
Freezer: These can be frozen for up to 3 months. Layer them between sheets of wax paper in a freezer-safe container. Thaw in the fridge overnight or enjoy them frozen for a cold treat.
Room Temperature: If your house is cool (below 70°F/21°C), they are safe on the counter for a few days, but the chocolate may soften if it gets warmer.
Cultural Context: The Peanut Butter Chocolate Phenomenon
The combination of peanut butter and chocolate is distinctly American. It gained massive popularity in the early 20th century. H.B. Reese, a former dairy farmer and shipping foreman for Milton Hershey, invented the Reese’s Peanut Butter Cup in 1928 in his basement. He used Hershey’s chocolate for the coating. The “penny cups” became so popular that he eventually discontinued his other candy lines to focus on them. Today, making homemade versions (often called “Buckeyes” in Ohio, though Buckeyes typically leave a circle of peanut butter visible at the top) is a beloved tradition across the United States, particularly during the holiday season and football tailgates.
FAQ
Q: Can I use almond butter instead?
A: Absolutely. Almond butter or cashew butter works well. Just ensure it is a “no-stir” variety for the best texture stability.
Q: Why is my filling too sticky to roll?
A: Your kitchen might be too warm, or the butter was too soft. Put the bowl of dough in the refrigerator for 20 minutes to firm up, then try rolling again.
Q: How do I get the “feet” off the bottom of the truffles?
A: The “feet” are the pools of chocolate that form at the base. Once the chocolate is set, you can use a small paring knife to carefully trim the excess chocolate around the base for a clean, round look.
Enjoy making these No Bake Reese’s Chocolate Truffles! They are a testament to the fact that you don’t need professional equipment to create professional-tasting confections at home.
No Bake Reese’s Chocolate Truffles
Ingredients
Equipment
Method
- Line a baking sheet with parchment paper or wax paper. Ensure the sheet fits in your freezer.
- In a large mixing bowl, beat softened butter and creamy peanut butter until smooth and fluffy.
- Add vanilla extract and salt. Gradually mix in powdered sugar and graham cracker crumbs until a dough forms.
- Scoop dough into 1-inch balls and roll until smooth. Place on the prepared baking sheet.
- Freeze the peanut butter balls for 30-45 minutes until firm.
- In a microwave-safe bowl, melt chocolate chips and coconut oil in 30-second intervals, stirring until smooth.
- Remove balls from freezer. Dip each ball into melted chocolate, tapping off excess, and return to the baking sheet.
- Refrigerate for 15 minutes to set the chocolate completely before serving.