Orange Creamsicle Truffles
Orange Creamsicle Truffles: A Nostalgic, No-Bake Summer Delight
There are few flavor combinations quite as universally beloved and deeply nostalgic as the classic orange creamsicle. The bright, zesty punch of citrus perfectly mellowed by rich, smooth vanilla cream instantly transports you back to chasing the ice cream truck on a hot summer afternoon. But what if you could capture that exact, iconic flavor profile in a rich, bite-sized, no-bake dessert? Enter these incredible Orange Creamsicle Truffles.
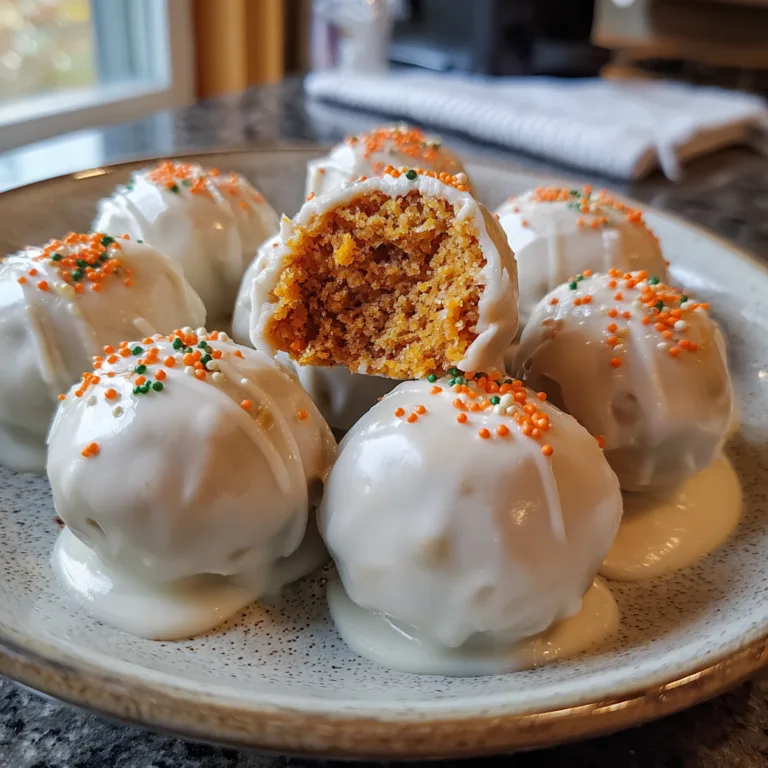
These truffles are the ultimate party treat, blending the ease of a simple cookie ball with the stunning visual appeal of a boutique candy shop creation. Featuring a dense, creamy, vanilla-and-citrus-infused center encased in a snappy, vibrant orange shell, they are a guaranteed crowd-pleaser. Whether you are hosting a summer barbecue, bringing a dessert to a baby shower, or simply craving a sweet afternoon pick-me-up, this recipe delivers maximum flavor with minimal effort.

Why You Will Love These Bright and Citrusy Treats
One of the best things about making truffles is that they require absolutely no baking. When the weather heats up and the last thing you want to do is turn on your oven, these truffles come to the rescue. The center is made from a simple mixture of crushed vanilla sandwich cookies and softened cream cheese, meaning the food processor does all the heavy lifting.
Beyond their ease, these truffles are a feast for the eyes. The vibrant orange coating is bold and cheerful, making them stand out on any dessert table. When you take a bite, the contrast between the hard, sweet candy shell and the soft, tangy, melt-in-your-mouth interior is incredibly satisfying. They look like they took hours of meticulous work, but only you will know how effortlessly they came together.
The Secret to the Perfect Creamsicle Flavor
Nailing the creamsicle flavor requires a delicate balance. You want the orange to be prominent, but it shouldn’t taste artificial or overly acidic. The magic lies in using a two-pronged approach to the citrus flavor: fresh orange zest and high-quality orange extract.
The fresh zest provides those bright, floral, natural essential oils that give the truffle a sophisticated edge. The orange extract, on the other hand, provides the concentrated, nostalgic “candy” flavor that makes it taste like a true creamsicle. When combined with the tanginess of the cream cheese and the sweet vanilla notes of the crushed cookies, the resulting flavor is identical to the frozen treat you remember from childhood.
Essential Ingredients for Truffle Magic
You only need a handful of simple ingredients to whip up a batch of these sweet treats. Gather the following before you begin:
- – 1 package (about 14 oz) of golden vanilla sandwich cookies: Brands like Golden Oreos work perfectly. You want to use the entire cookie, filling and all, as it provides sweetness and structure.
- – 8 oz cream cheese, softened to room temperature: Use full-fat, brick-style cream cheese for the best texture and flavor. Do not use spreadable tub cream cheese.
- – 1 tablespoon fresh orange zest: Be sure to only grate the outermost orange part of the peel, avoiding the bitter white pith underneath.
- – 1 teaspoon pure orange extract: This boosts the creamsicle flavor significantly.
- – 1 teaspoon vanilla extract: To round out that creamy, ice-cream-like flavor profile.
- – 1 bag (12 oz) of vibrant orange candy melts: Candy melts are ideal because they coat smoothly and set up firm at room temperature without the need to temper chocolate.
- – White sprinkles or white chocolate shavings: For garnishing the tops before the shell sets.
Step-by-Step Instructions for Perfect Truffles
Follow these steps to create beautifully uniform, perfectly coated creamsicle truffles.
- Crush the Cookies: Place the entire package of vanilla sandwich cookies into a food processor. Pulse until the cookies are reduced to fine, uniform crumbs. If you do not have a food processor, place the cookies in a large zip-top bag and crush them thoroughly with a rolling pin.
- Mix the Filling: Add the softened cream cheese, fresh orange zest, orange extract, and vanilla extract to the cookie crumbs in the food processor. Pulse until a thick, dough-like mixture forms. (Alternatively, mix by hand in a large bowl until completely combined).
- Roll the Truffles: Line a large baking sheet with parchment paper or a silicone baking mat. Using a small cookie scoop or a spoon, portion out the mixture and use your hands to roll it into smooth, uniform balls (about 1 inch in diameter). Place them on the prepared baking sheet.
- The Crucial Chill: Place the baking sheet of truffles into the refrigerator for at least 1 hour, or into the freezer for 30 minutes. The balls must be firm before dipping, otherwise, they will fall apart in the warm candy coating.
- Melt the Candy Coating: In a microwave-safe bowl, melt the orange candy melts according to the package directions (usually heating in 30-second bursts at 50% power, stirring in between). Ensure the candy is completely smooth and liquid.
- Dip and Decorate: Remove the chilled truffles from the fridge. Using a fork or a chocolate dipping tool, submerge one truffle into the melted orange candy until completely coated. Lift it out, tapping the fork gently on the side of the bowl to allow excess coating to drip off. Carefully slide the coated truffle back onto the parchment paper.
- Garnish Immediately: While the orange coating is still wet, immediately sprinkle the top with white sprinkles, white chocolate crumbs, or a tiny pinch of extra orange zest. The candy coating sets quickly, so do this after dipping every single truffle.
- Let Set: Allow the truffles to sit at room temperature for about 15-20 minutes, or until the outer shell is completely hardened and matte.
Pro Tips for Flawless Dipping
Dipping truffles can sometimes be frustrating, but a few pro tips make it infinitely easier. First, if your candy melts seem too thick to dip smoothly, add a small amount (about half a teaspoon) of vegetable oil or coconut oil to the bowl and stir well. This will thin the coating out, making it easier to work with.
Second, do not let your truffles get *too* cold. If you freeze them solid and then dip them in warm candy coating, the rapid temperature change can cause the beautiful orange shell to crack as it cools. Chill them just until they hold their shape firmly.
Storage Instructions
Because the center of these truffles is made with dairy (cream cheese), they must be stored in the refrigerator. Place the fully set truffles in an airtight container, separating layers with wax paper or parchment paper to prevent them from sticking together. They will keep beautifully in the fridge for up to one week.
You can also freeze these truffles for longer storage! Place them in a freezer-safe, airtight container, and they will last for up to 3 months. When you are ready to enjoy them, simply let them thaw in the refrigerator overnight. They are honestly quite delicious eaten straight from the freezer, too!

Frequently Asked Questions (FAQs)
Can I use white chocolate instead of candy melts?
Yes, you can! However, white chocolate requires tempering to set up hard and snappy at room temperature. If you melt standard white chocolate chips and dye them orange (using oil-based food coloring only!), you may need to store the finished truffles in the fridge so the coating doesn’t become soft and sticky.
Can I make this recipe dairy-free or vegan?
Absolutely. Simply substitute the cream cheese for your favorite plant-based cream cheese alternative, ensure your vanilla sandwich cookies are vegan (many commercial brands actually are!), and use a dairy-free white chocolate or candy coating.
Can I use different flavors?
The base of crushed cookies and cream cheese is incredibly versatile! Swap the orange extract and zest for lemon to make lemon truffles, or use strawberry extract and freeze-dried strawberry powder for a berry version. The possibilities are endless.
Bring a burst of sunshine to your next gathering with these delightful Orange Creamsicle Truffles. They are the perfect, effortless way to enjoy a classic summer flavor all year round!
Orange Creamsicle Truffles
Ingredients
Equipment
Method
- In a food processor, pulse the vanilla sandwich cookies until they form fine crumbs.
- Add the softened cream cheese, orange zest, orange extract, and vanilla extract to the crumbs. Pulse until a thick dough forms.
- Roll the mixture into 1-inch balls and place them on a parchment-lined baking sheet.
- Chill the truffles in the refrigerator for at least 1 hour (or freezer for 30 minutes) until firm.
- Melt the orange candy melts in a microwave-safe bowl in 30-second increments, stirring until smooth.
- Dip each chilled truffle into the melted candy coating, tapping off the excess, and return to the parchment paper.
- Immediately garnish the wet truffles with white sprinkles or chocolate shavings before the coating sets.
- Let set at room temperature until the shell is hard. Store leftovers in an airtight container in the refrigerator.