PB & Jelly Cobbler
The Ultimate Peanut Butter and Jelly Cobbler Recipe
There are few flavor combinations as universally beloved, profoundly nostalgic, and instantly comforting as peanut butter and jelly. For generations, this simple pairing has been a staple in lunchboxes, an after-school savior, and a late-night craving quencher. But what happens when you take those iconic, childhood-defining flavors and elevate them into a warm, decadent, spectacular baked dessert? You get the ultimate Peanut Butter and Jelly Cobbler. This recipe is a transformative culinary experience that takes the humble PB&J from a casual daytime snack to a show-stopping, crowd-pleasing dessert that will have both kids and adults begging for a second helping.
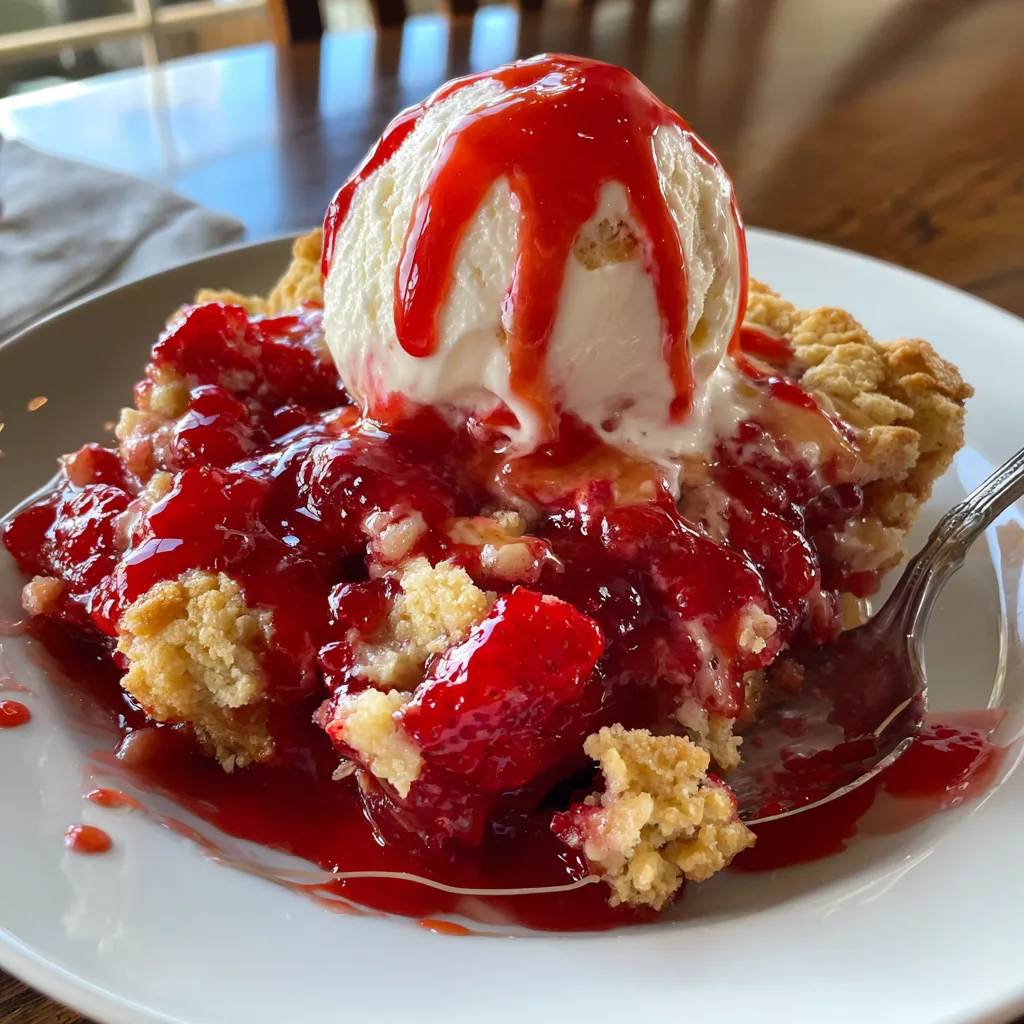
Imagine a thick, bubbling layer of sweet, vibrant, gooey fruit jelly, serving as the rich foundation of the dish. Now, picture that luscious fruit base blanketed by a thick, golden-brown, buttery peanut butter cookie dough crust. As it bakes, the edges of the peanut butter topping become crisp and caramelized, while the underside remains soft, tender, and perfectly steamed by the bubbling fruit juices below. When served warm, straight out of the oven, with a massive scoop of slowly melting vanilla ice cream on top, the contrasting temperatures and textures create a symphony of flavor that is genuinely hard to beat. In this comprehensive guide, we are going to explore everything you need to know to master this spectacular Peanut Butter and Jelly Cobbler.
The Nostalgic Magic of Peanut Butter and Jelly
Before diving into the mechanics of the cobbler, it is worth understanding why the combination of peanut butter and jelly works so phenomenally well on a scientific and culinary level. The magic lies in the brilliant contrast of flavors and textures. Peanut butter provides a dense, rich, fatty, and savory-salty profile. It coats the palate and offers a deeply comforting mouthfeel. Jelly, on the other hand, brings sharp sweetness, bright fruitiness, and a touch of acidity that cuts right through the heavy richness of the peanuts. Together, they achieve a perfect harmony—the salt enhances the sweet, the fat balances the acid, and the creaminess complements the sticky, gel-like texture of the fruit.
By translating this classic sandwich into a cobbler format, we are amplifying all of those complementary traits. The heat of the oven intensifies the sweetness of the jelly, turning it into a molten, syrupy delight. Meanwhile, the peanut butter transforms from a spread into a tender, crumbly, cake-like crust that absorbs the fruit juices while maintaining a satisfying, buttery bite. It is the ultimate comfort food, wrapping the safety of childhood memories in the warmth of a freshly baked pastry.
Choosing the Perfect Ingredients for Your Cobbler
Because this dessert relies on a relatively short list of pantry staples, the quality and type of ingredients you choose will significantly impact the final result. Let us break down the essential components that make this Peanut Butter and Jelly Cobbler a resounding success.
The Peanut Butter: The star of the topping needs to be chosen carefully. For baking purposes, traditional, commercial creamy peanut butter (like Jif or Skippy) is highly recommended over “natural” peanut butters that require stirring. Natural peanut butters tend to separate and have varying oil contents, which can make your cobbler topping overly greasy, crumbly, or structurally unsound. Standard creamy peanut butter has emulsifiers that ensure a smooth, tender, and perfectly textured dough. If you love a crunch, commercial crunchy peanut butter is an excellent alternative that adds a wonderful textural element to the crust.
The Jelly, Jam, or Preserves: This is where you can truly customize the dish to your liking. While “jelly” is in the title, using fruit preserves or jam often yields a superior cobbler. Jelly is made from fruit juice and is entirely smooth, which can melt down very thinly when baked. Jam contains crushed fruit, and preserves contain whole or large pieces of fruit. Using a high-quality strawberry or raspberry preserve will give your cobbler a fantastic, jammy texture with actual bites of fruit that hold up beautifully to the heat of the oven. Grape jelly is the most classic, nostalgic choice, but tart cherry or blackberry preserves offer a more sophisticated, complex flavor profile.
The Butter and Sugars: The foundation of our cobbler topping is a classic creaming method using unsalted butter, granulated sugar, and brown sugar. The brown sugar is critical here; its molasses content adds a deep, caramel-like chewiness to the peanut butter crust that perfectly mimics the texture of a soft-baked cookie. Ensure your butter is softened to room temperature so it creams smoothly with the sugars, creating air pockets that give the topping a light, tender crumb.
Ingredients
Gather the following ingredients to create this magnificent, crowd-pleasing dessert. Make sure your dairy ingredients are at room temperature for the best results.
For the Fruit Filling:
- – 3 cups high-quality fruit preserves or thick jam (Strawberry, Grape, or Raspberry are highly recommended)
- – 1 cup fresh berries (optional, matching your jam flavor, for extra texture)
- – 1 tablespoon lemon juice (to brighten the fruit flavors)
- – 1 tablespoon cornstarch (to help thicken the filling as it bakes)
For the Peanut Butter Topping:
- – 1 1/2 cups all-purpose flour, spooned and leveled
- – 1 teaspoon baking powder
- – 1/2 teaspoon baking soda
- – 1/2 teaspoon fine sea salt
- – 1/2 cup (1 stick) unsalted butter, softened to room temperature
- – 3/4 cup creamy commercial peanut butter (not natural)
- – 1/2 cup granulated white sugar
- – 1/2 cup packed light brown sugar
- – 1 large egg, room temperature
- – 1/4 cup whole milk
- – 1 teaspoon pure vanilla extract
Step-by-Step Instructions
Follow these detailed instructions to assemble and bake your cobbler to golden, bubbling perfection:
- Preheat and Prepare: Preheat your oven to 350°F (175°C). Lightly grease a 9×13-inch baking dish with non-stick cooking spray or a thin coating of butter. Set the prepared dish aside.
- Mix the Dry Ingredients: In a medium-sized mixing bowl, whisk together the all-purpose flour, baking powder, baking soda, and salt. Whisking ensures the leavening agents are evenly distributed, which is crucial for a uniformly rising crust. Set this bowl aside.
- Prepare the Fruit Base: In a separate bowl, combine the fruit preserves (or jam), fresh berries (if using), lemon juice, and cornstarch. Stir gently until the cornstarch is completely dissolved and the mixture is cohesive. The cornstarch is a secret weapon here; it prevents the jam from becoming a watery soup in the oven. Pour this fruit mixture evenly into the bottom of your prepared 9×13-inch baking dish.
- Cream the Butter and Sugars: In the bowl of a stand mixer fitted with the paddle attachment, or in a large bowl using a hand mixer, beat the softened butter, creamy peanut butter, granulated sugar, and light brown sugar together on medium-high speed. Beat this mixture for about 2 to 3 minutes, scraping down the sides of the bowl as needed, until it is pale, fluffy, and completely smooth.
- Add the Wet Ingredients: Add the room-temperature egg to the peanut butter mixture and beat on medium speed until fully incorporated. Next, pour in the whole milk and the pure vanilla extract. Mix until just combined. The mixture might look slightly curdled at this stage, but do not worry; it will come together once the dry ingredients are added.
- Combine Wet and Dry: Turn your mixer to the lowest speed. Gradually add the dry flour mixture into the wet ingredients. Mix only until the flour disappears and a soft, thick, cookie-like dough forms. Overmixing at this stage will develop the gluten in the flour and result in a tough, dense topping instead of a tender, cakey crust.
- Assemble the Cobbler: Using a cookie scoop or two large spoons, drop dollops of the peanut butter dough evenly over the top of the fruit filling in the baking dish. You do not need to spread the dough into a perfectly flat layer; leaving gaps is exactly what you want. As the cobbler bakes, the dough will spread and puff up, and the brightly colored fruit juices will bubble up beautifully through the spaces between the dollops.
- Bake to Perfection: Place the baking dish in the center rack of your preheated oven. Bake for 35 to 45 minutes. You will know the cobbler is done when the peanut butter topping is a deep golden brown and a toothpick inserted into the thickest part of the dough comes out clean. The fruit filling around the edges should be vigorously bubbling and syrupy.
- Cool and Serve: This is the hardest part, but it is absolutely necessary. Remove the cobbler from the oven and place it on a wire rack to cool for at least 15 to 20 minutes before serving. If you cut into it immediately, the molten fruit filling will be too runny and aggressively hot. Letting it rest allows the fruit to thicken and set up slightly. Serve warm, generously spooned into bowls.
Pro Tips for the Best PB&J Cobbler
To ensure your dessert turns out spectacularly every single time, keep these professional baking tips in mind:
Watch the Edges: Because peanut butter dough contains a high amount of sugar and fat, it can brown quickly in the oven. Keep an eye on your cobbler around the 30-minute mark. If the topping is getting too dark but the dough is not yet cooked through, loosely tent a piece of aluminum foil over the baking dish for the remaining baking time to prevent burning.
The Magic of the Scoop: Using an ice cream scoop or a medium cookie scoop to portion out the dough over the jelly not only makes the assembly process incredibly fast, but it also creates a beautiful, rustic, bumpy texture on top that crisp up perfectly while baking.
Do Not Skip the Lemon Juice: It might seem odd to add lemon juice to a peanut butter dessert, but a small splash of acid in the fruit filling is essential. It balances the intense sweetness of the jam and the heavy richness of the peanut butter, making the overall dessert taste brighter and much more complex.
Exciting Variations to Try
Once you have mastered the classic version, the possibilities for customization are nearly endless. Consider these delicious twists on the original recipe:
- The Nutella Twist: Swap out half of the peanut butter in the dough recipe for chocolate hazelnut spread (Nutella). The combination of chocolate, hazelnut, peanut butter, and fruit is absolutely divine and adds a rich, dark depth to the crust.
- Crunchy Peanut Addition: If you love texture, fold half a cup of roughly chopped, salted roasted peanuts into the cobbler dough right before dropping it onto the fruit. This adds a fantastic savory crunch that contrasts beautifully with the soft baked dough and gooey jelly.
- Almond Butter & Cherry: For a slightly more sophisticated, adult palate, substitute the peanut butter with creamy almond butter, and use a high-quality tart cherry preserve for the base. Add a dash of almond extract to the dough for an incredible flavor profile.
- The “Elvis” Cobbler: Channel the King of Rock and Roll by adding a layer of thinly sliced fresh bananas on top of the jelly layer before adding the peanut butter dough. You can even sprinkle some cooked, crispy bacon bits on top for a truly wild, sweet-and-salty experience.
Serving Suggestions and Pairings
A cobbler this rich and warm absolutely demands a cool, creamy counterpart to achieve dessert perfection. The ultimate pairing is, without a doubt, a generous scoop of premium vanilla bean ice cream. The cold ice cream melts into the hot crevices of the peanut butter crust, creating a luscious sauce that mingles with the bubbling fruit jelly. It is a textural and temperature contrast that is out of this world.
If you prefer a lighter accompaniment, freshly whipped heavy cream lightly sweetened with powdered sugar and a dash of vanilla extract is a fantastic option. For the true purists, a tall, ice-cold glass of whole milk is the traditional and arguably most satisfying way to wash down this peanut buttery treat.

Storage, Reheating, and Freezing Instructions
Storage: If you miraculously have leftovers, allow the cobbler to cool completely to room temperature. Cover the baking dish tightly with plastic wrap or transfer the leftovers to an airtight container. It can be stored at room temperature for up to 2 days, or in the refrigerator for up to 5 days. Note that storing it in the fridge will make the topping slightly softer, but it will still taste incredible.
Reheating: This dessert is vastly superior when served warm. To reheat individual portions, simply microwave a bowl of the cobbler for 30 to 45 seconds until the jelly is bubbling and the crust is warm. To reheat the entire dish, place it in a 300°F (150°C) oven for about 15-20 minutes, or until warmed through.
Freezing: You can absolutely freeze this cobbler! Bake it completely and let it cool. Wrap the entire dish tightly in a layer of plastic wrap, followed by a layer of heavy-duty aluminum foil. Freeze for up to 3 months. To serve, thaw the cobbler overnight in the refrigerator and then reheat in a 350°F oven for about 20-25 minutes until hot and bubbly.
Gather your ingredients, preheat your oven, and get ready to experience a wave of delicious nostalgia. This Peanut Butter and Jelly Cobbler is guaranteed to become a highly requested favorite in your household rotation!
Peanut Butter and Jelly Cobbler
Ingredients
Equipment
Method
- Preheat oven to 350°F (175°C). Lightly grease a 9×13-inch baking dish.
- In a medium bowl, whisk together the flour, baking powder, baking soda, and salt.
- In a separate bowl, stir together the preserves, fresh berries, lemon juice, and cornstarch. Spread this mixture evenly into the bottom of the prepared baking dish.
- In a large bowl or stand mixer, cream the softened butter, peanut butter, granulated sugar, and brown sugar until light and fluffy (about 2-3 minutes).
- Beat in the egg, milk, and vanilla extract until well combined.
- Turn mixer to low and gradually add the dry flour mixture, mixing just until a soft dough forms. Do not overmix.
- Using a cookie scoop, drop dollops of the peanut butter dough evenly over the top of the fruit filling.
- Bake for 35-45 minutes until the topping is golden brown and the fruit is bubbling. Cool for 15-20 minutes before serving warm with ice cream.