PB Marshmallow Cookies
The Chewy, Gooey Peanut Butter Marshmallow Cookies of Your Dreams
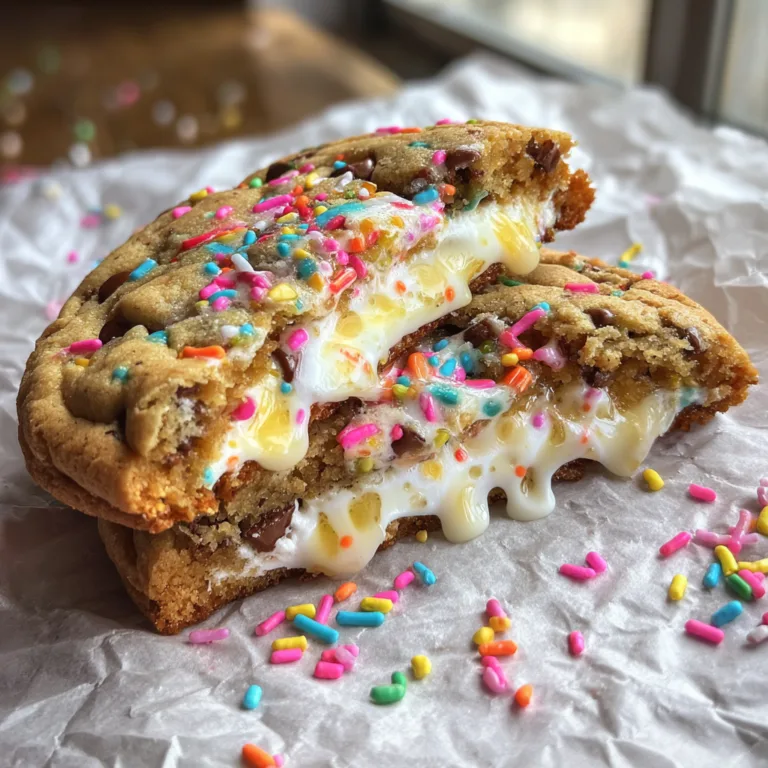
There is a specific kind of magic that happens when salty, creamy peanut butter meets sweet, pillowy marshmallows. It is a flavor combination that evokes childhood memories of school lunches and sticky fingers. These Peanut Butter Marshmallow Cookies take that nostalgic “Fluffernutter” concept and transform it into a sophisticated, bakery-style treat. Imagine a cookie with crisp, golden edges, a soft, chewy peanut butter center, and pockets of gooey, melted marshmallow throughout. It is not just a cookie; it is an experience.
The texture here is everything. The peanut butter provides a dense, fudgy bite, while the marshmallows melt down to create chewy, caramelized voids that taste like toasted campfire treats. When warm, they are messy in the best way possible. When cooled, they settle into a chewy masterpiece that pairs perfectly with a cold glass of milk. Whether you are baking for a holiday exchange, a weekend treat, or just because you have a craving for something sweet and salty, this recipe is guaranteed to become a household favorite.
In this guide, we are going to walk through the secrets to keeping your marshmallows from disappearing completely (a common baking tragedy!), how to achieve that perfect crinkle top, and why the type of peanut butter you use matters more than you think. Get your mixer ready—it’s time to bake.

Why This Recipe Works
You might be thinking, “Can’t I just throw marshmallows into my standard cookie dough?” You could, but you might end up with a sticky mess on your baking sheet. This recipe is chemically balanced to support the marshmallows.
- Structure Stability: The ratio of flour to fat is adjusted so the cookies don’t spread too thin when the marshmallows melt.
- Flavor Balance: The saltiness of the peanut butter cuts through the intense sweetness of the marshmallows, preventing the cookie from becoming cloying.
- Texture Contrast: The crunch of the exterior, the chew of the peanut butter dough, and the goo of the marshmallow create a “triple threat” texture profile.
- No Chill Time Required: Unlike many heavy butter cookies, these can go straight from the mixer to the oven, meaning you get cookies in your mouth faster.
Ingredients You Will Need
The ingredient list is simple, pantry-staple focused, but quality matters.
- Creamy Peanut Butter – Use standard commercial peanut butter (like Jif or Skippy). Natural peanut butter that separates acts differently in baking and can make the cookies too oily or crumbly.
- Unsalted Butter – Softened to room temperature so it creams perfectly with the sugars.
- Brown Sugar – Packed. The molasses in brown sugar adds moisture and chewiness, essential for a soft cookie.
- Granulated White Sugar – Helps to crisp up the edges and provides sweetness.
- Egg – Acts as the binder. Use a large egg at room temperature.
- Vanilla Extract – A generous splash enhances the peanut butter flavor.
- All-Purpose Flour – The structural backbone of the cookie. measure carefully (spoon and level) to avoid dry cookies.
- Baking Soda – The leavening agent that helps the cookies rise and spread just enough.
- Salt – Crucial to balance the sugar. If using salted peanut butter, reduce this slightly.
- Mini Marshmallows – The star of the show. Mini marshmallows distribute better than large ones chopped up.
Step-by-Step Instructions
1. Preheat and Prep
Preheat your oven to 350°F (175°C). Line two large baking sheets with parchment paper. Do not use foil, as the melting marshmallows will stick to it like cement. Parchment paper is non-negotiable here.
2. Cream the Wet Ingredients
In a large bowl or stand mixer fitted with the paddle attachment, beat the softened butter, peanut butter, brown sugar, and granulated sugar together on medium-high speed. You want this mixture to be light, fluffy, and pale in color. This usually takes about 2-3 minutes. This step aerates the dough, leading to a better texture.
3. Add Egg and Vanilla
Add the egg and vanilla extract to the butter mixture. Beat on medium speed until fully combined, scraping down the sides of the bowl to ensure everything is incorporated.
4. Mix the Dry Ingredients
In a separate medium bowl, whisk together the flour, baking soda, and salt. Turn the mixer to low speed and gradually add the dry ingredients to the wet ingredients. Mix only until streaks of flour disappear. Do not overmix, or you will end up with tough cookies.
5. The Marshmallow Fold
Remove the bowl from the mixer. Using a sturdy spatula or wooden spoon, gently fold in the mini marshmallows. If you want to ensure they stay intact, you can freeze your marshmallows for 15 minutes before this step!
6. Scoop and Bake
Use a medium cookie scoop (about 1.5 to 2 tablespoons) to portion the dough. Roll them into balls and place them on the baking sheet, spaced about 2 inches apart. These cookies will spread.
Pro Tip: Press a few extra marshmallows onto the tops of the dough balls before baking for that “Instagram-worthy” look.
7. Bake
Bake for 10 to 12 minutes. The edges should be golden brown, but the centers might still look slightly underdone and soft. That is exactly what you want. The marshmallows will be bubbling.
8. Cool and Serve
Let the cookies cool on the baking sheet for at least 5-10 minutes. They are extremely fragile when hot because of the molten marshmallow. Once they firm up, transfer them to a wire rack to cool completely.

Expert Tips for Marshmallow Success
Marshmallows are tricky in the oven. They essentially turn into liquid sugar. Here is how to control the chaos:
- The Freezer Trick: As mentioned, freezing your mini marshmallows before mixing them in helps them hold their shape longer in the oven, resulting in distinct pockets of marshmallow rather than them dissolving into the dough completely.
- Contain the Goo: If a marshmallow on the edge melts out and creates a weird shape, use a round cookie cutter or a glass to gently “scoot” the warm cookie back into a perfect circle immediately after taking the pan out of the oven.
- Parchment is Key: I cannot stress this enough—melted marshmallow on a bare baking sheet is a nightmare to clean. Use parchment paper.
Variations to Try
Feeling adventurous? Try these twists on the classic recipe:
The “S’mores” Cookie
Fold in 1/2 cup of semi-sweet chocolate chips or chocolate chunks along with the marshmallows. You get the chocolate, peanut butter, and marshmallow trinity.
The “Elvis”
Add 1/2 cup of chopped cooked bacon to the dough. It sounds crazy, but the smoky, salty bacon with peanut butter and sweet marshmallow is a flavor bomb inspired by the King himself.
Crunchy Texture
Use crunchy peanut butter instead of creamy for added texture, or fold in 1/2 cup of crushed pretzels for a salty crunch.
Peanut Butter Marshmallow Cookies
Ingredients
Equipment
Method
- Preheat oven to 350°F (175°C). Line two baking sheets with parchment paper.
- In a large bowl, cream together softened butter, peanut butter, brown sugar, and granulated sugar until fluffy (2-3 minutes).
- Add the egg and vanilla extract, beating until fully combined.
- In a separate bowl, whisk together flour, baking soda, and salt.
- Gradually mix dry ingredients into the wet mixture on low speed until just combined.
- Gently fold in the mini marshmallows by hand.
- Scoop dough into balls (approx 1.5 tbsp each) and place 2 inches apart on baking sheets.
- Bake for 10-12 minutes until edges are golden. Centers may look soft.
- Allow cookies to cool on the baking sheet for 5-10 minutes to set before transferring to a wire rack.
Notes
Storage and Freezing
Room Temperature: Store cooled cookies in an airtight container at room temperature for up to 4 days. If you stack them, place a piece of wax paper between layers to prevent them from sticking together.
Freezing Dough: You can scoop the dough into balls and freeze them on a baking sheet. Once frozen solid, transfer to a ziplock bag. Bake from frozen, just adding an extra minute or two to the bake time.
Freezing Baked Cookies: These freeze well for up to 3 months. Thaw on the counter for an hour before eating.
Conclusion
Peanut Butter Marshmallow Cookies are the ultimate comfort food. They are unpretentious, messy, and absolutely delicious. They remind us that baking doesn’t always have to be about perfect piping and delicate structures; sometimes, it’s just about melting sugar and peanut butter into a warm, gooey disc of happiness. So grab a glass of milk, preheat that oven, and treat yourself to one of the best cookies you will ever make.
Peanut Butter Marshmallow Cookies
Ingredients
Equipment
Method
- Preheat oven to 350°F (175°C). Line two baking sheets with parchment paper.
- In a large bowl, cream together softened butter, peanut butter, brown sugar, and granulated sugar until fluffy (2-3 minutes).
- Add the egg and vanilla extract, beating until fully combined.
- In a separate bowl, whisk together flour, baking soda, and salt.
- Gradually mix dry ingredients into the wet mixture on low speed until just combined.
- Gently fold in the mini marshmallows by hand.
- Scoop dough into balls (approx 1.5 tbsp each) and place 2 inches apart on baking sheets.
- Bake for 10-12 minutes until edges are golden. Centers may look soft.
- Allow cookies to cool on the baking sheet for 5-10 minutes to set before transferring to a wire rack.