Red Velvet Brownie Cheesecakes
Red Velvet Brownie Bottom Mini Cheesecakes: The Ultimate Bite-Sized Indulgence
Introduction to the Perfect Flavor Pairing
When it comes to decadent desserts, few flavor combinations are as universally adored as rich, cocoa-infused red velvet and tangy, sweet cream cheese. Usually, you find these two paired in a traditional cake with frosting. However, if you want to truly elevate your dessert table and offer your guests something unforgettable, you need to introduce them to the magic of Red Velvet Brownie Bottom Mini Cheesecakes. These stunning, two-toned treats combine the dense, fudgy satisfaction of a brownie with the luxurious, melt-in-your-mouth creaminess of a classic baked cheesecake.
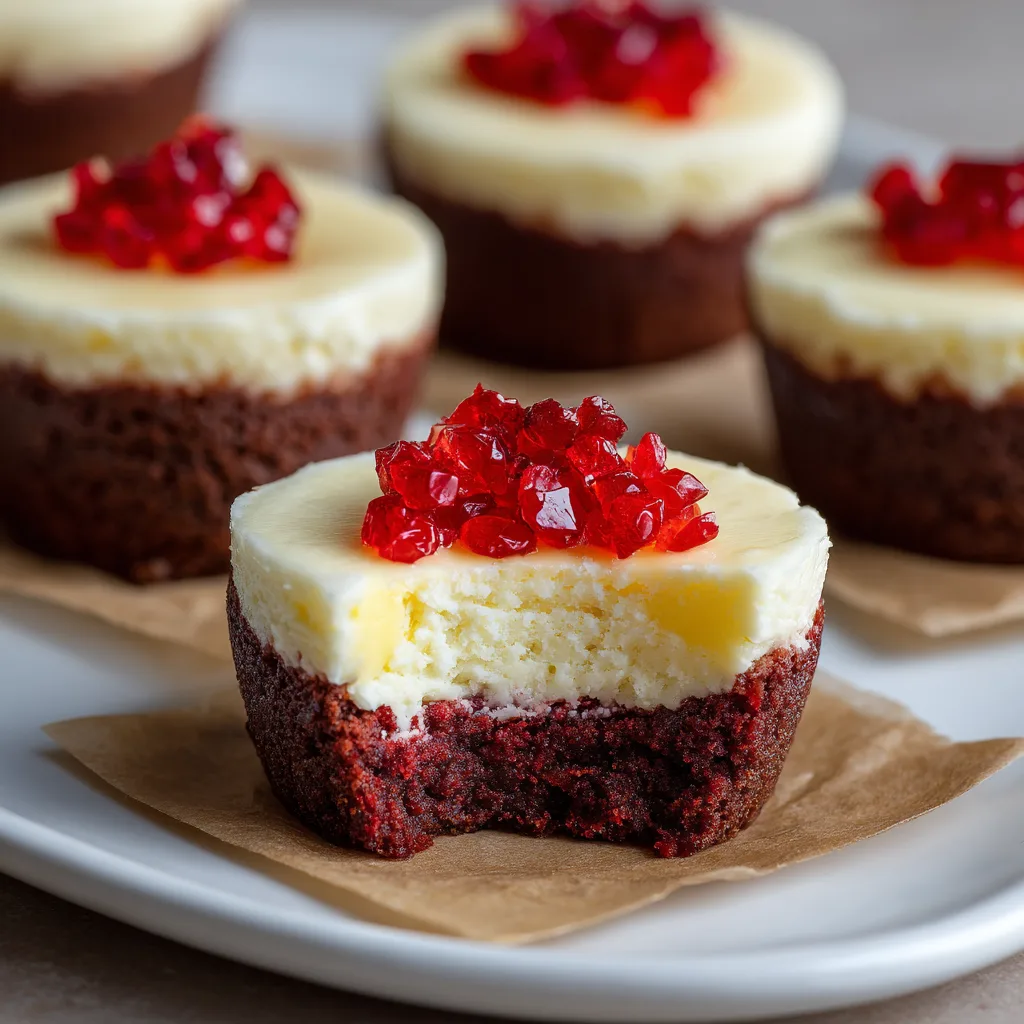
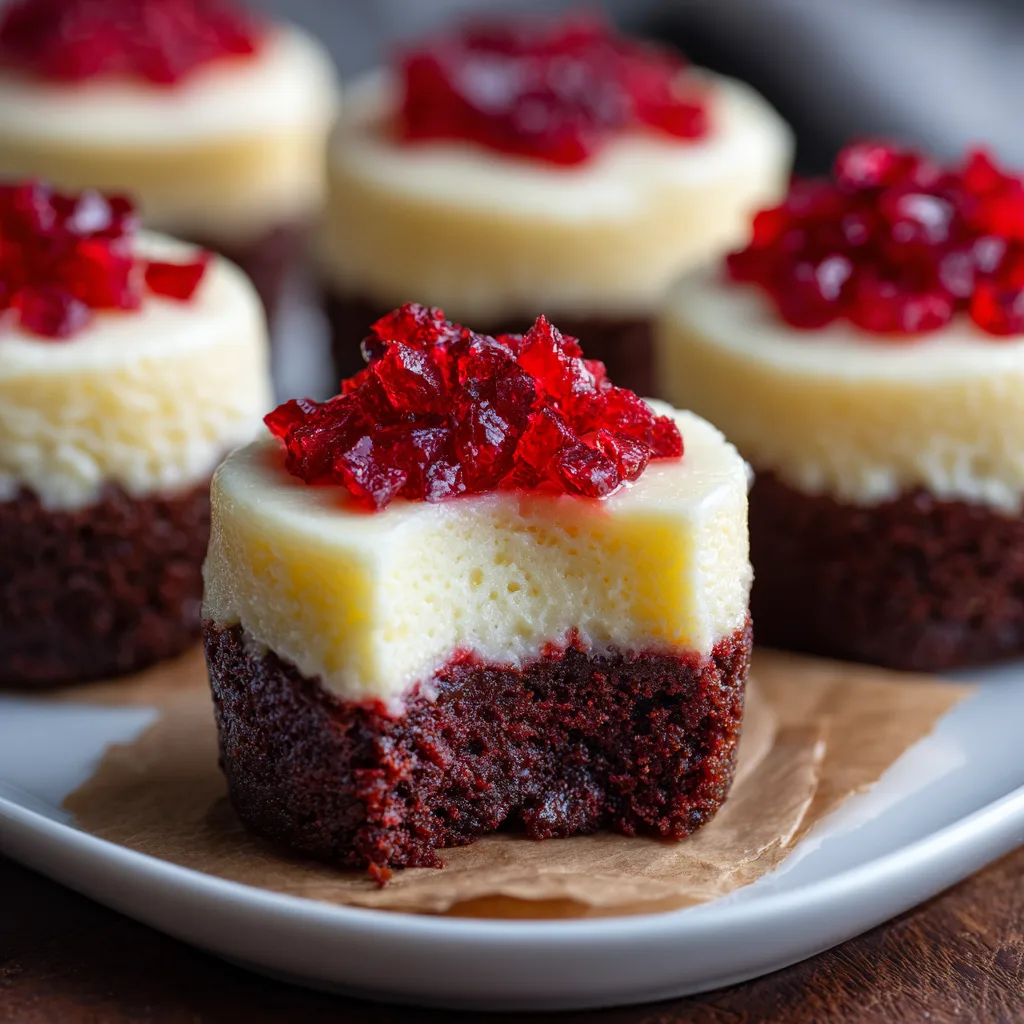
Visually, these bite-sized desserts are an absolute showstopper. They boast a distinct, beautiful contrast with a vibrant, deep red crumbly base supporting a thick, smooth, pale top layer. This striking appearance makes them the perfect centerpiece for holiday gatherings, Valentine’s Day celebrations, or any elegant party where you want to impress without the hassle of slicing and serving a massive cake. Best of all, because they are baked in individual portions, the baking time is significantly reduced, and the dreaded “cheesecake water bath” is completely unnecessary.
The Anatomy of a Two-Layer Masterpiece
The success of these mini cheesecakes lies in the beautiful contrast of both texture and flavor between the two distinct layers. Let’s break down what makes each component so spectacular.
The Fudgy Red Velvet Base: Unlike a standard graham cracker crust, the foundation of this dessert is an actual layer of red velvet brownie. It is slightly dense, wonderfully chewy, and features that signature hint of cocoa powder that defines true red velvet flavor. The vibrant red color provides a stunning visual anchor for the treat.
The Creamy Cheesecake Top: Resting heavily on the brownie base is a generous layer of classic vanilla cheesecake. It is exceptionally smooth, rich, and slightly tangy, cutting perfectly through the sweetness of the brownie layer below. When you take a bite, as seen in the beautifully textured cross-section of these treats, the two layers meld together in a symphony of dense, velvety perfection.
Baking in Miniature: Why It Works
Baking full-sized cheesecakes can be intimidating. They require long baking times, delicate cooling processes, and often crack despite your best efforts. Mini cheesecakes eliminate almost all of these hurdles. By baking the batter in a standard muffin tin lined with paper or silicone liners, the heat distributes quickly and evenly. They bake in a fraction of the time and are far less prone to sinking or cracking.
Furthermore, individual portions are simply better for entertaining. Guests can easily grab one (or two) as they mingle, without needing plates or forks. To add an extra touch of elegance, you can garnish the smooth tops with a small cluster of bright red diced candied fruit or sprinkles, which beautifully echoes the vibrant red hue of the brownie base hidden beneath.
Ingredients
Gather the following ingredients to create these beautiful layered desserts:
- For the Red Velvet Brownie Base:
- – 1/2 cup unsalted butter, melted
- – 1 cup granulated sugar
- – 1/4 cup unsweetened cocoa powder
- – 1 teaspoon vanilla extract
- – 1 tablespoon liquid red food coloring
- – 2 large eggs
- – 3/4 cup all-purpose flour
- – Pinch of salt
- For the Cheesecake Layer:
- – 16 oz (2 blocks) full-fat cream cheese, softened to room temperature
- – 1/2 cup granulated sugar
- – 1 teaspoon vanilla extract
- – 2 large eggs, room temperature
- – Optional: Small diced red candied fruit or red sprinkles for garnish
Instructions
Follow these steps to create your miniature two-layer masterpieces:
- Prepare the Pan: Preheat your oven to 325°F (163°C). Line a standard 12-cup muffin tin with paper liners. Lightly spray the inside of the liners with non-stick cooking spray to ensure the sides release cleanly.
- Mix the Brownie Batter: In a medium bowl, whisk together the melted butter, sugar, and cocoa powder until smooth. Stir in the vanilla extract and red food coloring. Whisk in the eggs one at a time. Finally, gently fold in the flour and salt until just combined. Do not overmix.
- Create the Base Layer: Spoon about 1 to 1.5 tablespoons of the red velvet brownie batter into the bottom of each prepared muffin cup, spreading it to cover the bottom evenly. Bake for 10 minutes to allow the base to slightly set. Remove from the oven and maintain the oven temperature.
- Mix the Cheesecake Batter: While the bases are baking, beat the softened cream cheese in a large bowl with a hand mixer on medium speed until perfectly smooth and creamy. Add the sugar and vanilla, beating until combined. Add the eggs one at a time, mixing on low speed just until the yellow disappears.
- Add the Top Layer: Spoon the cheesecake batter directly over the slightly baked red velvet bases, filling each liner almost to the top.
- Bake and Chill: Return the pan to the oven and bake for 18-20 minutes, or until the centers of the cheesecakes are just set and no longer jiggle aggressively. Remove from the oven and allow them to cool completely in the pan. Once cool, transfer the pan to the refrigerator and chill for at least 3 hours (preferably overnight) to allow the cheesecake to fully firm up.
- Garnish and Serve: Once completely chilled, carefully remove the paper liners. Top the center of each mini cheesecake with a small cluster of diced red candied fruit before serving.
Pro Tips for the Best Results
Room Temperature Ingredients: This is the golden rule of cheesecake. Your cream cheese and eggs must be at room temperature before you begin mixing. If the cream cheese is cold, it will remain lumpy, and you will overmix the batter trying to smooth it out, which leads to cracked cheesecakes.
Do Not Overmix the Eggs: Once you add the eggs to the cheesecake batter, mix on the lowest possible speed and stop the moment the yolk disappears. Beating too much air into the eggs will cause the cheesecakes to puff up wildly in the oven and then collapse and sink as they cool.
Storage Advice
These mini cheesecakes are excellent make-ahead desserts. Store them in a single layer in an airtight container in the refrigerator for up to 5 days. They also freeze beautifully. Wrap the fully chilled, un-garnished cheesecakes individually in plastic wrap, place them in a freezer bag, and freeze for up to 2 months. Thaw them overnight in the refrigerator before garnishing and serving.
Conclusion
These Red Velvet Brownie Bottom Mini Cheesecakes offer the ultimate dessert experience in one perfectly portioned bite. With their gorgeous two-toned appearance, dense fudgy base, and tangy, creamy top, they are guaranteed to steal the show at your next event. Skip the stress of a full-sized cake and opt for these elegant, effortless, and utterly delicious miniature treats.
Red Velvet Brownie Bottom Mini Cheesecakes
Ingredients
Equipment
Method
- Preheat oven to 325°F (163°C) and line a 12-cup muffin tin with paper liners.
- For the brownie base, whisk melted butter, sugar, and cocoa powder. Stir in vanilla and red food coloring.
- Whisk in 2 eggs, then gently fold in the flour and salt until combined.
- Divide the batter among the muffin cups (about 1-1.5 tbsp each). Bake for 10 minutes, then remove from oven.
- For the cheesecake, beat softened cream cheese until smooth. Add sugar and vanilla and mix well.
- Mix in 2 eggs on low speed just until combined. Do not overmix.
- Spoon the cheesecake batter over the baked red velvet layers, filling to the top.
- Bake for 18-20 minutes until the centers are set. Cool completely in the pan, then chill in the refrigerator for at least 3 hours.
- Remove liners and top with diced red candied fruit before serving.