Samoa Brownies
Decadent Samoa Brownies: The Ultimate Caramel, Coconut, and Chocolate Experience
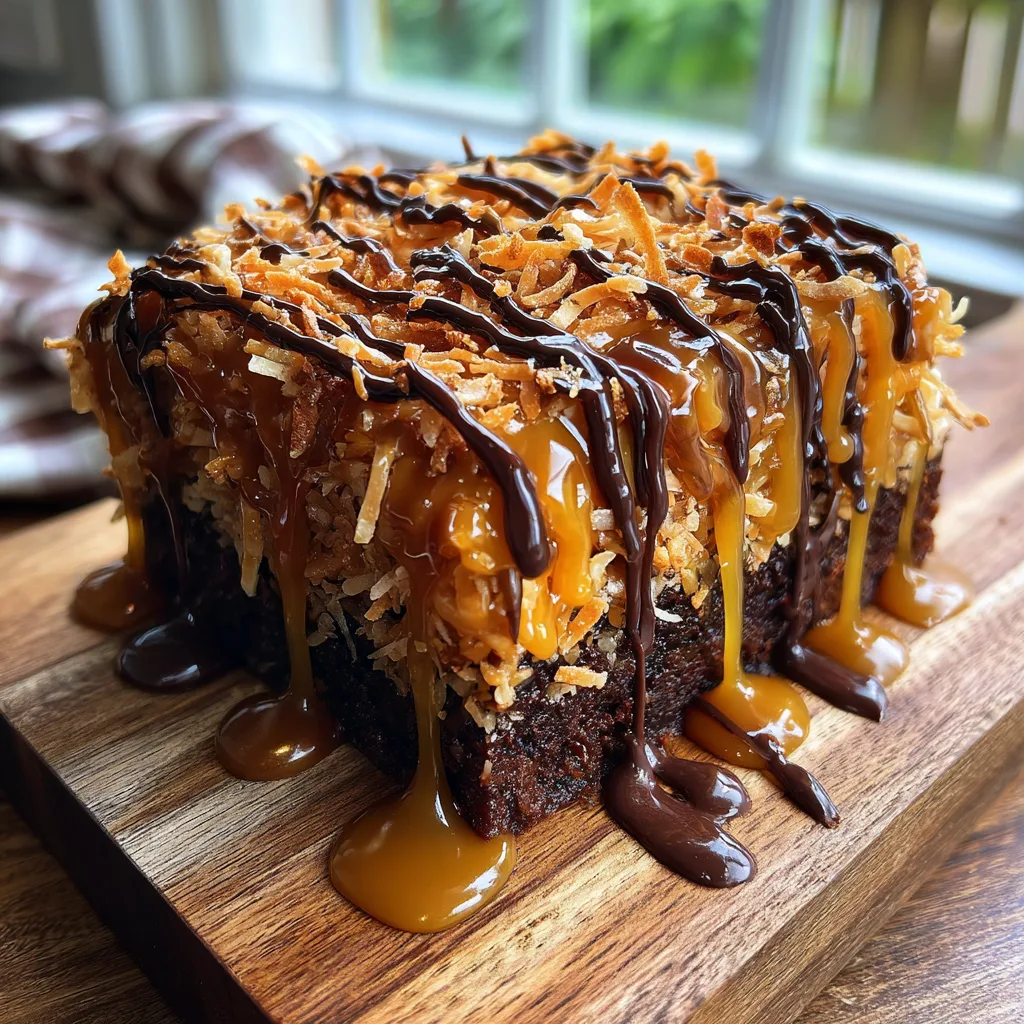
There are few flavor combinations in the world of desserts as universally beloved and instantly recognizable as the holy trinity of rich dark chocolate, sweet toasted coconut, and gooey, buttery caramel. Made famous by a certain iconic Girl Scout cookie, this flavor profile has captured the hearts and taste buds of millions. But what happens when you take that legendary, delicate little cookie and transform it into a thick, fudgy, over-the-top, bakery-style brownie? You get the Samoa Brownie—a dessert so outrageously decadent and intensely satisfying that it will immediately become the star of any bake sale, potluck, or late-night kitchen craving.
In this comprehensive, deep-dive guide, we are going to explore every single facet of creating the perfect Samoa Brownies. We will break down the science of achieving the ultimate fudgy brownie base, discuss the nuances of toasting coconut to golden perfection, and explore the best methods for creating that sticky, glorious caramel topping that binds it all together. Whether you are an experienced home baker looking for your next show-stopping recipe or a beginner wanting to impress your friends and family, this guide will provide you with all the knowledge, tips, and tricks you need to master this incredible treat.
The Anatomy of the Perfect Samoa Brownie
To truly understand what makes these brownies so spectacular, we have to look at the dessert in three distinct layers. Each layer requires a specific approach to ensure that the final product is balanced. If the brownie is too sweet, it will clash with the caramel. If the coconut isn’t toasted properly, the texture will be chewy rather than delightfully crisp. Let us break down the anatomy of this masterpiece.
Layer One: The Fudgy Chocolate Base
The foundation of any great loaded brownie must be sturdy enough to hold up a heavy topping, yet soft and fudgy enough to melt in your mouth. For Samoa Brownies, we want to lean heavily into the “fudgy” category rather than “cakey.” Cakey brownies, which rely on more flour and chemical leaveners like baking powder, tend to be too light and airy to support a dense layer of caramel and coconut. A fudgy base, created by melting butter and chocolate (or using a high ratio of fat to flour with cocoa powder), provides a dense, intensely chocolatey canvas. The slight bitterness of a dark cocoa powder is crucial here; it acts as a much-needed counterbalance to the extreme sweetness of the caramel topping.
Layer Two: The Caramel Coconut Crown
This is where the magic happens. The topping is a mixture of deeply toasted, sweetened shredded coconut folded into a rich, thick caramel. The toasting of the coconut is non-negotiable. Raw shredded coconut has a floral, slightly muted flavor and a chewy texture. Toasting it draws out the natural oils, intensifies the nutty flavor, and provides a crispness that contrasts beautifully with the soft brownie below. The caramel used to bind the coconut must be thick enough to hold its shape when sliced, but soft enough to remain gooey at room temperature. Using a high-quality soft caramel candy melted down with a splash of heavy cream is often the most reliable method for home bakers to achieve this perfect consistency.
Layer Three: The Chocolate Drizzle
The crowning glory of a Samoa Brownie is the signature zig-zag drizzle of chocolate across the top. This isn’t just for aesthetics (though it does make them look identical to their cookie inspiration). The top layer of chocolate provides a final hit of cocoa flavor that hits your palate first, tying the whole flavor journey together. A semi-sweet or dark chocolate is best here to maintain that crucial balance of sweet and bitter.
Mastering the Ingredients: A Deep Dive
Great baking relies on understanding your ingredients. Let’s explore what you need to make these brownies spectacular.
Choosing the Right Cocoa Powder: For the brownie base, Dutch-processed cocoa powder is highly recommended. Unlike natural cocoa powder, Dutch-processed cocoa has been treated with an alkalizing agent to neutralize its natural acidity. This results in a darker color and a smoother, more mellow, and deeply earthy chocolate flavor that pairs impeccably with caramel.
The Coconut Conundrum: Sweetened vs. Unsweetened: You will find both sweetened and unsweetened shredded coconut in the baking aisle. For this recipe, sweetened shredded coconut is the traditional choice because it mimics the moisture and flavor of the classic cookie. However, if you prefer a dessert that is a little less intensely sweet, you can absolutely use unsweetened desiccated coconut. Just be aware that unsweetened coconut toasts much faster than sweetened coconut, so keep a close eye on the oven!
The Caramel Component: You have three main options for the caramel binder:
1. Store-bought soft caramel candies: (Like Kraft caramels). Unwrapping these and melting them in the microwave with 2-3 tablespoons of heavy cream or milk yields the most consistent, chewy, and sliceable topping.
2. Thick Dulce de Leche: Canned dulce de leche provides a deeper, more roasted flavor, though it can sometimes be a bit softer, making the brownies slightly messier to cut.
3. Homemade Caramel: If you are a purist, making a homemade caramel sauce is an option, but it must be cooked to the “soft ball” stage (around 235°F) so that it sets up thick enough to hold the coconut together.
Ingredients
For the Fudgy Brownie Base:
- – 1/2 cup (1 stick) unsalted butter, melted and slightly cooled
- – 1 cup granulated sugar
- – 2 large eggs, room temperature
- – 1 teaspoon pure vanilla extract
- – 1/2 cup all-purpose flour
- – 1/2 cup unsweetened cocoa powder (Dutch-processed preferred)
- – 1/4 teaspoon salt
For the Caramel Coconut Topping:
- – 3 cups sweetened shredded coconut
- – 11 oz bag of soft caramel candies (unwrapped)
- – 3 tablespoons heavy cream or milk
- – 1/4 teaspoon salt (optional, to balance sweetness)
For the Chocolate Drizzle:
- – 1/2 cup semi-sweet chocolate chips
- – 1 teaspoon coconut oil or vegetable oil (helps the chocolate melt smoothly and prevents it from cracking when cut)
Instructions
Follow these detailed steps to build your ultimate Samoa Brownies:
- Toast the Coconut: Preheat your oven to 325°F (163°C). Spread the shredded coconut evenly on a large, rimmed baking sheet. Bake for 10-15 minutes, stirring every 3 minutes. Keep a very close eye on it, as coconut goes from perfectly golden to burnt in a matter of seconds. Once evenly toasted and fragrant, remove from the oven and set aside to cool.
- Prepare the Pan and Oven: Increase the oven temperature to 350°F (175°C). Line an 8×8-inch square baking pan with parchment paper, leaving an overhang on two sides to act as a “sling” for easy removal later. Lightly spray the parchment with non-stick cooking spray.
- Mix the Wet Ingredients for the Base: In a large mixing bowl, whisk together the melted, cooled butter and the granulated sugar until well combined. Add the room temperature eggs one at a time, whisking vigorously after each addition until the mixture is smooth and slightly pale. Stir in the vanilla extract.
- Incorporate the Dry Ingredients: Sift the all-purpose flour, cocoa powder, and salt directly into the wet ingredients. Using a rubber spatula, gently fold the dry ingredients into the wet until just combined. Do not overmix; overmixing develops the gluten in the flour, which can lead to tough, cakey brownies rather than fudgy ones. Stop mixing as soon as the last streak of flour disappears.
- Bake the Brownies: Pour the thick brownie batter into the prepared baking pan, spreading it out into an even layer with your spatula. Bake for 20-25 minutes. A toothpick inserted into the center should come out with a few moist crumbs attached, but no wet batter. Do not overbake! Let the brownies cool completely in the pan while you prepare the topping.
- Prepare the Caramel Topping: In a microwave-safe bowl, combine the unwrapped caramel candies, heavy cream, and a pinch of salt. Microwave in 30-second bursts, stirring well after each interval, until the caramels are completely melted and the mixture is perfectly smooth.
- Combine Coconut and Caramel: Pour about 3/4 of the melted caramel mixture over the cooled, toasted coconut. Fold them together until the coconut is completely and evenly coated. Reserve the remaining 1/4 of the plain caramel.
- Assemble the Layers: Spread the reserved plain caramel in a thin layer over the top of the cooled brownies. This acts as a “glue” to hold the coconut mixture in place. Next, dollop the caramel-coconut mixture all over the top and press it down firmly into an even, compact layer using an offset spatula or your hands (lightly greased with butter so it doesn’t stick).
- Melt the Chocolate Drizzle: In a small microwave-safe bowl, combine the chocolate chips and coconut oil. Microwave in 20-second increments, stirring in between, until melted and perfectly smooth.
- The Final Flourish: Transfer the melted chocolate to a small zip-top bag, snip a tiny piece off the corner, and pipe thick zig-zag lines across the entire pan of brownies.
- Chill and Slice: This is the hardest part, but it is crucial. Place the entire pan in the refrigerator for at least 1 hour to allow the caramel and chocolate to fully set. Once set, use the parchment overhang to lift the brownies out of the pan and onto a cutting board. Use a large, sharp knife to cut into squares, wiping the blade clean between cuts for perfectly neat edges.
Tips for Perfection and Troubleshooting
Even with a straightforward recipe, things can occasionally go awry. Here is how to ensure perfect results every time:
Why are my brownies crumbly? Crumbly brownies are usually the result of overbaking or overmixing. Remember that brownies continue to bake in the hot pan even after you remove them from the oven. It is always better to pull them out a minute early rather than a minute late. Additionally, folding the flour in gently is key to a tender crumb.
My caramel topping is too hard to cut! If you use caramel candies without adding enough heavy cream, the caramel can set up too firmly in the fridge, making it difficult to bite into. Ensure you measure the heavy cream accurately. Letting the brownies sit at room temperature for 15 minutes before serving will also soften the caramel beautifully.
How to get perfectly clean slices: The secret to bakery-style, clean-cut brownie squares is temperature and blade friction. Chill the brownies thoroughly so the caramel is firm. Run your large chef’s knife under very hot water, wipe it completely dry with a towel, and make one firm, downward pressing cut (do not saw back and forth). Wipe the blade clean, heat it again, and repeat for every single cut.
Creative Variations
While the classic Samoa flavor is hard to beat, you can use this recipe as a jumping-off point for other incredible creations.
Salted Caramel Samoa Brownies: Elevate the sophisticated flavors of this dessert by adding an extra half-teaspoon of flaky sea salt to the caramel mixture, and sprinkling a tiny bit of flaky sea salt (like Maldon) over the top of the chocolate drizzle before it sets. The sweet and salty dynamic is truly addictive.
Samoa Blondies: Not a huge fan of chocolate? Swap the brownie base for a rich, brown sugar and butter blondie base. The molasses notes in the blondie pair spectacularly well with the toasted coconut and caramel topping.
Nutty Samoa Brownies: For an added textural crunch, fold half a cup of chopped, toasted pecans or almonds into the coconut-caramel mixture. It adds a wonderful savory depth to the intensely sweet topping.
Storage and Freezing Guidelines
Because of the dairy in the caramel, these brownies are best stored in an airtight container in the refrigerator. They will keep beautifully for up to a week. When you are ready to eat one, let it sit at room temperature for about 10 to 15 minutes to allow the caramel to soften slightly and reach that perfect gooey texture.

These brownies also freeze incredibly well! Wrap individual brownie squares tightly in plastic wrap, then place them all into a large freezer-safe zip-top bag. They can be frozen for up to 3 months. To thaw, simply unwrap a brownie and let it sit at room temperature for about an hour, or microwave it for 10-15 seconds for a warm, molten, ultra-gooey experience that is out of this world.
The Magic of Nostalgic Baking
Baking is often about more than just combining ingredients; it is about recreating feelings and memories. The Samoa Brownie taps into that universal childhood joy of cookie season, but elevates it to a sophisticated, intensely satisfying dessert format that appeals to adults and kids alike. The contrast of textures—the fudgy bottom, the chewy and crunchy middle, the snappy chocolate top—creates a multidimensional eating experience that guarantees this recipe will be requested at every gathering you attend.
Take your time toasting the coconut, be patient while the caramel sets, and enjoy the glorious, messy, decadent process of creating one of the most spectacular baked goods you will ever pull out of your oven.
Samoa Brownies
Ingredients
Equipment
Method
- Preheat oven to 325°F. Spread coconut on a baking sheet and toast for 10-15 mins, stirring often, until golden. Set aside.
- Increase oven to 350°F. Line an 8×8 pan with parchment paper.
- In a bowl, whisk melted butter and sugar. Add eggs one at a time, whisking well, then stir in vanilla.
- Fold in the flour, cocoa powder, and salt until just combined. Pour into the prepared pan and bake 20-25 minutes. Let cool completely.
- In a microwave-safe bowl, melt unwrapped caramels and heavy cream in 30-second intervals until smooth.
- Reserve 1/4 of the caramel and spread it thinly over the cooled brownies. Mix the remaining caramel with the toasted coconut.
- Press the caramel-coconut mixture firmly and evenly over the top of the brownies.
- Melt chocolate chips and coconut oil in the microwave until smooth. Drizzle thickly over the coconut layer.
- Chill in the refrigerator for at least 1 hour until set before cutting into squares.