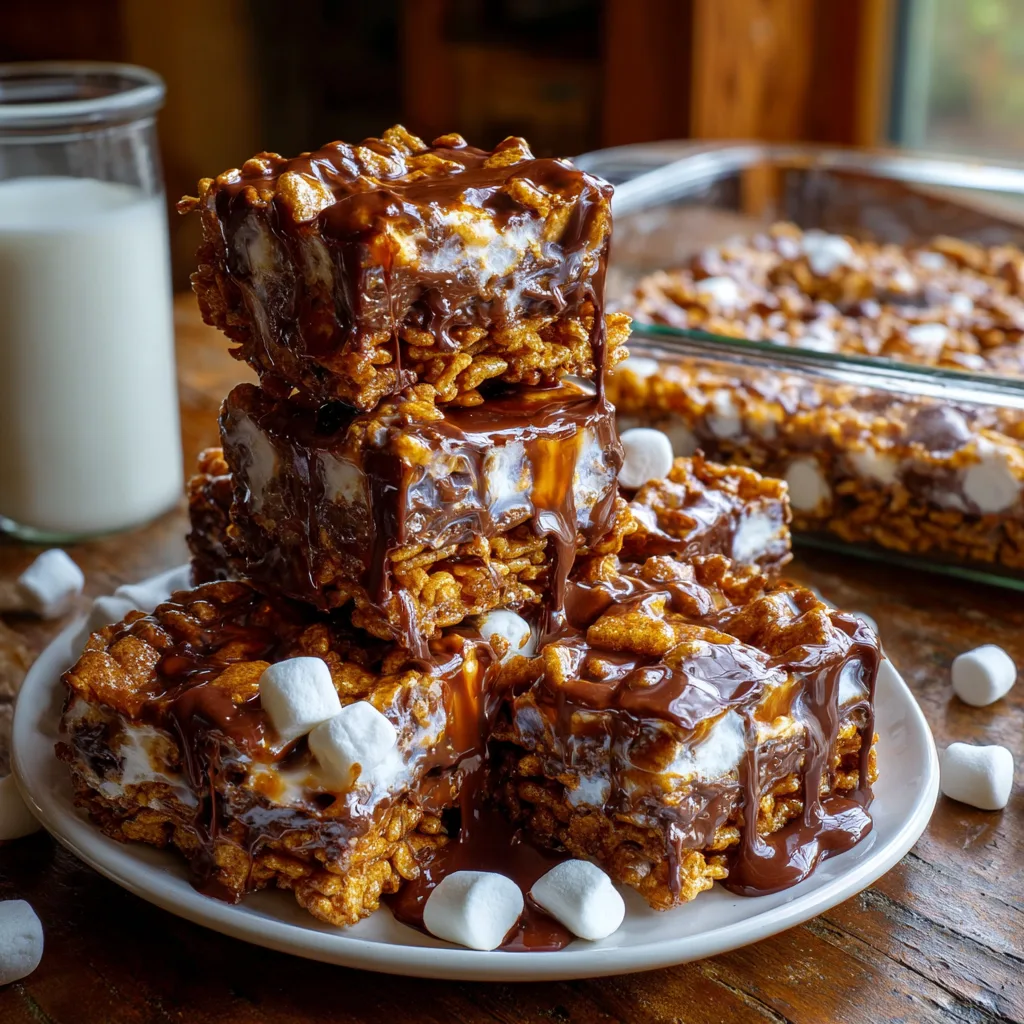
S’mores Cereal Bars
The Ultimate No-Bake Golden Grahams S’mores Bars Recipe
There is a unique kind of nostalgia attached to the flavor of a classic s’more. The charred, gooey marshmallow, the snap of the graham cracker, and the melting, sweet milk chocolate combine to create a sensory experience that instantly transports us back to summer campfires and crisp autumn evenings outdoors. But what happens when you crave that exact flavor profile in the middle of a rainy afternoon, or when you need to feed a large crowd at a potluck without hovering over an open flame? Enter the brilliant, crowd-pleasing, and incredibly easy solution: Golden Grahams S’mores Bars.
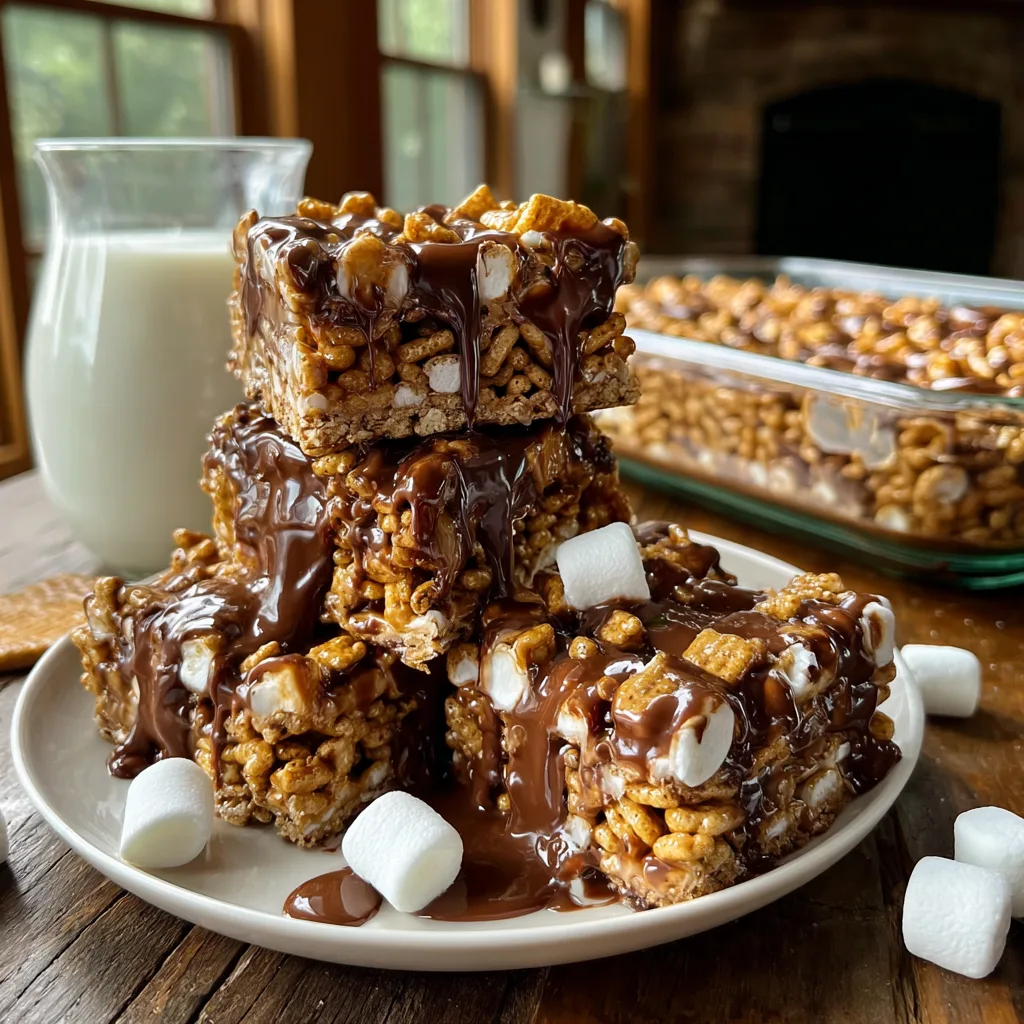
These no-bake cereal bars take everything you love about traditional campfire s’mores and condense them into a portable, sliceable, and utterly addictive treat. By substituting standard graham crackers with Golden Grahams cereal, you achieve an incredible crunch that holds up beautifully against the gooey melted marshmallows and rich chocolate. Whether you are an experienced baker looking for a quick win or a beginner wanting to impress your friends, this comprehensive guide will walk you through creating the most perfect, drool-worthy Golden Grahams S’mores Bars you have ever tasted.
Why You Will Obsess Over These No-Bake S’mores Bars
The appeal of these bars extends far beyond their delicious taste. First and foremost, they require absolutely no baking. In the heat of the summer when turning on the oven is the last thing you want to do, these no-bake treats are a lifesaver. You only need a stovetop or a microwave to melt the butter, marshmallows, and chocolate, making the active preparation time incredibly short.
Furthermore, these bars are a textural masterpiece. Traditional s’mores can sometimes be structurally unsound—one bite and the marshmallow shoots out the back. These bars, however, are bound together by a sticky, buttery marshmallow and chocolate matrix. Every single bite delivers the perfect ratio of crunchy cereal, soft marshmallow clouds, and rich chocolate. The addition of whole mini marshmallows folded in at the very end ensures that you get distinct pockets of fluffy marshmallow texture, rather than just a homogenous sticky syrup.
Finally, they are infinitely scalable and perfect for sharing. A single 9×13 inch pan yields enough rich bars to satisfy a whole party of guests. They travel beautifully in lunchboxes, make fantastic bake-sale items, and are guaranteed to be the first dessert to disappear at any gathering.
The Anatomy of the Perfect S’mores Bar: Ingredients Breakdown
To achieve the perfect balance of flavor and texture, you only need a handful of accessible ingredients. The quality of these ingredients will directly impact your final product, so choose wisely!
- – 8 cups Golden Grahams cereal: This is the star of the show. Golden Grahams have a deep, honey-graham flavor and a sturdy, ridged texture that holds onto the marshmallow and chocolate coating without immediately turning soggy.
- – 1/4 cup (1/2 stick) unsalted butter: Butter is crucial for keeping the bars soft. If you omit the butter, your melted marshmallows will harden like rock candy once cooled. The butter provides richness and a tender chew.
- – 1 (10-ounce) bag miniature marshmallows (plus 1 extra cup for folding): You will melt the majority of the bag to create the sticky binder for the bars. The extra cup of marshmallows is folded in off the heat so they retain their shape, providing lovely white visual contrast and soft, pillowy bites.
- – 1 1/2 cups high-quality milk chocolate chips: Since milk chocolate is the traditional choice for classic s’mores, it is highly recommended here. It provides the authentic, sweet flavor we associate with the campfire treat. However, if you prefer a less sweet bar, you can substitute semi-sweet or dark chocolate chips.
- – 1 teaspoon pure vanilla extract: Vanilla enhances the flavors of the chocolate and the graham cereal, bringing a depth of flavor that elevates these from a simple kid’s snack to a gourmet-tasting dessert.
- – A pinch of flaky sea salt (optional): While not strictly traditional, a tiny sprinkle of sea salt over the finished bars can help cut the intense sweetness and bring out the chocolate notes.
Step-by-Step Instructions for Gooey Perfection
While this recipe is simple, timing and temperature are key to ensuring your bars turn out chewy rather than hard. Follow these steps closely.
- Prepare Your Pan: First, line a 9×13 inch baking dish with parchment paper, leaving an overhang on the sides to act as handles. Lightly grease the parchment paper with non-stick cooking spray or a light rub of butter. This step is non-negotiable, as the mixture is incredibly sticky.
- Measure the Cereal: Place the 8 cups of Golden Grahams cereal into the largest mixing bowl you own. You need plenty of room to stir vigorously without sending cereal flying across your kitchen.
- Melt the Base: In a large saucepan, melt the unsalted butter over low to medium-low heat. Once the butter is completely melted, add the 10-ounce bag of miniature marshmallows. Stir constantly with a silicone spatula. Keep the heat low! High heat will cause the sugars in the marshmallow to crystallize, resulting in rock-hard cereal bars.
- Add Chocolate and Vanilla: As soon as the marshmallows are completely melted and smooth, remove the saucepan from the heat immediately. Stir in the vanilla extract. Then, add 1 cup of the milk chocolate chips. Stir gently until the chocolate is mostly melted. It is okay if there are a few streaks; it adds to the visual appeal.
- Coat the Cereal: Pour the hot, chocolatey marshmallow mixture over the Golden Grahams in your large bowl. Working quickly but gently, use your silicone spatula to fold the mixture together until every single piece of cereal is coated.
- Fold in the Extras: Once the cereal is evenly coated, gently fold in the remaining 1/2 cup of milk chocolate chips and the extra 1 cup of mini marshmallows. Because the mixture has cooled slightly, these add-ins should retain their shape rather than melting completely into the batter.
- Press into the Pan: Transfer the sticky mixture into your prepared 9×13 inch baking dish. Using a lightly greased spatula (or your hands, lightly coated with butter or cooking spray), press the mixture firmly and evenly into the pan. Do not pack it down too aggressively, or the bars will become dense and hard to eat. A gentle but firm press is all you need.
- Chill and Slice: Allow the bars to cool completely at room temperature for at least 1 to 2 hours to set up. If you are in a rush, you can place them in the refrigerator for about 30 minutes, but bring them back to room temperature before serving for the best chewy texture. Use the parchment paper overhang to lift the entire block out of the pan, place it on a cutting board, and slice into squares using a large, sharp knife.
Expert Tips for the Best No-Bake Cereal Bars
Making cereal bars is easy, but making exceptional cereal bars requires a few professional tricks. Here is how to ensure yours are the best on the block:
Low and Slow is the Golden Rule: When melting your butter and marshmallows, patience is your best friend. If you crank up the heat to melt them faster, you will boil the sugars. Boiled sugar turns hard when it cools. By melting everything gently over low heat, you ensure that the finished bars remain soft, pliable, and chewy for days.
Freshness Matters: Stale marshmallows will not melt smoothly and will result in a lumpy, tough binder. Always buy a fresh bag of marshmallows for this recipe. Similarly, ensure your Golden Grahams are fresh and crunchy out of the box; stale cereal will ruin the textural contrast.
The Grease Trick: Everything about this recipe is sticky. To save your sanity, lightly grease everything that touches the melted marshmallow mixture: your mixing bowl, your stirring spatula, and your hands when pressing the mixture into the pan. This prevents the marshmallow from adhering to your tools and pulling the bars apart.
Delicious Variations and Upgrades
While the classic milk chocolate and graham combination is flawless, this recipe serves as a fantastic canvas for your culinary creativity. Here are several ways to customize your Golden Grahams S’mores Bars:
- Peanut Butter S’mores: Stir 1/2 cup of creamy peanut butter into the melted marshmallow mixture just before adding the cereal. Top the finished bars with crushed peanut butter cups instead of extra chocolate chips.
- Dark Chocolate Sea Salt: Swap the milk chocolate chips for high-quality dark chocolate chunks (60% cacao or higher). Once you have pressed the mixture into the pan, immediately sprinkle the top generously with flaky Maldon sea salt. The salty-sweet combination is irresistible.
- White Chocolate and Berry: For a completely different flavor profile, use white chocolate chips instead of milk chocolate, and fold in 1/2 cup of freeze-dried strawberries or raspberries along with the dry cereal.
- Campfire Char: If you miss the actual campfire flavor, take a kitchen butane torch and lightly toast the exposed mini marshmallows on the top of the pressed bars before letting them set. This adds an authentic smoky flavor and a beautiful toasted appearance.
Storing, Freezing, and Making Ahead
One of the greatest advantages of these S’mores Bars is their excellent shelf life, provided they are stored correctly.
Room Temperature Storage: The best way to store these bars is in an airtight container at room temperature. They will stay perfectly soft and chewy for up to 4 or 5 days. You can place sheets of parchment or wax paper between layers if you need to stack them, to prevent them from sticking together.
Should I Refrigerate Them? It is generally not recommended to store these in the refrigerator. The cold temperature will cause the melted chocolate and marshmallow binder to harden significantly, making the bars incredibly tough to bite into. If you live in a very hot and humid climate and must refrigerate them to prevent melting, be sure to let them sit out at room temperature for at least 30 minutes before eating.
Freezing: These bars freeze remarkably well! Wrap individual squares tightly in plastic wrap, then place them all into a heavy-duty freezer zip-top bag. They can be frozen for up to 3 months. To thaw, simply unwrap a bar and leave it on the counter at room temperature for 15-20 minutes.
Frequently Asked Questions
Why did my s’mores bars turn out so hard?
The most common culprit for hard cereal bars is cooking the marshmallow and butter mixture over too high of a heat, or cooking it for too long. Once the marshmallows are melted, immediately remove them from the heat. Pressing the mixture into the pan too firmly can also compress the cereal and make the bars dense.
Can I use a different type of cereal?
Yes! While Golden Grahams provide the authentic s’mores flavor, you can easily use Rice Krispies, Cinnamon Toast Crunch, or Honey Nut Cheerios using the exact same base recipe proportions.
Can I make these in the microwave?
Absolutely. Place the butter and marshmallows in a large microwave-safe bowl. Microwave on high in 30-second intervals, stirring after each interval, until completely melted and smooth. Then proceed with adding the chocolate and cereal as written in the recipe.
Is there a way to make this vegetarian?
Standard marshmallows contain gelatin, which is an animal byproduct. To make these vegetarian, look for vegan marshmallows (such as the Dandies brand) at your local specialty grocery store. They melt slightly differently, so you may need to add an extra tablespoon of butter to achieve the right consistency.
There is no need to wait for a campfire to enjoy the quintessential flavors of summer. With just a few ingredients, a single pot, and 15 minutes of your time, these Golden Grahams S’mores Bars will bring the magic of a gooey, chocolatey s’more right into your kitchen. Happy making!
Golden Grahams S’mores Bars
Ingredients
Equipment
Method
- Line a 9×13 inch baking dish with parchment paper and lightly grease with cooking spray. Place the Golden Grahams cereal into a very large mixing bowl.
- In a large saucepan over low heat, melt the butter. Add the 10-ounce bag of marshmallows and stir constantly until completely melted and smooth.
- Immediately remove the pan from heat. Stir in the vanilla extract and 1 cup of the milk chocolate chips, stirring until the chocolate is mostly melted.
- Pour the hot marshmallow-chocolate mixture over the cereal in the large bowl. Using a greased spatula, quickly but gently fold until all the cereal is coated.
- Fold in the remaining 1/2 cup of milk chocolate chips and the reserved 1 cup of mini marshmallows so they remain intact.
- Transfer the mixture into the prepared baking dish. Using lightly greased hands or a spatula, gently press the mixture evenly into the pan. Do not pack too tightly.
- Allow the bars to set at room temperature for 1 to 2 hours before using the parchment paper to lift them out and slice into squares.