S’mores Cookie Bars
The Ultimate S’mores Cookie Bars Recipe
There is an undeniable, universal nostalgia attached to the classic s’more. The very mention of the word evokes memories of crackling campfires, crisp evening air, sticky fingers, and the delightful contrast of crunchy graham crackers, melting milk chocolate, and gooey, fire-roasted marshmallows. But what happens when you crave that exact flavor profile but do not have access to an open flame, a campfire, or the great outdoors? The answer lies in the magic of your own kitchen oven. Enter the phenomenal, crowd-pleasing, and utterly indulgent S’mores Cookie Bars.
This recipe takes everything you adore about traditional campfire s’mores and transforms them into a neat, sliceable, and intensely satisfying baked good. It eliminates the mess of assembling individual treats over an unpredictable fire while amplifying the flavors by incorporating a buttery, brown sugar and graham cracker cookie dough. Whether you are baking for a summer barbecue, a cozy winter night indoors, a school bake sale, or simply a weekend treat for your family, this comprehensive guide will walk you through creating the perfect batch of S’mores Cookie Bars from scratch.
The Anatomy of a Perfect S’mores Bar
To truly appreciate this dessert, one must understand its beautifully engineered layers. A standard s’more is a simple sandwich, but a S’mores Cookie Bar is a masterclass in texture and flavor balance. It consists of three distinct components that meld together perfectly during the baking process.
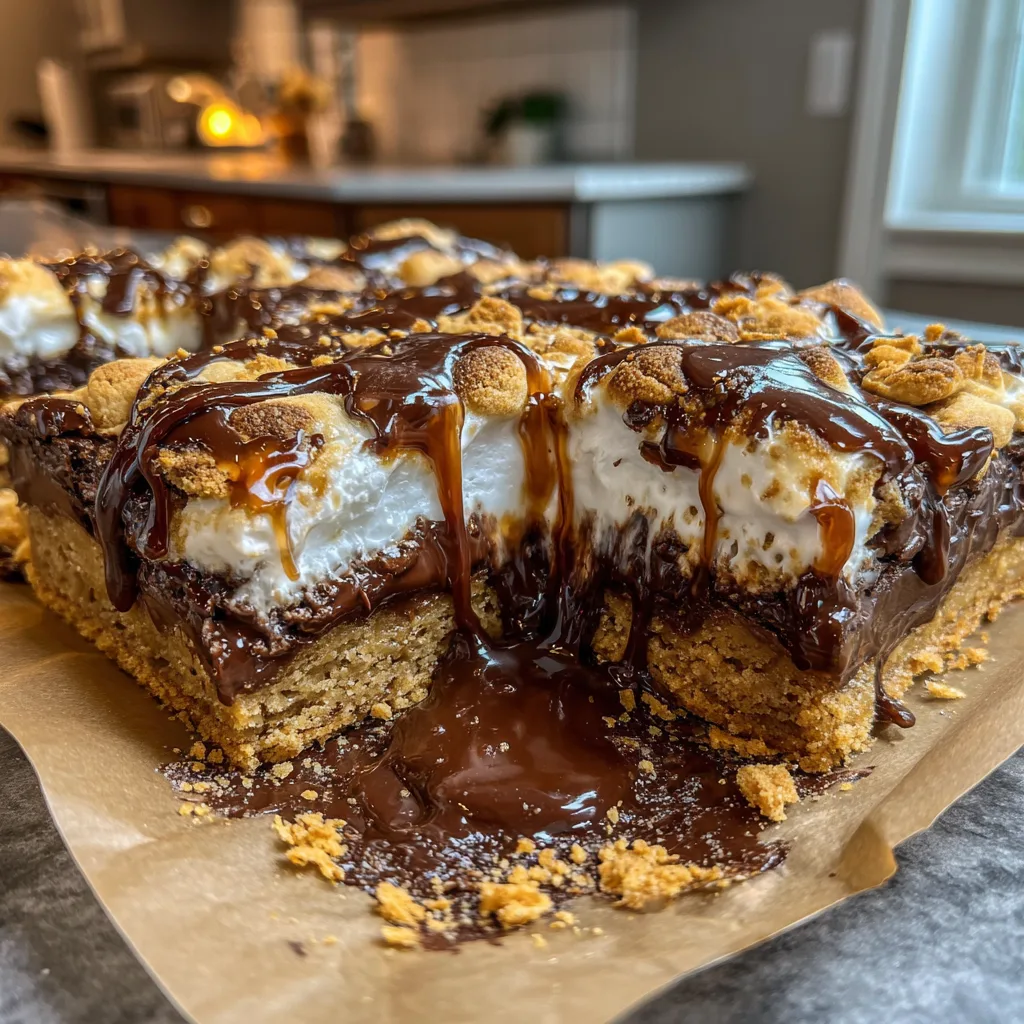
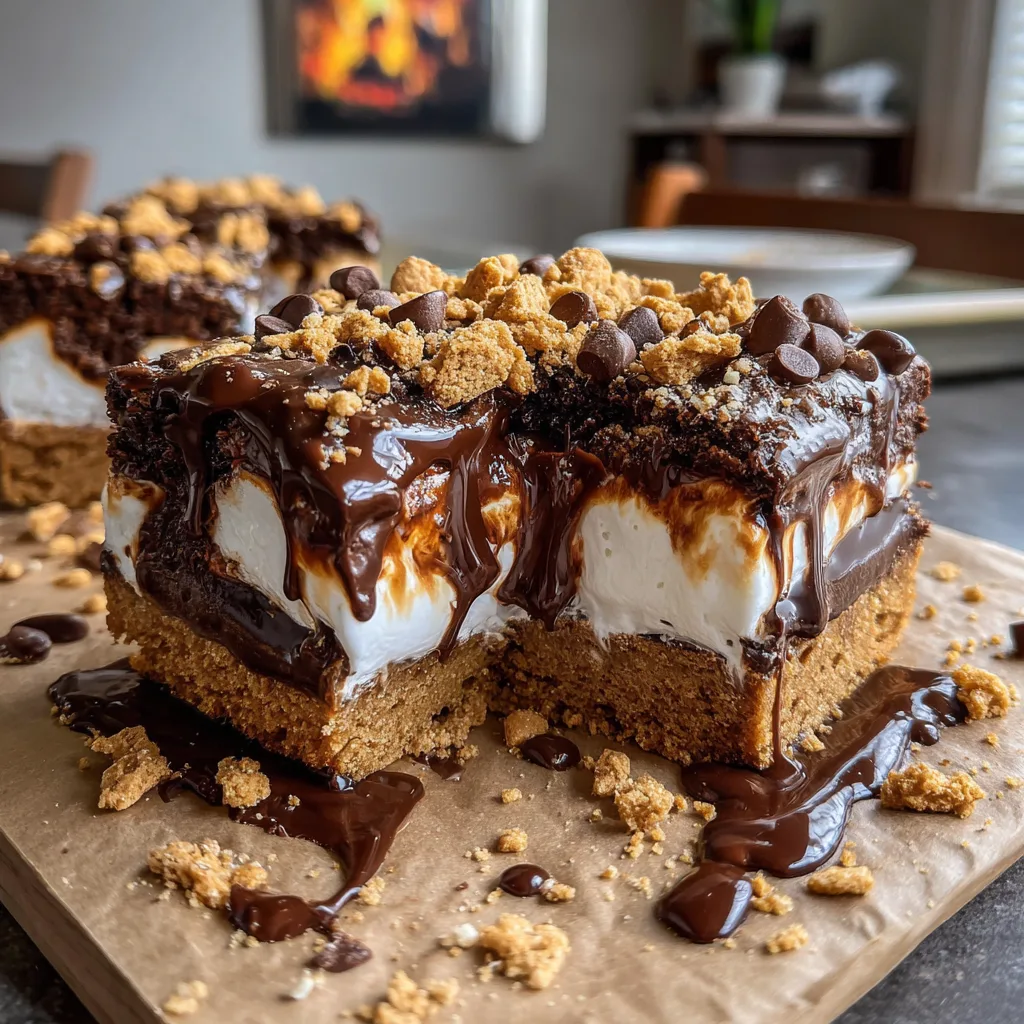
First, there is the base and the topping. Instead of plain, dry graham crackers, this recipe utilizes a rich, buttery cookie dough that is heavily fortified with crushed graham cracker crumbs. This ensures the graham flavor is front and center, but the texture is soft, chewy, and reminiscent of a high-quality blondie or chocolate chip cookie without the chips. Second is the chocolate layer. We use full-sized milk chocolate bars (like the classic Hershey’s) layered generously across the bottom dough. As it bakes, it melts into a thick, luxurious fudge-like center. Finally, the marshmallow layer. Nestled between the chocolate and the top layer of dough sits a generous cloud of marshmallow creme (fluff) or halved marshmallows, which puffs up and becomes incredibly gooey, sticky, and sweet in the oven.
Why You Will Fall in Love with This Recipe
There are countless dessert recipes on the internet, so why should these S’mores Cookie Bars become your new go-to? The reasons are as layered as the bars themselves. First and foremost is convenience. Making traditional s’mores for a crowd is a logistical nightmare—someone’s marshmallow always catches on fire, the chocolate never melts quite right, and the crackers inevitably crumble. With these bars, you can serve sixteen people simultaneously with perfectly proportioned ratios of chocolate, marshmallow, and graham cracker in every single bite.
Furthermore, these bars are incredibly versatile and transportable. They do not require refrigeration, making them ideal for packing in lunchboxes, taking on picnics, or mailing in care packages. They are also highly customizable; once you master the basic dough and layering technique, you can experiment with dark chocolate, peanut butter cups, or even flavored marshmallows.
Essential Ingredients for S’mores Cookie Bars
The success of baking lies in the quality and precise measuring of your ingredients. Gather the following items before you begin:
- – Unsalted Butter: Using unsalted butter allows you to control the exact amount of sodium in your dessert. It must be softened to room temperature so it creams properly with the sugars, creating a light and airy dough foundation.
- – Brown Sugar: The molasses in brown sugar provides a deep, caramel-like sweetness and contributes significantly to the chewy texture of the cookie dough. Make sure it is packed tightly when measuring.
- – Granulated White Sugar: This adds straight sweetness and helps the edges of the cookie bars achieve a slight, satisfying crispness in the oven.
- – Large Eggs: Eggs act as the binding agent, holding the dough together, while providing moisture and structure. Room temperature eggs mix into the batter much more evenly than cold eggs.
- – Vanilla Extract: Pure vanilla extract is non-negotiable. It enhances all the other flavors, particularly the chocolate and the marshmallow, bridging the gap between the different components.
- – All-Purpose Flour: The structural backbone of your cookie dough. Be sure to spoon and level your flour rather than scooping it directly from the bag to avoid a dense, dry dough.
- – Graham Cracker Crumbs: You can buy these pre-crushed in a box or crush your own using a food processor or a ziplock bag and a rolling pin. This is what gives the dough its signature s’mores identity.
- – Baking Powder: The leavening agent that gives the dough a little lift so it does not bake into a hard, flat brick.
- – Salt: A crucial ingredient in all baking. It balances the intense sweetness of the marshmallow and chocolate, elevating the overall flavor profile.
- – Milk Chocolate Bars: Traditional thin milk chocolate bars (like Hershey’s) work best here because they melt smoothly and evenly, replicating that classic campfire taste.
- – Marshmallow Creme (Fluff) or Marshmallows: Marshmallow creme is highly recommended because it stays soft and gooey even after the bars have cooled completely. If using real marshmallows, use large ones cut in half or mini marshmallows, though be aware they may become a bit chewier once cooled.
Step-by-Step Instructions to Baking Perfection
Follow these detailed steps carefully, and you will be rewarded with a pan of absolute perfection.
- Preparation is Key: Begin by preheating your oven to 350°F (175°C). Take an 8×8 or 9×9 inch square baking pan and line it meticulously with parchment paper. Leave an overhang on the sides. This is called a “sling,” and it is absolutely vital for removing the sticky bars from the pan later without destroying them. Lightly spray the parchment with non-stick cooking spray for extra insurance.
- Whisk the Dry Ingredients: In a medium-sized mixing bowl, whisk together the all-purpose flour, graham cracker crumbs, baking powder, and salt. Ensuring these are thoroughly mixed before adding them to the wet ingredients prevents overmixing the dough later.
- Cream the Butter and Sugars: In a large bowl, using a handheld mixer or a stand mixer fitted with a paddle attachment, beat the softened unsalted butter, packed brown sugar, and granulated sugar on medium-high speed. Do this for about 2 to 3 minutes until the mixture transforms into a pale, light, and fluffy consistency. Scrape down the sides of the bowl with a rubber spatula as needed.
- Add the Wet Ingredients: Add the eggs one at a time, beating well after each addition to ensure they emulsify properly into the butter mixture. Pour in the vanilla extract and mix until just combined.
- Incorporate the Dry Ingredients: Turn your mixer down to its lowest speed. Gradually pour the dry flour and graham crumb mixture into the wet ingredients. Mix only until the white streaks of flour just disappear. Overmixing will develop the gluten and result in tough, hard cookie bars.
- Build the First Layer: Divide your dough in half. Take one half and press it evenly into the bottom of your prepared, parchment-lined baking pan. If the dough is too sticky, lightly wet your fingers or spray a spatula with non-stick spray to help press it down smoothly into all four corners.
- Create the Chocolate Layer: Unwrap your milk chocolate bars and lay them flat in a single, even layer over the bottom dough. Break the chocolate into smaller pieces if necessary to cover any empty gaps. You want chocolate in every single bite.
- Add the Marshmallow Layer: Dollop the marshmallow creme evenly over the chocolate layer. Use a wet spatula or a butter knife sprayed with cooking spray to spread the creme out. It does not have to be absolutely perfect, as it will puff and spread as it bakes, but try to get an even layer. If using whole marshmallows, arrange them closely together over the chocolate.
- Top it Off: Take the remaining half of your cookie dough. Instead of trying to spread it (which will just smear the marshmallow creme everywhere), flatten small sections of the dough between your hands like pancakes and lay them gently over the marshmallow layer like a patchwork quilt. It is completely fine if some marshmallow peeks through the cracks; it will look beautiful and rustic when baked.
- Bake to Golden Perfection: Place the pan in the preheated oven and bake for 25 to 30 minutes. You are looking for the top cookie dough layer to become a light, golden brown and for the edges to look set. The marshmallow might puff up significantly—do not panic, it will settle down as it cools.
- The Crucial Cooling Process: Remove the pan from the oven and place it on a wire cooling rack. This is the hardest part of the recipe: you must let the bars cool completely in the pan for at least 2 to 3 hours. If you attempt to cut them while they are hot, the molten chocolate and marshmallow will ooze everywhere, resulting in a structural disaster.
- Slice and Serve: Once entirely cool, use the parchment paper overhang to gently lift the entire block out of the pan onto a cutting board. Use a large, sharp chef’s knife to cut the block into 16 even squares. For the cleanest cuts, wipe the blade of your knife with a damp paper towel between each slice.
Choosing Between Marshmallow Fluff and Real Marshmallows
A common debate when making S’mores Cookie Bars is whether to use marshmallow creme (fluff) or actual marshmallows. Both have their merits, but they yield distinctly different results.
Marshmallow creme is the preferred ingredient for bakery-style bars. Because it is essentially whipped marshmallow without the gelatin that makes regular marshmallows hold their shape, it remains incredibly soft, gooey, and spreadable even after the bars have been baked and cooled. It creates a beautiful, thick white ribbon between the chocolate and the dough.
Real marshmallows, on the other hand, contain gelatin. When baked, they will puff up magnificently and toast beautifully on top if exposed. However, as they cool, the gelatin resets. This means that once the bars are at room temperature, the marshmallow layer will become dense and quite chewy. If you prefer a chewier texture, real marshmallows are great. If you want a soft, oozing center, stick to the creme.
Creative Variations to Try
Once you have the base recipe down, these bars are a blank canvas for culinary creativity. Here are a few ways to switch things up:
- Peanut Butter S’mores: Swap out the standard milk chocolate bars for peanut butter cups. The salty-sweet combination of peanut butter, chocolate, and marshmallow is out of this world.
- Dark Chocolate Sea Salt: For a more sophisticated, adult palate, use high-quality dark chocolate bars (70% cocoa or higher) and sprinkle flaky sea salt over the top cookie dough layer before baking.
- Nutella Swirl: Instead of solid chocolate bars, spread a thick, generous layer of chocolate hazelnut spread over the bottom dough before adding the marshmallow layer.
- Cookie Butter Twist: Substitute the graham cracker crumbs in the dough with crushed Biscoff or speculoos cookies for an incredible caramelized spice flavor.
How to Store and Freeze S’mores Bars
Because these bars are so rich, you will likely have leftovers. Storing them correctly ensures they stay fresh and delicious for days to come.
Room Temperature: Store the cut bars in an airtight container at room temperature for up to 4 to 5 days. To prevent them from sticking together, separate layers with a sheet of wax paper or parchment paper. There is no need to refrigerate them; in fact, refrigeration will dry out the cookie dough faster and make the chocolate rock hard.
Freezing: These bars freeze exceptionally well. Wrap individual bars tightly in plastic wrap, then place them in a heavy-duty freezer zip-top bag or a freezer-safe container. They will keep for up to 3 months. To thaw, simply let them sit at room temperature for a few hours before eating.
Reheating: If you want to recapture that gooey, straight-from-the-oven experience, place a single room-temperature bar on a microwave-safe plate and microwave it for 8 to 10 seconds. The chocolate will melt slightly, and the marshmallow will become warm and stretchy again.
Troubleshooting Common Baking Issues
Baking is a science, and sometimes things go slightly awry. Here is how to fix or avoid common issues:
My bars are too crumbly: This usually happens if you overmeasured your flour or graham cracker crumbs. Always use the spoon-and-level method for flour. It can also happen if your butter wasn’t softened enough, leading to a dry dough.
The bars won’t come out of the pan: This is why the parchment paper sling is mandatory! If you skipped it, run a hot knife around the edges of the pan and try to lift them out with a strong metal spatula, but accept that the first piece will likely be a sacrifice.
The top layer didn’t cover everything: That is perfectly okay! The “patchwork” method of pressing pieces of dough over the top is designed to be rustic. Seeing the toasted marshmallow bubbling up through the gaps makes the bars look incredibly appetizing and authentic.
A Brief History of the S’more
It is fascinating to think about where this flavor combination originated. The first recorded version of the recipe was published in the 1927 guidebook “Tramping and Trailing with the Girl Scouts,” credited to a troop leader named Loretta Scott Crew. It was originally called “Some More,” presumably because everyone who ate one immediately demanded some more. Over the decades, the name was shortened to the contraction “s’more,” and it became a staple of American camping culture. By taking these classic ingredients and baking them into a bar, we are continuing a nearly century-old tradition of enjoying this flawless flavor trifecta in new, innovative ways.
Frequently Asked Questions (FAQ)
Can I make this recipe gluten-free?
Yes, you can adapt this recipe by using a high-quality 1:1 gluten-free baking flour blend in place of the all-purpose flour, and by sourcing certified gluten-free graham cracker crumbs. Ensure all your other ingredients, including the chocolate and marshmallow, are processed in gluten-free facilities.
Why do I need both brown and white sugar?
Brown sugar adds moisture and chewiness due to the molasses, while white sugar helps the edges crisp up and provides structure. The combination of both yields the perfect blondie-like texture for the cookie layers.
Can I double this recipe?
Absolutely. If you are baking for a large crowd, double all the ingredients and bake it in a 9×13 inch rectangular baking dish. You will likely need to increase the baking time by 5 to 10 minutes; keep a close eye on it until the top is golden brown.
Baking S’mores Cookie Bars is guaranteed to fill your kitchen with the most incredible aromas. Gather your ingredients, prepare your pan, and get ready to bite into the ultimate combination of buttery graham cookie, rich melted chocolate, and sweet, sticky marshmallow.
S’mores Cookie Bars
Ingredients
Equipment
Method
- Preheat oven to 350°F (175°C). Line an 8×8 or 9×9 inch baking pan with parchment paper, leaving an overhang for easy removal.
- In a medium bowl, whisk together the flour, graham cracker crumbs, baking powder, and salt. Set aside.
- In a large bowl, beat the softened butter, brown sugar, and granulated sugar until light and fluffy (about 2 minutes).
- Add the egg and vanilla extract to the butter mixture, beating well to combine.
- Gradually add the dry ingredients to the wet ingredients, mixing on low speed until just combined. Do not overmix.
- Press exactly half of the dough evenly into the bottom of the prepared baking pan.
- Break the chocolate bars into pieces and arrange them in a single, even layer over the bottom dough crust.
- Spread the marshmallow creme evenly over the chocolate layer using a wet spatula or butter knife.
- Take the remaining half of the cookie dough, flatten small sections into patties, and place them patch-work style over the marshmallow layer.
- Bake for 25-30 minutes until the top is golden brown and the edges are set.
- Cool COMPLETELY in the pan on a wire rack (at least 2 hours) before lifting out by the parchment paper and slicing into 16 squares.