S’mores Sushi Recipe
The Ultimate S’mores Sushi Recipe: A Fun, No-Bake Dessert Experience
When you think of sushi, you probably imagine savory rolls of rice, seaweed, and fresh fish. But what if we took the beloved concept of a sushi roll and transformed it into a sweet, nostalgic, and absolutely irresistible dessert? Enter the magnificent world of S’mores Sushi. This wildly creative and incredibly delicious treat takes the classic flavors of a campfire s’more—marshmallow, chocolate, and a satisfying crunch—and rolls them up into a visually stunning, bite-sized dessert that is guaranteed to be the star of any gathering.
Whether you are hosting a children’s birthday party, looking for a unique contribution to a summer potluck, or simply craving a fun weekend project in the kitchen, this S’mores Sushi recipe is the perfect solution. It requires no baking, utilizes simple ingredients you likely already have in your pantry, and offers a delightful textural experience that bridges the gap between crispy, gooey, and rich. In this comprehensive guide, we will walk you through every single step of creating this masterpiece, share expert tips for the perfect roll, and explore variations that will keep your dessert repertoire exciting and fresh.
Why You Will Fall in Love with S’mores Sushi
There are countless reasons to adore this recipe, starting with its pure novelty. Food that looks like other food is always a massive hit, especially with younger crowds. The illusion of sushi combined with the familiar, comforting taste of marshmallow cereal treats creates a playful eating experience. It is a fantastic conversation starter and looks incredibly impressive on a dessert table, despite being astonishingly easy to put together.

Beyond the aesthetics, the flavor profile is a proven winner. Traditional s’mores can be messy, requiring an open flame and perfect timing. This recipe captures the essence of a s’more without the sticky hands or the smell of campfire smoke on your clothes. The crispy cereal base acts as the “rice” and the “graham cracker” element, providing a sturdy, crunchy exterior. The inside is a dual-layered dream of soft, sweet marshmallow fluff and rich, smooth chocolate. Every single slice delivers the perfect ratio of ingredients, ensuring that no bite is left wanting.
Furthermore, this is a no-bake recipe. In the heat of the summer, turning on the oven is the last thing anyone wants to do. This dessert relies on simple stovetop melting and a brief chill in the refrigerator to set. It is a brilliant way to satisfy a sweet tooth without heating up your entire house. It also makes the recipe highly accessible for beginner cooks or for children who want to help out in the kitchen without the dangers of a hot oven.
The Essential Ingredients for Your Dessert Roll
The beauty of this S’mores Sushi lies in its simplicity. You do not need any exotic or hard-to-find ingredients to create this show-stopping dessert. Here is everything you need to gather before you begin:
- – 1/4 cup unsalted butter
- – 10 oz mini marshmallows (plus extra for the filling if desired, though fluff works best)
- – 5 cups Rice Krispies cereal (or any crispy rice cereal)
- – 2 cups marshmallow fluff
- – 1 cup semi-sweet chocolate chips (for the interior fudge layer and the top drizzle)
- – 1 teaspoon coconut oil or butter (optional, for thinning the chocolate drizzle)
- – 1/2 cup graham cracker crumbs (optional, for authentic s’mores flavor)
Each ingredient plays a crucial role. The butter and mini marshmallows melt together to create the sticky, sweet binder that holds the crispy rice cereal together, forming the structural integrity of your “sushi roll.” The marshmallow fluff provides that distinct, gooey, unapologetically sweet center that mimics the freshly roasted marshmallow of a traditional s’more. The chocolate chips, when melted, add the necessary richness and depth, cutting through the sweetness of the marshmallow and completing the classic flavor trio.
Step-by-Step Instructions to Roll Like a Pro
Making S’mores Sushi is a fun, hands-on process. It involves a bit of sticky work, but following these steps will ensure a tight, beautiful roll every time.
- Prepare your workspace: Lay out a large sheet of parchment paper or wax paper on your kitchen counter. You can lightly spray it with non-stick cooking spray to ensure your cereal mixture does not stick later on. This is crucial for an easy rolling process.
- Melt the marshmallow base: In a large saucepan, melt the 1/4 cup of butter over low heat. Once the butter is completely melted, add the 10 oz of mini marshmallows. Stir continuously with a silicone spatula until the marshmallows are completely melted and the mixture is smooth. Remove the saucepan from the heat immediately to prevent the sugar from burning or hardening.
- Incorporate the cereal: Pour the 5 cups of crispy rice cereal into the melted marshmallow mixture. Gently fold the cereal in until every piece is evenly coated in the sticky, buttery goodness. If you are using graham cracker crumbs for extra authentic flavor, fold them in during this step as well.
- Flatten the “rice”: Transfer the sticky cereal mixture onto your prepared parchment paper. Using a greased spatula or greased hands, press the mixture out into a large, even rectangle, about 1/2 inch thick. Try to make the edges as straight as possible, as this will result in a neater final sushi roll.
- Prepare the chocolate: In a microwave-safe bowl, melt half of your chocolate chips in 30-second increments, stirring well after each interval until completely smooth.
- Layer the fillings: Spread an even layer of the marshmallow fluff over the flattened cereal rectangle, leaving about a 1-inch border around the edges so the filling doesn’t squish out when rolling. Next, drizzle or spread the melted chocolate over the marshmallow fluff layer.
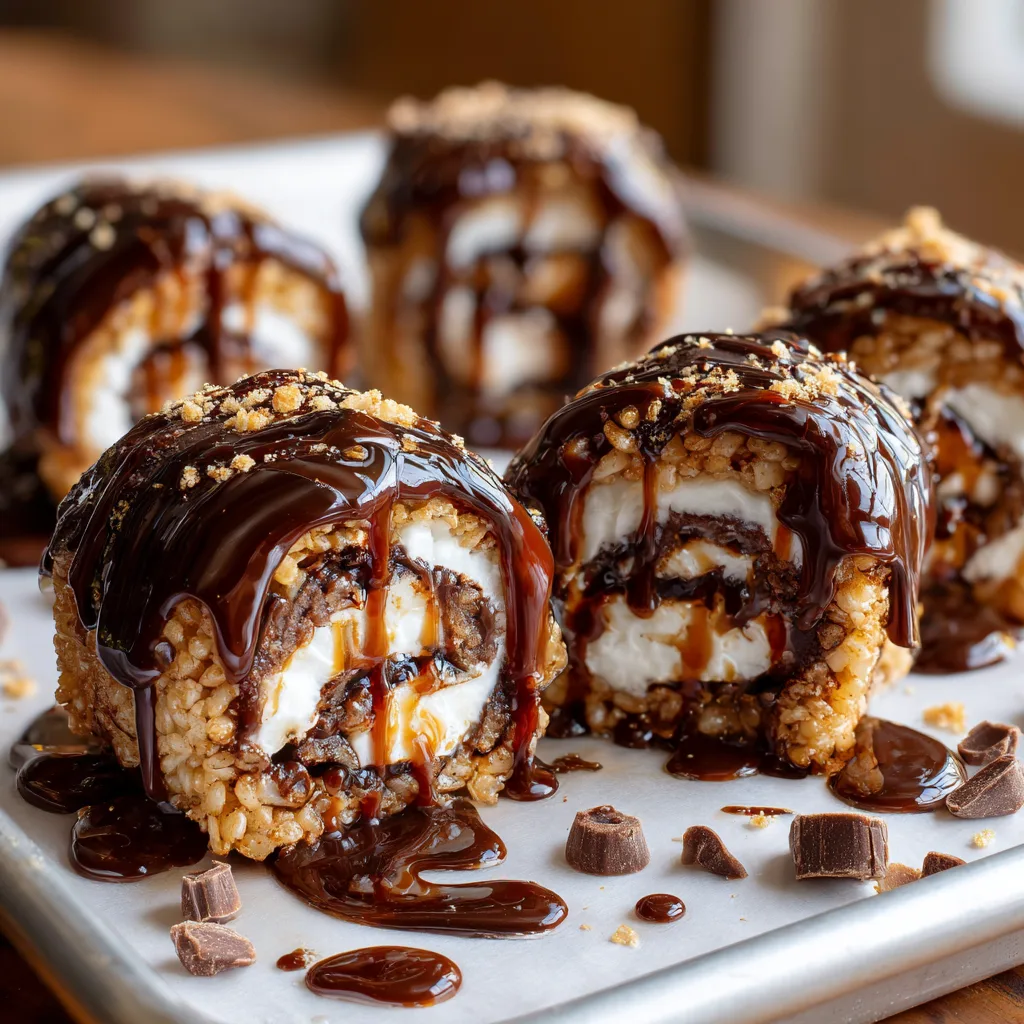
- Roll the sushi: Starting from one of the longer sides, use the parchment paper to help lift and tightly roll the cereal mixture over the filling, exactly like you would roll traditional sushi with a bamboo mat. Keep the roll as tight as possible. Once completely rolled, wrap the parchment paper tightly around the log.
- Chill to set: Place the wrapped roll in the refrigerator for at least 1 hour, or until it is firm to the touch. This step is non-negotiable, as trying to slice a warm roll will result in a messy, squished dessert.
- Slice and garnish: Once chilled, remove the roll from the fridge and unwrap it. Using a sharp, serrated knife, slice the log into 1-inch thick “sushi” rounds. Melt the remaining chocolate chips (with a tiny bit of coconut oil if needed for smoothness) and creatively drizzle it over the top of your sliced sushi.
Expert Tips for the Perfect Dessert Sushi
While the recipe is straightforward, working with melted marshmallows can sometimes be a sticky situation. Here are some expert tips to ensure your S’mores Sushi turns out flawlessly:
Do Not Compress Too Hard: When flattening your cereal mixture into a rectangle, press firmly enough to bind the ingredients, but do not crush the cereal. If you pack it down too hard, your sushi roll will be incredibly dense and tough to bite into. You want it to retain a slightly airy, crispy texture.
Grease Everything: Melted marshmallows will stick to almost any dry surface. Coating your hands, your spatulas, and your parchment paper with a light layer of non-stick spray or butter is the secret to a stress-free experience. If your hands get too sticky while pressing the rectangle, simply re-grease them.
The Sharpest Knife for Slicing: Slicing the chilled roll can be tricky because of the contrasting textures of the hard cereal exterior and the soft, gooey interior. Use a very sharp serrated knife (like a bread knife) and use a gentle sawing motion. If the knife gets gummy, wipe it clean with a hot, damp cloth between slices.
Creative Variations to Customize Your Treat
The S’mores Sushi is just the starting point. Once you master the basic rolling technique, the possibilities for customization are endless. Here are some fantastic variations to try:
Peanut Butter Lover’s Roll: Swap out half of the marshmallow fluff for creamy peanut butter. You can also mix Reese’s Pieces into the cereal mixture or use a peanut butter drizzle on top instead of chocolate. This gives the treat a classic chocolate-peanut butter profile that is always a hit.
Cookies and Cream Sushi: Instead of regular crispy rice cereal, use a cocoa-flavored rice cereal. For the filling, crush up Oreo cookies and mix them into the marshmallow fluff. Drizzle the finished slices with melted white chocolate for a beautiful cookies and cream presentation.
Fruity Pebble Roll: For a vibrant, colorful variation perfect for young kids, substitute the standard rice cereal with Fruity Pebbles. Keep the marshmallow fluff center but perhaps add a layer of strawberry jam or thinly sliced fresh strawberries for a fruity twist.
Serving Suggestions and Ideal Occasions
Serving S’mores Sushi is half the fun! To really lean into the sushi theme, serve these sweet rolls on a wooden cutting board or a traditional slate sushi platter. Provide your guests with wooden chopsticks—watching people try to pick up a dense, gooey cereal treat with chopsticks is highly entertaining and adds to the novelty of the dessert.
This dessert is exceptionally versatile when it comes to occasions. It is a brilliant addition to a backyard barbecue, offering a s’mores experience without needing a fire pit. It is also a massive hit at school bake sales because of its unique appearance and high visual appeal. For a fun family movie night, preparing this roll together is a great bonding activity that results in a delicious movie snack.
How to Store Your S’mores Sushi
If you happen to have any S’mores Sushi left over (which is rare!), proper storage is key to maintaining that perfect crispy-yet-gooey texture.
Room Temperature vs. Refrigerator: It is generally best to store the sliced sushi in an airtight container at room temperature for up to 3 days. Keeping them in the refrigerator for extended periods can dry out the cereal, making it hard to chew. However, if your kitchen is very warm and the chocolate/fluff is melting, you can store them in the fridge and simply let them sit at room temperature for 15 minutes before serving.
Freezing: Yes, you can freeze S’mores Sushi! If you want to make the roll ahead of time, wrap the uncut log tightly in plastic wrap, followed by a layer of aluminum foil. Freeze for up to 2 months. When you are ready to serve, let the log thaw in the refrigerator overnight, then slice and add your fresh chocolate drizzle.
Frequently Asked Questions (FAQs)
Can I use regular-sized marshmallows instead of mini marshmallows?
Yes, you absolutely can. Mini marshmallows melt faster and more evenly, which is why they are recommended. If you only have large marshmallows, just cut them into quarters before melting to speed up the process and prevent the butter from separating.
My cereal mixture is too hard to roll. What did I do wrong?
This usually happens for two reasons: either the marshmallow mixture was cooked too long on the stove, causing the sugar to reach the hard-ball stage, or you compressed the cereal too tightly when flattening it. Remember to remove the pan from the heat as soon as the marshmallows melt, and press the cereal gently.
Can I use a different type of spread inside?
Definitely! Nutella, cookie butter (Biscoff spread), peanut butter, or even a thick caramel sauce can be used alongside or instead of the marshmallow fluff. Just ensure whatever spread you choose is thick enough that it won’t entirely leak out when you slice the sushi.
S’mores Sushi is more than just a recipe; it is a creative culinary project that brings joy to both the maker and the eater. By combining the beloved, rustic flavors of a classic s’more with the playful, precise presentation of a sushi roll, you create a dessert that is truly unforgettable. Gather your ingredients, prepare your parchment paper, and get ready to roll up some delicious fun!
S’mores Sushi
Ingredients
Equipment
Method
- Lay out a large sheet of parchment paper and lightly grease it with cooking spray.
- In a large saucepan, melt butter over low heat. Add mini marshmallows and stir until completely melted and smooth. Remove from heat immediately.
- Fold in the Rice Krispies cereal until fully coated by the marshmallow mixture.
- Transfer the mixture to the greased parchment paper. With greased hands, press it flat into a 1/2-inch thick rectangle.
- Melt half of the chocolate chips in the microwave. Spread an even layer of marshmallow fluff over the cereal rectangle, leaving a 1-inch border. Drizzle or spread the melted chocolate over the fluff.
- Starting from a long edge, tightly roll the cereal mixture into a log, using the parchment paper to assist you.
- Wrap the log tightly in parchment paper and chill in the refrigerator for at least 1 hour until firm.
- Unwrap and slice into 1-inch thick rounds using a serrated knife. Melt remaining chocolate chips and drizzle over the top before serving.