Soft and Chewy Grinch Sugar Cookies Recipe
The Ultimate Soft and Chewy Grinch Sugar Cookies for Your Holiday Tray
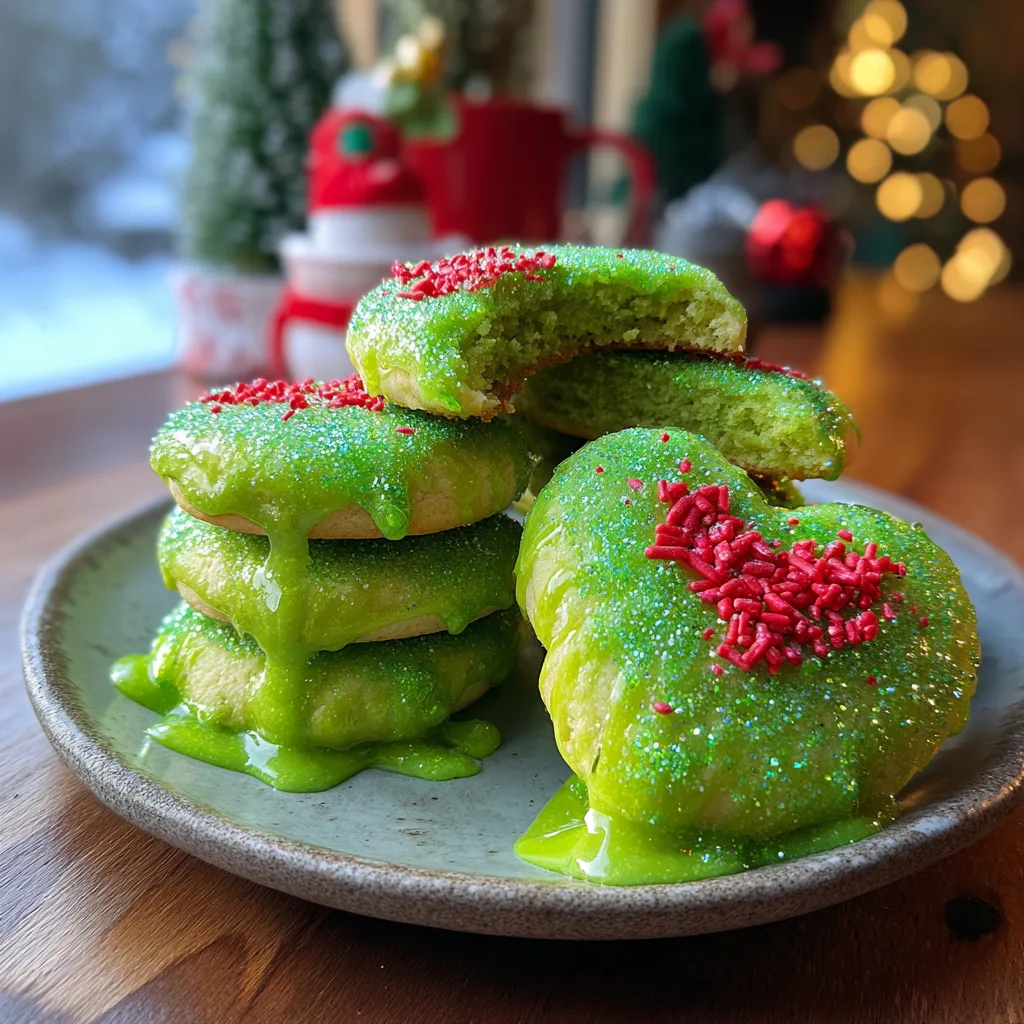
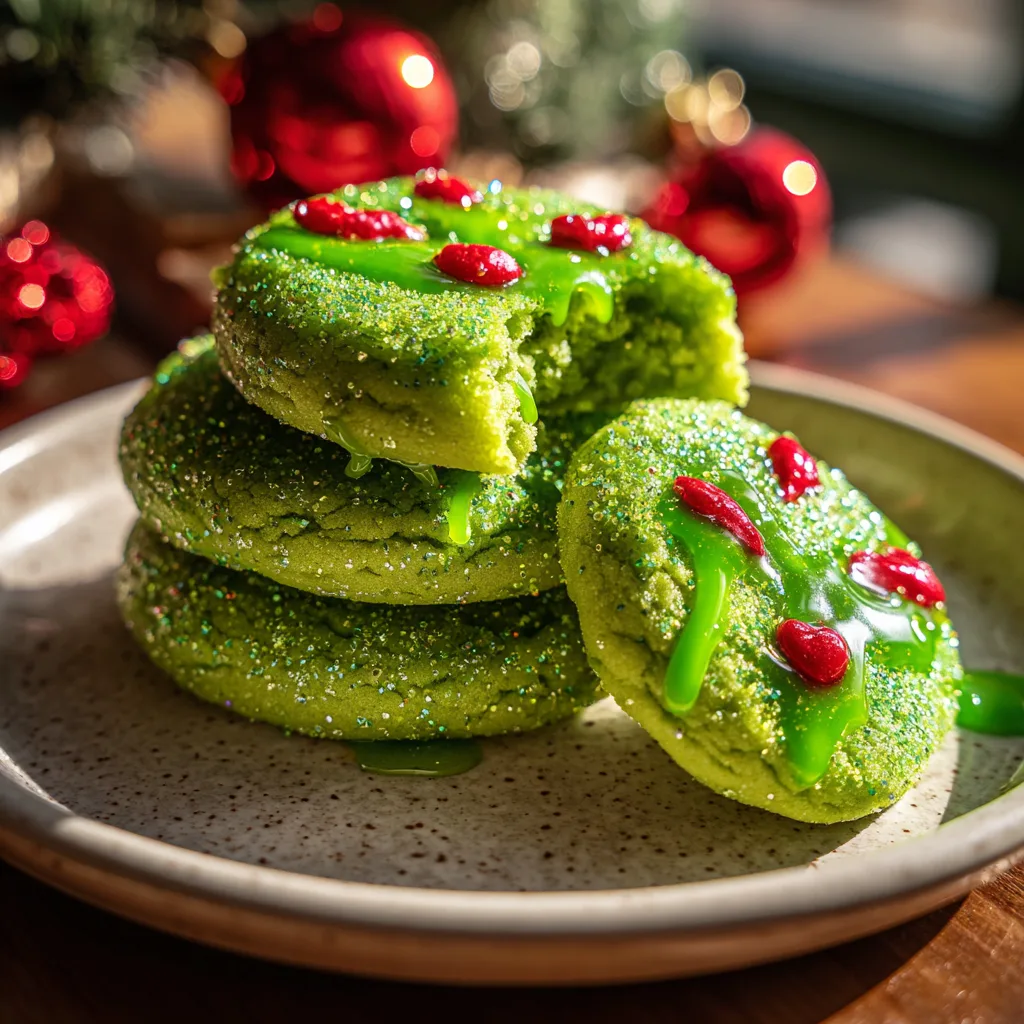
Every holiday season needs a showstopper, and nothing steals the spotlight quite like these Grinch Sugar Cookies. Inspired by the classic Dr. Seuss character who stole (and then saved) Christmas, these vibrant green treats are as delicious as they are adorable. Whether you are hosting a festive movie marathon, preparing for a cookie exchange, or just looking for a fun baking project with the kids, these heart-warming cookies are guaranteed to make everyone’s heart grow three sizes.
Unlike complicated decorated cookies that require hours of royal icing work, these drop-style sugar cookies come together quickly. They feature a soft, pillowy interior, a sparkly sugar-coated exterior, and a simple cute face that even a novice baker can master. The secret lies in the perfect balance of buttery richness and vanilla flavor, dyed a whimsical “Grinch green” that pops on any dessert table.
Why You Will Love This Recipe
There are countless Christmas cookie recipes out there, but this one holds a special place in the holiday rotation for several reasons:
- Visual Appeal: The neon green color combined with the red heart sprinkle is instantly recognizable and festive.
- Texture Perfection: We use a combination of butter and oil (or cream cheese in some variations, though we stick to butter here for classic flavor) to ensure the cookies stay soft for days.
- Kid-Friendly: Kids love rolling the dough balls in the green sugar and helping to place the “heart” on the Grinch.
- No Chill Time Required: Unlike cut-out cookies, these drop cookies can often go straight into the oven, though a short chill helps them keep their puffiness.
Ingredients
Gather these pantry staples to get started. The key to that signature look is, of course, the food coloring and the heart sprinkles.
- All-Purpose Flour – The structural base of the cookie. Make sure to spoon and level your flour so the cookies don’t get too cakey.
- Cornstarch – The secret weapon! A small amount of cornstarch keeps the cookies incredibly soft and prevents them from spreading too thin.
- Baking Powder & Baking Soda – For just the right amount of lift.
- Salt – Balances the sweetness.
- Unsalted Butter – Softened to room temperature. This provides the rich flavor and tender crumb.
- Granulated Sugar – Used in the dough and for rolling.
- Egg – Room temperature is best for emulsification.
- Vanilla Extract – Use pure vanilla for the best flavor.
- Almond Extract – (Optional) A tiny splash gives that classic bakery sugar cookie taste.
- Green Gel Food Coloring – Gel works best as it won’t water down the dough. Look for “Leaf Green” or “Electric Green.”
- Green Sanding Sugar – For rolling the dough balls before baking. This gives them a sparkle and a nice crunch.
- Red Heart Sprinkles – Represents the Grinch’s heart growing!
- Green Decorating Icing – A small tube of store-bought green icing or melted green candy melts to draw the face.
Instructions
Step 1: Prep the Oven and Pans
Preheat your oven to 350°F (175°C). Line two large baking sheets with parchment paper or silicone baking mats. This prevents sticking and ensures the bottoms don’t brown too quickly.
Step 2: Mix Dry Ingredients
In a medium bowl, whisk together the flour, cornstarch, baking powder, baking soda, and salt. Set this aside. Whisking ensures the leavening agents are evenly distributed.
Step 3: Cream Butter and Sugar
In a large bowl (or stand mixer fitted with the paddle attachment), beat the softened butter and granulated sugar together on medium-high speed for about 2-3 minutes. You want the mixture to be pale, light, and fluffy.
Step 4: Add Wet Ingredients and Color
Add the egg, vanilla extract, and almond extract (if using). Beat until combined. Scrape down the sides of the bowl. Now, add your green gel food coloring. Start with a few drops and mix, adding more until you reach your desired vibrant green shade. Remember, the color will fade slightly during baking, so go a shade darker than you think you need.
Step 5: Combine
Turn the mixer to low speed and gradually add the dry ingredients. Mix just until the flour streaks disappear. Do not overmix, or your cookies will be tough.
Step 6: Roll and Coat
Pour the green sanding sugar into a small shallow bowl. Scoop about 1.5 tablespoons of dough (a medium cookie scoop works great) and roll it into a ball between your palms. Roll the ball generously in the green sanding sugar until fully coated.
Step 7: Bake
Place the coated dough balls on the prepared baking sheets, spacing them about 2 inches apart. Flatten them very slightly with the bottom of a glass or your palm (just a little!). Bake for 8-10 minutes. The centers should still look slightly soft and underbaked—they will set as they cool. Do not let the edges brown.
Step 8: Decorate
Immediately after removing the cookies from the oven, while they are still hot and soft, gently press a red heart sprinkle onto each cookie (this can serve as the heart or the nose depending on your design preference). Allow cookies to cool on the baking sheet for 5 minutes, then transfer to a wire rack to cool completely.
Once completely cool, use the green decorating icing (or melted candy melts in a piping bag) to draw on the Grinch’s face—slanted eyebrows and a mischievous smile.
Tips for the Perfect Grinch Cookies
Use Gel Coloring: Liquid food coloring adds moisture to the dough which can affect the texture. Gel coloring provides intense pigment without changing the consistency.
Don’t Overbake: These cookies are meant to be soft. If you bake them until they are hard, you lose that delightful chewy texture. Pull them out when they look puffy and set around the edges.
The “Heart” Placement: If you forget to put the heart sprinkle on while the cookies are hot, use a tiny dot of icing to glue it on after they have cooled.
Uniform Size: Using a cookie scoop is the best way to ensure all your cookies bake evenly and look uniform on the plate.
Variations to Try
- Peppermint Twist: Swap the almond extract for peppermint extract for a minty holiday flavor.
- Chocolate Chip: Mix in mini semi-sweet chocolate chips for a “Grinch chip” version, though this might distract from the face design.
- Cream Cheese Frosting: Instead of drawing a face, simply smear green cream cheese frosting on top and place the heart in the center.
Serving and Storage
These cookies are perfect for shipping as they hold their shape well. Store them in an airtight container at room temperature for up to 5 days. To keep them extra soft, place a slice of white bread in the container with the cookies (the cookies absorb moisture from the bread).
Freezing Instructions: You can freeze the baked cookies (without the icing face) for up to 3 months. Thaw on the counter and draw the face before serving. Alternatively, freeze the dough balls before baking for fresh cookies on demand!
The Cultural Impact of the Grinch
Why do we love the Grinch so much? It’s a story of redemption. Serving these cookies is a sweet reminder of the true meaning of Christmas—that it’s not about the packages, boxes, or bags, but about community and love. Plus, the bright green color breaks up the monotony of brown gingerbread and white sugar cookies on a holiday platter.
Enjoy making these whimsical treats. They are sure to bring a smile to even the grumpiest guest at your holiday party!
Grinch Sugar Cookies
Ingredients
Equipment
Method
- Preheat oven to 350°F (175°C). Line two baking sheets with parchment paper.
- In a medium bowl, whisk together flour, cornstarch, baking powder, baking soda, and salt.
- In a large bowl, cream together butter and sugar until light and fluffy (about 2-3 minutes).
- Mix in the egg, vanilla extract, and almond extract. Add green food coloring and mix until combined and vibrant.
- Gradually add dry ingredients to wet ingredients, mixing on low speed just until combined.
- Scoop dough into balls (approx 1.5 tbsp each) and roll them generously in green sanding sugar.
- Place on baking sheet 2 inches apart and flatten slightly. Bake for 8-10 minutes until set but soft.
- Immediately press a red heart sprinkle into each cookie while hot. Cool on pan for 5 minutes, then transfer to wire rack.
- Once completely cool, use green icing to pipe a small Grinch face (eyebrows and smile) on each cookie.