Sugar Cone S’mores
The Ultimate Camping Dessert Upgraded: Campfire Sugar Cone S’mores
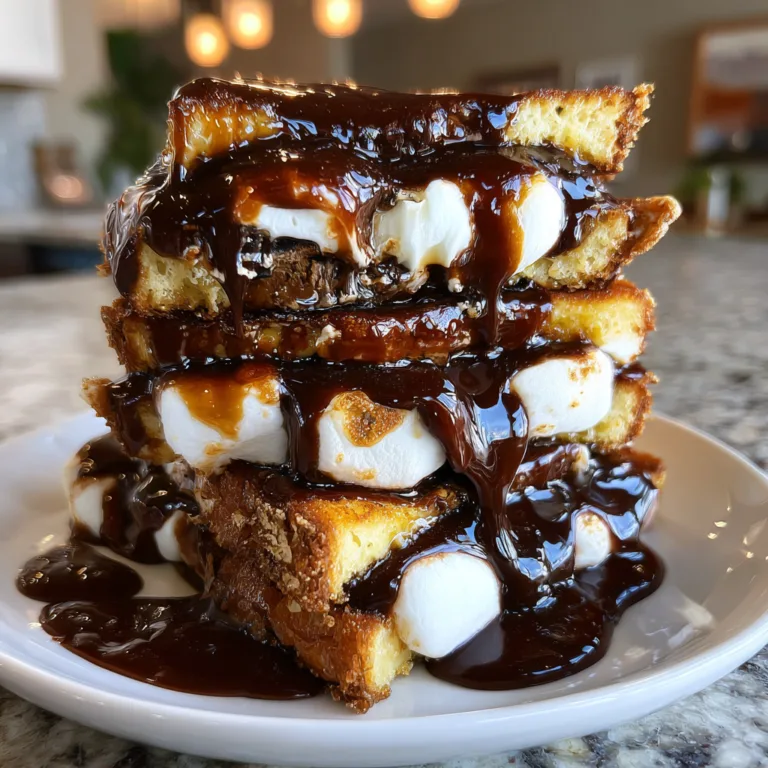
There is an undeniable, almost primitive joy associated with gathering around a crackling campfire as the sun dips below the horizon. The scent of woodsmoke, the symphony of crickets, and the cool evening breeze all set the stage for one of humanity’s favorite culinary traditions: the making of s’mores. For generations, the classic combination of graham crackers, roasted marshmallows, and squares of milk chocolate has been the undisputed king of outdoor desserts. However, as beloved as the traditional s’more is, it comes with a well-known set of challenges. Graham crackers crumble at the slightest pressure, melted chocolate oozes out the sides onto sticky fingers, and the structural integrity of the entire dessert is often compromised after the very first bite. Enter the brilliant, mess-free, and infinitely customizable alternative: Campfire Sugar Cone S’mores.
This ingenious twist on the classic treat replaces the fragile graham cracker with a sturdy, crunchy sugar cone or waffle cone. By treating the cone like an edible vessel, you can stuff it to the brim with mini marshmallows, chocolate chips, and an array of customized fillings. Once wrapped tightly in heavy-duty aluminum foil and gently heated over the campfire embers, a grill, or even in your home oven, the ingredients meld together into a gooey, molten masterpiece. Every single bite delivers the perfect ratio of crispy cone to melted chocolate and toasted marshmallow fluff, all safely contained within a neat, portable package. Whether you are pitching a tent in the deep wilderness, hosting a backyard summer barbecue, or simply craving a cozy autumn treat indoors, Campfire Sugar Cone S’mores are guaranteed to revolutionize your dessert experience.

The Nostalgia of Traditional S’mores vs. The Ingenuity of Cone S’mores
To truly appreciate the brilliance of the sugar cone s’more, we must first look at the history of its predecessor. The first official recipe for a “Some More” was published in the 1927 Girl Scout guidebook, “Tramping and Trailing with the Girl Scouts.” Since that moment almost a century ago, the basic formula has remained largely unchanged. It is a ritual of patience, requiring the precise roasting of a marshmallow to achieve that perfect golden-brown exterior and molten center, followed by the rapid assembly required to melt the chocolate before the marshmallow cools.
However, the traditional s’more is inherently flawed when it comes to neatness. Children and adults alike inevitably end up with sticky faces, chocolate-smeared clothes, and a pile of broken graham cracker crumbs. The Campfire Sugar Cone S’more eliminates these issues entirely. The cone acts as a protective barrier, keeping the molten, gooey goodness contained until you are ready to eat it. Furthermore, traditional s’mores rely on the residual heat of the marshmallow to melt a thick square of chocolate, which often results in cold, hard chocolate paired with a warm marshmallow. Because the sugar cone s’more is wrapped in foil and heated as a single unit, the chocolate chips and marshmallows melt uniformly together, creating a flawlessly integrated, warm, and comforting filling that resembles a rich, toasted fondue.
Why You Will Fall in Love with Campfire Sugar Cone S’mores
There are countless reasons why this dessert trend has taken the camping and culinary world by storm. First and foremost is the undeniable factor of convenience. Preparing traditional s’mores in the dark while swatting away mosquitoes can be a logistical nightmare. Sugar cone s’mores, on the other hand, can be prepped completely in advance. You can stuff the cones, wrap them securely in foil, and pack them in your cooler or picnic basket hours before you ever strike a match. When dessert time arrives, there is no fumbling with open bags of sticky marshmallows or melting chocolate bars—you simply place the pre-wrapped cones near the heat source and wait.
Another major advantage is portion control and ease of eating. The conical shape naturally fits into the human hand, making it incredibly easy for young children to hold without dropping half their dessert into the dirt. The closed bottom of the cone means no dripping, saving parents the hassle of extensive post-dessert cleanups. Additionally, the crunch of a high-quality sugar cone or waffle cone provides a superior textural contrast to the soft, pillowy marshmallows compared to a standard, sometimes stale, graham cracker.
Essential Ingredients for the Perfect S’mores Cone
The beauty of the Campfire Sugar Cone S’more lies in its simplicity. To create the foundational recipe, you only need three core ingredients, but the quality of these components will dictate the final result.
- – Sugar Cones or Waffle Cones: The vessel is the most critical element. Sugar cones offer a fantastic, sturdy crunch and a classic, sweet flavor that pairs beautifully with the fillings. Waffle cones are larger and slightly more fragile but allow for a massive amount of filling and provide a deep, caramelized flavor profile. Avoid standard cake cones (the flat-bottomed, wafer-like cones), as they lack the flavor and structural integrity to hold up to the heat and molten ingredients.
- – Mini Marshmallows: While you could theoretically rip apart full-sized marshmallows, mini marshmallows are absolutely essential for proper layering. Their small size allows them to fill the crevices of the cone, ensuring that every bite contains an even distribution of marshmallow fluff. They also melt much faster and more uniformly than their larger counterparts.
- – Chocolate Chips or Chunks: Ditch the massive, hard-to-melt chocolate bars. Standard semi-sweet or milk chocolate chips are perfect for cones because they cascade down into the narrowest point of the cone, guaranteeing chocolate in the very last bite. For a more luxurious texture, high-quality chocolate chunks or chopped baking chocolate will provide incredible pools of liquid chocolate.
Step-by-Step Instructions: How to Make Campfire Sugar Cone S’mores
Creating these delightful treats is an incredibly straightforward process that makes for a fantastic interactive activity for families. Here is the foolproof method for assembling the perfect cone.
- Prepare Your Station: Lay out a clean, dry surface and tear off squares of heavy-duty aluminum foil. Each square should be roughly 10 by 10 inches, large enough to completely encase the cone with plenty of overlap to seal the edges.
- The Foundation Layer: Begin by dropping a small handful of chocolate chips directly into the bottom point of the sugar cone. This is a crucial step; if you put marshmallows at the bottom, they may expand and blow out the tip of the cone. The chocolate provides a dense, heavy base.
- Layering the Fillings: Alternate layers of mini marshmallows and chocolate chips. Think of it like building a lasagna. A layer of marshmallows, a sprinkle of chocolate chips, another layer of marshmallows. Gently press down on the fillings as you go to pack them tightly, but be careful not to crack the delicate shell of the cone.
- The Crowning Glory: Top off the wide brim of the cone with a generous mound of mini marshmallows. As they melt, they will expand slightly and create a beautiful, gooey seal at the top of the cone.
- The Wrapping Process: Place the stuffed cone in the center of your aluminum foil square. Roll the foil tightly around the cone, ensuring the pointy bottom is secure. Fold the top of the foil over the open end of the cone, crimping it tightly to trap the heat and prevent any rogue marshmallows from escaping as they expand.
Three Cooking Methods: Campfire, Grill, and Oven
The versatility of this recipe is what makes it a year-round favorite. You are not limited to the wilderness; you can enjoy these treats in your backyard or even in your kitchen.
1. The Campfire Method (The Authentic Experience): Once your campfire has burned down to glowing, white-hot coals, you are ready to cook. Do not place the foil-wrapped cones directly into roaring, open flames, as this will instantly scorch the sugar cone and turn the chocolate bitter. Instead, nestle the wrapped cones near the edge of the fire ring, resting them on warm rocks or indirect coals. Turn the cones carefully with long metal tongs every 2 to 3 minutes. Total cooking time will range from 5 to 8 minutes depending on the heat of your fire. You will know they are close to done when the foil is hot to the touch and the cone yields slightly to gentle pressure from the tongs.
2. The Backyard Grill Method (The Controlled Environment): Preheat your gas or charcoal grill to a medium-low heat (around 300°F to 350°F). Place the foil-wrapped cones on the grill grates, slightly away from direct, aggressive flames. Close the grill lid to create an oven-like environment. Turn the cones every 2 minutes to ensure even heating. This method usually takes about 6 to 10 minutes. The grill provides a fantastic, controlled way to cook dozens of cones simultaneously for a summer party.
3. The Kitchen Oven Method (The Rainy Day Lifesaver): When camping is rained out or winter sets in, the oven is your best friend. Preheat your oven to 350°F (175°C). You can either wrap the cones in foil as usual or, for a slightly crispier cone and a beautifully browned marshmallow top, leave them unwrapped. If leaving them unwrapped, stand the cones upright in a specialized baking rack or carefully balance them in a deep muffin tin. Bake for 5 to 7 minutes. Keep a close eye on them; the moment the marshmallows puff up and turn golden brown, they are ready to be devoured.
Pro Tips for the Perfect Melting Experience
While the process is simple, a few expert tips can elevate your s’mores cones from good to mind-blowing.
Always use heavy-duty aluminum foil. Standard foil is prone to tearing when scraped against grill grates or campfire rocks, which will let ash into your dessert and let gooey chocolate leak out. If you only have standard foil, double-wrap your cones.
Do not overstuff the cones to the point where they are bulging. Marshmallows expand significantly when exposed to heat. If the cone is packed too tightly, the expanding air and sugar will cause the fragile waffle or sugar cone to fracture, resulting in a messy blowout.
Let them rest! This is the hardest but most important step. When you remove the cones from the heat source, the interior is effectively edible lava. Let the foil-wrapped cone sit at room temperature for at least 2 to 3 minutes before unwrapping. This allows the heat to distribute evenly, finishes the melting process, and saves the roof of your mouth from severe burns.
Creative Variations and Gourmet Upgrades
The true magic of the sugar cone s’more is that the cone acts as a blank canvas for infinite flavor combinations. Once you master the classic chocolate and marshmallow version, it is time to experiment.
The Peanut Butter Lover: Swap the standard chocolate chips for a mix of peanut butter chips and milk chocolate chips. Add small dollops of creamy peanut butter or even miniature peanut butter cups to the layers. The saltiness of the peanut butter cuts beautifully through the intense sweetness of the marshmallows.
The Fruit and Fondue Cone: For a fresher take, add finely diced strawberries, raspberries, or sliced bananas to the layers. The heat will slightly macerate the fruit, creating a warm, jammy syrup that mixes perfectly with dark chocolate chunks.
The Caramel Pecan Turtle: Layer mini marshmallows with milk chocolate chips, chopped toasted pecans, and a generous drizzle of thick caramel sauce. This variation transforms a simple campfire snack into a rich, decadent, bakery-quality dessert.
The Cookies and Cream: Use white chocolate chips and crushed chocolate sandwich cookies (like Oreos) along with the marshmallows. The crushed cookies add an incredible secondary crunch that contrasts brilliantly with the soft, melted interior.

Fun Facts and Cultural Context of the S’more
Did you know that the United States celebrates National S’mores Day every year on August 10th? It is a testament to how deeply ingrained this dessert is in American culture. The name itself, a contraction of “some more,” highlights the addictive nature of the treat. Interestingly, while the classic graham cracker was originally invented in the 1829 by Reverend Sylvester Graham as a bland health food intended to curb immoral urges, it eventually became the cornerstone of one of the most indulgent desserts in history.
The adaptation of using an ice cream cone instead of a graham cracker is a relatively modern innovation, born out of the Pinterest and food-blogging era where visual appeal, portability, and “hack” culture intersect. It represents the beautiful evolution of traditional recipes adapting to modern desires for convenience without sacrificing flavor.
Conclusion: Creating Lasting Memories Around the Fire
Ultimately, whether you stick to the traditional, slightly messy method or embrace the innovative brilliance of Campfire Sugar Cone S’mores, the core experience remains the same. These desserts are not just about consuming sugar; they are about the communal experience of cooking together, the warmth of the fire, and the creation of lasting memories. The sugar cone simply removes the stress of cleanup and broken crackers, allowing you to focus entirely on the joy of the moment, the conversation with friends and family, and the absolutely perfect, gooey, chocolatey bite.
So the next time you are packing your camping gear, loading up the RV, or just firing up the backyard grill, leave the fragile boxes of graham crackers on the grocery store shelf. Grab a box of sturdy sugar cones, a bag of mini marshmallows, and your favorite chocolate chips. Wrap them up, toss them near the coals, and prepare to experience the ultimate evolution of the campfire classic. Your tastebuds, and your laundry machine, will thank you.
Campfire Sugar Cone S’mores
Ingredients
Equipment
Method
- Tear off six 10×10 inch squares of heavy-duty aluminum foil.
- Drop a small handful of chocolate chips into the very bottom of each sugar cone to create a solid base.
- Alternate layering mini marshmallows and chocolate chips (and any optional add-ins) until the cone is filled to the top.
- Mound a few extra mini marshmallows right at the top opening of the cone.
- Place the stuffed cone in the center of a foil square, roll tightly, and crimp the top to seal completely.
- CAMPFIRE/GRILL: Place wrapped cones near hot coals or on a medium-low grill. Cook for 5-8 minutes, turning every 2 minutes with tongs.
- OVEN: Bake at 350°F (175°C) for 5-7 minutes until marshmallows are gooey and chocolate is melted.
- Carefully remove from heat and let sit in the foil for 2-3 minutes before unwrapping to avoid burns. Enjoy immediately!