The Ultimate Guide to the Best Fudgy Chocolate Brownie Cookies
There is a distinct category of dessert lovers who constantly find themselves torn between two classics: the chewy, handheld convenience of a cookie and the rich, dense, molten indulgence of a freshly baked brownie. If you fall into this category, prepare to have your baking world changed forever. Enter the chocolate brownie cookie—sometimes affectionately known as the “brookie” (though that term sometimes refers to a layered bar). This is not merely a chocolate cookie; it is a culinary hybrid that takes the absolute best aspects of a fudgy brownie and delivers them in a perfectly portioned, round format.
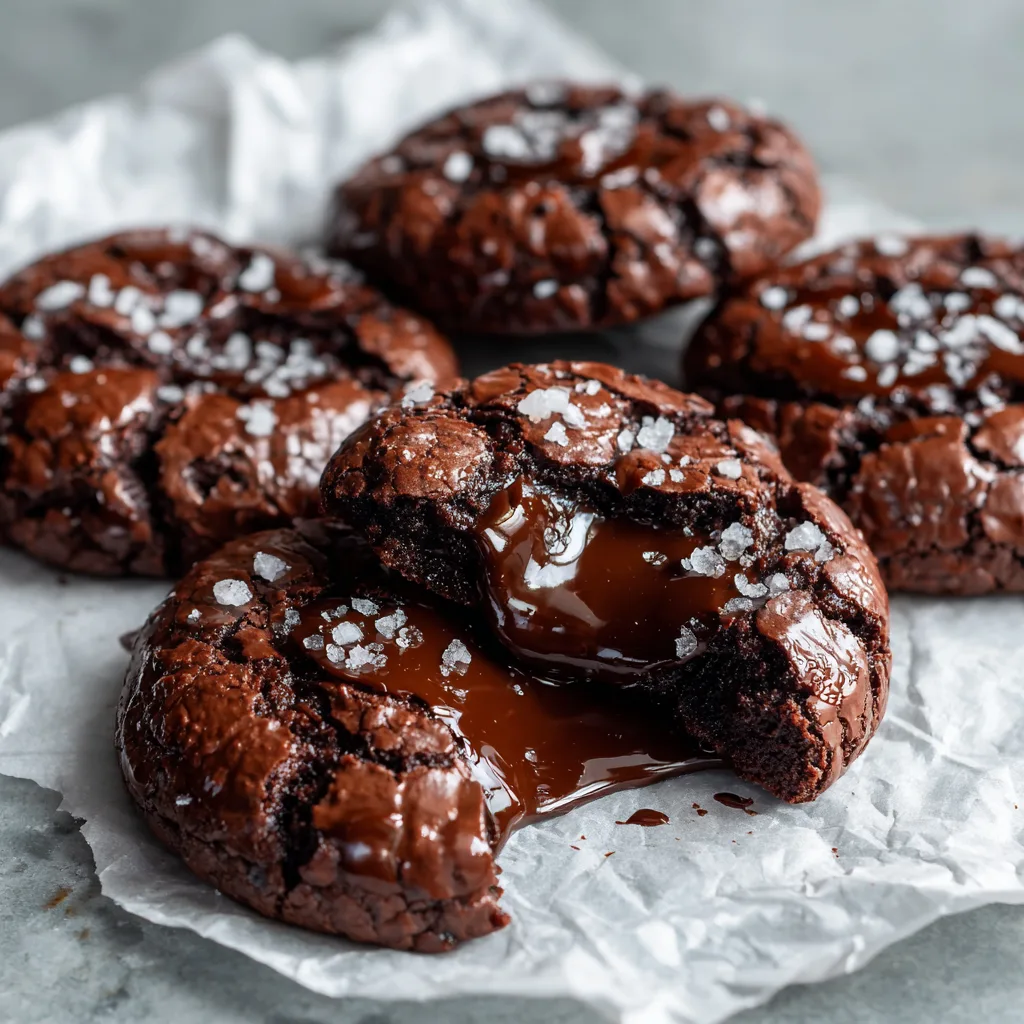
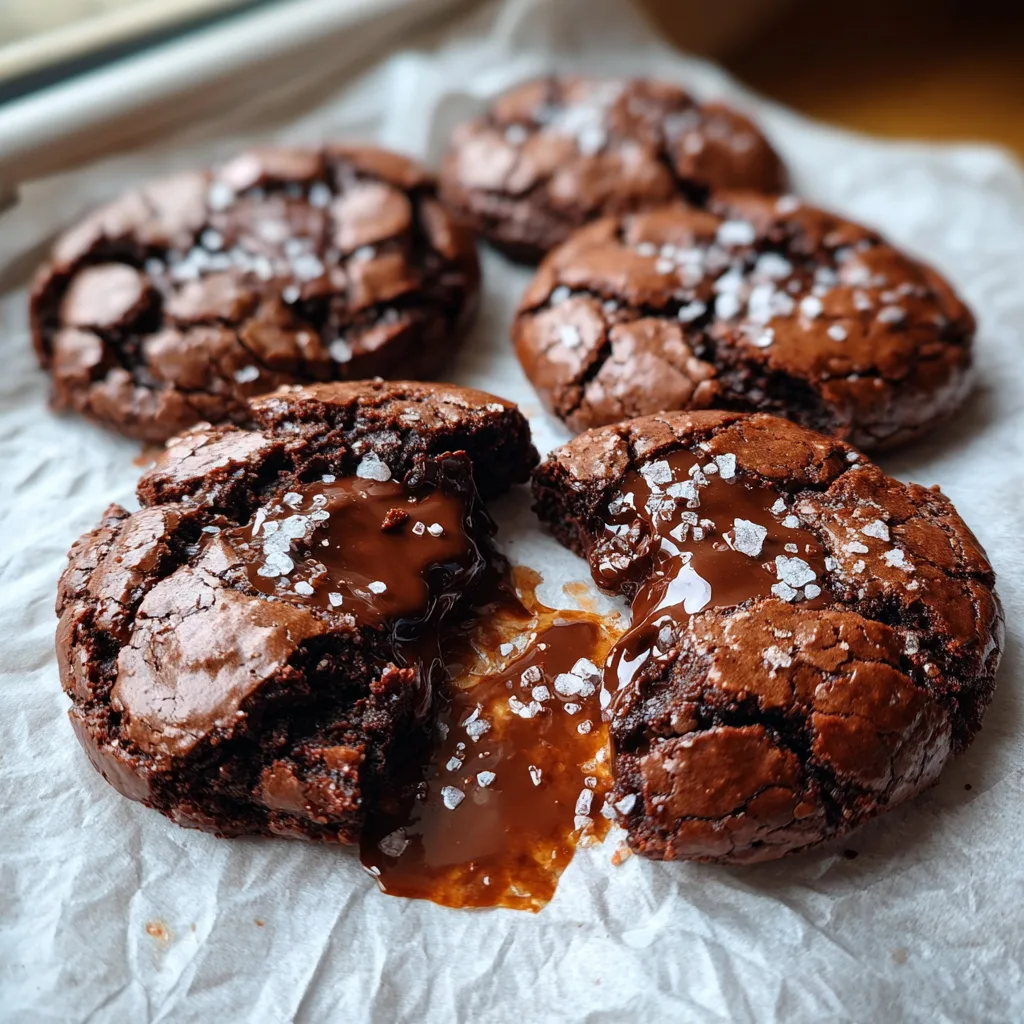
The images you see of these cookies are not exaggerated. When executed correctly, they possess a very specific set of characteristics that set them apart from a standard double chocolate chip cookie. They feature a impossibly shiny, paper-thin, crackly crust on top—similar to the delicate top layer of a pan of brownies—which shatters upon the first bite. Beneath that delicate exterior lies a center that is unapologetically gooey, dense, and intensely chocolatey. They are the definition of a “melt-in-your-mouth” experience, often finished with a sprinkle of flaky sea salt to balance the intense sweetness.
This comprehensive guide will walk you through everything you need to know to achieve that holy grail texture at home. We will dive into the science behind the “crinkle top,” the importance of ingredient selection, and the crucial timing required to ensure your centers remain molten and fudgy rather than cakey. Whether you are baking for a holiday cookie swap, a decadent weekend treat, or simply a Tuesday night chocolate craving, this recipe is guaranteed to become a permanent fixture in your repertoire.
The beauty of this recipe lies in its simplicity despite its sophisticated appearance. You don’t need fancy equipment—just a mixer, some bowls, and a dedication to using good quality chocolate. Let’s explore why this specific method creates the ultimate chocolate experience.
Why You Will Become Obsessed With This Recipe
- Texture Nirvana: It is the perfect marriage of crispy edges, a flaky top, and a center that stays soft for days.
- Intense Chocolate Flavor: By using both melted chocolate and cocoa powder, we achieve a depth of flavor that cocoa alone cannot provide.
- The “Wow” Factor: The glossy, cracked appearance looks professional and bakery-worthy with minimal effort.
- Quick Baking Time: Unlike a pan of brownies that takes 40 minutes, these bake in just about 10 to 12 minutes.
The Science Behind the Shiny Crinkle Top
Before we get to the mixing bowls, it is helpful to understand the “why” behind the process, particularly that signature shiny, cracked top. If you have ever made brownies and wondered why some recipes have a dull top and others have a glossy, flaky crust, the secret almost always lies in how you treat the eggs and sugar.
To achieve the crinkle, we need to create a sort of meringue base. By whipping the eggs and sugar together vigorously before adding the chocolate and dry ingredients, you are dissolving the sugar into the egg whites and incorporating air. During baking, this aerated sugar-egg mixture rises to the surface. As the cookie expands and spreads in the heat of the oven, this thin top layer dries out faster than the interior, causing it to crack and fissure, resulting in that beautiful, glossy mosaic appearance.
If you skip the whipping step and just dump everything in a bowl, your cookies will still taste good, but they will likely be dull, flatter, and lack that characteristic brownie texture.
**Ingredients Needed**
The ingredient list is relatively short, but the quality of those ingredients will significantly impact the final product. Because chocolate is the star, don’t skimp on it.
- High-Quality Dark Chocolate (roughly chopped): This is the foundation of your flavor. Use a baking bar you enjoy eating straight, preferably around 60% to 70% cocoa solids. Avoid chocolate chips for melting, as they contain stabilizers that prevent them from melting smoothly and can affect the final texture.
- Unsalted Butter: Used for melting with the chocolate to create the rich fat base. Using unsalted allows you to control the sodium level.
- Eggs: You will need large eggs at room temperature. These provide structure and are crucial for the whipping technique mentioned above.
- Granulated Sugar and Light Brown Sugar: We use a combination. White sugar helps create that crisp exterior and aids in the “crinkle” science, while brown sugar adds moisture, chewiness, and a hint of caramel flavor.
- Vanilla Extract: Essential for enhancing the chocolate flavor.
- All-Purpose Flour: You need very little flour for this recipe compared to standard cookies. Too much flour will lead to cakey cookies, which is the opposite of what we want.
- Unsweetened Cocoa Powder: Dutch-processed cocoa powder is recommended here for a darker color and smoother, less acidic flavor, but natural cocoa powder will also work.
- Baking Powder: Just a tiny amount to give the cookies a little lift before they settle into their dense final form.
- Salt: Crucial to balance the sweetness.
- Flaky Sea Salt (Optional but highly recommended): For sprinkling on top right after baking. The crunch and salty burst against the rich chocolate are unbeatable.
**Instructions**
Follow these steps closely, paying attention to the visual cues, especially during the egg whipping stage.
- Prep and Melt: Preheat your oven to 350°F (175°C). Line two large baking sheets with parchment paper. In a heat-proof bowl set over a pot of barely simmering water (a double boiler setup), melt the chopped dark chocolate and butter together. Stir occasionally until completely smooth and glossy. Remove from the heat and let it cool slightly for about 5–10 minutes so it doesn’t scramble the eggs later.
- Whip Eggs and Sugars: While the chocolate cools, place the eggs, granulated sugar, and brown sugar in a large mixing bowl. Using an electric hand mixer or a stand mixer fitted with the whisk attachment, beat on high speed for exactly 5 to 7 minutes. This step is non-negotiable. The mixture should become pale yellow, thick, and ribbon-like when you lift the beaters. Beat in the vanilla extract at the end.
- Combine Wet Ingredients: With the mixer on low speed, slowly pour the cooled melted chocolate/butter mixture into the whipped egg mixture. Mix just until combined. Do not overmix, or you will deflate the air you just incorporated.
- Sift and Fold Dry Ingredients: In a separate small bowl, whisk together the flour, cocoa powder, baking powder, and fine salt. Sift this dry mixture directly over the wet chocolate batter. Sifting is important to remove lumps from the cocoa powder. Using a rubber spatula, gently fold the dry ingredients into the wet until just combined. You should see no streaks of flour. The batter will be thick and glossy, resembling brownie batter more than cookie dough.
- Scoop and Bake: Immediately scoop the batter onto the prepared baking sheets using a medium cookie scoop (about 1.5 tablespoons in size). Leave about 2 to 3 inches of space between them as they will spread. Bake one tray at a time in the center of the oven for 10 to 12 minutes.
- The Crucial Timing: The cookies are done when they are puffed up, the tops are shiny and cracked, and the edges look set. The centers will look very soft and underbaked—this is exactly what you want. They will deflate and firm up as they cool. Do not overbake them, or you will lose the fudgy center.
- Cool and Finish: Remove the baking sheet from the oven and immediately sprinkle the cookies with flaky sea salt if desired. Let the cookies cool completely on the baking sheet. They are too delicate to move when hot. As they cool, the magical fudgy texture sets in.
Expert Tips for Success
Making these cookies isn’t difficult, but precision helps ensure the perfect outcome every time.
- Room Temperature Eggs: Cold eggs will cause the melted chocolate mixture to seize up when combined. Ensure your eggs are at room temperature for a smooth batter.
- Timing the Whip: Set a timer for whipping the eggs and sugar. Five minutes can feel like a long time, but don’t stop early. You need that pale, thick structure to get the shiny crust.
- Bake Immediately: Once the batter is mixed, scoop and bake it right away. The longer the batter sits, the more it cools and thickens, which can affect how they spread and crack in the oven.
- The “Bang” Method (Optional): If your cookies aren’t cracking as much as you’d like halfway through baking, open the oven door and carefully lift the baking sheet up a few inches and let it drop against the rack. This deflates the cookie suddenly and encourages cracking.
Variations and Customizations
While perfection needs little adjustment, you can customize these brownie cookies to your liking once you master the base recipe.
- Chocolate Chips: Fold in 1/2 cup of semi-sweet or milk chocolate chips at the very end for triple chocolate flavor and added texture nuggets.
- Nuts: Add 1/2 cup of toasted chopped walnuts or pecans for a classic brownie crunch.
- Espresso: Add 1 teaspoon of instant espresso powder to the dry ingredients to intensify the chocolate flavor without making them taste like coffee.
- Mint or Orange: Replace the vanilla extract with 1/2 teaspoon of peppermint extract or orange extract for a festive twist.
Serving and Storage Suggestions
These cookies are arguably at their absolute best about an hour out of the oven, when they have cooled enough to set but are still slightly warm in the center. Serve them with a tall glass of cold milk or a scoop of vanilla bean ice cream for an indulgent dessert.
To store, keep the completely cooled cookies in an airtight container at room temperature. They will stay fresh and fudgy for up to 4 days. If you stack them, place a piece of parchment paper between layers to prevent them from sticking together. You can also freeze the baked cookies for up to two months; just thaw them at room temperature before eating.
Final Thoughts
Mastering the chocolate brownie cookie is a game-changer for any home baker. It is a recipe that yields impressive, bakery-quality results that satisfy the deepest chocolate cravings. By respecting the technique of whipping the eggs and sugar, and resisting the urge to overbake, you will be rewarded with the ultimate glossy, cracked, and impossibly gooey treat that friends and family will beg you to make again and again. Enjoy the process, and indulge in the chocolatey results!
Fudgy Chocolate Brownie Cookies
Ingredients
Equipment
Method
- Preheat oven to 350°F (175°C). Line two baking sheets with parchment paper.
- Place the chopped dark chocolate and butter in a heat-proof bowl set over a saucepan of barely simmering water (double boiler). Melt gently, stirring occasionally until smooth and glossy. Remove from heat and let cool slightly for 5-10 minutes.
- In a large mixing bowl, using a hand mixer or stand mixer with whisk attachment, beat the eggs, granulated sugar, and brown sugar on high speed for exactly 5-7 minutes. The mixture should be thick, pale, and leave ribbons when the beater is lifted. Beat in the vanilla extract.
- With the mixer on low speed, slowly pour in the slightly cooled melted chocolate mixture. Mix only until just combined; do not overmix.
- In a small bowl, whisk together flour, sifted cocoa powder, baking powder, and fine salt. Sift this over the wet batter. Gently fold with a rubber spatula until just combined and no flour streaks remain. The batter will be thick like brownie batter.
- Immediately scoop the batter onto prepared baking sheets using a medium cookie scoop (about 1.5 tbsp size), spacing them 2-3 inches apart. Do not flatten.
- Bake one sheet at a time for 10-12 minutes. They are done when puffed, the tops are shiny and cracked, but the centers still look very soft and underbaked. Do not overbake.
- Remove from oven and immediately sprinkle with flaky sea salt. Allow to cool completely on the baking sheets to set.


