Veggie Critter Snacks
Healthy Fun: Creative Veggie Critters Your Kids Will Actually Eat
The daily snack-time struggle is a reality for many parents. Getting your children to reach for the colorful, nutrient-dense fruits and vegetables instead of the convenient, processed options can feel like an uphill battle. But what if we told you that with a simple perspective shift—turning mealtime into art time—you could transform their attitude toward healthy eating? This recipe for Creative Veggie Critter Snacks does exactly that. By repurposing classic ingredients like celery sticks, peanut butter, cream cheese, and a vibrant array of fresh fruit and vegetable shapes, you create playful edible art that is as engaging to make as it is delicious to eat. Say goodbye to uninspired snacks and hello to wholesome, happy fun that will make them ask for seconds of ‘bugs’ and ‘snails’!
The Power of Play: How Food Art Encourages Healthy Eating
The psychology behind this approach is powerful and surprisingly effective. When children are involved in the food creation process, they feel a sense of ownership over the final product. This involvement reduces “food neophobia,” the common fear of trying new foods, because they know exactly what went into the creation. More importantly, when food looks like a colorful creature instead of a plain vegetable, it reduces the intimidation factor. It becomes a game, an exploration of shapes and textures, rather than a confrontation with a mandatory ‘healthy’ task. By making snacks fun and interactive, you are fundamentally changing the environment in which healthy foods are consumed, fostering positive associations that can last a lifetime.
The Magic of Celery Logs: A Versatile and Neutral Foundation
While many children may express initial hesitation toward a plain celery stalk, its architectural properties make it the perfect structural base for edible creations. The natural hollow grove of the celery stalk acts like a built-in trough for holds cream cheese and peanut butter spreads. When filled, the celery provides a sturdy ‘log’ that is both easy to hold and capable of supporting vertical elements. Furthermore, celery’s flavor profile is relatively neutral, meaning it absorbs and complements the flavors of the richer spreads, rather than competing with them. Once they are coated with a satisfying, shiny spread and adorned with colorful fruits, the celery itself becomes a part of the fun journey of textures—a satisfying crunch beneath the creamy filling and juicy toppings.
Ingredients You will Need
For these adorable critter snacks, you will need a variety of simple, wholesome ingredients. This list is highly customizable based on your children’s preferences and allergies:
- – Celery stalks (washed, trimmed, and dried)
- – Cream Cheese (softened, or similar savory spread like hummus)
- – Peanut Butter (or your preferred nut-free substitute like SunButter or almond butter)
- – Apples (red, green, or a mix, for round and crescent slices)
- – Cucumber (sliced into round coins)
- – Orange (mandarin or clementine slices for round segments)
- – Cherry Tomatoes (red, for ladybugs and heads)
- – Blueberries (black, for caterpillars)
- – Red Grapes (for caterpillars)
- – Green Grapes (for caterpillars)
- – Candy eyes (or miniature chocolate chips/raisins for a healthier alternative)
Step-by-Step Instructions
This is a wonderfully interactive recipe that your kids will love to help assemble. Here is how to create these delightful snacks:
- Prepare the Bases: Thoroughly wash and pat dry the celery stalks. Excess moisture will make the spreads slip. Trim the ends and cut the stalks into 3-4 inch ‘logs’. Pat dry again.
- Fill the Groves: Use a knife or offset spatula to fill some celery grooves with cream cheese and some with peanut butter (or SunButter). You can also create two-tone logs for a fun visual effect. Make sure the spreads are applied generously to maximize the shiny gloss effect.
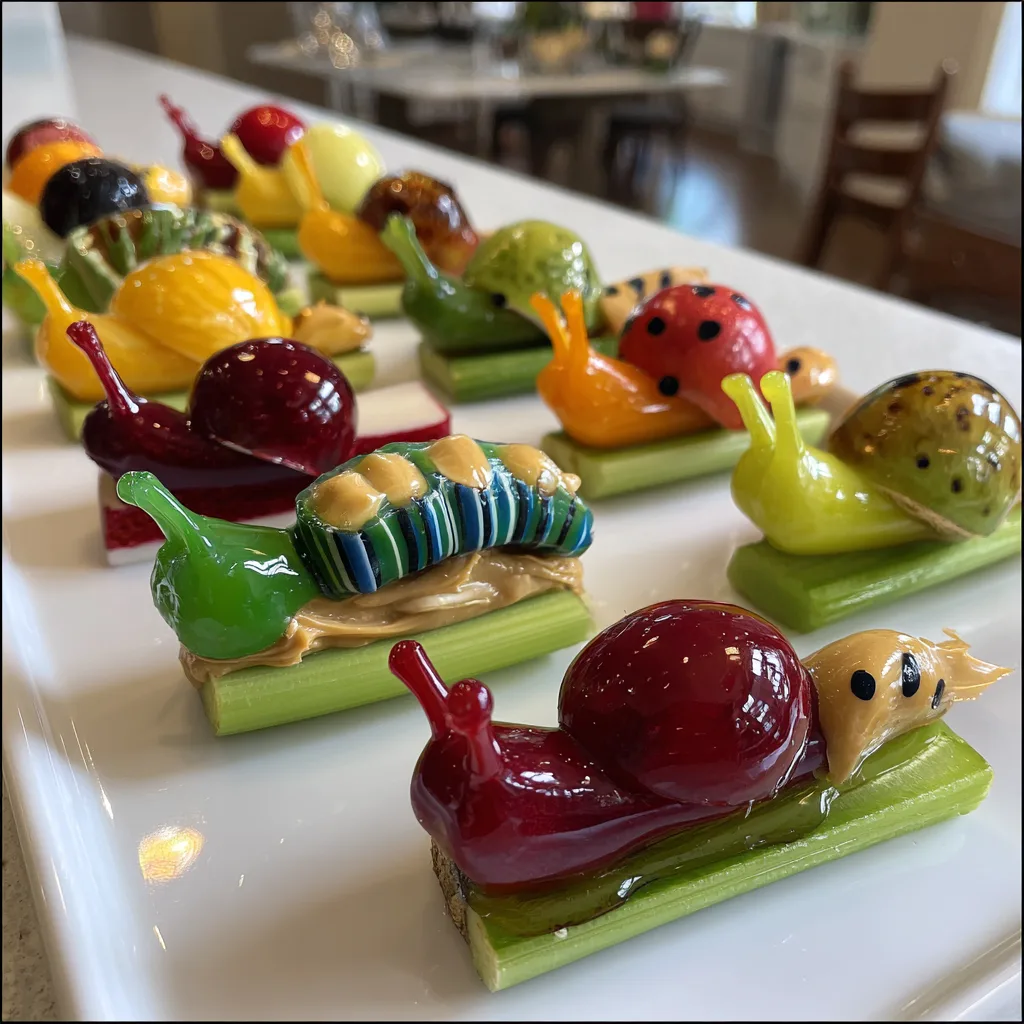
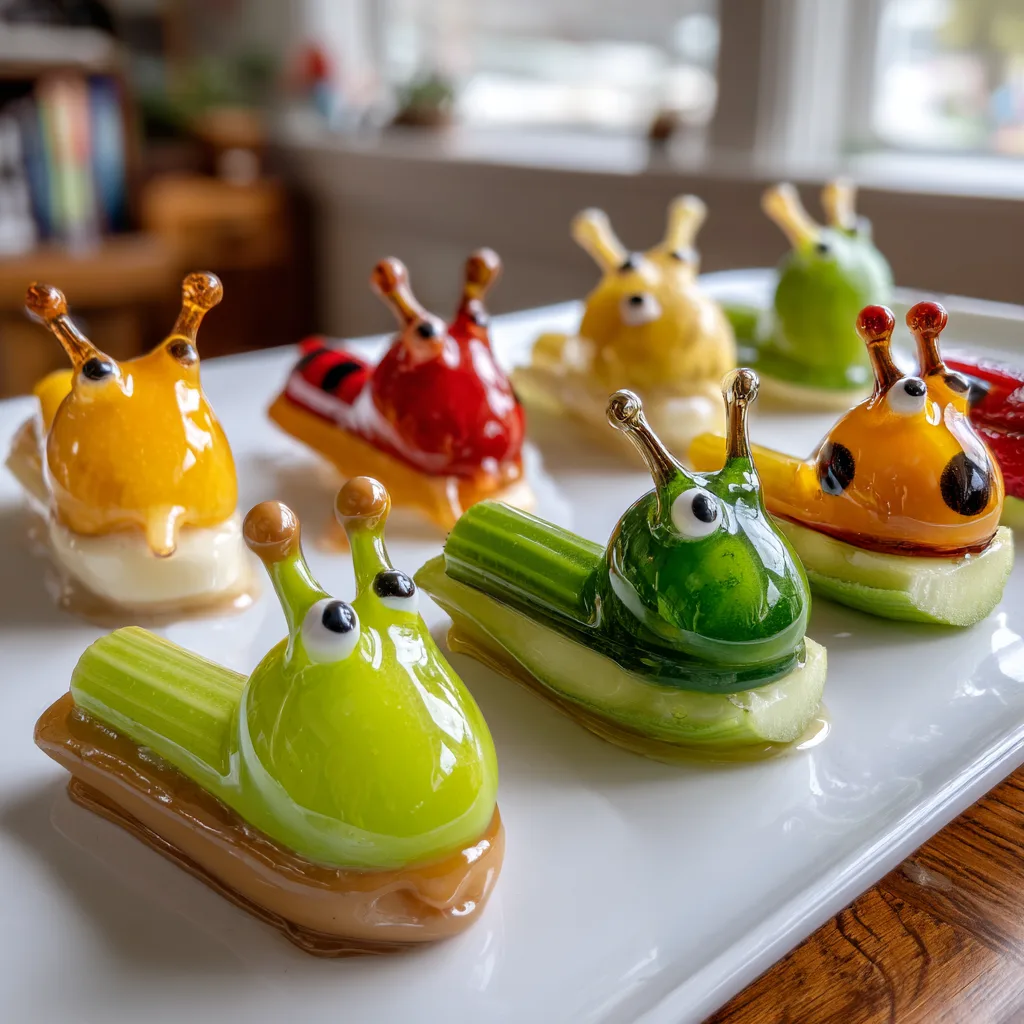
- Create the Snails: * Assemble the Shell: Gently press a thin round slice of apple, cucumber, or an orange slice vertically into a *peanut butter-filled* log (referencing the photo, snails are predominantly with brown spread). * Form the Head: Use a small dab of spread to attach two candy eyes to the top of the fruit slice ‘shell’.
- Create the Caterpillars: * Form the Head: Create a head using a halved grape, cherry tomato, or blueberry with candy eyes attached with spread. Lay grape halves, blueberries, or cucumber slices along the cream cheese or peanut butter log (the photo shows a beautiful mixture). * Assemble the Body: Gently press grape halves, blueberries, or cucumber slices onto the *cream cheese-filled* log (or other spread-filled log) in segments.
- Create the Ladybugs: * Assemble the Body: Place a halved cherry tomato flat onto a *cream cheese-filled* log. * Form the Head: Use a tiny spread head and attach eyes. You can optionally add tiny spread spots to the tomato body, although not prominently seen in the photo.
- The Finished Presentation: Use small dabs of spread to ensure all eyes are securely attached. Arrange the finished ‘critters’ creatively on a clean white surface or on a fun themed plate. Serve immediately or cover and refrigerate for short-term storage. (If refrigerating, use raisins or chocolate chips for eyes as candy eyes can bleed).
Ensure that all candy eyes are securely attached to prevent a potential choking hazard for very small children, or consider using safer, edible alternatives.
Creativity in the Kitchen: Tips and Variations
This recipe is just the beginning! The true joy of this snack is the endless room for improvisation and personalization. Here are some fantastic ways to make this recipe your own:
- Nut-Free Substitutions: For homes and schools with nut allergies, Sunflower seed butter (SunButter) is an excellent, protein-rich substitute for peanut butter that perfectly replicates the look and texture. Hummus is another fantastic savory alternative that pairs wonderfully with celery.
- Healthier Eyes: While candy eyes are incredibly charming, many parents prefer healthier, all-edible alternatives. Miniature raisins or small dots of fruit leather (like a fruit rollup cut with a punch) work beautifully as healthy eyes. Tiny chocolate chips are also a great compromise.
- Different Fruit Shapes: Don’t limit yourself to just rounds and crescents. Melon ballers can create perfect spheres for caterpillar bodies. Use kiwi slices, pear wedges, or even starfruit for unique shell shapes. Tiny pretzel sticks or slivered almonds can be used for antennae.
- Get the Kids Involved: Setting out a variety of ingredients in small bowls and letting your children use their imagination is half the fun. They will love designing their own unique ‘bugs’ and are far more likely to eat the final creation if they are the artistic masterminds behind it.
The Power of Presentation: Maximizing the Shiny Gloss Effect
When presenting these snacks, the initial visual impact is critical. In a high-quality food photo, elements that look wet and glistening are inherently more appetizing and drool-worthy. For your home snacks, you can achieve a similar ‘ liquid glass’ effect with simple techniques. If using cream cheese, soften it fully or choose a whipped variety. If using peanut butter, make sure it is fresh and natural (stirring oils back in well) so that it spreads smoothly with maximum sheen. You can also lightly brush the fruit slices with a little lemon juice to prevent browning and add a glistening moisture layer. This ” completamente drench look” not only makes the snacks look irresistible but also enhances the overall sensory experience.
Cultural Context: The Heritage of ‘Ants on a Log’ and Edible Art
The practice of creating edible art from celery, peanut butter, and raisins (the classic ‘Ants on a Log’) has deep roots in American home cooking and school snack traditions. It began in the late 19th and early 20th centuries as a way to make raw vegetables more appealing and nutrient-dense for children. It became a staple because it was easy, affordable, and fun, tapping into the power of whimsical names to engage little eaters. Our Creative Veggie Critters is a modern, vibrant evolution of this classic concept, celebrating the same core idea with a broader palette of colors and shapes, making it a timeless technique for fostering healthy eating habits through joyful play.
Conclusion
The Creative Veggie Critter Snacks recipe is more than just an assembly guide; it is a philosophy of joyful eating and interactive play. By turning raw vegetables and fruits into delightful edible sculptures, you are providing your children with a fun and engaging pathway to a healthier lifestyle. The struggle of snack time can dissolve into shared creative moments, laughter, and a sense of accomplishment. It changes the conversation from “you have to eat your vegetables” to “you get to create with your food.” The resulting glistening, colorful treats are so full of maximum shine and gloss effect that they are drool-worthy and utterly mouth-watering to adults as well, ensuring everyone wants to join in on the fun. So, clear off the counter, set out the ingredients, and prepare for a snack time that is full of wholesome, healthy, and happy discovery!
Creative Veggie Critter Snacks
Ingredients
Equipment
Method
- Clean and cut celery stalks into 3-4 inch logs. Ensure they are completely dry.
- Fill some celery groves with cream cheese and some with peanut butter (or alternative spread).
- **For Snails:** Gently press fruit slices vertically into the filled logs. Referencing the image, snails are shown on peanut butter spread. Use a dab of spread to attach candy eyes to the top of the fruit slice ‘shell’.
- **For Caterpillars:** Halve a grape or tomato for a head, attach eyes using a small spread dab. Lay halved grapes, blueberries, or cucumber slices in segments along a spread-filled log.
- **For Ladybugs:** Place a halved cherry tomato flat onto a cream cheese-filled log. Add a small spread head and attach eyes.
- Arrange the finished ‘critters’ creatively on a clean white surface or on a fun plate. Serve immediately or cover and refrigerate for short-term storage.