Christmas Cake Balls
Festive Christmas Cake Balls: The Ultimate Holiday Truffle
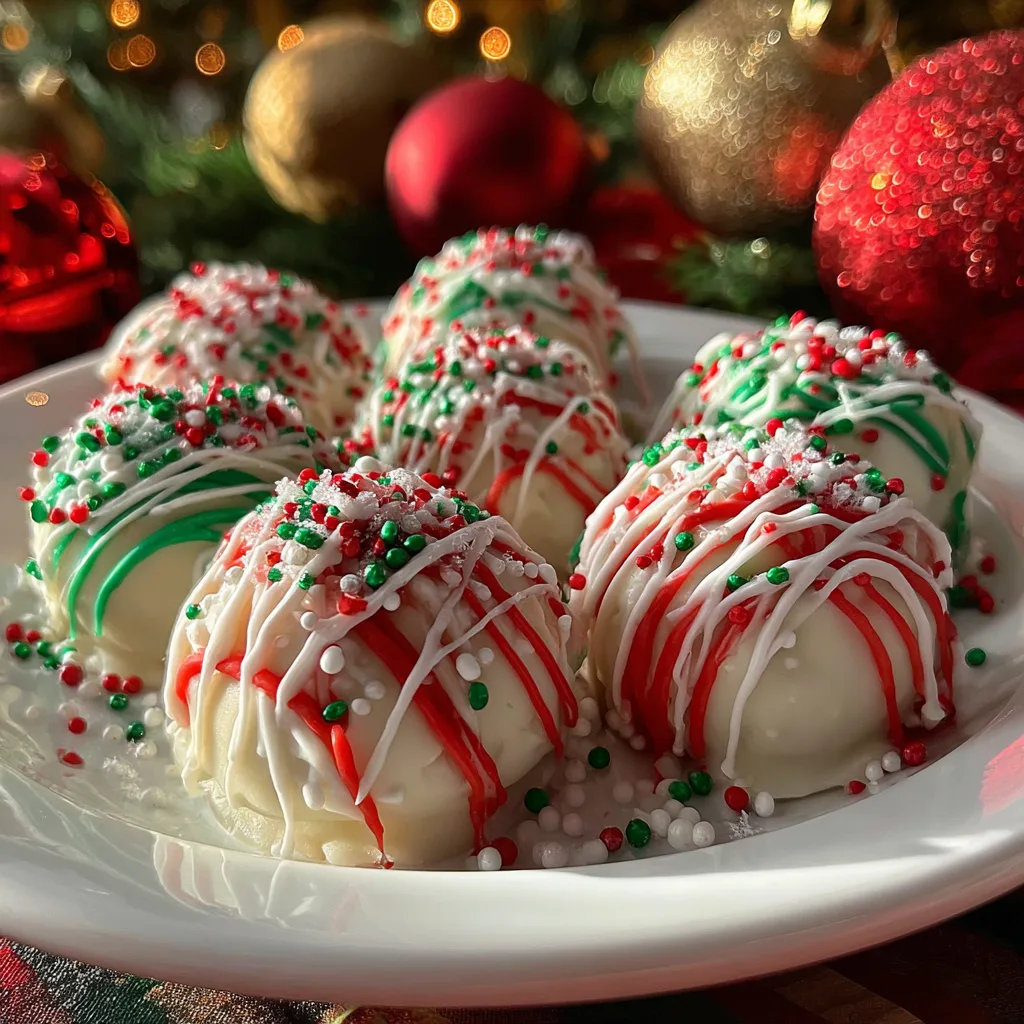
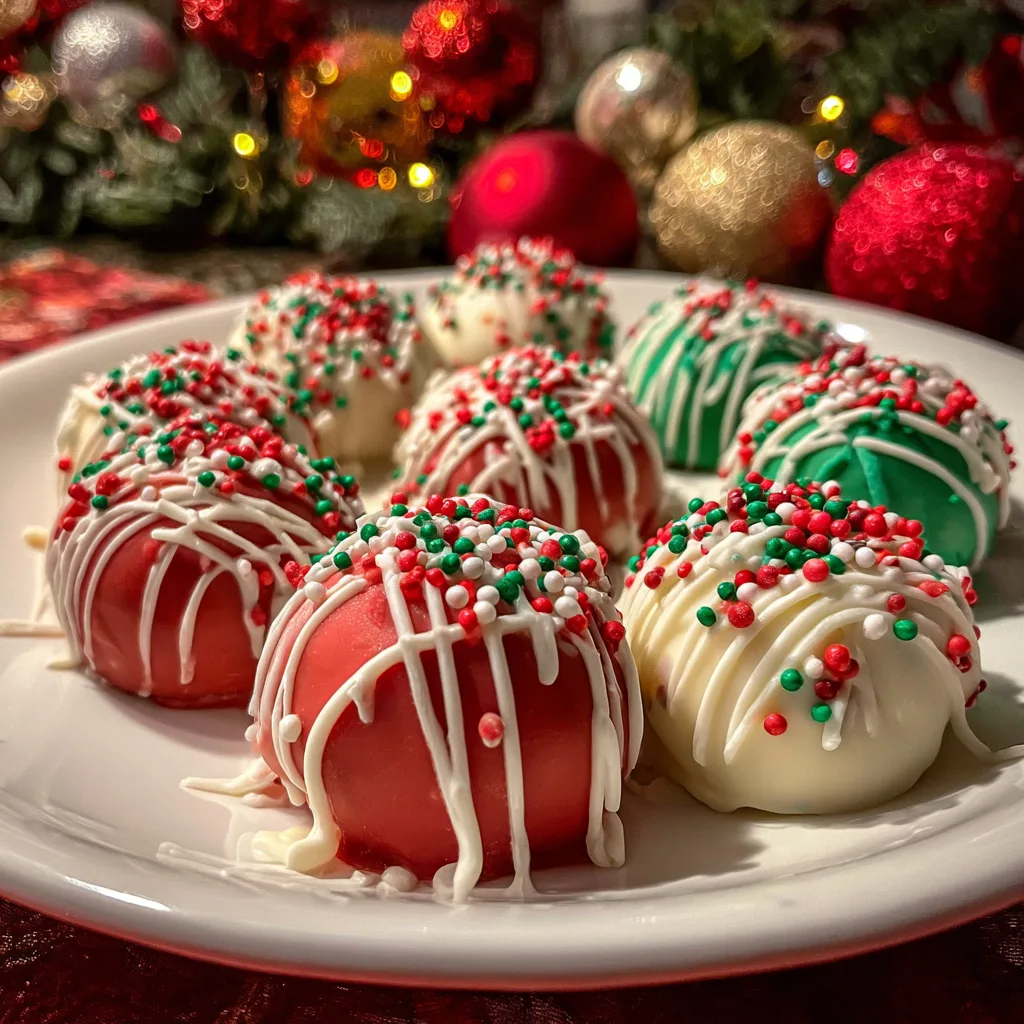
There is a specific kind of magic that happens when you walk into a holiday party and see a platter of bright, colorful, bite-sized treats. Christmas Cake Balls are that magic. They are the perfect combination of moist, tender cake and rich, creamy frosting, all encapsulated in a snappy, sweet candy shell. Looking at the photo above, you can almost taste the satisfying crack of the red, green, and white chocolate coating giving way to the soft, truffle-like center.
These treats—often called cake truffles or “naked” cake pops (because they skip the stick)—are a staple of holiday baking for a reason. They are incredibly versatile, visually stunning, and deceptively easy to make. They look like they came from a high-end chocolatier, with their vibrant colors and professional-looking drizzles, but they are actually a fun, low-stress project that you can do in your own kitchen. Whether you are looking for a gift for neighbors, a standout addition to a cookie exchange, or just a sweet bite to enjoy by the tree, these cake balls are the answer.
In this comprehensive guide, we will walk you through exactly how to achieve that smooth, professional finish, how to keep your cake balls perfectly round, and the secrets to melting candy coating without it seizing up. We will turn your kitchen into Santa’s workshop with this foolproof recipe.
Why This Recipe Is A Holiday Essential
- Make-Ahead Friendly: The holidays are busy. These cake balls actually taste better after sitting for a day, and they freeze beautifully. You can make them weeks in advance and just pull them out when guests arrive.
- Customizable Centers: While the outside is festive red, green, and white, the inside can be anything you want. Red velvet is a classic choice for Christmas, but chocolate, vanilla, gingerbread, or even funfetti work perfectly.
- Kid-Approved: This is a fantastic recipe to make with little helpers. Kids love crumbling the cake, rolling the balls, and shaking the sprinkles over the wet chocolate.
- No Fancy Equipment: You don’t need a candy thermometer or expensive molds. Just a bowl, a fork, and a baking sheet are all you really need to create these gems.
Ingredients Overview
The beauty of this recipe lies in its simplicity. Here is what you need to gather:
The Core Components
- Cake Mix (plus ingredients to bake it): You can use a standard box mix (Red Velvet, Devil’s Food, or Vanilla) or your favorite homemade recipe. The box mix is often preferred for this because it is formulated to be moist and durable.
- Frosting: A tub of store-bought frosting or a batch of homemade buttercream. Cream cheese frosting pairs exceptionally well with red velvet, while chocolate fudge frosting is great for chocolate cake.
The Coating and Decoration
- Candy Melts: To achieve the vibrant red, forest green, and bright white colors seen in the photo, candy melts are the best option. They are vanilla-flavored wafers designed to melt smoothly and harden quickly.
- Vegetable Shortening or Coconut Oil: This is the secret ingredient. Adding a teaspoon of shortening to your melting chocolate thins it out, making it easier to dip and ensuring a smooth, thin shell rather than a thick, clumpy one.
- Sprinkles: Nonpareils (the tiny round balls) in red, white, and green add a festive crunch and hide any imperfections in the coating.
Step-by-Step Instructions
Step 1: Bake and Cool the Cake
Start by baking your cake according to the package directions or your recipe. It doesn’t need to look pretty because you are going to destroy it shortly! Pour the batter into a 9×13 pan for the quickest baking time. Once baked, let it cool completely. This is crucial; if the cake is warm, it will melt the frosting and result in a mushy, greasy mess.
Step 2: The Crumble
This is the fun part. Break the cooled cake into chunks and place them in a large bowl. Using your hands or a stand mixer with a paddle attachment, crumble the cake until it resembles fine breadcrumbs. You don’t want any large dry chunks left.
Step 3: Mix in the Frosting
Add about 1/2 to 3/4 of the container of frosting to the crumbs. Do not add it all at once! Mix it in until the dough comes together and holds its shape when squeezed. It should have the consistency of playdough. If it is too dry, add more frosting. If it is too wet, it will be hard to dip later.
Step 4: Roll and Chill
Using a tablespoon or a small cookie scoop, portion out the dough and roll it between your palms into smooth, tight spheres. Place them on a baking sheet lined with parchment paper.
Crucial Step: Place the baking sheet in the freezer for 20 minutes or the fridge for an hour. The balls need to be firm so they don’t fall apart in the warm chocolate, but not frozen solid (which can crack the candy shell).
Step 5: Melting the Coating
Place your red, green, and white candy melts into separate microwave-safe bowls. Add a teaspoon of shortening or coconut oil to each bowl. Microwave in 30-second intervals at 50% power, stirring thoroughly between each burst. Be patient—overheating will cause the candy to “seize” and become clumpy.
Step 6: The Dip
Remove only a few cake balls from the fridge at a time. Drop a ball into the melted coating. Using a fork, roll it around to coat. Lift it out with the fork and tap the handle of the fork against the edge of the bowl to shake off excess chocolate. Slide the ball off onto the parchment paper using a toothpick.
Step 7: Decorate Immediately
While the coating is still wet, add your sprinkles if you want them embedded in the shell. If you are doing the drizzle method shown in the photo, wait for the base coat to dry completely (about 10 minutes). Then, take a spoon or a piping bag filled with contrasting melted chocolate (e.g., white chocolate over red balls) and drizzle quickly back and forth. Add sprinkles immediately on top of the wet drizzle.
Troubleshooting Common Issues
Problem: My coating is cracking.
Solution: This usually happens because of extreme temperature differences. If you dip a frozen-solid cake ball into hot chocolate, the cake expands as it warms up, cracking the shell. Make sure balls are chilled, not frozen rock-hard.
Problem: The chocolate is too thick.
Solution: Candy melts can be thick. Do not be afraid to add more shortening or specifically sold “candy thinner” (paramount crystals) until it flows like heavy cream.
Problem: “Feet” forming at the bottom.
Solution: This is when chocolate pools at the base. Tapping the fork adequately before placing the ball down helps. You can also wait until they are dry and trim the excess off with a small paring knife for a clean look.
Flavor Variations to Try
- Peppermint Bark: Use chocolate cake, add a teaspoon of peppermint extract to the frosting, and dip in white chocolate. Top with crushed candy canes.
- Gingerbread: Use spice cake mix and mix with cream cheese frosting. Dip in white chocolate and top with a dusting of cinnamon.
- Oreo Truffles: Skip the cake entirely! Crush 36 Oreo cookies (the whole cookie with filling) and mix with an 8oz block of cream cheese. Roll and dip as usual.
- Snowballs: Dip the balls in white chocolate and immediately roll them in sweetened shredded coconut.
Storage and Gifting
Storage: These should be stored in the refrigerator because of the frosting/cream cheese content. They will stay fresh in an airtight container for up to 1 week in the fridge.
Freezing: They freeze exceptionally well. Place them in a freezer-safe bag or container for up to 3 months. Thaw them in the fridge overnight before serving to prevent condensation from ruining the finish.
Gifting: These are delicate, so packaging matters. Place each ball in a mini cupcake liner to keep them from rolling around. Arranging them in a tins or a windowed bakery box makes for a stunning presentation. They are sturdy enough to be transported but should be kept cool so the chocolate doesn’t bloom or melt.
Conclusion
Christmas Cake Balls are more than just a dessert; they are edible ornaments that brighten up any table. The contrast of the crisp shell against the dense, fudgy interior is satisfying every single time. By mixing up the colors—red, green, and white—and getting creative with drizzles and sprinkles, you create a platter that looks incredibly festive and high-effort, despite being quite simple to pull together. So turn on some holiday music, melt that chocolate, and get ready to make the sweetest treat of the season!
Festive Christmas Cake Balls
Ingredients
Equipment
Method
- Bake the cake according to package instructions in a 9×13 pan. Allow to cool completely.
- Crumble the cooled cake into a large bowl until fine crumbs form. No large chunks should remain.
- Mix in 3/4 of the frosting tub. Combine until the mixture holds its shape when rolled. Add more frosting only if needed.
- Roll mixture into 1-inch balls and place on a parchment-lined baking sheet.
- Freeze the balls for 20 minutes to firm up (do not freeze solid).
- Melt candy melts in separate bowls in the microwave at 50% power in 30-second intervals. Stir in a little coconut oil to thin if necessary.
- Dip each chilled cake ball into the coating, tap off excess, and place back on parchment.
- Drizzle with contrasting chocolate colors and top with sprinkles immediately before the coating sets.
- Let set completely before serving or storing in the refrigerator.