Chewy & Festive Christmas Cookie Bars Recipe
The Ultimate Chewy Christmas Cookie Bars Recipe
There is something undeniably magical about the holiday season. Between the twinkling lights, the cozy sweaters, and the gathering of friends and family, the atmosphere is filled with warmth. But let’s be honest: the best part of the holidays is the baking. The smell of vanilla and melted butter wafting through the house is the true scent of Christmas. If you are looking for the perfect treat to anchor your holiday dessert table, look no further than these Christmas Cookie Bars.
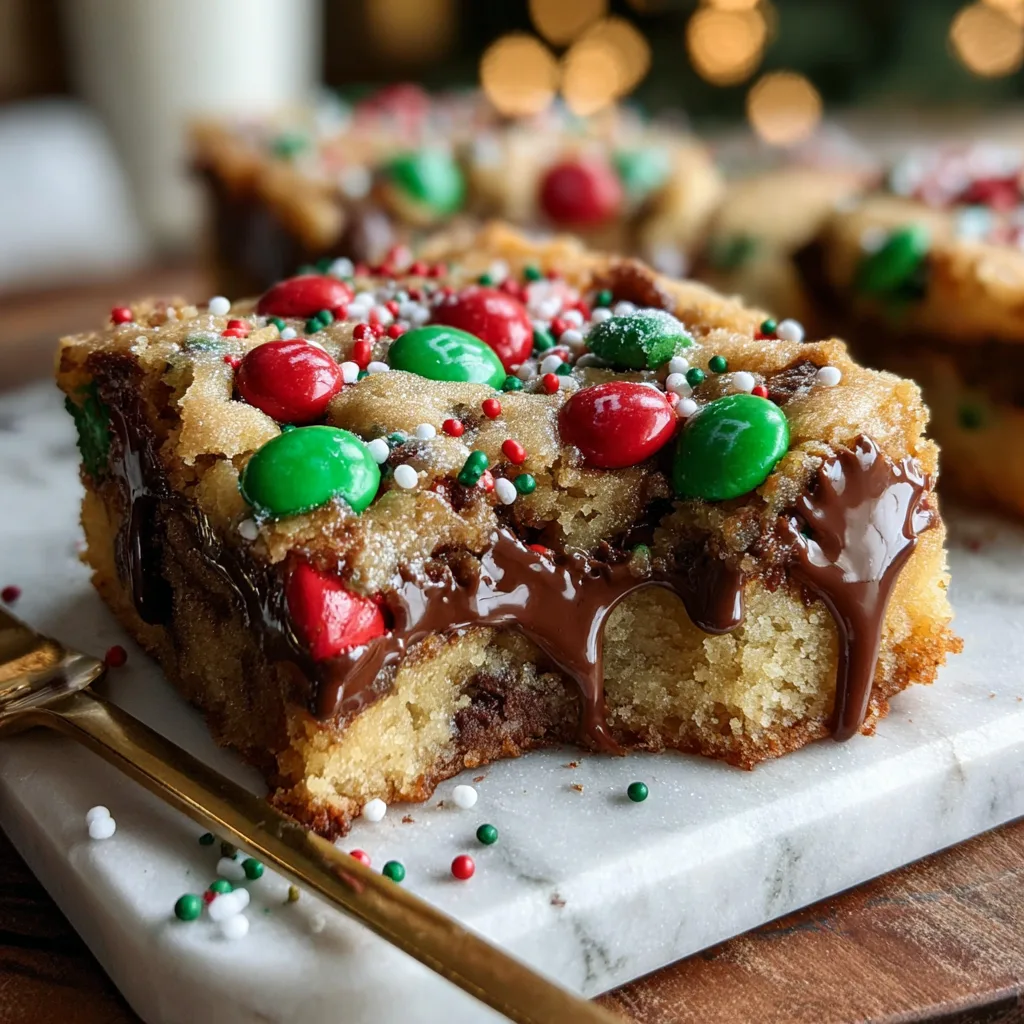
Forget the hassle of scooping individual cookies or worrying about them spreading too much on the pan. These cookie bars—often called blondies—are the easier, thicker, and arguably more delicious cousin of the classic chocolate chip cookie. Loaded with festive holiday M&Ms, sprinkles, and white (or dark!) chocolate chips, they are dense, chewy, and packed with buttery flavor. They require just one bowl, no mixer, and less than 30 minutes of your time. Whether you are a seasoned baker or a complete novice, this recipe is fail-proof and guaranteed to impress.
Why You Will Fall in Love With This Recipe
It is rare to find a recipe that balances ease of preparation with such stunning results. Here is why these bars will become your new holiday tradition:
- No Chilling Required: Unlike many cookie recipes that require hours in the fridge to prevent spreading, this batter goes straight from the bowl to the oven.
- Texture Perfection: If you love the soft, gooey center of a cookie but hate the crispy edges, these bars are for you. Every bite is soft, dense, and fudgy.
- Fully Customizable: While we use holiday M&Ms and sprinkles, you can easily swap mix-ins to suit your taste or whatever you have in your pantry.
- Crowd Pleaser: The bright red and green colors make them instantly festive, perfect for cookie exchanges, office parties, or a treat for Santa.
Ingredients Overview
Great recipes start with great ingredients. The beauty of these Christmas Cookie Bars lies in their simplicity. You likely have most of these items in your pantry right now.
- Unsalted Butter (Melted): Using melted butter is the secret to the chewy, fudgy texture. Creaming solid butter adds air (cakey texture), while melted butter creates density.
- Brown Sugar: This provides moisture and that deep, caramel-like molasses flavor that distinguishes a blondie from a sugar cookie.
- Egg: The binding agent that holds everything together and adds richness.
- Vanilla Extract: A crucial flavor enhancer. Don’t skip it!
- All-Purpose Flour: The structural backbone of the bars. Be careful not to pack it down when measuring.
- Baking Powder: Just a little lift is needed to make them tender without making them cakey.
- Salt: Balances the sweetness and enhances the chocolate flavor.
- Holiday M&Ms: The star of the show! They add crunch, chocolatey goodness, and festive color.
- White Chocolate Chips: These add creamy pockets of sweetness. (Note: You can swap these for semi-sweet chocolate chunks if you prefer a classic cookie taste).
- Sprinkles: Use festive red, green, and white sprinkles (jimmies work best) for that extra holiday “pop.”
Step-by-Step Instructions
Follow these simple steps to achieve cookie bar perfection. No fancy equipment needed!
1. Preheat and Prep
Start by preheating your oven to 350°F (175°C). This standard baking temperature ensures the bars bake evenly without burning the edges. Line an 8×8-inch baking pan with parchment paper. Leave a little overhang on the sides—this acts as a “sling” to easily lift the bars out once they are cooled.
2. Mix the Wet Ingredients
In a medium to large mixing bowl, combine your melted butter and brown sugar. Whisk them together vigorously until the mixture is smooth and combined. It should look like wet sand. Add the egg and vanilla extract, mixing again until the batter is glossy and smooth.
3. Incorporate the Dry Ingredients
Add the flour, baking powder, and salt directly into the wet mixture. Switch to a rubber spatula or wooden spoon and mix until just combined. Important Tip: Stop mixing as soon as the flour streaks disappear. Over-mixing develops gluten, which can make your bars tough instead of tender.
4. Fold in the Mix-ins
This is the fun part! Gently fold in your holiday M&Ms, white chocolate chips, and sprinkles. Reserve a small handful of M&Ms and sprinkles to press onto the top of the batter before baking—this ensures they look pretty and colorful when they come out of the oven.
5. Bake to Perfection
Pour the thick batter into your prepared pan and spread it into an even layer using your spatula. Top with the reserved candies. Bake for 20–25 minutes. The top should be golden and set, but the center might still look slightly soft. Do not overbake! They will continue to firm up as they cool.
6. Cool and Slice
Let the bars cool completely in the pan. This takes patience, but cutting them while hot will result in a messy crumble. Once cool, lift them out using the parchment paper and slice into 9 large squares or 16 smaller bites.
Expert Baking Tips for the Best Results
Even with a simple recipe, a few tricks can take your baking from “good” to “bakery-level professional.”
Measure Flour Correctly
The most common baking mistake is using too much flour, which leads to dry, crumbly bars. If you don’t have a kitchen scale, use the “spoon and level” method: spoon flour into your measuring cup and level it off with a knife. Never scoop the cup directly into the flour bag.
Don’t Overbake
Blondies and cookie bars are meant to be gooey. Pull them out of the oven when the edges are golden brown and pull away slightly from the sides, even if the middle looks a tad underdone. The residual heat from the pan will finish the job.
Room Temperature Egg
While the butter is melted, having your egg at room temperature helps it emulsify better into the batter, creating a smoother, more uniform texture. If you forgot to take the egg out, place it in a bowl of warm water for 5 minutes.
Variations and Customizations
This recipe is a blank canvas for your creativity. Here are some delicious variations to try:
Salted Caramel & Pretzel: Swap the white chocolate for caramel bits and add 1/2 cup of crushed pretzels for a sweet and salty twist.
Double Chocolate: Add 2 tablespoons of cocoa powder to the flour and swap brown sugar for white sugar for a brownie-like base.
Nutty Crunch: Add 1/2 cup of chopped walnuts or pecans. The nuttiness pairs beautifully with the brown sugar and butter.
Peppermint Bark: Swap the M&Ms for crushed candy canes and use dark chocolate chunks alongside white chocolate chips.
Serving and Storage Suggestions
Serving Ideas
These bars are rich enough to stand on their own, but if you want to elevate your dessert game, try serving them warm with a scoop of vanilla bean ice cream. A drizzle of hot fudge or caramel sauce creates a decadent sundae experience.
Storage Instructions
Room Temperature: Store the cooled bars in an airtight container on the counter for up to 5 days. Add a slice of white bread to the container to keep them extra soft.
Freezing: These bars freeze beautifully! Wrap individual bars in plastic wrap and place them in a freezer-safe bag. They can be frozen for up to 3 months. Thaw at room temperature for an hour before eating.
The History of the Cookie Bar
While we often think of the cookie bar as a modern convenience, its ancestor, the “blondie,” actually predates the chocolate chip cookie. Recipes for molasses-flavored bars date back to the late 19th century, long before chocolate became a staple baking ingredient. The addition of M&Ms and holiday colors is a modern American twist that celebrates the festive spirit of abundance and joy.
Frequently Asked Questions
Can I double this recipe?
Yes! You can double the ingredients and bake it in a 9×13-inch pan. You may need to add 5–8 minutes to the baking time.
Why are my bars greasy?
This usually happens if the butter was too hot when mixed with the sugar, causing the fat to separate. Make sure your melted butter has cooled slightly before mixing.
Can I use margarine instead of butter?
Technically yes, but we don’t recommend it. Butter provides a flavor and mouthfeel that oil-based margarine simply cannot replicate.

Conclusion
These Christmas Cookie Bars are more than just a dessert; they are a bite of holiday cheer. With their vibrant colors, rich buttery flavor, and irresistibly chewy texture, they are sure to become a requested favorite year after year. So put on your favorite holiday playlist, grab your mixing bowl, and get ready to bake some memories. Happy Holidays!
Christmas Cookie Bars
Ingredients
Equipment
Method
- Preheat oven to 350°F (175°C) and line an 8×8-inch pan with parchment paper.
- Mix wet ingredients: In a medium bowl, stir melted butter, brown sugar, egg, and vanilla until smooth.
- Add dry ingredients: Mix in flour, baking powder, and salt until combined.
- Fold in M&Ms, white chocolate chips, and sprinkles.
- Bake for 20–25 minutes, or until golden and set in the center.
- Cool & slice: Let cool completely in the pan before cutting into bars.