Galaxy Swirl Fudge
Magical Galaxy Swirl Fudge: A Sparkly, Sweet Escape
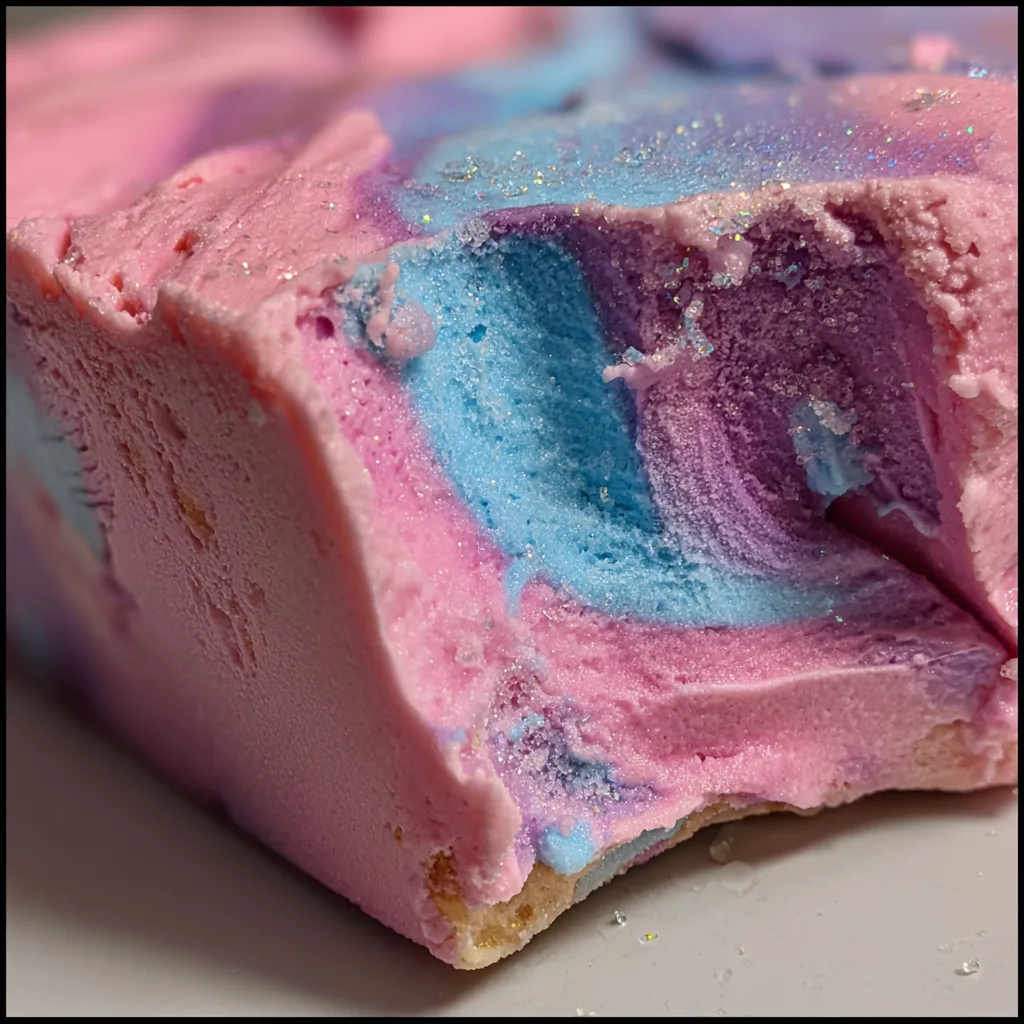
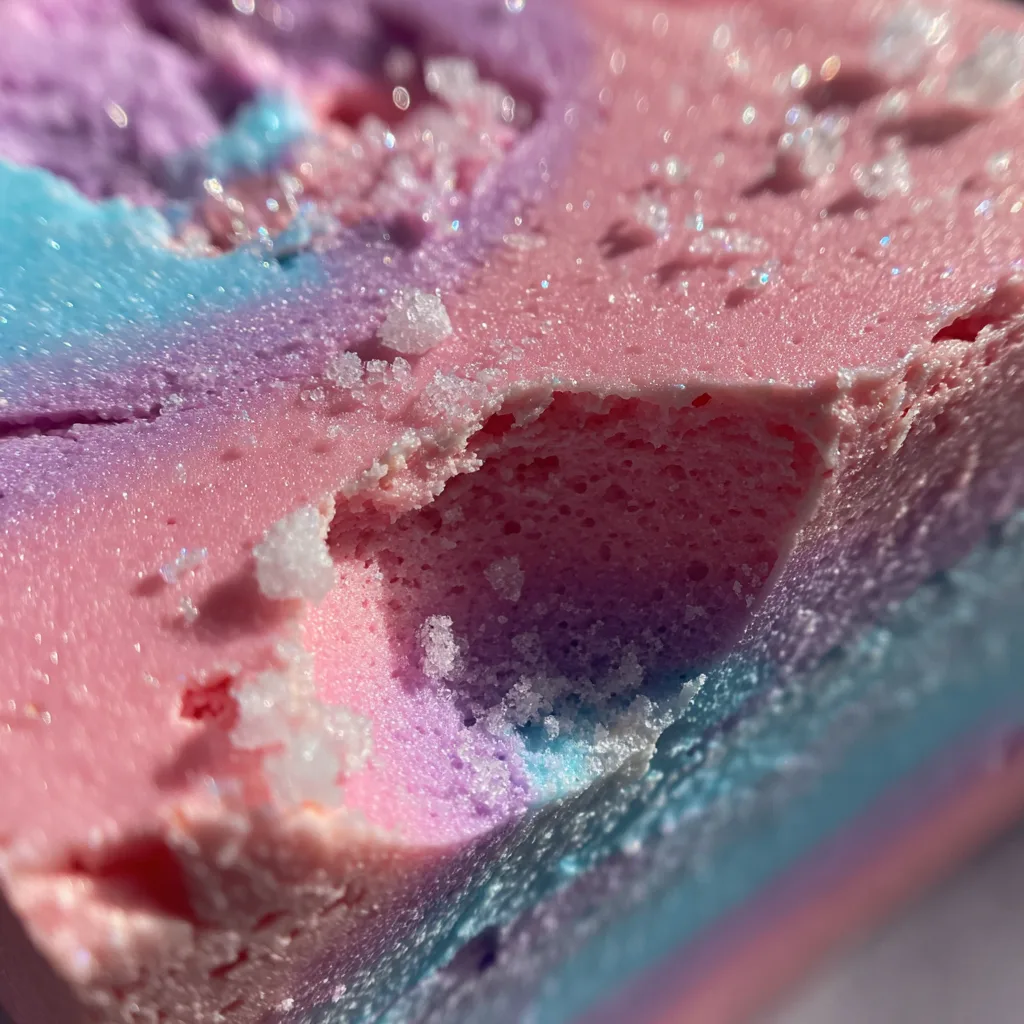
There are desserts that taste good, and then there are desserts that transport you to another dimension entirely. This Magical Galaxy Swirl Fudge is firmly in the latter category. With its mesmerizing swirls of electric pink, deep cosmic purple, and vibrant cyan blue, all dusted with a generous layer of edible stardust, this treat is a feast for the eyes before it ever touches your tongue. But don’t let the show-stopping appearance fool you—underneath that glittering exterior lies a dense, creamy, and deeply satisfying white chocolate fudge that melts in your mouth.
Whether you are throwing a unicorn-themed birthday party, looking for a fun weekend project with the kids, or simply craving a sweet treat that looks as good as it tastes, this recipe is your golden ticket. The best part? It requires no candy thermometer, no complex tempering of chocolate, and can be whipped up in less than 20 minutes. It is the ultimate low-effort, high-reward confection that promises to impress every single time.
Why You Will Love This Recipe
Fudge can be an intimidating confection for many home cooks. Traditional recipes often require precise temperature control, boiling sugar syrups to the “soft-ball stage,” and vigorous beating to achieve the right texture. This recipe, however, bypasses all that stress. Here is why it will become a staple in your kitchen:
- No Candy Thermometer Needed: We use the “cheat’s method” involving sweetened condensed milk and white chocolate, ensuring a perfect set every time without the fuss of boiling sugar.
- Endlessly Customizable: While we are aiming for a galaxy look here, you can easily swap the colors for holiday themes (red and green for Christmas, orange and black for Halloween) or flavor extracts.
- Visual Masterpiece: The addition of edible glitter and the marbling technique makes every single square unique. No two pieces of galaxy fudge look the same, making it a truly artistic endeavor.
- Perfect for Gifting: Because it is so dense and shelf-stable, this fudge packages beautifully. Wrap a few squares in cellophane, tie with a silver ribbon, and you have a handmade gift that looks professionally made.
Ingredients Overview
To create this interstellar treat, you only need a handful of accessible ingredients. However, quality matters when working with simple confections.
- White Chocolate Chips (3 cups): This form the base of your fudge. Use high-quality white chocolate chips like Ghirardelli or Guittard if possible. Cheaper brands often contain more oil and less cocoa butter, which can lead to a greasy separation or a refusal to set properly.
- Sweetened Condensed Milk (14 oz can): This is the magic binder. It provides the sugar and the creaminess needed to turn the chocolate into a sliceable fudge. Do not confuse this with evaporated milk; they are not interchangeable!
- Unsalted Butter (3 tbsp): A touch of butter adds a glossy sheen to the fudge and helps to smooth out the texture, preventing it from being too sticky.
- Vanilla Extract (1 tsp): White chocolate can be very sweet on its own. A splash of high-quality vanilla adds depth and rounds out the flavor profile.
- Gel Food Coloring: You will need Pink, Blue, and Purple. Crucial Tip: You must use gel food coloring, not liquid water-based coloring. Liquid coloring can cause the chocolate to “seize” (turn into a grainy, hard lump) instantly. Gel coloring is concentrated and won’t disrupt the fat ratio of the chocolate.
- Edible Glitter / Lustre Dust: This is the finishing touch that gives the fudge its “galaxy” appearance. Look for “edible glitter” or “disco dust” in the baking aisle or craft store. Ensure it is labeled as food-safe.
- Salt (pinch): Just a tiny pinch of fine sea salt helps to cut through the intense sweetness of the white chocolate and condensed milk.
Equipment You Will Need
Having the right tools ready before you start is key, as fudge sets quickly once the chocolate is melted.
- 8×8 inch Square Baking Pan: The standard size for a thick, substantial square of fudge.
- Parchment Paper or Aluminum Foil: To line the pan for easy removal.
- Medium Microwave-Safe Bowl: For melting the base mixture.
- Three Small Bowls: For mixing the individual colors.
- Rubber Spatula: Essential for scraping the bowl and folding the mixture.
- Toothpick or Skewer: The tool you will use to create the beautiful marble swirls.
Step-by-Step Instructions
Follow these steps closely to achieve that perfect, creamy consistency and stunning swirl.
1. Prepare Your Station
Start by lining your 8×8 inch baking pan with parchment paper or aluminum foil. Leave a bit of overhang on the sides so you can easily lift the fudge out later. If using foil, lightly grease it with butter or cooking spray to ensure nothing sticks.
2. Melt the Base
In a large, microwave-safe bowl, combine the 3 cups of white chocolate chips, the 14 oz can of sweetened condensed milk, and the 3 tbsp of unsalted butter. Microwave in 30-second intervals. After each interval, stop and stir vigorously. It usually takes about 90 seconds to 2 minutes total. Stop heating when most chips are melted and stir until the residual heat melts the rest. The mixture should be smooth and glossy. Stir in the vanilla extract and the pinch of salt.
3. Divide and Color
Working quickly (the fudge will start to thicken as it cools), divide the white fudge mixture into four parts. Keep one part white in the main bowl. Scoop the other three parts into small separate bowls. Add a drop or two of pink gel coloring to one bowl, blue to the second, and purple to the third. Stir each until the color is uniform.
4. Layer the Colors
Drop spoonfuls of the different colored mixtures randomly into the prepared pan. Alternate between pink, blue, purple, and the reserved white mixture. It should look like a patchwork quilt of colors in the pan. Do not smooth it out yet.
5. Create the Galaxy Swirl
Take your skewer or a butter knife and drag it through the dollops of fudge in a figure-eight or “S” pattern. Be careful not to over-mix! If you mix too much, the colors will muddy together and turn gray. You want distinct ribbons of color. Once you are happy with the swirl, gently tap the pan on the counter to level the surface.
6. Add the Stardust
While the fudge is still wet and tacky, generously sprinkle the top with your edible glitter or lustre dust. You can use silver stars, holographic dust, or pearl shimmer to mimic the night sky.
7. Set and Serve
Place the pan in the refrigerator for at least 2 to 3 hours, or until the fudge is completely firm. Once set, lift the fudge out of the pan using the parchment paper overhang. Place on a cutting board and cut into small squares. (Tip: Dip your knife in hot water and wipe it dry between cuts for super clean edges).
Tips for Success
Even though this recipe is simple, a few technical details make the difference between good fudge and great fudge.
Avoid Seizing the Chocolate
Water is the enemy of melting chocolate. Ensure your bowls and spoons are completely dry before you start. Even a single drop of water can cause the chocolate to clump up into a gritty paste. This is also why we insist on gel food coloring rather than liquid.
Don’t Overheat
White chocolate burns much faster than dark chocolate because of its high milk solid content. If you microwave it for too long, it will turn yellow and chunky. Slow and steady wins the race—stirring does more of the work than the heat does.
The Texture Factor
If you prefer a softer fudge, you can add an extra tablespoon of butter. If you want a harder, drier fudge that can withstand being out at room temperature for longer periods, stick to the recipe as written. The texture shown in the image is dense and slightly crumbly—a sign of a well-set sugar structure.
Variations and Serving Ideas
Flavor Infusions:
While vanilla is classic, you can match the flavor to the fun colors. A few drops of Cotton Candy flavoring or Bubblegum extract make this a hit with kids. For a more sophisticated palate, try a drop of lavender oil in the purple section.
Add-Ins:
To add texture, consider folding in some popping candy (Pop Rocks) right at the end for a fizzy surprise that mimics exploding stars! You could also add rainbow sprinkles or small star-shaped sugar confetti.
The “Midnight” Version:
For a darker galaxy look, use dark chocolate for half the batter and color the white chocolate sections with deep blue and purple. The contrast between the almost-black dark chocolate and the neon swirls creates a stunning “deep space” effect.
Storage and Freezing
Room Temperature:
This fudge can be stored in an airtight container at room temperature for up to 1 week. Keep it in a cool, dry place away from direct sunlight, which can melt the fats and fade the colors.
Refrigerator:
For longer storage, keep the fudge in the fridge for up to 3 weeks. Cold fudge is delicious, having a texture similar to a firm truffle. Let it sit for 10 minutes before eating if you prefer it softer.
Freezing:
Galaxy fudge freezes exceptionally well. Wrap individual pieces in plastic wrap and then place them in a freezer bag. They will keep for up to 3 months. Thaw in the refrigerator overnight before serving.
Common Questions (FAQ)
Why is my fudge oily?
If pools of oil appear on top of your fudge, the mixture may have gotten too hot or was stirred too vigorously, causing the cocoa butter to separate. You can try to blot it with a paper towel, but next time, heat more gently.
Why is my fudge soft and not setting?
This usually happens if not enough chocolate was used relative to the condensed milk, or if low-quality “white baking chips” (which contain no cocoa butter) were used. Ensure you are measuring your chocolate chips correctly.
Can I use liquid food coloring?
It is highly risky. Liquid food coloring contains water, which causes chocolate to seize. If you absolutely cannot find gel coloring, try mixing the liquid color with the condensed milk before adding the chocolate chips, though gel is still the safest bet.
Conclusion
This Magical Galaxy Swirl Fudge is more than just a dessert; it is an experience. From the satisfying process of swirling the vibrant colors to the joy of seeing the glitter catch the light, it brings out the inner child in everyone. Whether you are an experienced baker or a kitchen novice, this recipe offers a foolproof way to create something spectacular. So grab your sprinkles, melt that chocolate, and prepare for blast-off into a universe of sweetness!
Magical Galaxy Swirl Fudge
Ingredients
Equipment
Method
- Line an 8×8 inch square baking pan with parchment paper or foil. If using foil, grease lightly with butter.
- In a large microwave-safe bowl, combine white chocolate chips, sweetened condensed milk, and butter.
- Microwave in 30-second intervals, stirring vigorously between each heat, until the mixture is completely melted and smooth (approx 90 seconds total).
- Stir in the vanilla extract and salt.
- Divide the mixture: Keep one quarter in the main bowl (white), and divide the rest into three small bowls.
- Tint the small bowls with pink, blue, and purple gel coloring respectively. Stir quickly to combine.
- Drop spoonfuls of each color (and the white) randomly into the prepared pan to create a patchwork effect.
- Run a toothpick or knife through the mixture in a swirling motion to marble the colors. Do not overmix.
- Immediately sprinkle generously with edible glitter.
- Refrigerate for at least 2-3 hours until firm. Remove from pan and cut into squares.