Banana Pudding Truffles
The Ultimate Spring Treat: Banana Pudding Easter Truffles
When the long, dark days of winter finally begin to fade and the first signs of spring emerge, our culinary cravings naturally shift. We move away from the heavy, spiced cakes and deep chocolate logs of December, leaning instead toward lighter, brighter, and more playful flavors. Easter and the surrounding spring months are a time of renewal, and dessert tables everywhere reflect this with vibrant pastel colors, fresh fruit flavors, and whimsical presentations. Among the myriad of spring confections, one treat stands out as an absolute crowd-pleaser: Banana Pudding Easter Truffles. These delightful, bite-sized morsels capture the soul-comforting nostalgia of a classic Southern banana pudding and wrap it up in an elegant, portable, and incredibly festive package.
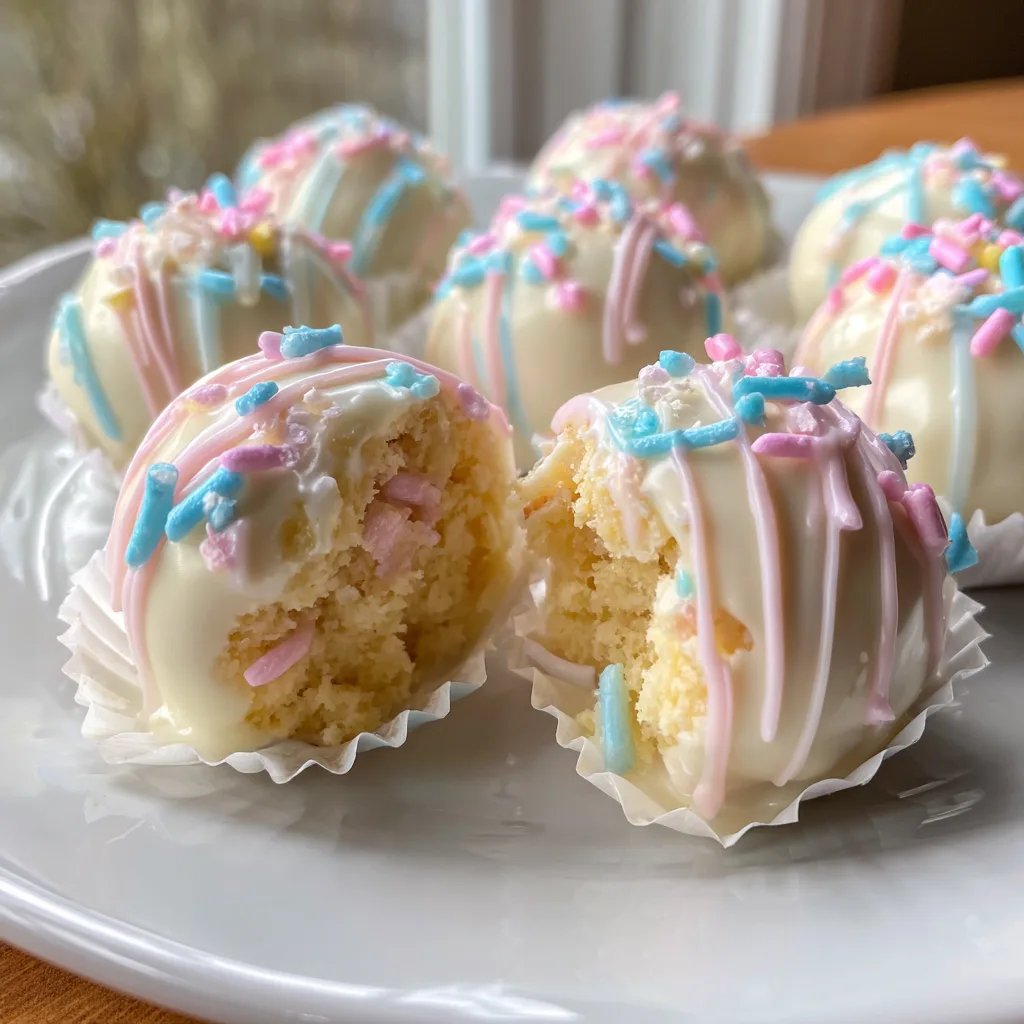
If you have never experienced a dessert truffle made from crushed cookies and cream cheese, you are in for a transformative culinary experience. The concept takes the beloved flavor profile of banana pudding—sweet vanilla wafers, rich cream, and distinct banana sweetness—and condenses it into a dense, fudgy, cake-pop-like center. This rich interior is then enrobed in a crisp, sweet white chocolate shell and adorned with a shower of pastel pink, blue, and yellow sprinkles. The resulting contrast between the snappy candy coating and the soft, creamy interior is nothing short of addictive. Whether you are hosting a formal Easter Sunday brunch, looking for a fun kitchen project to do with kids, or simply want a delicious bite to accompany your afternoon coffee, these Banana Pudding Easter Truffles are guaranteed to become a seasonal staple in your recipe repertoire.
The Magic of No-Bake Desserts for Busy Holidays
Holidays are notoriously stressful times for home cooks. Between preparing a large main course, coordinating side dishes, and entertaining guests, the thought of meticulously measuring flour, monitoring oven temperatures, and worrying about whether a cake will rise properly can be overwhelming. This is where the magic of no-bake desserts comes into play. Banana Pudding Easter Truffles are completely no-bake, requiring only a food processor (or a rolling pin and a ziplock bag), a mixing bowl, and a microwave to melt the chocolate.

Because there is no baking involved, these truffles are virtually foolproof. You do not have to worry about over-baking or under-baking. You are simply mixing pre-cooked and safe-to-eat ingredients until they reach a pliable, dough-like consistency. Furthermore, this recipe is an excellent make-ahead option. You can prepare the truffle centers days in advance, keeping them chilled in the refrigerator, and dip them in chocolate the day before your event. This flexibility allows you to reclaim your time on the actual holiday, ensuring you can mingle with your family and friends rather than being sequestered in the kitchen.
Deconstructing the Flavor: Why Banana Pudding Works as a Truffle
To understand why these truffles are so successful, we must look at the anatomy of traditional banana pudding. A classic Southern banana pudding relies on layers of vanilla custard (or pudding), fresh sliced bananas, and vanilla wafer cookies, topped with meringue or whipped cream. Over time, as the dessert sits in the refrigerator, the cookies absorb the moisture from the pudding, softening into a cake-like texture while simultaneously flavoring the pudding with their buttery vanilla notes.
This truffle recipe mimics that exact aging process instantly. By crushing vanilla wafer cookies into fine crumbs and mixing them with cream cheese and instant banana pudding mix, we create a dense dough that perfectly replicates the flavor and texture of a well-rested banana pudding. The cream cheese provides the necessary fat and moisture to bind the cookie crumbs, while also offering a subtle tanginess that cuts through the sweetness of the pudding mix and the white chocolate coating. The instant pudding mix acts as the primary flavor agent, delivering that unmistakable, nostalgic banana punch without the extra moisture of fresh bananas, which would cause the truffles to become soggy and spoil quickly.
Ingredients You Will Need
The beauty of this recipe lies in its short, accessible ingredient list. You can easily find these items at any local grocery store.
- – Vanilla Wafer Cookies: You will need one standard-sized box. These provide the structural base and the classic buttery vanilla flavor.
- – Cream Cheese: One standard brick, softened to room temperature. This acts as the binder. Do not use whipped cream cheese or low-fat spread, as the moisture content is different and will affect the texture.
- – Instant Banana Cream Pudding Mix: One small box of the dry mix. Do not prepare the pudding according to the box directions; you will be using the dry powder straight from the packet to flavor the dough.
- – White Chocolate Baking Chips or Candy Melts: For the outer shell. Candy melts (like almond bark or vanilla melting wafers) are often easier to work with for beginners as they melt smoothly and harden quickly without needing to be tempered.
- – Coconut Oil or Shortening: Just a small amount to thin the melted chocolate, making it easier to dip the truffles and creating a thinner, more professional-looking shell.
- – Pastel Easter Sprinkles: Jimmies, nonpareils, or shaped sprinkles in light pinks, blues, yellows, and purples to give the truffles their festive holiday appearance.
Step-by-Step Instructions: Creating Your Truffles
Follow these simple steps to achieve perfectly round, beautifully coated Banana Pudding Easter Truffles.
- Crush the Cookies: Place the entire box of vanilla wafer cookies into the bowl of a food processor. Pulse until the cookies are reduced to fine, sandy crumbs. If you do not have a food processor, place the cookies in a heavy-duty zip-top bag, seal it tightly with the air removed, and crush them with a rolling pin or heavy skillet until fine.
- Mix the Dough: In a large mixing bowl, combine the softened cream cheese, the dry instant banana pudding mix, and the crushed cookie crumbs. Use a hand mixer on low speed, or a sturdy wooden spoon, to blend the ingredients together. Keep mixing until a thick, cohesive dough forms and no dry powdery streaks remain. The mixture will be quite thick and slightly sticky.
- Portion and Roll: Line a baking sheet with parchment paper or a silicone baking mat. Using a small cookie scoop or a measuring tablespoon, scoop out equal portions of the dough. Roll each portion between the palms of your hands to form a smooth, round ball. Place the formed balls onto the prepared baking sheet.
- Chill the Centers: This is a crucial step. Place the baking sheet of truffles into the refrigerator for at least 1 to 2 hours, or into the freezer for 30 minutes. The truffles must be firm and cold before dipping, otherwise they will fall apart in the warm chocolate.
- Melt the Coating: In a microwave-safe bowl, combine the white chocolate chips or candy melts with a teaspoon of coconut oil. Microwave in 30-second intervals at 50% power, stirring vigorously after each interval. Continue until the chocolate is completely smooth and liquid. Do not overheat, or the white chocolate will seize and become clumpy.
- Dip the Truffles: Remove the chilled truffles from the fridge. Drop one truffle into the melted chocolate. Use a fork to roll it around until completely coated. Lift the truffle out with the fork, tapping the handle of the fork gently against the side of the bowl to allow excess chocolate to drip off. Carefully slide the coated truffle back onto the parchment paper.
- Decorate Immediately: White chocolate hardens quickly, especially when applied to a cold truffle center. Immediately after placing the dipped truffle on the parchment, sprinkle the top generously with your pastel Easter sprinkles. Do not wait to dip all the truffles before adding sprinkles, or the chocolate will have already set.
- Set and Serve: Allow the truffles to sit at room temperature until the chocolate shell is completely hardened. If your kitchen is warm, you can place them back in the refrigerator for 10 minutes to speed up the setting process. Once set, transfer them to mini paper cupcake liners for an elegant presentation.
Pro-Tips for the Perfect Chocolate Dip
Dipping truffles can sometimes be frustrating for home bakers, but a few simple tricks can yield professional-looking results. First, always make sure your truffles are cold. If they are warm, they will melt into the chocolate, creating a crumbly, unappealing mess in your dipping bowl. However, do not leave them in the freezer so long that they are rock solid, as the extreme temperature difference can cause the white chocolate shell to crack as it sets and the truffle center expands slightly upon thawing.
When melting white chocolate, patience is key. White chocolate is notoriously temperamental because it contains milk solids and no cocoa solids, making it highly susceptible to burning or seizing if exposed to too much heat or even a tiny drop of water. Always use 50% power on your microwave, and stir long after you think you should stop; the residual heat of the bowl will often melt the remaining lumps. Using a dipping tool or a standard fork is essential. The tines of the fork allow the excess chocolate to drain away. To prevent “feet” (the little puddles of chocolate that form at the base of the truffle when placed on the parchment), gently scrape the bottom of the fork against the lip of the bowl before transferring the truffle to the paper.
Creative Variations and Add-Ins
While this recipe is phenomenal as written, it serves as an excellent blank canvas for your own culinary creativity. If you want to elevate the banana flavor, you can incorporate freeze-dried bananas. Simply crush a handful of freeze-dried banana slices into a powder and mix it in with the crushed cookies. Unlike fresh bananas, freeze-dried bananas will not add excess moisture that could ruin the texture of the truffle, but they will provide an intense, authentic banana flavor.
You can also experiment with different cookie bases. Golden Oreos or shortbread cookies can be substituted for the vanilla wafers for a slightly different flavor profile. If you want to add a textural surprise, fold half a cup of finely chopped, toasted pecans or walnuts into the dough before rolling it into balls. For the coating, if you find white chocolate too sweet, you can dip the truffles in dark or semi-sweet chocolate. The bitterness of the dark chocolate pairs beautifully with the sweet, creamy banana center.
Storage and Make-Ahead Instructions
Banana Pudding Easter Truffles are the ultimate make-ahead dessert. Because they contain cream cheese, they must be stored in the refrigerator. Place the fully set truffles in an airtight container, separating layers with parchment or wax paper to prevent them from scuffing each other. They will keep beautifully in the refrigerator for up to one week. In fact, many people find that the flavor actually improves and deepens after a day or two in the fridge.
If you need to prepare them further in advance, these truffles freeze exceptionally well. Place them in a freezer-safe, airtight container, again separating layers with parchment paper. They can be frozen for up to two months. When you are ready to serve them, simply transfer the container to the refrigerator and let them thaw overnight. They can be eaten straight from the fridge for a crisp, cool treat, or allowed to sit at room temperature for 15 minutes to soften the center slightly before serving.
Serving Suggestions for Your Spring Gatherings
Presentation is everything when it comes to holiday desserts. Serving these Banana Pudding Easter Truffles in mini fluted paper liners (often sold as mini cupcake or candy liners) not only makes them look like they came from a high-end confectionery, but it also makes them incredibly easy for guests to pick up without getting chocolate on their fingers. Arrange them on a tiered dessert stand alongside other spring treats like lemon bars, pastel macarons, and fresh berries for a stunning centerpiece.
These truffles also make wonderful edible gifts. Place a half dozen of them in a small, clear cellophane bag, tie it with a pastel ribbon, and add a decorative tag. They are perfect for Easter baskets, hostess gifts, or sweet favors for a spring baby shower or bridal brunch. No matter how you choose to serve them, these Banana Pudding Easter Truffles are sure to spark joy and leave your guests asking for the recipe.
Banana Pudding Easter Truffles
Ingredients
Equipment
Method
- Crush the vanilla wafer cookies into fine crumbs using a food processor or a ziplock bag and rolling pin.
- In a large bowl, mix the softened cream cheese, dry banana pudding mix, and crushed cookies until a thick dough forms.
- Scoop out tablespoon-sized portions and roll them into smooth balls. Place on a parchment-lined baking sheet.
- Chill the truffles in the refrigerator for at least 1 hour, or freezer for 30 minutes until firm.
- In a microwave-safe bowl, melt the white chocolate and coconut oil in 30-second increments at 50% power, stirring well until smooth.
- Dip each chilled truffle into the melted white chocolate, tapping off the excess. Place back on the parchment paper.
- Immediately top with pastel sprinkles before the white chocolate sets.
- Allow truffles to set completely at room temperature or in the fridge. Store in an airtight container in the refrigerator.