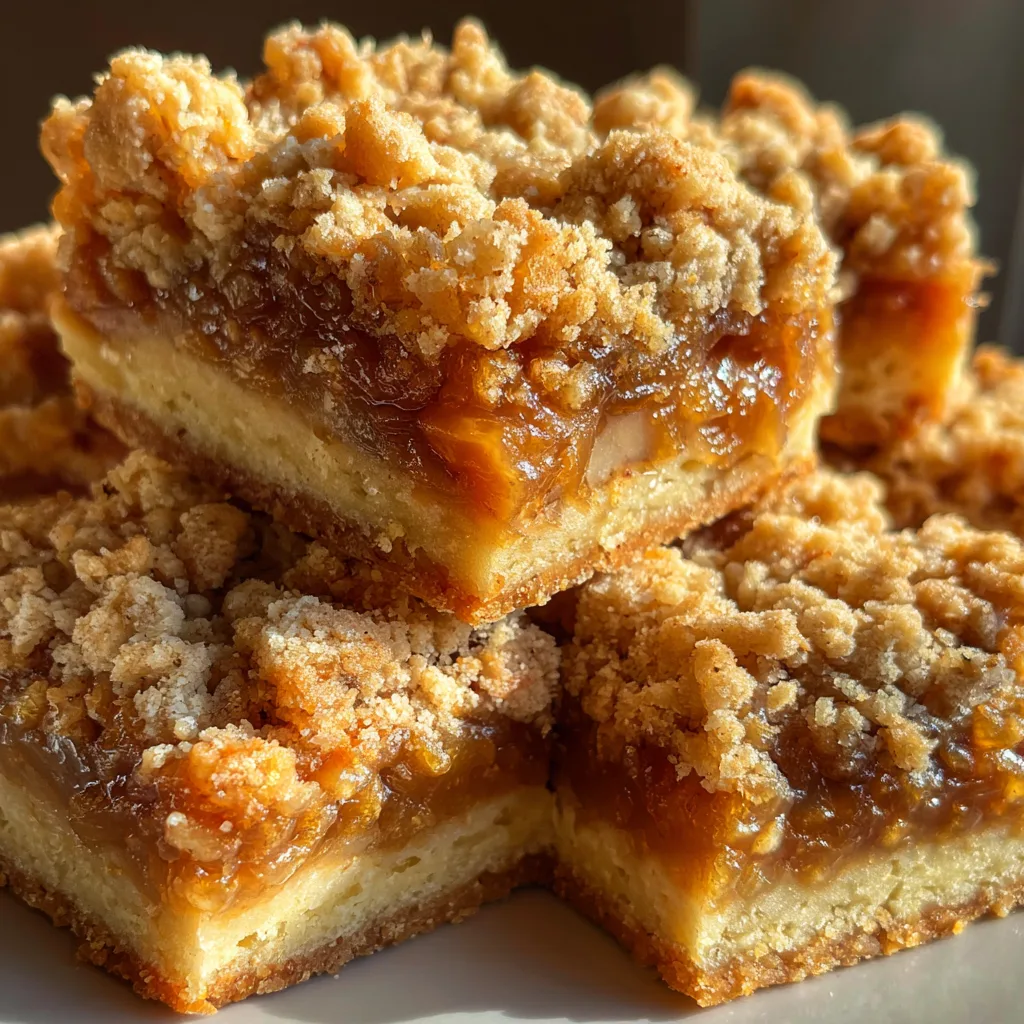
Caramel Apple Crumb Bars
The Ultimate Caramel Apple Crumb Bars Recipe
There is something undeniably magical about the aroma of cinnamon, sweet apples, and buttery pastry baking in the oven. It is the scent of comfort, of cozy afternoons, and of nostalgic family gatherings. If you are looking for a dessert that captures all the warm, spiced goodness of a traditional apple pie but with half the effort and double the buttery streusel, you have found it in these Ultimate Caramel Apple Crumb Bars. These portable, shareable treats offer a symphony of textures and flavors that will have everyone asking for the recipe.
In this comprehensive guide, we are going to dive deep into the art of making the perfect apple crumb bar. From mastering the versatile dough that doubles as both the base and the topping, to creating a spiced apple filling that achieves the perfect jammy consistency without making the crust soggy, every detail matters. Whether you are an experienced baker looking for a reliable go-to recipe or a beginner wanting to impress your friends at the next potluck, this article will walk you through every single step, tip, and trick you need to know.
The Anatomy of a Perfect Crumb Bar
To truly appreciate and master these bars, it helps to understand their architecture. A flawless crumb bar consists of three distinct yet harmonious layers:
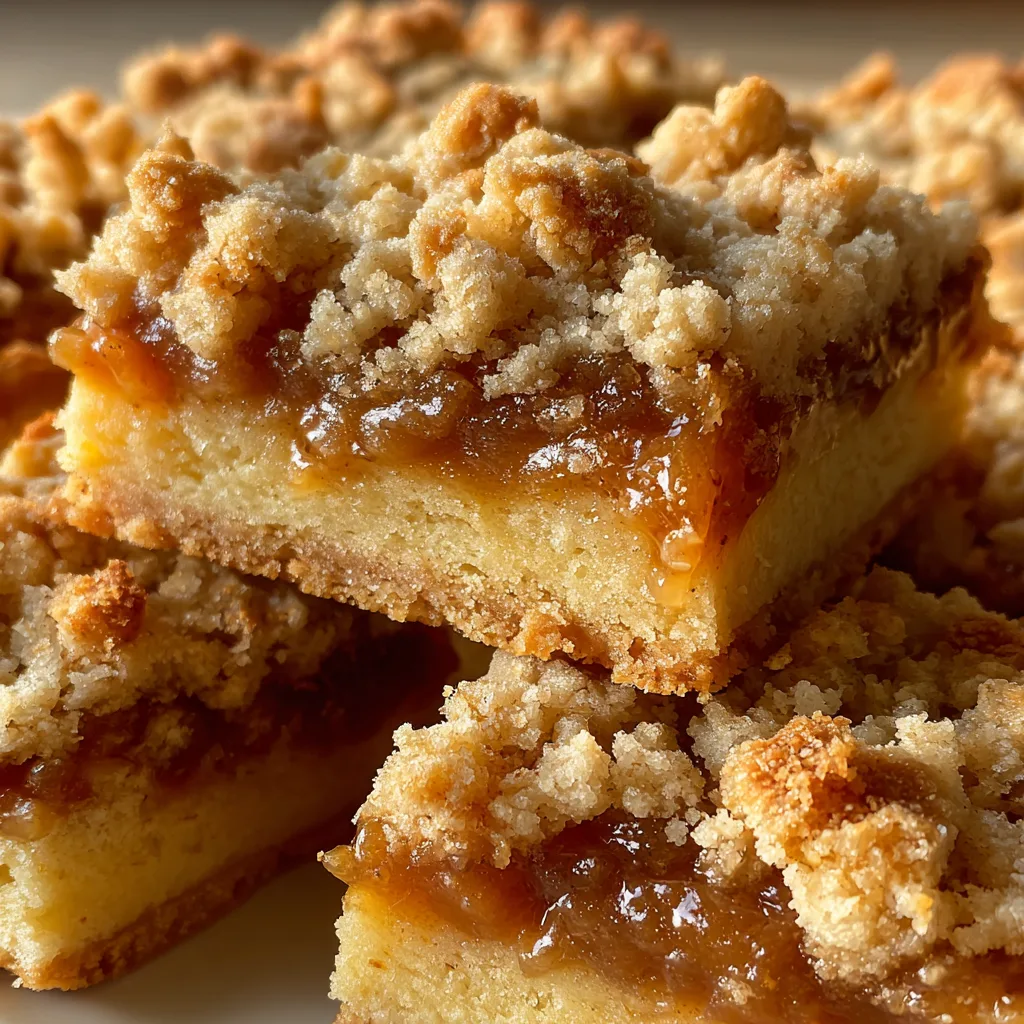
First, there is the sturdy, buttery shortbread base. This layer needs to be firm enough to hold the weighty apple filling without crumbling in your hands, yet tender enough to melt in your mouth. By using a combination of all-purpose flour, cold butter, and just the right amount of sugar, we create a base that acts as the perfect canvas.
Second is the star of the show: the rich, gooey apple filling. Unlike a pie where the apples might remain slightly crisp, the apples in these bars cook down into a luscious, spiced compote. The addition of brown sugar and cinnamon creates a caramel-like consistency that binds the fruit together. We use a touch of flour in the filling to absorb any excess moisture drawn out from the apples during baking, ensuring the bottom crust remains beautifully crisp.
Finally, the crowning glory is the crumb topping. Interestingly, in this recipe, the topping is simply a reserved portion of the base dough. However, the way it bakes on top is entirely different. Exposed to the direct heat of the oven, it transforms into crispy, golden, buttery nuggets that provide a vital textural contrast to the soft apples beneath.
Why You Will Fall in Love With This Recipe
While traditional apple pies are spectacular, they require rolling out dough, chilling, crimping, and carefully monitoring to avoid dreaded “soggy bottoms.” These bars bypass all that fuss while delivering an identical, if not superior, flavor profile. Here is why this recipe is a standout:
Efficiency is key. By using one mixture for both the crust and the streusel topping, you save time, reduce the number of dirty mixing bowls, and ensure a cohesive flavor from top to bottom. It is a brilliant baking shortcut that sacrifices absolutely nothing in terms of quality.
Furthermore, they are incredibly crowd-friendly. Slicing a pie for a large group can be a messy endeavor, often resulting in falling apart slices and uneven portions. Crumb bars, on the other hand, can be chilled and cut into perfectly neat squares, making them ideal for lunchboxes, bake sales, picnics, and buffet tables.
Ingredients You Will Need
Great baking starts with understanding your ingredients. Here is exactly what you need to assemble for these mouthwatering bars:
For the Crust and Crumb Topping:
- – 3 cups all-purpose flour
- – 1 cup granulated sugar
- – 1 teaspoon baking powder
- – 1/4 teaspoon salt
- – 1 cup (2 sticks) unsalted butter, cold and cubed
- – 1 large egg
- – 1 teaspoon pure vanilla extract
For the Apple Filling:
- – 4 to 5 medium apples (Granny Smith or Honeycrisp work best), peeled, cored, and diced small
- – 1/2 cup lightly packed brown sugar
- – 1 tablespoon all-purpose flour
- – 1 and 1/2 teaspoons ground cinnamon
- – 1/4 teaspoon ground nutmeg
- – 1 tablespoon freshly squeezed lemon juice
- – 1 teaspoon vanilla extract
Step-by-Step Instructions
Follow these detailed steps to ensure your bars come out perfectly every single time. Take your time, and enjoy the process of bringing these layers together.
- Prepare Your Pan and Oven: Preheat your oven to 375°F (190°C). Take a 9×13 inch baking pan and line it with parchment paper. Leave an overhang of paper on the sides. This creates a “sling” that will allow you to easily lift the entire block of bars out of the pan once they are cooled, making slicing incredibly neat and easy. Lightly grease the parchment paper with butter or non-stick spray.
- Mix the Dry Ingredients: In a large mixing bowl, whisk together the 3 cups of all-purpose flour, 1 cup of granulated sugar, baking powder, and salt. Whisking ensures the leavening agent and salt are evenly distributed throughout the flour, preventing any uneven baking or overly salty bites.
- Cut in the Butter: Add the cold, cubed butter to the flour mixture. Using a pastry blender, two forks, or your clean hands, cut the butter into the flour until the mixture resembles coarse, pea-sized crumbs. It is crucial that the butter remains cold, as these little pockets of fat will melt in the oven, creating a flaky, tender crust.
- Add the Wet Ingredients: Lightly beat the egg with the vanilla extract in a small dish, then pour it into the crumbly flour and butter mixture. Use a fork to gently toss the mixture until the egg is incorporated and the dough holds together when squeezed in your hand. Do not overmix; it should remain crumbly.
- Form the Base: Press slightly more than half of the dough mixture evenly into the bottom of your prepared 9×13 inch pan. Use the bottom of a measuring cup or a glass to press it down firmly and smoothly. This firm packing is what creates a solid foundation for the bars. Set the remaining dough aside—this will be your streusel topping.
- Prepare the Apples: In a separate bowl, combine the diced apples, brown sugar, 1 tablespoon of flour, cinnamon, nutmeg, lemon juice, and vanilla extract. Toss everything together until the apples are thoroughly coated in the spiced sugar mixture. The lemon juice prevents the apples from browning and adds a necessary hit of acidity to balance the sweetness.
- Layer the Filling: Spread the coated apple mixture evenly over the pressed-in crust in the pan. Be sure to spread them all the way to the edges and corners so every single bar gets a generous amount of fruit.
- Add the Crumb Topping: Take the reserved dough and sprinkle it evenly over the apple layer. Squeeze handfuls of the dough together slightly to create larger clumps before dropping them over the fruit. This creates that desirable, bakery-style chunky streusel appearance.
- Bake to Perfection: Place the pan in the preheated oven and bake for 40 to 45 minutes. You will know they are done when the top is a beautiful golden brown, and you can see the apple juices bubbling thickly around the edges of the pan.
- Cool Completely: This is the hardest part, but it is vital. Let the pan cool completely on a wire rack. If you try to cut the bars while they are warm, the filling will not have set, and they will fall apart into a delicious, but messy, crumble. For the cleanest cuts, you can even chill the cooled pan in the refrigerator for an hour before slicing.
Expert Tips for Baking Success
Baking is a science as much as it is an art. To elevate your crumb bars from good to spectacular, keep these expert tips in mind.
The choice of apple is paramount. You want a firm baking apple that will hold its shape and provide a tart contrast to the sweet crumble. Granny Smith is the traditional gold standard, but mixing them with a sweeter variety like Honeycrisp or Braeburn creates a wonderful complexity of flavor. Avoid soft apples like Red Delicious or McIntosh, as they will turn into mush during baking.
Temperature control of your butter makes a massive difference. Just like making a pie crust, cold butter is your best friend. If your kitchen is very warm and the dough feels greasy before it goes into the oven, pop the whole pan (and the reserved topping) into the fridge for 15 minutes before baking. This solidifies the butter, ensuring a tender, flaky outcome rather than a dense, oily one.
Do not skip the parchment paper sling. Sugary fruit fillings inevitably bubble up and caramelize against the sides of the pan. Without parchment paper, trying to extract the first few bars can ruin their appearance. The sling method guarantees perfect squares every time.
Exciting Flavor Variations
Once you master this base recipe, consider it a blank canvas for your culinary creativity. There are countless ways to customize these bars to suit different seasons and tastes.
Salted Caramel Apple Bars: Take these bars to an indulgent new level by drizzling half a cup of thick salted caramel sauce over the apple layer before adding the crumb topping. After baking and cooling, drizzle a little more on top for a stunning presentation.
Nutty Crunch Bars: For an added textural element, mix one cup of chopped pecans or walnuts into the reserved crumb topping dough. The nuts will toast beautifully in the oven, adding a deep, roasted flavor that pairs perfectly with the spiced apples.
Berry Apple Medley: Substitute one cup of the diced apples with fresh or frozen cranberries, raspberries, or blueberries. The tartness of the berries cuts through the sweetness beautifully and gives the filling a vibrant, jewel-toned color.
Maple Spice Bars: Swap the granulated sugar in the crust for maple sugar, and use maple syrup instead of lemon juice in the filling. Increase the cinnamon slightly and add a pinch of ground ginger for a deeply autumnal flavor profile.
Serving Suggestions
While these bars are spectacular eaten out of hand at room temperature, there are ways to turn them into an elegant plated dessert.
For a spectacular after-dinner treat, warm a square slightly in the microwave for about 15 seconds. Place it in a shallow bowl and top it with a generous scoop of premium vanilla bean ice cream. The contrast of the warm, spiced apples and crunchy topping against the cold, melting ice cream is a culinary masterpiece.
Alternatively, serve them at room temperature alongside a steaming mug of dark roast coffee or a spiced chai latte. The bitterness of the coffee perfectly balances the sweet caramel notes of the bars, making for a perfect mid-afternoon pick-me-up.
Storage and Freezing Instructions
If you manage to have leftovers, these bars store incredibly well, making them a great make-ahead dessert.
Room Temperature: Store the cooled, cut bars in an airtight container at room temperature for up to 3 days. If stacking them, place a sheet of wax paper or parchment paper between the layers to prevent them from sticking together.
Refrigerator: For longer storage, keep them in the fridge for up to a week. They are actually quite delicious served cold straight from the fridge, as the crust becomes wonderfully firm and chewy.
Freezing: These bars freeze beautifully. Wrap individual squares tightly in plastic wrap, then place them all in a large zip-top freezer bag. They will keep in the freezer for up to 3 months. Thaw them overnight in the refrigerator, or let them sit at room temperature for a couple of hours before eating.
Fun Facts and Cultural Context
The concept of “crumb” or “streusel” toppings originated in Germany (“streusel” literally translates to “something scattered or sprinkled”). German immigrants brought these baking techniques to the United States, where they quickly merged with the abundance of American apple orchards. The result was a fusion of the German crumb cake and the classic American apple pie.
Apples themselves have a rich history in baking. Because they naturally contain a high amount of pectin (a natural thickener), they are incredibly forgiving in baked goods, creating their own thick, syrupy sauce without the need for large amounts of added starches. This is why apple desserts have been a staple of home baking for centuries, relying on the fruit’s natural chemistry to create luscious textures.
Conclusion
The Ultimate Caramel Apple Crumb Bars represent everything that is wonderful about home baking. They are rustic yet beautiful, simple to execute yet complex in flavor, and guaranteed to bring a smile to anyone who tries them. By following the detailed steps, understanding the role of your ingredients, and utilizing the expert tips provided, you are well on your way to baking a dessert that will quickly become a highly requested favorite in your household. Happy baking!
Ultimate Caramel Apple Crumb Bars
Ingredients
Equipment
Method
- Preheat oven to 375°F (190°C). Line a 9×13 inch pan with parchment paper, leaving an overhang.
- In a large bowl, whisk together 3 cups flour, granulated sugar, baking powder, and salt.
- Cut in the cold, cubed butter using a pastry blender until the mixture resembles coarse crumbs.
- Lightly beat the egg and vanilla extract together, then toss into the crumb mixture until it holds together when squeezed.
- Press slightly more than half of the dough firmly into the bottom of the prepared pan. Set the rest aside.
- In another bowl, toss the diced apples with brown sugar, 1 tablespoon flour, cinnamon, nutmeg, lemon juice, and vanilla until coated.
- Spread the apple mixture evenly over the bottom crust.
- Sprinkle the reserved dough evenly over the apples, squeezing handfuls to create chunky streusel clumps.
- Bake for 40-45 minutes until the top is golden brown and the filling is bubbly.
- Cool completely in the pan on a wire rack before using the parchment sling to lift and cut into squares.