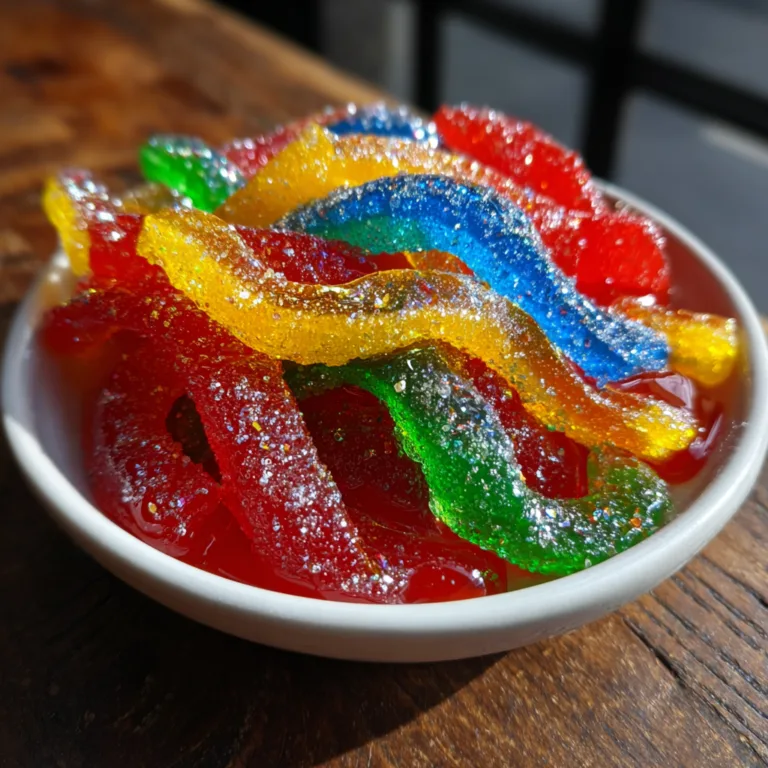
Kool-Aid Soaked Pineapples
The Ultimate Guide to Making Viral Kool-Aid Soaked Pineapples
If you have been scrolling through social media lately, especially TikTok or Instagram, you have likely come across one of the most vibrant, eye-catching, and mouth-watering snack trends of the year: Kool-Aid soaked pineapples. These neon-colored, intensely flavored fruit rings are taking the internet by storm, and for a very good reason. They are the perfect combination of sweet, tart, and undeniably fun. Whether you are looking to create a memorable treat for a summer barbecue, a kid’s birthday party, or just want to satisfy your own late-night sweet tooth, this recipe is an absolute game-changer.
In this comprehensive guide, we are going to dive deep into the world of Kool-Aid soaked pineapples. We will cover everything from the origins of this quirky snack to the science of how the flavors penetrate the fruit. By the time you finish reading, you will be equipped with all the knowledge, tips, and tricks you need to make the perfect batch of brightly colored candied pineapples right in your own kitchen.
What Are Kool-Aid Soaked Pineapples?
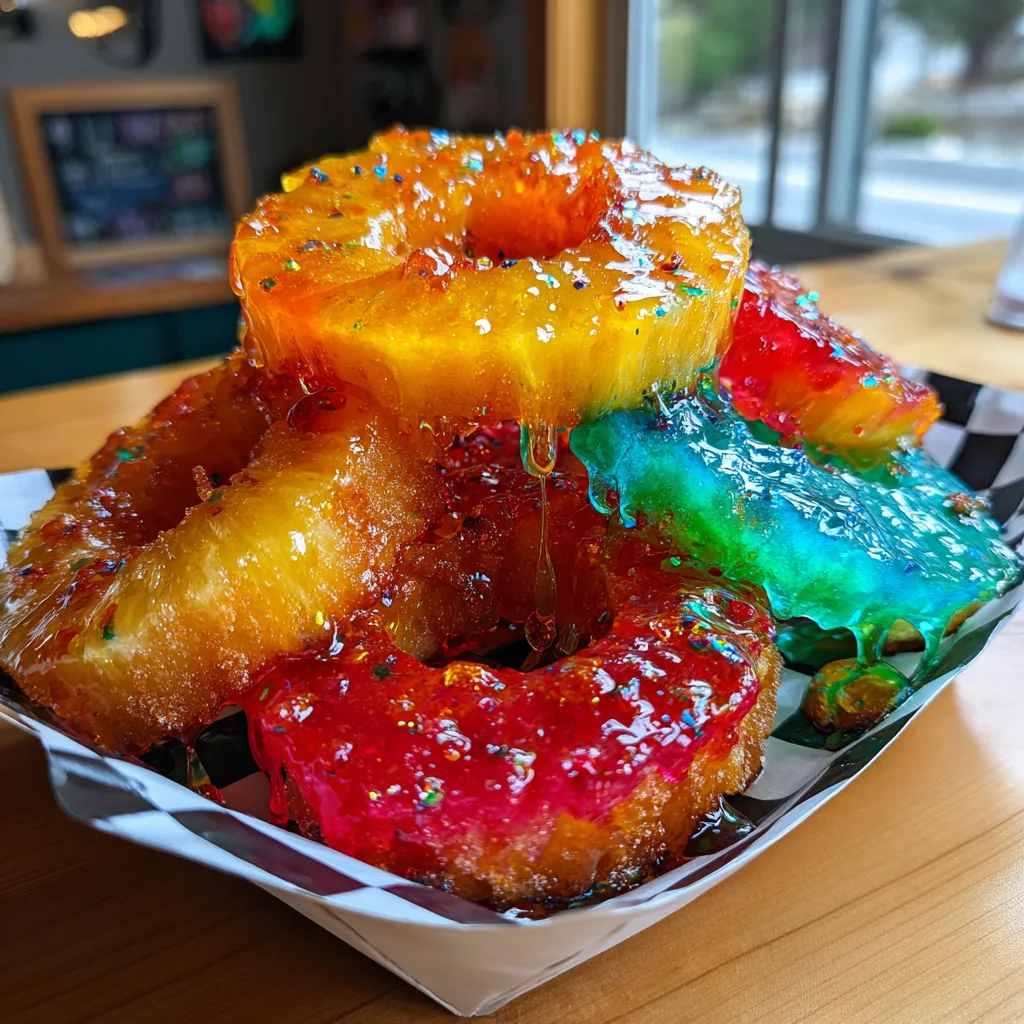
At their core, Kool-Aid soaked pineapples are exactly what they sound like: fresh or canned pineapple rings that have been submerged in a highly concentrated, sweetened Kool-Aid liquid for an extended period. The concept heavily borrows from the Southern tradition of “Kool-Aid Pickles” (often called “Koolickles”), where dill pickles are soaked in cherry Kool-Aid to create a sweet and sour delicacy. However, by substituting pickles with naturally sweet and porous pineapples, you get a treat that leans entirely into the dessert category.
The magic happens during the resting phase in the refrigerator. The pineapple acts like a sponge, drawing in the vibrant colors and artificial fruit flavors of the Kool-Aid, while releasing some of its natural tropical juices into the brine. The result is a hybrid fruit that tastes like a juicy, tropical gummy candy but retains the satisfying bite and fibrous texture of real pineapple. They are often served cold, straight from the fridge, making them a refreshing and hydrating treat during hot summer months.
The Science Behind the Soak: How Osmosis Creates Flavor
You might be wondering how the Kool-Aid manages to completely transform the pineapple from the inside out. The answer lies in a simple scientific process called osmosis. Osmosis is the movement of water across a semi-permeable membrane from an area of lower solute concentration to an area of higher solute concentration. When you place a piece of fruit into a sugary Kool-Aid solution, the natural water inside the pineapple cells begins to interact with the external liquid.
Because the Kool-Aid mixture is highly concentrated with sugar and flavor compounds, the liquid naturally wants to balance itself out. Over the course of 24 to 48 hours, the flavored liquid permeates the cell walls of the pineapple. Simultaneously, the natural enzymes and juices of the pineapple seep out into the Kool-Aid. This exchange is why the resulting snack isn’t just pineapple with Kool-Aid on top; it is a completely infused, structurally integrated flavor experience. The longer you let them soak, the deeper the color and flavor will penetrate the fruit.
Why You Will Love This Colorful Snack
There are countless reasons to fall in love with Kool-Aid soaked pineapples, beyond their obvious aesthetic appeal. First and foremost is the visual impact. The bright neon reds, blues, greens, and yellows are incredibly photogenic and bring an instant sense of joy to any table setting. They are guaranteed conversation starters.
Secondly, they are incredibly budget-friendly. Kool-Aid packets are notoriously inexpensive, often costing less than fifty cents a piece. Combined with canned pineapple and standard white sugar, you can create a large batch of these treats for just a few dollars. This makes them an ideal choice for large gatherings where you want to impress without breaking the bank.
Finally, the customizability is unmatched. With dozens of Kool-Aid flavors available on the market, the combinations are endless. You can mix and match to create specific color themes for holidays, sports teams, or birthday parties. The recipe is virtually foolproof, making it a fantastic culinary project to do with young children, who will love watching the fruit change colors overnight.
Ingredients You Need
- Pineapple Rings: You can use either fresh or canned pineapple. If using canned, make sure to buy the rings packed in 100% juice, not heavy syrup, as you will be adding plenty of sugar with the Kool-Aid. Save the juice to use in the soaking liquid!
- Kool-Aid Drink Mix Packets: You will need the small, unsweetened packets (typically 0.13 oz each). Choose multiple colors like Cherry (Red), Blue Raspberry (Blue), Lemon-Lime (Green), and Lemonade (Yellow) for a rainbow effect.
- Granulated Sugar: Because we are using unsweetened Kool-Aid, sugar is essential to balance the extreme tartness of the powder and create a candied effect.
- Water or Pineapple Juice: This will act as the base for your soaking liquid. Using the reserved juice from canned pineapples adds an extra layer of tropical flavor.
Step-by-Step Instructions
- Prepare Your Containers: Start by gathering several airtight containers with tight-fitting lids. You will need a separate container for each color/flavor of Kool-Aid you plan to make to prevent the colors from mixing and turning into a muddy brown.
- Drain and Prep the Pineapple: If using canned pineapple rings, open the cans and carefully drain the juice into a large measuring cup. Set the pineapple rings aside. If using fresh pineapple, peel, core, and slice the fruit into even, half-inch thick rings.
- Mix the Liquid Base: In each container, empty one packet of unsweetened Kool-Aid. Add about 1/2 cup to 3/4 cup of granulated sugar to each container, depending on how sweet you want the final product to be.
- Add the Liquid: Pour 1 to 1.5 cups of liquid (a mix of water and your reserved pineapple juice works best) into each container. Stir vigorously until the sugar and Kool-Aid powder are completely dissolved. The liquid should be intensely colored and slightly syrupy.
- Submerge the Pineapples: Carefully drop the pineapple rings into the colored liquids. Make sure the fruit is completely submerged. If necessary, add a little more water to cover them completely.
- Seal and Chill: Place the lids tightly on the containers and put them in the refrigerator. Allow them to soak for a minimum of 24 hours. For the deepest, most vibrant colors and intense flavor, let them soak for 48 to 72 hours.
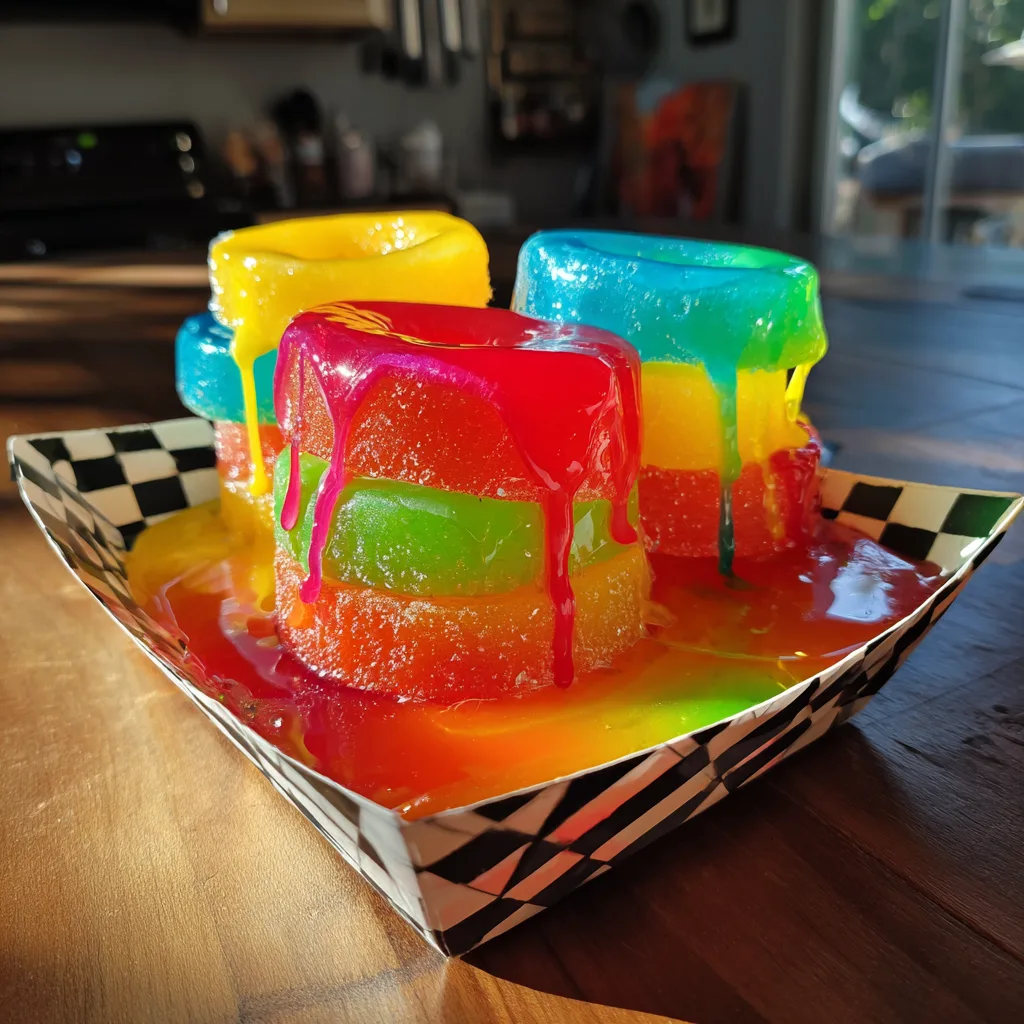
- Serve and Enjoy: Remove the pineapples from the liquid using tongs. You can serve them whole, slice them into chunks, or layer them in a clear cup for a beautiful rainbow presentation!
Best Kool-Aid Flavor Combinations
Choosing the right flavors is part of the fun. While you can use any flavor you like, some pair better with the natural acidity of pineapple than others. Here are a few fan-favorite combinations:
- Tropical Punch (Red): This is a classic for a reason. The blend of cherry, orange, and other fruit flavors in Tropical Punch perfectly complements the pineapple, creating a taste similar to classic fruit punch.
- Blue Raspberry (Blue): A massive hit with kids. The sweet and slightly tart profile of blue raspberry turns the pineapple into a vibrant, neon blue treat that tastes exactly like a melted slushie.
- Lemon-Lime (Green): For those who prefer a more tart, citrus-forward snack, the green lemon-lime flavor provides a zesty kick that cuts through the sweetness.
- Grape (Purple): Grape Kool-Aid offers a deep, rich flavor that transforms the pineapple into a dark, jewel-toned dessert. It is surprisingly delicious when paired with the tropical notes of the fruit.
Tips for the Perfect Candied Pineapple
While the process is simple, a few expert tips can elevate your Kool-Aid soaked pineapples from good to incredible:
Do Not Skip the Sugar: It might be tempting to reduce the sugar to make the snack healthier, but doing so will result in an incredibly sour pineapple. Unsweetened Kool-Aid is pure citric acid and flavor; it needs the sugar to balance it out and create the “candied” effect.
Patience is Key: You might be eager to dig in after a few hours, but resisting the urge is crucial. The fruit needs a full 24 hours for the osmosis process to work. If you pull them out too early, the center of the pineapple will remain pale and unflavored.
Use Glass or Stain-Resistant Plastic: Kool-Aid contains strong food dyes that can easily stain light-colored plastic containers. To avoid ruining your favorite Tupperware, use glass mason jars or deli containers that you do not mind dedicating to colorful projects.
Creative Ways to Serve Your Kool-Aid Pineapples
Serving these bright treats is half the fun. While eating them straight out of the fridge with your fingers is perfectly acceptable, here are some creative ways to present them:
The Rainbow Cup: As seen in viral photos, you can chop the differently colored pineapple rings into chunks and layer them in a clear plastic cup. Start with blue at the bottom, followed by green, yellow, and red. It creates a stunning visual that looks like a high-end dessert from a theme park.
Popsicle Sticks: Before soaking, insert a wooden popsicle stick into the bottom of each pineapple ring. Once soaked, you have colorful pineapple popsicles that are easy to eat on the go without getting sticky fingers.
Cocktail Garnishes: For adult parties, these neon rings make incredible garnishes for tropical cocktails like Mai Tais, Piña Coladas, or Rum Punches. They add a pop of color and a burst of flavor as they sit on the rim of the glass.
Variations to Try
Once you have mastered the basic recipe, it is time to experiment! The Kool-Aid soaked method is highly adaptable. Here are a few variations to spice things up:
Spicy “Chamoy” Style: Inspired by Mexican street food, you can add a dash of Tajín (chili-lime seasoning) to the Kool-Aid liquid, or sprinkle it over the pineapples right before serving. The combination of sweet, sour, and spicy is incredibly addictive.
Adults-Only Boozy Pineapples: Take your summer pool party to the next level by substituting half of the water in the recipe with coconut rum or vodka. The pineapples will absorb the alcohol along with the Kool-Aid flavor, creating an intoxicating and delicious bite-sized treat. (Please eat responsibly!)
Different Fruits: Don’t limit yourself to pineapples. This method works wonderfully with peeled green apples, watermelon chunks, and peeled cucumber slices. The firmer the fruit, the better it will hold up during the long soak.
Frequently Asked Questions
Can I use sugar-free sweetener instead of regular sugar? Yes, you can substitute regular sugar with your preferred granular sugar substitute (like Stevia or Erythritol) if you are watching your sugar intake. Just be sure to use the equivalent conversion for the amount of sugar called for in the recipe.
How long do Kool-Aid soaked pineapples last? When stored in an airtight container in the refrigerator, completely submerged in their liquid, they will easily last for up to two weeks. However, they are usually eaten long before then!
Can I use fresh pineapple instead of canned? Absolutely. Fresh pineapple actually absorbs the flavor and color beautifully and tends to maintain a firmer texture than canned. Just ensure it is fully ripe before slicing and soaking.
Storing and Freezing Instructions
Proper storage is essential to keep your candied pineapples tasting fresh. Always keep them in the refrigerator, as leaving them at room temperature can cause them to ferment and spoil quickly.
If you want to create an entirely different texture, try freezing them! After the 24-hour soak, remove the pineapple rings from the liquid, pat them slightly dry, and place them on a parchment-lined baking sheet in the freezer. Once frozen solid, transfer them to a freezer-safe bag. Frozen Kool-Aid pineapples have a satisfying, slushie-like texture that is perfect for cooling down on a scorching hot day.
Conclusion
Kool-Aid soaked pineapples are more than just a fleeting internet trend; they are a genuinely delicious, highly customizable, and incredibly fun treat to make at home. With minimal ingredients, zero cooking time, and a little bit of patience, you can transform ordinary fruit into a vibrant, candy-like snack that appeals to kids and adults alike. Whether you stick to the classic rainbow flavors or invent your own spicy or boozy variations, this is one recipe you will find yourself making again and again. Gather your ingredients, pick your favorite colors, and get ready to experience the ultimate sweet and tangy summer snack!
Kool-Aid Soaked Pineapples
Ingredients
Equipment
Method
- Drain the canned pineapple rings, reserving the juice in a large measuring cup.
- Set up separate airtight containers for each color of Kool-Aid you plan to make.
- In each container, add 1 packet of Kool-Aid powder and 3/4 cup of granulated sugar.
- Pour 1.5 cups of your water/pineapple juice mixture into each container and stir vigorously until the powder and sugar are completely dissolved.
- Carefully place the pineapple rings into the colored liquids, dividing them evenly among the containers. Ensure the fruit is fully submerged.
- Secure the lids tightly and place the containers in the refrigerator.
- Allow the pineapples to soak for a minimum of 24 hours (48 hours for best results) so the flavor and color fully penetrate the fruit.
- Remove from the liquid and serve whole, or cut into chunks and layer in clear cups for a rainbow effect.