Golden Oreo Sand Pudding
The Ultimate Golden Oreo Sand Pudding Cups Recipe: A Beach Party in a Cup
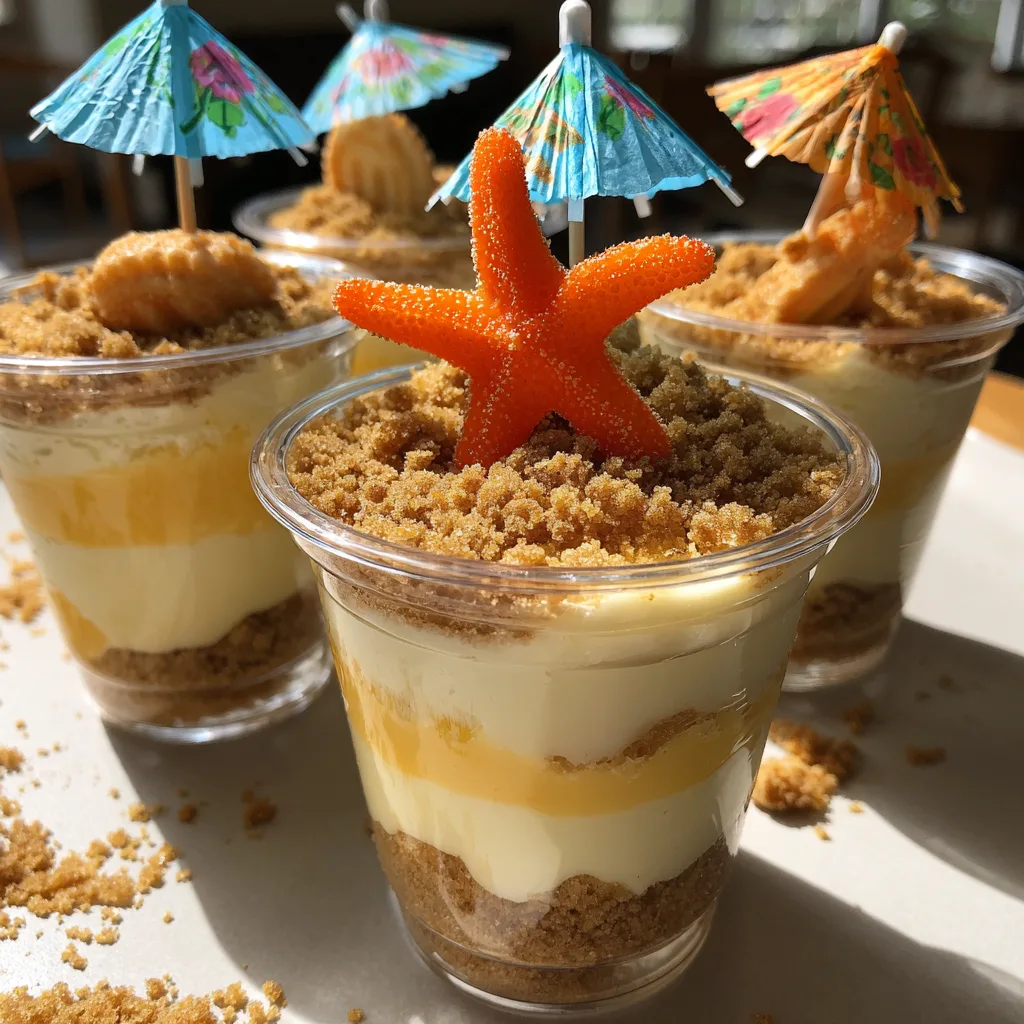
When the weather starts warming up and summer is on the horizon, the craving for light, fun, and refreshing desserts begins to set in. Enter the Golden Oreo Sand Pudding Cup. This whimsical, no-bake dessert is an absolute showstopper for summer barbecues, pool parties, beach-themed birthdays, or simply a fun weekend project with the kids. These adorable individual cups mimic the look of a sandy beach, complete with edible sea creatures and festive little drink umbrellas, making them just as fun to look at as they are to eat.
If you are familiar with the classic “dirt and worms” dessert made with chocolate cookies and gummy worms, you will instantly recognize the concept here. However, this sunny variation swaps the dark chocolate for the sweet, vanilla-forward flavor of Golden Oreos and rich, creamy vanilla pudding. The result is a lighter, brighter dessert that screams summer vacation. In this comprehensive guide, we are going to dive deep into everything you need to know to create the perfect batch of Golden Oreo Sand Pudding Cups, from achieving the perfect “sand” texture to mastering the light-as-air pudding layers.

What Exactly is Sand Pudding?
Sand pudding is a clever, visually delightful layered dessert designed to look like a bucket of sand or a miniature beach. It is a playful twist on the traditional dirt cake. Instead of using dark chocolate sandwich cookies to mimic potting soil, this recipe utilizes vanilla or golden sandwich cookies, which, when crushed finely, bear an uncanny resemblance to warm beach sand.
The dessert is constructed in alternating layers. The “sand” provides a wonderful, slightly crunchy texture that contrasts beautifully with the soft, velvety layers of the filling. The filling itself is not just plain pudding out of a box. It is an elevated, incredibly rich mixture made by folding together instant vanilla pudding, softened cream cheese, butter, powdered sugar, and a whipped topping (like Cool Whip). This combination creates a stable, mousse-like consistency that holds its shape beautifully in the cup and tastes like a cross between a vanilla cheesecake and a classic pudding pie.
Why You Will Fall in Love with This Dessert
There are countless reasons why this recipe will become your go-to summer dessert. First and foremost is the convenience factor. This is a 100% no-bake recipe. During the sweltering heat of July or August, the last thing anyone wants to do is turn on their oven. This dessert comes together entirely on your countertop and chills in the refrigerator.
Secondly, the individual serving size is incredibly practical for parties. By layering the dessert in clear plastic cups, not only do you show off the beautiful, distinct layers of pudding and cookie crumbs, but you also make serving a breeze. Guests can just grab a cup and a spoon and mingle. There is no messy slicing or portioning required in the middle of a party.
Finally, the creative potential is limitless. While this recipe uses gummy starfish and paper umbrellas to create a beach scene, you can easily customize the toppings. You could add gummy sharks, Swedish Fish, candy pearls, or even little chocolate seashells. It is an interactive dessert that encourages creativity.
The Science of the Perfect Pudding Layer
To make the best possible sand pudding, it is important to understand why we do not just use plain boxed pudding. If you were to layer just standard instant pudding with cookie crumbs, the moisture from the pudding would quickly turn the cookies to complete mush, and the pudding itself might weep or separate over time.
By blending the instant pudding with a mixture of cream cheese, butter, and powdered sugar, you are introducing fat and stability to the base. The cream cheese adds a slight tang that cuts through the extreme sweetness of the powdered sugar and cookies, creating a much more balanced flavor profile. Folding in a whipped topping at the very end incorporates air, transforming the dense cream cheese mixture into a light, fluffy, mousse-like texture that gently rests on the cookie crumbs without instantly soaking them.
Key Ingredients Breakdown
Gathering the right ingredients is the first step to dessert success. Here is what you will need and why.
The “Sand”
You will need a standard package (usually around 14-15 ounces) of Golden Oreos or an equivalent golden vanilla sandwich cookie. Do not remove the cream filling! The cream inside the cookie helps bind the crumbs slightly, giving them a slightly damp sand texture rather than flying everywhere like dry dust. You can process these in a food processor for ultra-fine sand, or crush them in a zip-top bag with a rolling pin for a slightly more textured, pebbly beach look.
The Cream Cheese Mixture
One 8-ounce block of full-fat cream cheese and 1/4 cup (half a stick) of unsalted butter form the rich base. It is absolutely vital that both of these are softened to room temperature before you begin. If they are cold, you will end up with lumpy filling. Powdered sugar is added to sweeten this mixture and help it blend smoothly without graininess.
The Pudding Base
You will need two small boxes (3.4 oz each) of instant vanilla pudding mix (or French Vanilla for a richer flavor). Make sure you buy INSTANT pudding, not the cook-and-serve variety. You will mix this with cold milk. Whole milk yields the creamiest results, but 2% works fine as well.
The Fluff
An 8-ounce tub of frozen whipped topping (like Cool Whip), thawed in the refrigerator, is folded into the mixture. This is what gives the pudding layer its airy, cloud-like texture. While you can use homemade stabilized whipped cream, store-bought whipped topping is incredibly stable and prevents the dessert from weeping in the fridge.
The Decorations
This is where you bring the beach to life! Gummy starfish, Swedish fish, gummy sharks, or even chocolate shells work perfectly. Miniature paper drink umbrellas add height, color, and an undeniable tropical vacation vibe.
Ingredients List
For the Cookie Sand:
For the Pudding Filling:
For Serving and Decorating:
Step-by-Step Instructions
Follow these detailed steps to build your beautiful beach cups.
1. Create the Sand
Place the entire package of Golden Oreos (cookies and filling) into a food processor. Pulse continuously until the cookies break down into fine crumbs that resemble sand. If you do not have a food processor, place the cookies in a heavy-duty gallon zip-top bag, seal it tightly pressing all the air out, and crush them thoroughly with a rolling pin. Set the cookie crumbs aside in a bowl.
2. Whip the Cream Cheese Mixture
In a large mixing bowl, use an electric hand mixer or a stand mixer fitted with the paddle attachment to beat the softened cream cheese and softened butter together on medium speed until perfectly smooth and creamy. There should be no lumps. Reduce the mixer speed to low and gradually add the sifted powdered sugar. Once incorporated, beat on medium-high for 1 minute until fluffy. Set this bowl aside.
3. Whisk the Pudding
In a separate, medium-sized bowl, whisk together the two boxes of instant vanilla pudding mix and the 2 3/4 cups of cold milk. Whisk vigorously for about 2 minutes until the pudding begins to thicken significantly. It will be quite thick.
4. Combine the Mixtures
Pour the thickened vanilla pudding into the large bowl containing the cream cheese mixture. Use your electric mixer to blend them together until smooth and completely combined.
5. Fold in the Fluff
Using a large rubber spatula, gently fold the thawed whipped topping into the pudding and cream cheese mixture. Fold gently using a sweeping motion from the bottom of the bowl to the top to keep the mixture light and airy. Do not overmix, or you will deflate the fluff.
6. Assemble the Cups
Set out your clear plastic cups. Begin by adding about 2 tablespoons of the crushed cookie “sand” to the bottom of each cup to form the base. Next, add a thick layer of the pudding mixture. (Pro-tip: Transfer the pudding mixture to a large piping bag or a gallon zip-top bag with the corner snipped off to pipe it into the cups cleanly without smearing the sides). Add another layer of cookie sand, followed by another layer of pudding. Finish each cup with a final, even layer of cookie sand to represent the beach surface.
7. Chill
Place the assembled cups in the refrigerator for at least 2 hours to allow the pudding to set completely and the layers to meld together slightly.
8. Decorate and Serve
Just before serving, decorate the top “beach” layer of each cup. Press a gummy starfish or Swedish fish into the cookie sand. Open a miniature paper drink umbrella and stick it into the sand to complete the tropical look. Serve immediately with a spoon!
Expert Tips for the Best Sand Pudding
Room Temperature is Crucial: If your cream cheese or butter is cold, it will not blend smoothly, and you will end up with unappetizing little white lumps of fat throughout your smooth pudding. Leave them on the counter for at least an hour before mixing.
Clean Cup Edges: When layering, it is easy to accidentally smear the pudding on the inside of the clear cup, which ruins the distinct layered look. Piping the pudding filling using a pastry bag is the easiest way to ensure pristine, professional-looking layers.
Wait to Decorate: Do not put the paper umbrellas or gummy candies on the pudding cups before putting them in the fridge. The moisture in the fridge can make the paper umbrellas soggy and the gummy candies sticky or slimy. Decorate right before you bring them out to your guests.
Fun Variations to Try
While the classic vanilla and Golden Oreo combination is fantastic, you can easily tweak this recipe to suit different themes or flavor preferences.
The Classic “Dirt”: Swap the Golden Oreos for classic dark chocolate Oreos and the vanilla pudding for chocolate pudding. Top with gummy worms instead of sea creatures for a classic garden dirt cake.
Graham Cracker Sand: If you find Golden Oreos too sweet, you can substitute them with finely crushed graham crackers. Add 2 tablespoons of melted butter to the graham cracker crumbs to help them mimic the damp sand texture.
Tropical Coconut: Use coconut flavored instant pudding instead of vanilla, or fold half a cup of toasted shredded coconut into your vanilla pudding mixture for a true tropical island flavor.
Storage and Make-Ahead Instructions
This dessert is phenomenal for entertaining because it actually benefits from being made ahead of time. The chilling process allows the flavors to meld and the pudding to set into a perfect, scoopable consistency.
Making Ahead: You can assemble the cups (without the decorations) up to 48 hours in advance. Cover the cups loosely with plastic wrap to prevent them from absorbing any odors from the refrigerator.
Leftovers: If you have leftovers, they will keep in the refrigerator for up to 3 days. However, the cookie crumbs will become progressively softer as they absorb moisture from the pudding. Many people actually prefer this softer, cake-like texture, but if you want to keep the crunch, eat them within the first 24 hours.
Freezing: It is not recommended to freeze this dessert. The pudding and cream cheese mixture can separate and become watery or grainy when thawed.
A Brief History of Novelty Puddings
The concept of disguising food as inedible objects has a long history in culinary arts, dating back to elaborate medieval banquets where meat was formed to look like mythical creatures. In modern American cuisine, the “dirt cake” emerged in the 1970s and 1980s as novelty baking pans and themed children’s parties gained immense popularity. It was an era of playful, convenience-based cooking, heavily utilizing boxed mixes and instant puddings.
The “Sand Pudding” is the natural, summery evolution of that concept. As beach-themed parties and luau aesthetics became popular summer staples, home cooks brilliantly adapted the dirt cake formula using lighter, golden ingredients to fit the season. It perfectly encapsulates the joy of playing with your food.
Creating Golden Oreo Sand Pudding Cups is a surefire way to bring smiles to your guests’ faces. They are effortlessly charming, incredibly delicious, and capture the carefree spirit of summer in every single bite. Enjoy crafting your miniature beaches, and have a wonderful, sweet summer!
Golden Oreo Sand Pudding Cups
Ingredients
Equipment
Method
- Crush the entire package of Golden Oreos (cookies and filling) in a food processor until they resemble fine sand. Set aside.
- In a large bowl, beat the softened cream cheese and butter until smooth. Gradually add the powdered sugar and beat until fluffy.
- In a separate bowl, whisk together the instant vanilla pudding mix and cold milk for about 2 minutes until thickened.
- Pour the thickened pudding into the cream cheese mixture and beat until fully combined and smooth.
- Gently fold the thawed whipped topping into the pudding mixture using a spatula until no streaks remain.
- Assemble the cups: Place about 2 tablespoons of cookie sand into the bottom of each clear cup. Pipe or spoon a layer of the pudding mixture over the sand.
- Repeat the layers, ending with a final layer of cookie sand on top to look like a beach.
- Refrigerate the cups for at least 2 hours to set.
- Just before serving, decorate the top of each cup with a gummy starfish and a paper umbrella.