Grilled Chicken Caprese
Grilled Chicken Caprese: A Fresh, Flavorful, and Easy Summer Dinner
When the sun is shining and the weather is warm, the last thing anyone wants to do is spend hours standing over a hot stove or waiting for the oven to bake a heavy, complicated meal. Summer dining is all about embracing fresh, vibrant ingredients, quick cooking methods, and spending as much time outdoors as possible. Enter the Grilled Chicken Caprese. This phenomenal dish takes the world-famous, beloved Italian Caprese salad—a simple, stunning combination of fresh tomatoes, creamy mozzarella, and fragrant basil—and transforms it into a hearty, protein-packed main course that will completely revolutionize your warm-weather dinner rotation.
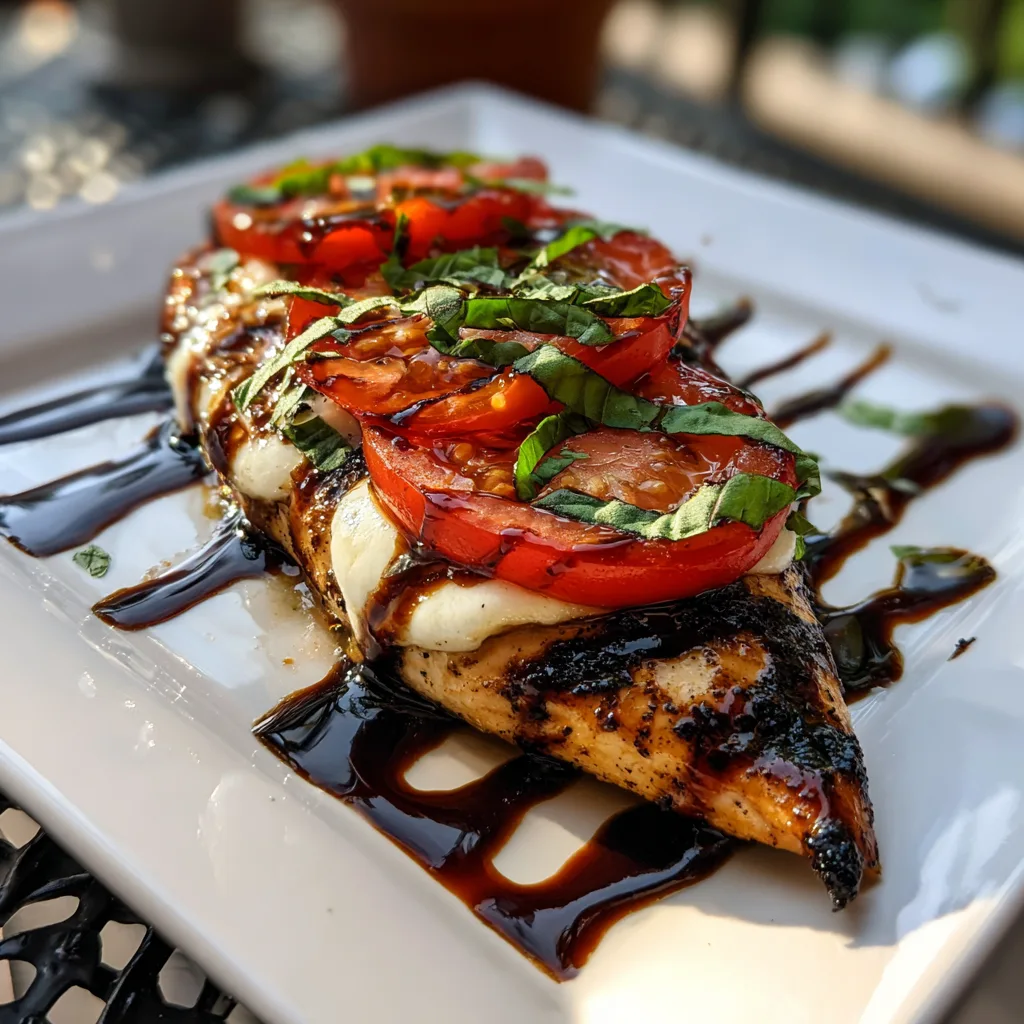
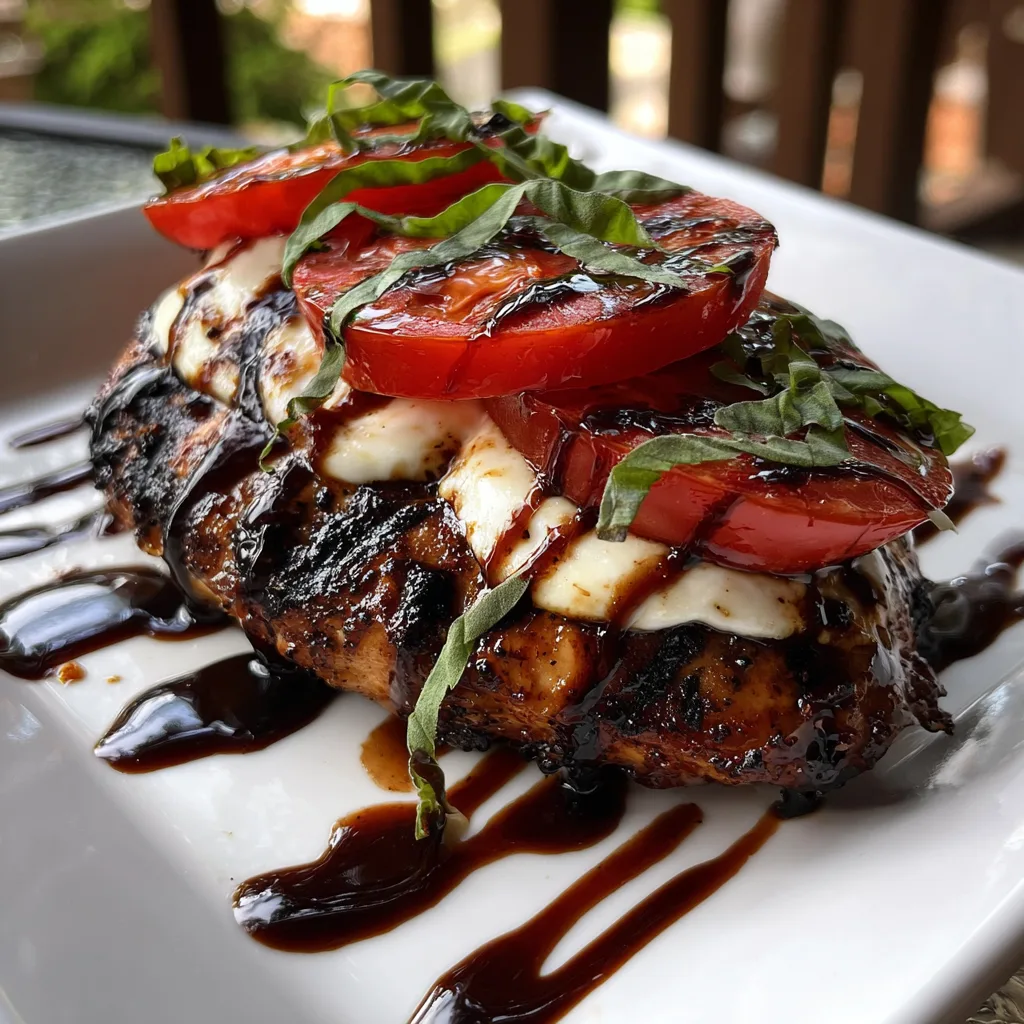
Imagine biting into a perfectly tender, slightly charred, and immensely juicy grilled chicken breast. Now, imagine that chicken crowned with a thick, gooey layer of freshly melted mozzarella cheese, topped with a cool, vibrant slice of summer-ripe tomato, sprinkled with freshly snipped basil leaves, and finally, heavily drizzled with a sticky, sweet, and tangy balsamic glaze that ties every single element together. It is a masterpiece of contrasting temperatures, textures, and flavors. Whether you are hosting a lively backyard barbecue with friends, looking for a romantic date-night dinner on the patio, or simply needing a lightning-fast, healthy weeknight meal for the family, this Grilled Chicken Caprese is the ultimate culinary answer. In this comprehensive guide, we will cover everything from achieving the perfect grill marks to crafting a homemade balsamic reduction, ensuring your chicken is flawless every single time.
Why This Grilled Chicken Caprese Will Become a Weekly Staple
There is a reason why the Caprese flavor profile has endured for nearly a century: it is practically perfect. Translating those flavors onto a grilled piece of poultry offers several incredible benefits that make this recipe an absolute must-try.
First, it is incredibly quick. Because we pound the chicken breasts to an even thickness before they hit the grill, the actual cooking time is entirely manageable—usually under 15 minutes. From prep to plate, you can have a gourmet-quality meal on the table in under half an hour. Second, it is a remarkably healthy option. This dish is naturally low in carbohydrates, high in lean protein, and packed with the nutritional benefits of fresh tomatoes and heart-healthy olive oil. It is incredibly keto-friendly and fits seamlessly into almost any diet plan.
Finally, the visual appeal is staggering. We eat with our eyes first, and the bright, patriotic colors of the Italian flag represented in this dish—the striking red of the tomato, the pure white of the mozzarella, and the vivid green of the basil—contrasted against the dark, glossy balsamic drizzle, make this a restaurant-worthy presentation that requires very little artistic effort from the home cook.
The Anatomy of the Perfect Caprese: Key Ingredients
With a recipe this beautifully simple, the quality of your ingredients is paramount. There is nowhere for mediocre produce to hide. Here is exactly what you need to create the ultimate Grilled Chicken Caprese:
- – 4 Boneless, Skinless Chicken Breasts: Look for medium-sized breasts. If they are massive, slice them in half horizontally to create thinner cutlets. This ensures they cook quickly and evenly on the grill without drying out.
- – 2 Tablespoons Olive Oil: Used for brushing the chicken to prevent sticking on the grill and to help the seasonings adhere perfectly. Use a high-quality extra virgin olive oil for the best flavor.
- – 1 Tablespoon Italian Seasoning: A classic blend of dried oregano, basil, thyme, and rosemary that infuses the meat with a savory, herbaceous baseline before the fresh toppings are even added.
- – 1 Teaspoon Garlic Powder: Adds a savory depth and pungency to the chicken without burning on the grill the way fresh minced garlic might.
- – Salt and Black Pepper: Essential for seasoning the meat. Be generous with the freshly cracked black pepper.
- – 8 Ounces Fresh Mozzarella Cheese: This is crucial! Do not use the hard, yellow-tinged blocks of low-moisture mozzarella used for pizza. You want the soft, bright white balls or logs of fresh mozzarella (often packed in water). Slice it about 1/4-inch thick. It melts into a luxurious, creamy blanket.
- – 2 Large, Ripe Tomatoes: Since this is a summer dish, seek out the best tomatoes you can find. Beefsteak tomatoes or large heirloom varieties are ideal. They should be firm but yield slightly to gentle pressure, and they should smell fragrant at the stem.
- – 1/2 Cup Fresh Basil Leaves: Dried basil absolutely will not work as a garnish here. You need the sweet, peppery bite of fresh basil leaves. We will slice them into thin ribbons (a technique called chiffonade) for a beautiful presentation.
- – 1/4 Cup Balsamic Glaze: You can purchase a squeeze bottle of balsamic glaze (also called balsamic reduction) in the vinegar aisle of most grocery stores, or you can make your own. It is thick, syrupy, and provides the essential sweet and sour kick.
Step-by-Step Instructions for Grilling Perfection
Follow these detailed steps to ensure your chicken is exceptionally juicy, your cheese is perfectly melted, and your presentation is flawless.
- Prepare the Chicken: Place the chicken breasts on a cutting board. Cover them with a piece of plastic wrap. Using a meat mallet or the bottom of a heavy skillet, gently pound the thickest parts of the breasts until each piece is a uniform, even thickness (about 1/2 to 3/4 inch thick). This step is non-negotiable for even grilling!
- Season the Meat: Brush both sides of the pounded chicken breasts lightly with the olive oil. In a small bowl, mix the Italian seasoning, garlic powder, salt, and black pepper. Rub this seasoning mixture evenly all over both sides of the chicken.
- Preheat the Grill: Preheat your outdoor gas or charcoal grill to medium-high heat (about 400°F to 425°F). Make sure your grill grates are meticulously clean. Right before placing the chicken down, carefully oil the grates using a pair of long tongs and a paper towel dipped in high-heat cooking oil (like canola or avocado oil) to prevent sticking.
- Grill the Chicken: Place the seasoned chicken breasts onto the hot grill. Let them cook undisturbed for about 5 to 6 minutes per side. You want to see beautiful, dark grill marks. Use a digital meat thermometer to check for doneness; you are looking for an internal temperature of about 160°F at this stage, as it will continue to cook slightly.
- The Cheese Melt: During the final 1 to 2 minutes of grilling, place 1 or 2 slices of the fresh mozzarella cheese directly onto the top of each chicken breast. Close the lid of the grill. This traps the heat and allows the mozzarella to melt into a soft, gooey, beautiful blanket.
- Rest the Meat: Carefully remove the cheese-topped chicken from the grill using a spatula (to ensure the cheese doesn’t slide off) and transfer them to a clean platter. Allow the chicken to rest for 3 to 5 minutes. This allows the juices inside the meat to redistribute, ensuring every bite is moist and tender.
- The Fresh Finish: Once the chicken has rested, top each cheesy breast with a thick slice of fresh tomato. Scatter the fresh basil ribbons generously over the top.
- The Grand Finale: Just before serving, drizzle the entire platter heavily with the thick balsamic glaze. Serve immediately while the chicken is hot and the tomato is cool!
How to Make Your Own Balsamic Reduction (Glaze)
While store-bought balsamic glaze is incredibly convenient, making it from scratch is surprisingly easy, significantly cheaper, and allows you to control the exact sweetness and consistency. To make your own:
Pour 1 cup of high-quality balsamic vinegar into a small, non-reactive saucepan. If you prefer a sweeter glaze, you can whisk in 1 tablespoon of honey or brown sugar. Bring the vinegar to a gentle boil over medium heat, then immediately reduce the heat to medium-low so it maintains a steady simmer. Let it simmer uncovered for about 15 to 20 minutes. Keep a close eye on it towards the end! You will know it is done when the liquid has reduced by half, thickened slightly, and coats the back of a spoon. Remember that it will thicken considerably more as it cools down to room temperature. Transfer it to a glass jar and let it cool completely before drizzling.
Expert Tips for the Juiciest Grilled Chicken
Grilling chicken breasts can be intimidating because they are incredibly lean and prone to drying out. Here are the secrets to success:
The Pounding Method: As mentioned, pounding the chicken is the most critical step. A chicken breast is naturally thick at one end and thin at the other. If you don’t pound it, by the time the thick end is cooked through, the thin end will be tough, dry, and overcooked.
Do Not Over-Flip: When you place the chicken on the grill, leave it alone! Let it develop a crust and sear properly. If you try to flip it and it feels stuck to the grates, it is not ready. It will naturally release from the metal when a good crust has formed.
Invest in a Thermometer: Stop cutting into your chicken to see if it is done (which lets all the precious juices run out!). A quick-read digital meat thermometer is the best investment you can make for your kitchen. Pull the chicken off the grill at 160°F to 165°F for perfectly safe, juicy poultry.
Delicious Variations to Customize Your Meal
This recipe is incredibly versatile. Here are a few ways to switch up the flavors to suit your mood or pantry:
Pesto Caprese: For an extra burst of herbaceous garlic flavor, smear a tablespoon of fresh basil pesto onto the chicken breast right after it comes off the grill, placing the melted mozzarella and tomato directly on top of the pesto layer.
Baked Caprese: Don’t have a grill or the weather isn’t cooperating? No problem! You can easily bake this. Sear the seasoned chicken in an oven-safe skillet on the stove for 3 minutes per side, then top with cheese and bake in a 400°F oven for 10-15 minutes until cooked through.
Avocado Addition: For a buttery, California-style twist, add a few slices of fresh, ripe avocado on top of the tomato slice before adding the basil and balsamic glaze.
What to Serve Alongside Grilled Chicken Caprese
Because this main course is so robust and flavorful, you want side dishes that complement, rather than compete with, the Mediterranean vibe. Here are some fantastic pairings:
If you want to keep the meal low-carb and light, serve the chicken alongside a simple arugula salad dressed with lemon and olive oil, or a platter of grilled asparagus spears or zucchini. If you are looking for heartier comfort, a side of angel hair pasta tossed lightly in garlic, olive oil, and parmesan cheese is divine. Thick slices of toasted ciabatta or focaccia bread are also practically mandatory for mopping up any leftover balsamic glaze and chicken juices from your plate.
The Cultural Heritage of the Caprese Salad
The flavor profile you are enjoying has a rich and patriotic history. The original Insalata Caprese (literally translated to “Salad of Capri”) originated on the beautiful, picturesque island of Capri, located in the Tyrrhenian Sea off the Sorrentine Peninsula of Italy. While its exact invention date is debated, it became immensely popular in the 1920s.
The dish was designed specifically to pay homage to Italy. The ingredients were specifically chosen because their colors perfectly mirror the Italian flag (the Tricolore): the vibrant red of the tomatoes, the snowy white of the fresh mozzarella, and the brilliant green of the basil. By creating this Grilled Chicken Caprese, you are participating in a century-old culinary tradition that celebrates simplicity, national pride, and the absolute peak of summer produce.
Storage and Reheating Guidelines
If you have leftovers, proper storage is key to maintaining the texture of the dish.
If possible, store the cooked, cheesy chicken breasts in an airtight container in the refrigerator separately from the fresh tomato and basil. This prevents the tomato from becoming mushy and the basil from turning black. The chicken will keep for up to 3 days. To reheat, place the chicken in a skillet over low heat with a splash of water, cover with a lid, and let it gently steam until warmed through and the cheese is soft again. Top with a fresh slice of tomato, new basil, and a fresh drizzle of balsamic just before serving.
Embrace the flavors of summer with this incredible Grilled Chicken Caprese. It is guaranteed to become your new favorite way to enjoy chicken on the grill, bringing a touch of Italian magic to your own backyard!
Grilled Chicken Caprese
Ingredients
Equipment
Method
- Pound chicken breasts to an even 1/2-inch thickness. Brush with olive oil and season evenly with Italian seasoning, garlic powder, salt, and pepper.
- Preheat grill to medium-high heat. Oil the grates to prevent sticking.
- Grill chicken for 5-6 minutes per side until charred and internal temperature reaches 160°F.
- During the last 2 minutes of grilling, top each chicken breast with slices of fresh mozzarella. Close the grill lid to melt the cheese.
- Remove chicken from grill and let rest for 3-5 minutes.
- Top each cheesy chicken breast with a slice of fresh tomato and fresh basil ribbons.
- Drizzle generously with balsamic glaze just before serving. Enjoy!