Kiwi Grape Fruit Turtles
The Ultimate Guide to Making Adorable Kiwi and Grape Fruit Turtles
Finding snacks that are both highly nutritious and genuinely appealing to children can often feel like an uphill battle for parents and caregivers. While pre-packaged, processed snacks are incredibly convenient, they frequently lack the essential vitamins, minerals, and dietary fiber that growing bodies desperately need. On the other hand, a simple bowl of plain fruit might be met with sighs of disappointment from toddlers and young kids who crave visual stimulation and excitement. This is precisely where the magic of edible food art comes into play. Enter the Kiwi and Grape Fruit Turtles: a delightfully simple, completely healthy, and absolutely adorable snack that bridges the gap between nutrition and fun. These little green creatures are guaranteed to bring a massive smile to anyone’s face, making healthy eating an activity to look forward to rather than a chore.
In this comprehensive guide, we are going to dive deep into the wonderful world of playful healthy snacks. We will explore the immense nutritional benefits of the ingredients used, discuss the psychology behind why making food fun encourages better eating habits, and provide you with detailed, step-by-step instructions to create the perfect fruit turtles. Whether you are prepping for a themed birthday party, packing a special school lunchbox, or simply trying to encourage your picky eater to consume more fresh produce, these kiwi and grape turtles are the perfect solution.
The Psychology of Fun Food: Why Shape Matters
You might wonder if taking the extra five minutes to arrange fruit into the shape of an animal actually makes a difference. The short answer is: absolutely. Child nutritionists and pediatricians have long studied the eating behaviors of children, and the consensus is clear. Children are incredibly visual and tactile learners. Their relationship with food is governed not just by taste, but by texture, color, and presentation. When food looks like something recognizable and fun—like a cute little turtle—it immediately lowers a child’s natural defenses against trying something new or eating “boring” healthy foods.
By transforming a slice of kiwi and a handful of grapes into a familiar, friendly animal, you are engaging a child’s imagination. You invite them to play with their food in a constructive way. This playful interaction reduces mealtime anxiety, makes the dining experience positive, and significantly increases the likelihood that the child will actually consume the healthy offering. Furthermore, involving children in the process of building these fruit turtles can foster a sense of pride and ownership over their snack, making them even more eager to eat their culinary creations.
Nutritional Spotlight: The Superpowers of Kiwi and Grapes
These fruit turtles aren’t just cute; they are absolute nutritional powerhouses. Let’s break down the incredible health benefits of the two primary ingredients: kiwis and green grapes.
The Mighty Kiwi: Often overlooked in favor of apples or bananas, the kiwi is a true superfood. A single serving of kiwi contains more Vitamin C than an equivalent amount of orange. This massive dose of Vitamin C is crucial for boosting the immune system, aiding in wound healing, and enhancing iron absorption. Kiwis are also loaded with dietary fiber, particularly in their seeds and flesh, which promotes a healthy digestive tract and prevents constipation. Furthermore, they contain a unique enzyme called actinidin, which helps break down proteins and aids in overall digestion. They are also an excellent source of Vitamin K, Vitamin E, potassium, and folate.
The Glorious Green Grape: Green grapes provide the perfect sweet crunch to complement the soft, tangy kiwi. Grapes are fantastic sources of hydration, as they are composed primarily of water. They are rich in powerful antioxidants, particularly flavonoids and resveratrol, which help protect the body’s cells against oxidative stress and inflammation. Grapes also contain essential vitamins such as Vitamin C and Vitamin K. The natural sugars in grapes provide a quick, healthy burst of energy, making them an ideal afternoon pick-me-up for active children.
Essential Ingredients for Fruit Turtles
One of the best aspects of this recipe is its sheer simplicity. You only need three basic ingredients to bring these adorable creatures to life. When selecting your produce, look for firm but ripe kiwis that yield slightly to gentle pressure, and crisp, brightly colored green grapes.
- – 3 large Kiwi fruits (firm but ripe, peeled)
- – 1 bunch of large Green Grapes (washed and dried well)
- – 2 tablespoons Mini Chocolate Chips (for the eyes)
- – Optional: 1 teaspoon of Honey, Yogurt, or Cream Cheese (to act as edible “glue” for the eyes)
Equipment Needed
You do not need any fancy culinary gadgets for this fun food project. Basic kitchen tools will suffice.
- – A sharp paring knife or a small chef’s knife
- – A cutting board
- – A vegetable peeler (optional, for the kiwi)
- – Toothpicks (optional, for precise placement of the eyes or securing pieces if traveling)
- – A serving platter (a shiny silver tray makes them look like they are swimming!)
Step-by-Step Instructions: Bringing Your Turtles to Life
Follow these detailed steps to create your very own bale of fruit turtles. The process is so simple that older toddlers and young children can easily help assemble them once an adult has done the chopping.
- Prep and Wash: Begin by thoroughly washing the green grapes under cold running water. Pat them completely dry with a clean paper towel. Moisture on the grapes will make it difficult for the chocolate chip eyes to adhere later.
- Peel the Kiwis: Carefully peel the kiwi fruits. You can do this by using a vegetable peeler, or by slicing off the top and bottom of the kiwi, standing it upright, and running a paring knife down the sides to remove the fuzzy brown skin.
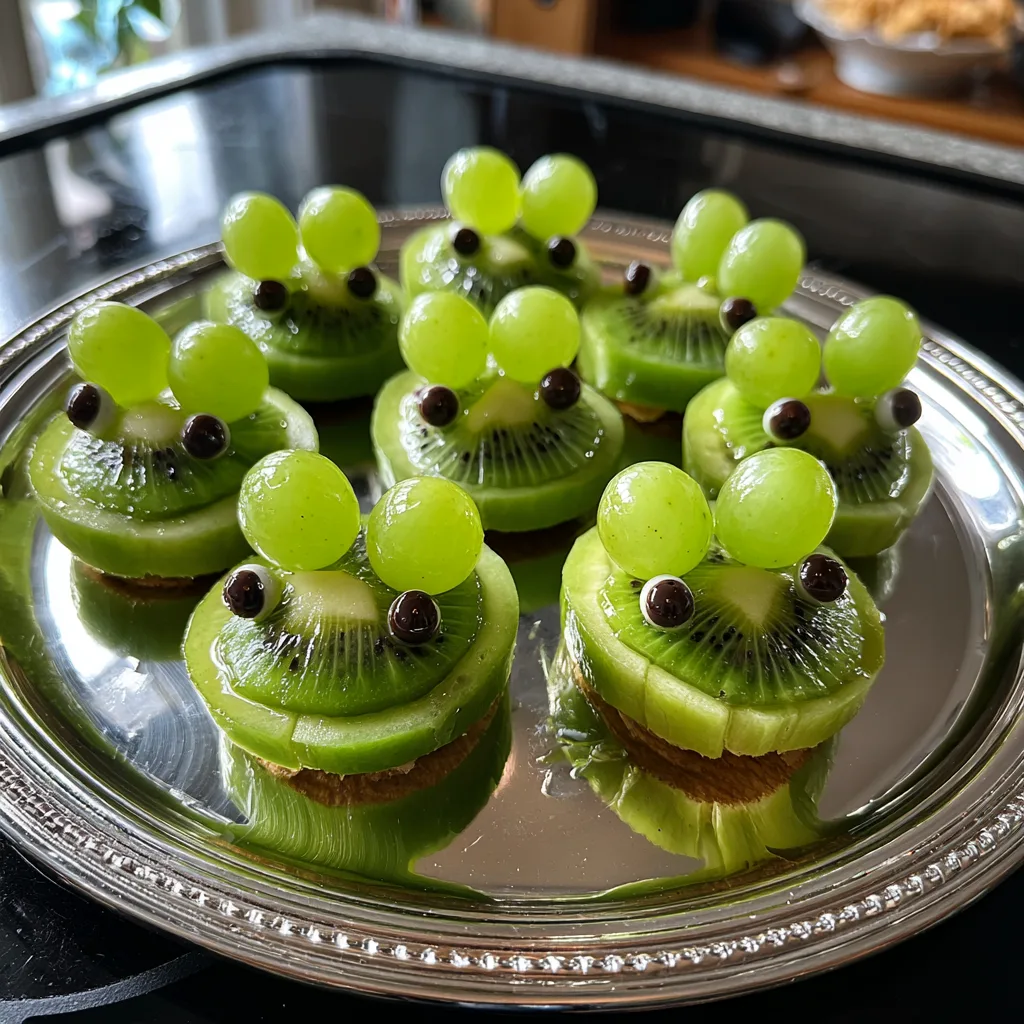
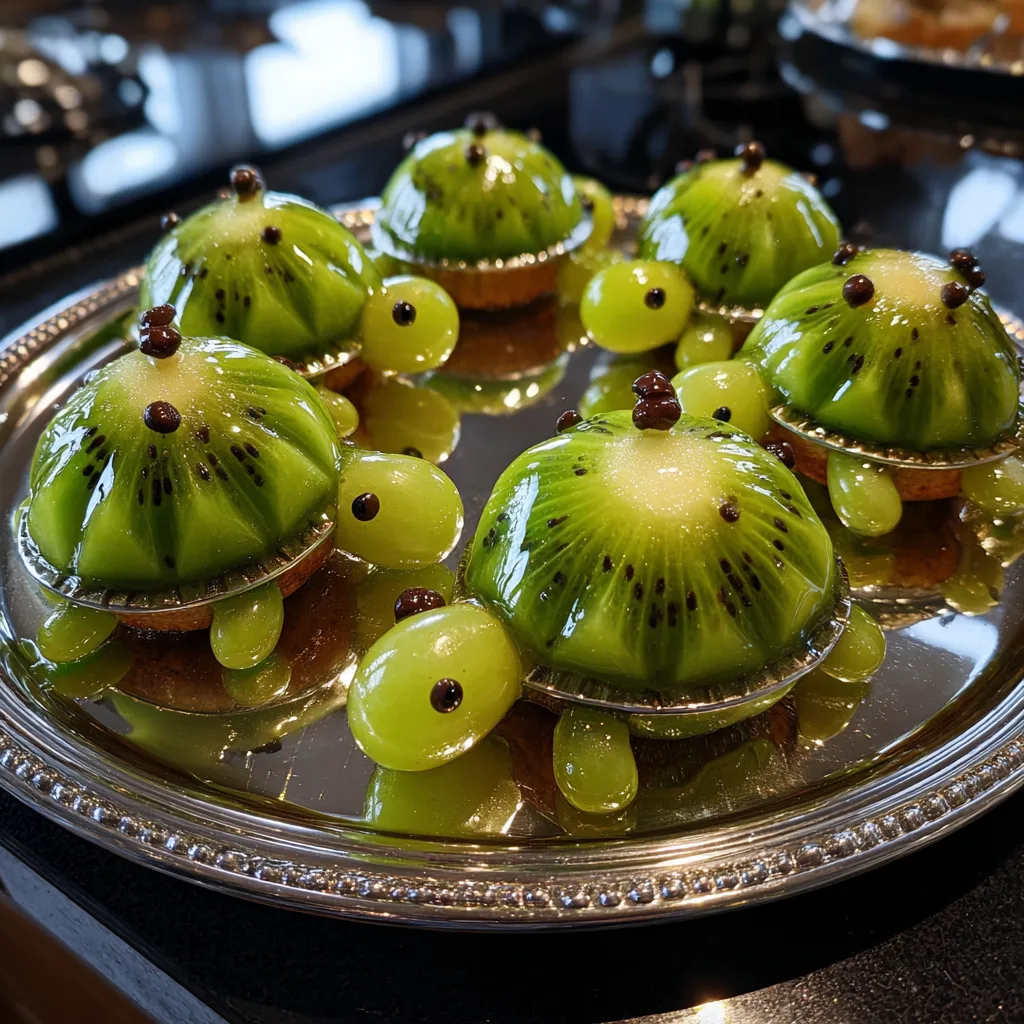
- Slice the Shells: Place the peeled kiwis on your cutting board and slice them crosswise into thick rounds, about 1/2 to 3/4 of an inch thick. These thick, vibrant green slices will serve as the realistic-looking shells for your turtles. Lay the kiwi slices flat on your serving platter, spacing them out to leave room for the heads and legs.
- Create the Heads: Select the largest, most uniform whole green grapes from your bunch. These will act as the turtle heads. Place one whole grape at the top of each kiwi slice, pressing it right up against the edge of the kiwi.
- Cut the Legs: Take smaller green grapes and cut them in half lengthwise. You will need four grape halves for each turtle. These will serve as the four little flippers or legs.
- Assemble the Body: Arrange the four grape halves around the kiwi slice—two near the top by the head, and two near the bottom. Place the cut side down on the platter so the rounded skin side faces up, resembling turtle legs poking out from under the shell.
- Attach the Eyes: This is the step that brings the turtles to life! Take two mini chocolate chips for each turtle. If the grapes are at room temperature and slightly sticky, you might be able to press the flat base of the chocolate chip directly onto the grape head. However, for a more secure hold, use a toothpick to dab a microscopic dot of honey, thick yogurt, or cream cheese onto the flat side of the chocolate chip, then press it onto the grape head to form the eyes.
- Serve and Enjoy: Your adorable kiwi and grape fruit turtles are now ready to be admired and devoured! Serve them immediately for the freshest taste and best appearance.
Expert Tips for Flawless Fruit Art
To ensure your fruit turtles look absolutely picture-perfect, consider these pro tips from food art enthusiasts:
Dealing with Wet Fruit: Kiwis are inherently juicy. If your kiwi slices are overly wet, the grape legs might slide around on the platter. To prevent this, after slicing the kiwis, gently dab the bottom of each slice with a paper towel before placing it on the serving tray. This anchors the shell to the plate.
The “Glue” Factor: Mini chocolate chips can be heavy relative to the curved surface of a grape. If honey or yogurt isn’t holding them in place, try using a tiny dot of melted chocolate as glue. Once the melted chocolate sets, the eyes will be securely fastened. If you are strictly avoiding all added sugars, you can substitute the chocolate chips with tiny dots punched out of a nori (seaweed) sheet using a hole puncher, or tiny pieces of black sesame seeds.
Temperature Matters: Serve the fruit slightly chilled. Cold fruit holds its shape better and is generally more refreshing for kids to eat. However, keep in mind that condensation can form on cold fruit if left out in a warm room, which might make the chocolate chip eyes slide off. Assemble them just before serving if possible.
Creative Variations to Try
Once you have mastered the basic kiwi and grape turtle, the possibilities for customization are endless. Here are a few ways to switch things up:
Different Shells: While kiwi looks the most like a scaly green turtle shell, you can create a multi-colored turtle family by using slices of green apples, thick slices of cucumber, or even round slices of melon (like honeydew or cantaloupe) for the shells.
Different Legs and Heads: If you don’t have green grapes, you can use blueberries or purple grapes for the heads and legs. Blueberries make excellent, naturally dark heads that don’t even need extra eyes added to them if you are in a rush.
Edible Sand: To create an entire beach diorama for your turtles, spread a layer of crushed graham crackers or finely milled oat bran on the serving platter before arranging the turtles. This “sand” not only looks amazing but adds a nice textural crunch to the snack.
Serving Suggestions and Party Themes
These Kiwi and Grape Fruit Turtles are the ultimate party food. They fit perfectly into a wide variety of children’s party themes. Hosting an “Under the Sea” mermaid or ocean-themed party? These turtles are a must-have alongside starfish-shaped sandwiches and blue gelatin “ocean water.” They are also perfect for a “Jungle,” “Safari,” or “Reptile” themed birthday bash.
For everyday serving, they make a spectacular addition to a child’s bento box lunch. If you are packing them for school, it is highly recommended to secure the grape head and legs to the kiwi shell using plain wooden toothpicks. Just be absolutely certain to remind the child to remove the toothpicks before eating, or only use this method for older kids who understand the hazard.
Storage and Make-Ahead Advice
Fresh fruit art is always best consumed immediately after it is made. Once a kiwi is sliced, its enzymes begin to break down, and it will eventually become mushy. Grapes that have been cut in half will also start to lose their crispness and dry out.
However, if you must make these ahead of time for a party, you can fully assemble them on a platter, cover the platter tightly with plastic wrap to minimize air exposure, and store them in the refrigerator for up to 4 hours. Do not add the chocolate chip eyes until right before serving, as the moisture in the refrigerator can cause the chocolate to “bloom” (turn white) or slide right off the grapes due to condensation.
Conclusion
Incorporating fun, imaginative elements into everyday meals is a foolproof way to encourage healthier eating habits in children. The S’mores Pizza Roll-Up might win the night for dessert, but these Kiwi and Grape Fruit Turtles win the day for a healthy, vibrant, and incredibly cute snack. They require minimal effort, no cooking, and only three wholesome ingredients, making them a stress-free project for parents.
The next time you find yourself struggling to get your little ones to finish their fruit servings, ditch the plain bowl and take ten minutes to build a charming little turtle family. The giggles, the smiles, and the empty plates that follow will prove that a little bit of food art goes a very long way in making nutrition fun.
Kiwi and Grape Fruit Turtles
Ingredients
Equipment
Method
- Wash and completely dry the green grapes. Peel the kiwis.
- Slice the peeled kiwis crosswise into thick rounds (about 1/2 inch thick). These are the turtle shells.
- Place the kiwi slices flat on a serving platter.
- Select one whole green grape per kiwi slice and place it at the top to act as the head.
- Cut smaller green grapes in half lengthwise. Arrange four halves around each kiwi slice for the legs, cut side down.
- To attach the eyes, use a tiny dab of honey or yogurt on the flat side of two mini chocolate chips and stick them onto the whole grape head.
- Serve immediately and enjoy your healthy fruit creations!