Lattice Scallop Granny Square Crochet Bedspread: Complete Step-by-Step Pattern
Introduction
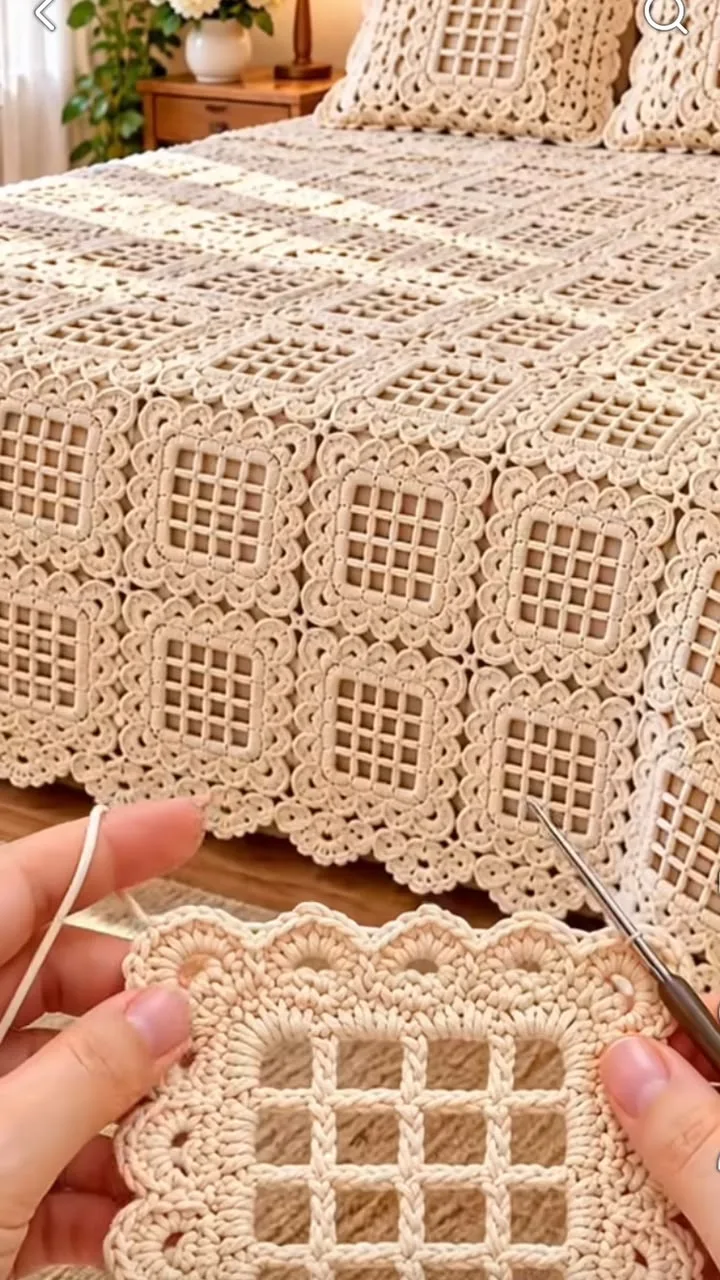
This crochet project results in a striking bedspread made up of delicately crafted granny squares, each featuring a decorative openwork lattice center and elegant, scalloped lace edges. The repeated motifs are joined seamlessly to create a unified and eye-catching piece that drapes beautifully over a bed. The pattern is worked in a solid, natural cream shade, imparting an air of timeless elegance and vintage charm to any room. The texture contrasts between the crisp geometric lattice and the soft, rounded scallop border make each motif stand out while harmonizing nicely across the spread. Suitable for bedspreads, throws, cushion covers, or decorative blankets, this project brightens bedrooms and sitting rooms alike. Making it is both engaging and rewarding due to its combination of structure and decorative flair—perfect for those who appreciate a challenge that yields a lasting heirloom piece.
Project Overview
The piece is built from identical square motifs, each consisting of three main sections: an openwork lattice center, a solid square round, and a lacy scalloped border. The squares are crocheted individually in rows and rounds, then joined using whip stitch or a crochet join as you assemble the bedspread. Motifs can be made separately and stitched together, making this an excellent portable project that grows one square at a time. Finally, an optional continuous border can be added around the finished spread for a polished effect.
Skill Level
Intermediate.
This pattern involves both openwork (filet/lattice) and advanced joinings, with a decorative scallop border that requires accurate stitch counting and tension for uniformity. Experience with working in rows, rounds, and joining motifs is recommended, although adventurous advanced beginners could attempt it with patience.
Materials
- Yarn: Sport weight (Category 2) or light DK cotton yarn works beautifully for stitch definition and drape. Approximate amount for a queen-size spread: 2,400-2,800 grams (8–10 skeins of 250g) in cream or preferred color.
- Crochet hook: 3.5 mm (E-4) or size to obtain gauge.
- Tapestry needle (for weaving ends, joining motifs).
- Scissors.
- Stitch markers (optional but useful for marking motif corners and joining points).
- Measuring tape (to check motif size/gauge).
Finished Size
Each finished motif measures approximately 15 x 15 cm (6 x 6 inches), including the scallop border.
A bedspread sized for a standard queen bed (60 x 80 inches / 152 x 203 cm) requires around 10 motifs by 13 motifs, for a total of 130 squares.
To adjust size: Add/subtract motifs as desired. You can make extra motifs for matching pillow covers or lengthen the piece for a king bed.
Gauge
One finished square motif (including border) = approximately 15 cm (6 inches) per side.
Small gauge variations are acceptable for a blanket, but consistent motif sizing is important for neat joins.
Stitches and Abbreviations
- ch – chain
- sl st – slip stitch
- sc – single crochet
- dc – double crochet
- tr – treble crochet
- sp – space
- st – stitch
- sk – skip
- beg – beginning
- rep – repeat
- RS/WS – right side/wrong side
Important Pattern Notes
- Unless marked, work through both loops of stitches.
- Ch-3 at start of dc rows/rounds counts as a dc.
- Join each round with a sl st unless otherwise instructed.
- For best appearance, use the invisible join for fasten-offs at borders.
- Take care to keep tension reasonably tight for the lattice sections to avoid sagging or distortion.
- Mark motif corners for easier joining later.
- All motifs should be made with the right side facing you on the last round.
Detailed Crochet Pattern
Part 1: Lattice Center
- Foundation: Ch 17.
(This sets up a 5×5 open grid: 5 blocks and 4 mesh spaces per row, for a crisp, airy lattice.) - Row 1 (RS): Dc in 6th ch from hook (counts as first open mesh), *ch 1, sk 1 ch, dc in next ch*, rep from * across (should end with dc in last ch). (7 dcs, 6 ch-1 sps)
- Rows 2-7: Ch 4 (counts as dc + ch 1), turn, dc in next dc, *ch 1, dc in next dc* across (end with dc in beg ch-space). (7 dcs, 6 ch-1 sps per row)
Result is a grid of dc and ch-1, forming 6 mesh rows and columns for a total of 25 open windows. - Do not fasten off. Continue to Part 2.
Part 2: Solid Border Round
- Round 1: Ch 1, turn, work 1 sc in each st and 2 sc in each corner space around the lattice square.
Evenly space sc along the sides by working 1 sc into each dc or ch-1 space edge along the sides (approx 7 sc per edge), plus 2 sc in each corner for a sharp corner.
Join with sl st to first sc. (Each side should have ~7 sc, with 2 sc in each corner.) - Round 2: Ch 2 (does not count as st), dc in same st, dc in each st to corner, (2 dc, ch 2, 2 dc) in each corner st, dc in remaining sts to end of round. Join with sl st to first dc.
Stitch count per side: ~11 dc between corner ch-2. Confirm four corners are clearly defined by ch-2 sps.
Part 3: Scalloped Lace Border
- Round 3 (Set-up for scallops): Sl st to next ch-2 corner, ch 1, (sc, ch 2, sc) in corner ch-2, *sk 1, dc in next 2 st, sk 1, (sc, ch 2, sc) in next st* repeat around to each corner.
(Adjust for an even number of scallop repeats per side; use sc as filler if you don’t have an exact count.) - Round 4 (Scallops): Sl st into corner ch-2 space, (ch 3, 2 tr, ch 3, sl st) all in same space (forms one large scallop at the corner).
*Sl st to next ch-2 sp, (ch 2, 2 dc, ch 2, sl st) in space* repeat in each ch-2 space along the edge, making large scallops at the corners for a ruffled effect.
Finish round, join with invisible stitch, fasten off and weave in ends.
Part 4: Making Multiple Motifs
- Repeat Steps 1–8 to make the total number of motifs needed for your bedspread. Make extras for matching pillows if desired.
Part 5: Joining the Squares
- Arrange motifs: Lay squares out in rows and columns until you’re satisfied with the layout. Mark corners if needed.
- Whipstitch join: Place two motifs RS together. Using the tapestry needle and a length of yarn, whipstitch through the back loops of the edge stitches (avoiding scallop tips) for a nearly invisible seam.
Work across motifs in rows, then join rows into a complete blanket. - Alternative join-as-you-go: On the final round of scallops, work a sl st join into the adjacent motif’s matching scallop spaces as you go, for a decorative join. (Sl st instead of ch-2 between scallops when joining, lining up corners and sides precisely.)
Part 6: Optional Blanket Border
- With RS facing, join yarn at any outer corner of your assembled bedspread.
- Ch 1, (sc, ch 2, sc) in corner scallop, *sk 1 st, dc in next 2 st, sk 1, (sc, ch 2, sc) in next st*, repeating the motif of the scallop border across all sides and joining in the round.
Work 2-3 rounds total, staggering scallops for a fuller edge as desired. Fasten off and weave in ends.
Assembly and Finishing
- Block all finished motifs before joining to shape the lattice and scallops for a uniform result. Pin motifs to a blocking board, mist lightly, and allow to dry flat.
- When joining, keep the corners and sides lined up for consistency.
- Weave in all yarn tails from joins on the back/Wrong Side.
- Steam lightly or use a pressing cloth after assembly to set the shape and keep edges flat.
- If making matching pillow covers, assemble as for the blanket and attach the square motif front to a fabric or crocheted back, adding a zipper or buttons as needed.
Customization Ideas
- Alternative colors: Use contrasting or tonal shades for the lattice and border rounds for a modern twist.
- Yarn weights: Try fingering or lace weight yarn for a delicate doily or tablecloth; use worsted for a heavier afghan.
- Blanket squares: Use the motif for throws or lap blankets; make fewer/larger motifs for a baby blanket.
- Bags, pillows, wall hangings: Sew motifs together to create tote bag panels, pillowcases, or vintage-inspired wall décor.
- Coasters and placemats: Make motifs with cotton for sturdy, washable tableware accessories.
Troubleshooting Tips
- Curling pieces: Block motifs after completion for flatness; loosen tension on first few rounds if needed.
- Uneven edges: Make sure stitch count is identical for all motifs, especially along the sides.
- Tight or loose joins: Use a matching hook or needle size; don’t pull yarn too tightly when joining squares.
- Motif size mismatches: Recheck gauge and use a larger/smaller hook as needed; restretch and block before joining.
- Visible color changes: Use the invisible join method, and always change yarn at a corner or on WS.
- Lumpy scallops: Maintain even stitch counts and tension on border rounds; block to smooth scallops.
Care Instructions
Hand wash in cool water with mild detergent; do not bleach. Gently squeeze out excess water. Lay flat to dry, reshaping as needed. If desired, steam block with a pressing cloth to rejuvenate the lace and scallops. Store folded, not hung, to avoid stretching.
Final Notes
Double-check your stitch counts, especially on the lattice rows and edges, to maintain uniformity across motifs. Adjust your hook or tension if motifs are coming out too tight or loose. Pay attention to the visual texture and scalloping as you work—comparing periodically to the finished image—so your project stays consistent. Enjoy the meditative, rhythmic process, and admire your growing stack of elegant squares as you progress!